
How it works
A healthy lawn is a dynamic biological system, not simply a green carpet. Its function relies on the interplay between the grass plants and the soil ecosystem. Each grass plant consists of roots, which anchor it and absorb water and nutrients, and shoots (the visible blades, or tillers). Grasses spread via tillers (new shoots from the base), rhizomes (underground stems), or stolons (above-ground runners), creating a dense turf. This entire process is powered by photosynthesis, where the blades capture sunlight to create energy for growth.
Bare spots occur when this system breaks down. The cause is always a limiting factor that overwhelms the grass's ability to grow and repair itself. For example, soil compaction from foot traffic physically squeezes out the pore spaces that hold air and water, suffocating the roots. A grub infestation severs the roots from the shoots, cutting off the plant's supply line. Fungal diseases attack plant tissues, disrupting internal transport. Dog urine creates a zone of extreme nitrogen toxicity that burns the plants. Repairing a patch involves more than just throwing down seed; it requires diagnosing the limiting factor, correcting the soil environment to be hospitable again, and reintroducing new plants (seeds) that can thrive in the restored micro-ecosystem. The goal is to re-establish the soil-plant symbiosis that allows a lawn to flourish.
Step-by-Step Fix
Follow these steps methodically to ensure your patch repair integrates seamlessly with the surrounding turf and addresses the root cause of the problem.
-
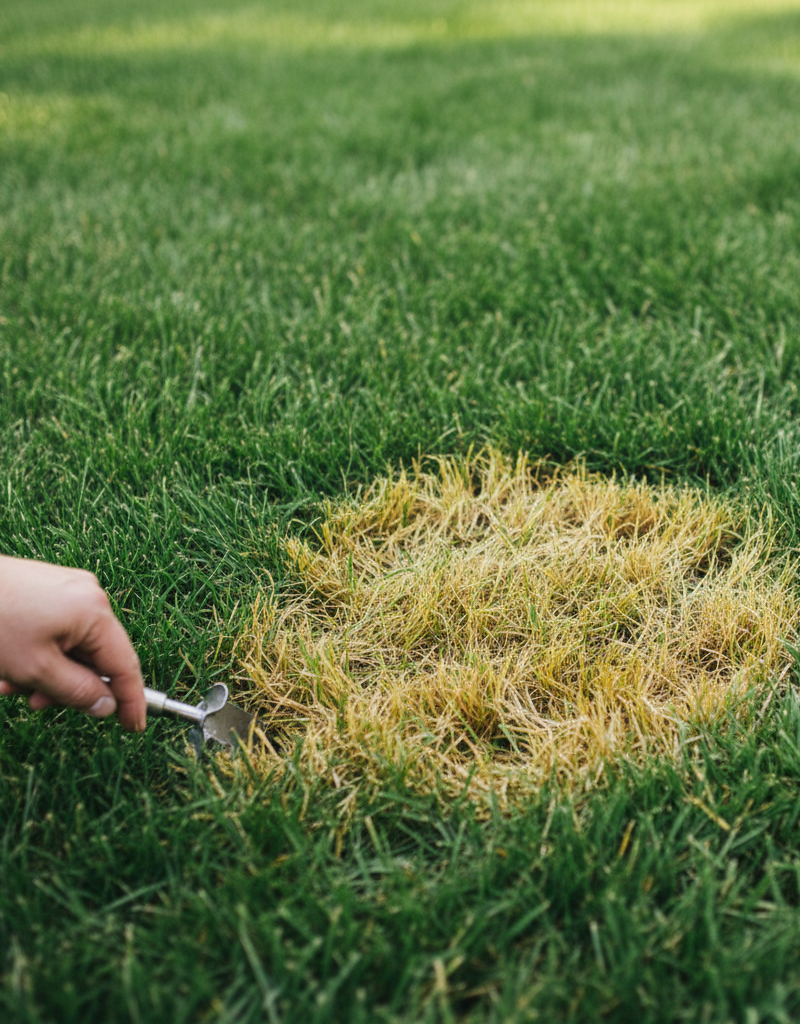
Diagnose the Underlying Cause — Before any physical work, determine why the spot appeared. Look for clues. C-shaped white worms under the sod indicate grubs. Concentrated, dark green rings with dead centers suggest dog urine. Irregular patterns with visible threads or lesions on grass blades point to fungal disease. Perfectly round, sunken spots in high-traffic areas signal compaction. Fixing the spot without addressing the cause, such as a pest infestation, is a temporary solution at best.
- Tools: Magnifying glass, hand trowel or spade.
- Safety: If you suspect a chemical spill, wear nitrile gloves during inspection.
-
Clear Debris and Dead Grass — Vigorously rake the bare spot and the surrounding 4-6 inches of weak turf. The goal is to remove all dead organic matter (thatch), weeds, and loose debris down to the bare soil. This step is crucial for ensuring the new seed can make direct contact with the soil, which is essential for germination.
- Tools: Sturdy metal leaf rake or a hard-tined garden rake.
-
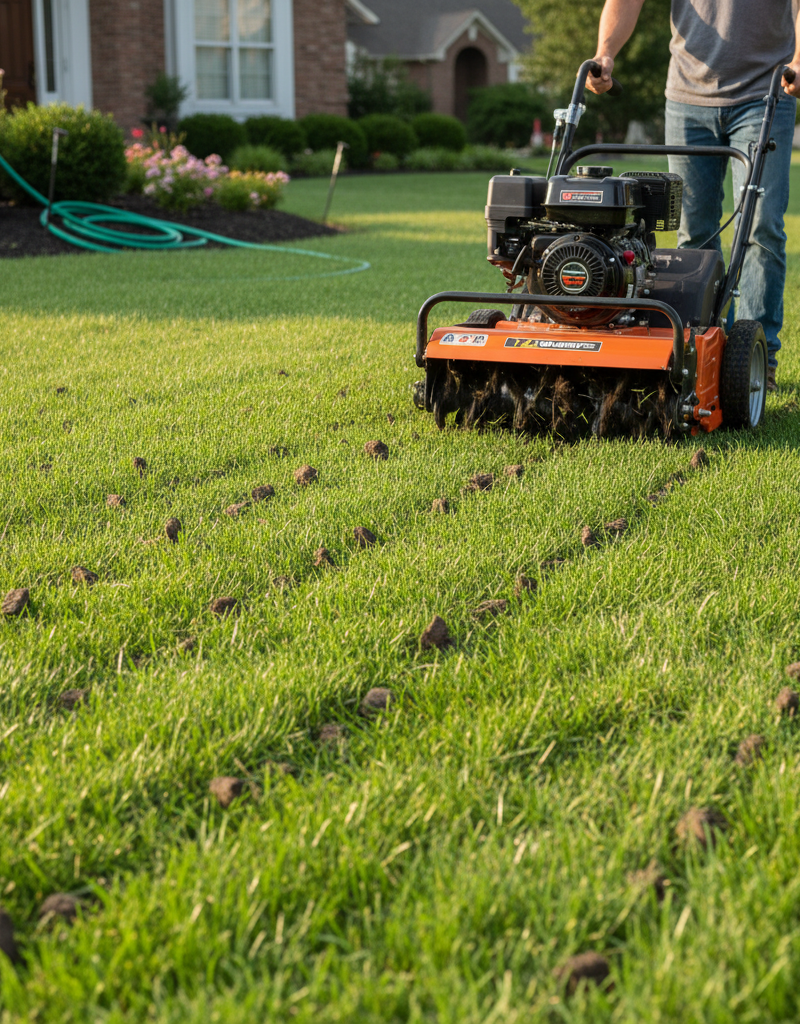
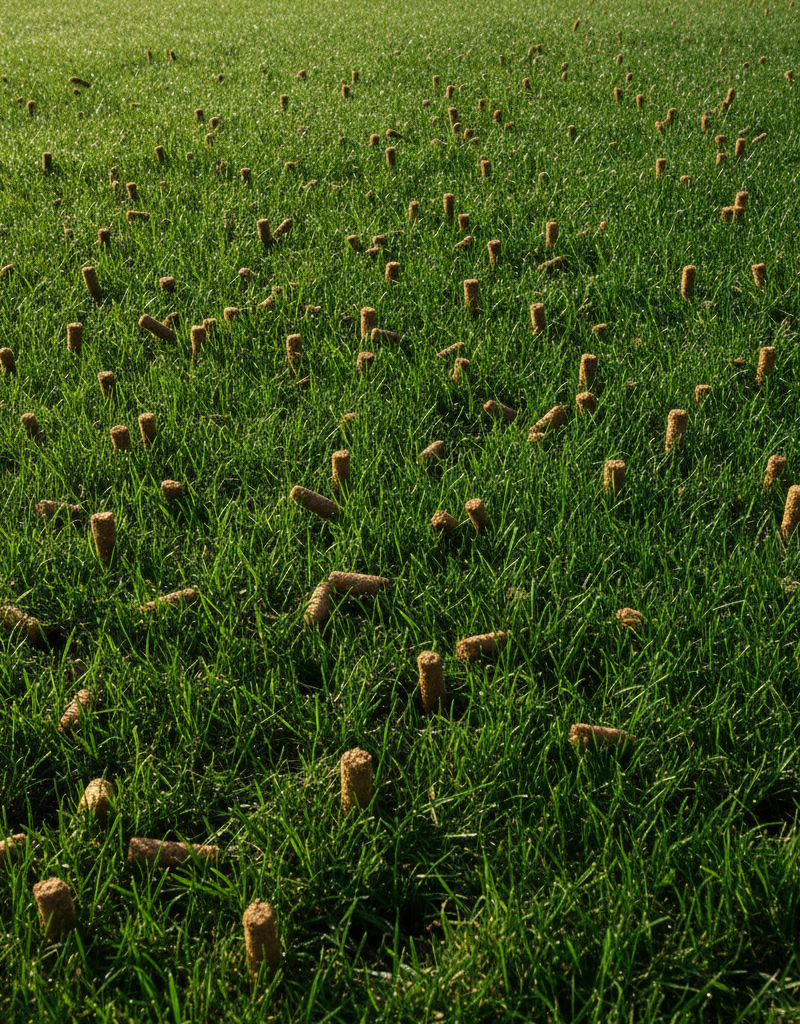
Test and Prepare the Soil — Use a simple DIY soil test kit to check the pH of the bare spot. The ideal pH for most turfgrasses is between 6.0 and 7.0. Next, use a garden fork or hand-held cultivator to loosen the top 4-6 inches of soil. If the area is heavily compacted, a manual core aerator can be used to pull out plugs of soil, creating channels for air, water, and root growth. Break up any large clumps of soil.
- Tools: Soil pH test kit, garden fork or cultivator, manual core aerator.
- Pro-Tip: If the pH is below 6.0, the soil is too acidic; you will add lime in the next step. If it's above 7.5, it's too alkaline and may require elemental sulfur.
-
Amend the Soil — A healthy seedbed is the most critical component of a successful patch. Spread a 1- to 2-inch layer of high-quality organic matter over the loosened soil. A 50/50 mix of screened compost and new topsoil is ideal. The compost introduces beneficial microbes and slow-release nutrients, while the topsoil provides structure. If your pH test required it, now is the time to mix in pulverized dolomitic lime (to raise pH) or elemental sulfur (to lower pH), following the application rates on the product packaging.
- Tools: Shovel or trowel, wheelbarrow for mixing.
- Materials: Bagged compost, topsoil, pH amendments (if needed).
-
Level the Surface — Rake the amended soil so it is smooth and perfectly level with the surrounding lawn. If you add too much soil, the patch will be a "bump" that gets scalped by the mower. If you add too little, it will become a puddle. Use the back of the rake to create a flat, even surface. Gently tamp the area with your feet or the back of a shovel to eliminate air pockets, but do not re-compact the soil.
-
Select and Apply Seed and Starter Fertilizer — Choose a seed that matches your existing lawn and climate. For northern regions, a mix of Kentucky Bluegrass, Perennial Ryegrass, and Fine Fescues is common. For southern regions, use Zoysia, Bermuda, or St. Augustine grass. Concurrently, apply a starter fertilizer, which is high in phosphorus (the middle number in the N-P-K ratio, e.g., 5-10-5) to promote strong root development. Follow the application rates on both the seed and fertilizer bags, using a small handheld spreader for even coverage.
- Tools: Handheld broadcast or drop spreader.
- If you don't know your grass type: Cut out a small plug of healthy turf and take it to a local, reputable garden center for identification.
-
Ensure Seed-to-Soil Contact — The seed must be pressed firmly into the top 1/4 inch of soil to germinate. Do not bury it deeper. Turn your leaf rake upside down and use the flat side to gently press the seed into the soil. For larger patches, use an empty or partially water-filled lawn roller to press the seed down. This contact ensures the seed can absorb moisture from the soil.
-
Apply a Protective Top Dressing — Cover the seeded area with a very thin layer (no more than 1/8 to 1/4 inch) of a protective mulch. The best material for this is sphagnum peat moss or a commercial seed-starting mulch (some contain tackifiers to prevent washout). This layer helps retain moisture, hides the seed from birds, and provides a visual indicator of when the area needs water (light-colored peat moss is dry). Avoid using hay, as it contains weed seeds; clean straw is an acceptable alternative.
-
Implement a Germination Watering Schedule — Water the patch immediately after applying the top dressing, using a sprinkler with a fine mist setting. For the first 7-14 days (until germination), the goal is to keep the top 1 inch of soil consistently moist, like a wrung-out sponge. This may require misting the area for 5-10 minutes, 2-3 times per day, especially in sunny or windy conditions. Do not allow the seedbed to dry out completely.
-
Transition to an Establishment Watering Schedule — Once the grass seedlings are about 1 inch tall, begin to transition your watering strategy. Reduce the frequency but increase the duration. Water once per day, but for a longer period (15-20 minutes), to encourage the roots to grow deeper in search of water. After another 2 weeks, transition to your normal lawn watering schedule of 1-1.5 inches of water per week, applied in 1-2 deep soakings.
-
Protect and First Mow — Keep all foot traffic, pets, and equipment off the newly seeded area for at least 3-4 weeks. Use string and stakes to create a visible barrier. Let the new grass grow until it is at least 3.5-4 inches tall before its first mowing. Ensure your mower blade is sharp, and mow on a dry day. Do not remove more than one-third of the grass blade's height.
Common mistakes
- Skipping the Diagnosis: Many homeowners see a bare spot and immediately throw down seed. If the problem was grubs, soil disease, or chemical burn, the new seed will fail just like the old grass. Instead: Spend 15 minutes digging and inspecting the area to identify the root cause before you begin the repair.
- Using the Wrong Products: Grabbing any bag of seed from the hardware store shelves often leads to a mismatched patch of color and texture. Similarly, using a standard high-nitrogen lawn fertilizer (e.g., 29-0-4) on new seeds can burn the seedlings and will not promote the necessary root growth. Instead: Identify your existing grass type and buy a matching seed blend. Use only a "starter" fertilizer that is high in phosphorus (P).
- Improper Watering: The most common failure point is incorrect watering. Drenching the area once a day washes away seeds and creates a waterlogged environment prone to rot. Letting it dry out for a day can kill germinating seeds. Instead: Water lightly and frequently (misting) for the first 1-2 weeks to keep the soil surface consistently moist, then gradually transition to deeper, less frequent watering as the seedlings mature.
- Applying Weed Control Too Soon: Standard pre-emergent or post-emergent herbicides will prevent grass seeds from germinating or will kill young seedlings. Instead: Manually pull any weeds that appear in the new patch. Wait until the new grass has been established and mowed at least 3 to 4 times before applying any weed control products to the area. Always read the product label for specific waiting periods.
- Burying the Seed: Raking soil over the seed too deeply (more than 1/4 inch) prevents it from getting the light it needs to germinate and forces the seedling to expend too much energy reaching the surface. Instead: After seeding, lightly rake so the seed is mixed into the very top layer of soil, or simply press it firmly into the surface with the back of a rake or a roller.
Cost & time breakdown
This table estimates costs and time for repairing a typical 10 sq. ft. bare spot and for a more significant lawn renovation.
| Task | DIY Cost | Pro Cost | Time |
|---|---|---|---|
| Basic Spot Repair (<10 sq. ft.) | $30 - $60 (seed, compost, starter fertilizer) | $125 - $250 (minimum service charge) | 1-2 hours initial work + 10 min daily watering for 2-3 weeks |
| Soil pH Test & Amendment | $15 - $25 (for a reusable test kit) + $20 for lime/sulfur | $75 - $150 (as part of a soil analysis service) | 30 minutes for test, 30 minutes to apply amendment |
| Grub/Pest Treatment (Spot) | $20 - $40 (for a full bag of insecticide) | $80 - $150 (for a targeted professional application) | 1 hour to diagnose and apply |
| Large Area Renovation (100+ sq. ft.) | $150 - $300 (bulk seed, multiple bags of soil, spreader rental) | $400 - $800+ | 4-6 hours initial work + ongoing watering |
| Core Aerator Rental (Full Lawn) | $80 - $120 (for a 4-hour rental) | $175 - $300 (as a standalone service) | 2-4 hours of physical labor |
When to call a pro
While patching a few bare spots is a manageable DIY project, certain situations indicate a more systemic problem that warrants professional intervention.
Call a certified lawn care specialist or landscape contractor if you encounter the following:
- More than 40% of the lawn is bare or thinning. Widespread failure suggests a fundamental issue with the soil composition, a severe nutrient imbalance, or an aggressive, hard-to-identify disease. A pro can perform a comprehensive soil analysis and develop a targeted, season-long treatment plan.
- DIY pest or disease control fails repeatedly. If you have applied appropriate grub killer or fungicide according to label directions and the problem persists or worsens, it's time for professional help. Lawn care companies have access to more potent, restricted-use products and the diagnostic expertise to identify the exact pathogen or pest life cycle for effective timing.
- Bare spots are caused by significant drainage problems. If patches consistently appear in low-lying areas that collect water after rain, or on slopes that are eroding, seeding alone will fail. This is a landscape architecture problem. A contractor can assess the grade and install solutions like French drains, dry wells, or retaining walls to permanently solve the water issue.
- You need a complete lawn renovation. For a lawn that is almost entirely weeds or bare soil, starting over is often the best option. This major project involves killing everything off, tilling, significant soil amendment, and either seeding or laying sod. Professionals have the specialized equipment (power rakes, slit seeders, sod rollers) to do this job efficiently and correctly.
Prevention & maintenance
A proactive approach to lawn care is the most effective way to prevent bare spots from forming in the first place.
- Conduct Annual Soil Testing: Every 2-3 years, send a soil sample to your local university extension service or use a quality home test kit. This reveals your soil's pH and any nutrient deficiencies. Based on the results, apply lime, sulfur, or specific fertilizers to maintain a pH of 6.0-7.0, the optimal range for nutrient availability.
- Aerate and Overseed Annually: Compaction is a primary cause of turf failure. For cool-season lawns (Fescue, Bluegrass), rent a core aerator and aerate the entire lawn each fall. For warm-season lawns (Bermuda, Zoysia), aerate in late spring. Immediately follow aeration by overseeding the entire lawn to introduce new, vigorous grass that increases density and outcompetes weeds.
- Mow High, Sharp, and Often: Keep your mower blades sharpened (at least twice per season) for a clean cut that heals quickly. Set your mowing height to the upper end of the recommended range for your grass type, typically 3 to 4 inches. Taller grass develops deeper roots, shades the soil to keep it cool, and prevents weed seeds from germinating. Never remove more than one-third of the blade height in a single mowing.
- Water Deeply and Infrequently: Encourage a deep, drought-tolerant root system by watering heavily but only when the lawn needs it. Look for signs of thirst: a dull, bluish-gray color and footprints that remain visible long after you walk on it. Apply 1 to 1.5 inches of water in a single session to moisten the soil 6-8 inches deep. This is far more effective than frequent, shallow watering.
- Manage Pet and Foot Traffic: Install stepping stones or create dedicated mulch paths for heavily trafficked routes. For areas where a dog frequently urinates, keep a watering can nearby and immediately flush the spot with a gallon of water to dilute the concentrated nitrogen and salts, preventing chemical burn.
Related Articles
Keep troubleshooting with these hand-picked guides from FixlyGuide:
- The #1 Mistake Killing Your Thin Lawn (and How to Fix It in a Weekend) — Overseeding a thin lawn is crucial for a lush yard, but a common mistake can ruin your efforts before they even begin. Learn how to diagnos…
- How Often to Water Your Lawn in Summer: A Homeowner's Guide — Watering your lawn correctly in summer is crucial for its health and appearance, preventing common issues like browning and shallow root gr…
- The #1 Mowing Mistake That Invites Weeds (And How to Fix It in 15 Minutes) — Discover the secret to a thriving lawn and banish weeds by avoiding the most common mowing error homeowners make, improving grass health dr…
- The 3 Lawn Mowing Mistakes Killing Your Grass (and How to Fix Them) — Discover the three most common lawn mowing mistakes homeowners make that damage their grass, and learn simple, actionable steps to correct…
- The #1 Summer Lawn Mistake Turning Your Grass Yellow (and How to Fix It) — Discover the most common summer lawn mistake that causes yellowing grass and learn the simple steps to revive your lawn.
- Gas Burner Won't Light? You're Making 1 of 5 Mistakes — Troubleshoot and fix a gas stove burner that won't light with simple DIY steps, addressing common igniter and clog issues.
Get the print-ready PDF of this guide
A clean, ad-free, printable version you can keep on your phone or pin to the workshop wall. Free with a FixlyGuide account.
- Print-optimized layout
- Tools, materials & every step included
- Saved to your account
Frequently asked questions
How long does it take for new grass to grow in bare spots?+
New grass typically germinates within 5-10 days, but it can take 2-4 weeks for it to establish enough to blend with your existing lawn. Full establishment can take several months, depending on the grass type and growing conditions.
Can I just throw grass seed on bare spots?+
Simply throwing grass seed on bare spots is unlikely to be effective. For successful germination, seeds need good contact with loosened soil, adequate moisture, and protection from birds and wind. Preparing the area and lightly raking the seeds in significantly increases success rates.
What time of year is best to fix bare spots in a lawn?+
The best time to fix bare spots is in the late summer to early fall (August to October) or early spring (March to May). These periods offer moderate temperatures and consistent moisture, which are ideal for grass seed germination and establishment, minimizing competition from weeds.
How do I stop bare spots from coming back?+
Prevent bare spots by addressing underlying causes like poor soil, pests, or disease. Maintain a regular lawn care routine, including proper watering, fertilization, and core aeration. Also, consider overseeding annually to keep your lawn dense and healthy, naturally preventing new bare spots.
Discussion
Loading comments…