
Tools & materials you'll need
Affiliate links- AmazonNon-contact voltage tester1 · Crucial for safety
- AmazonFlathead screwdriverFor faceplate
- AmazonPhillips head screwdriverFor outlet mounting screws and terminals
- AmazonWire strippers/cuttersIf re-stripping wires for better connection
- AmazonWork light or headlampFor better visibility in the electrical box
- AmazonNew duplex receptacle (optional)1 · If the outlet is damaged or tabs are broken
As an Amazon Associate FixlyGuide earns from qualifying purchases — at no extra cost to you. Prices and availability are accurate as of publication and subject to change.
Quick Answer
When one receptacle of a standard duplex outlet stops working while the other still functions, the issue is almost always a loose wire connection at the outlet itself, a tripped GFCI outlet or breaker upstream, or an unintended switched outlet setup. It's rarely a 'bad' outlet; instead, it's an interruption in the electrical path to that specific half. Most homeowners can diagnose and fix this problem in under 20 minutes with basic tools, saving the cost of an electrician.
The Problem
You've plugged in your phone charger or a lamp, and one half of your wall outlet is completely dead, while the other half works as if nothing is wrong. This is a common and perplexing problem for many homeowners. It signifies an incomplete electrical circuit to one of the two receptacles within the duplex outlet. Unlike a completely dead outlet, which often points to a tripped breaker or a larger circuit issue, a partially working outlet narrows down the potential culprits significantly. It suggests the problem likely lies within the outlet box itself or a very specific upstream interruption.
How It Works
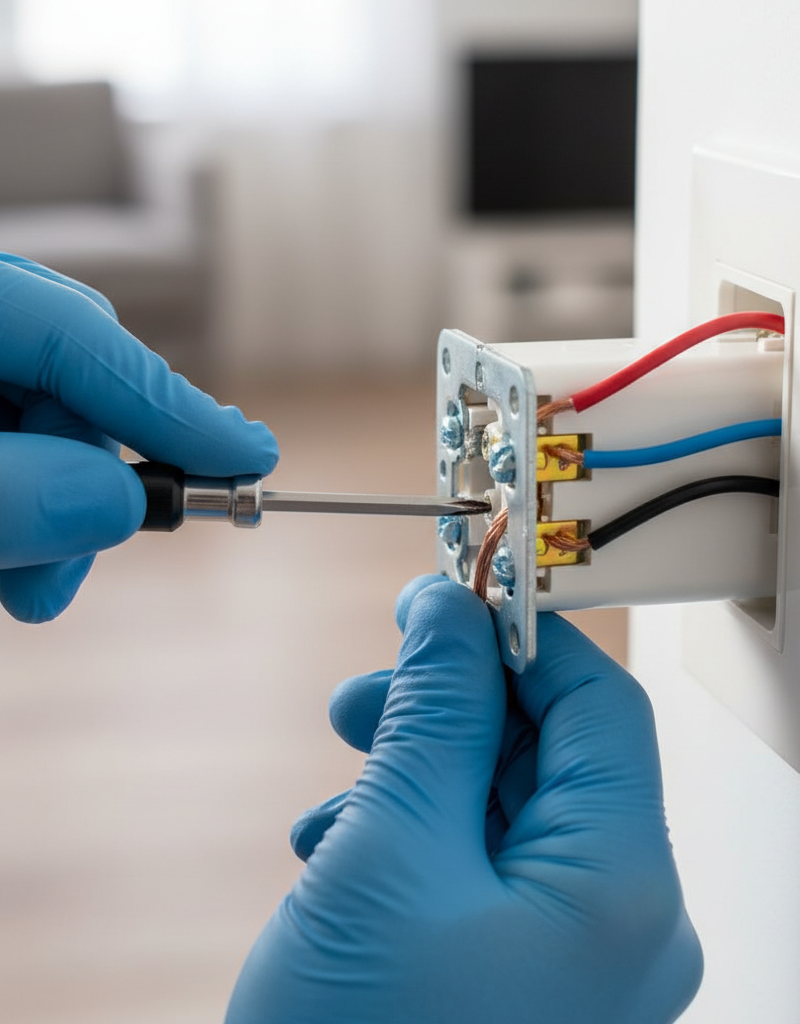
To understand why only half an outlet works, it helps to know how a standard 120-volt duplex outlet (also called a receptacle) is wired. Inside the outlet, there are two separate sets of hot (brass screws), neutral (silver screws), and ground (green screw) terminals. These are typically connected by small metal break-off tabs. The 'hot' tab connects the two brass screws, and the 'neutral' tab connects the two silver screws. When wiring an outlet, an electrician connects the incoming hot (black) wire to one brass screw and the incoming neutral (white) wire to one silver screw. The ground (bare copper or green) wire connects to the green screw.
For an outlet to be fully functional, both the hot and neutral connections must be sound for each receptacle. If only one receptacle works, it means that either the hot wire or the neutral wire connection for the non-working receptacle is interrupted. This interruption can be due to a loose wire, a faulty connection where the wire wraps around the screw terminal, or a break in the internal metal tab that unites the two receptacles. In some cases, especially in living rooms or bedrooms, one half of an outlet might be intentionally wired to a wall switch, creating a 'switched outlet' for lamps. If that switch is off, that half of the outlet will appear dead.
Step-by-Step Fix
SAFETY NOTE: Always turn off the power at the circuit breaker before working on any electrical outlet. Use a non-contact voltage tester to confirm the power is off before touching any wires.
-
Identify and Trip the Breaker — Locate the electrical panel. Identify the breaker controlling the affected outlet. If unsure, turn off the main breaker to the entire house, or turn off breakers one by one until the outlet is confirmed dead with a non-contact voltage tester.
- If this doesn't work: Ensure you've identified the correct breaker. Sometimes outlets are on unexpected circuits.
-
Test for Power (Again) — Use your non-contact voltage tester to confirm there is no power at the outlet. Insert the tester into both slots of both receptacles. Wiggle it gently. No beeping or light indicates the power is off.
- If the tester still reads power: Double-check the breaker. Do NOT proceed until the power is confirmed off.
-
Remove the Faceplate — Using a flathead screwdriver, remove the screw holding the faceplate to the outlet. Carefully pull the faceplate away and set it aside.
-
Unscrew and Gently Pull Out the Outlet — Use a Phillips head screwdriver to remove the two screws (one top, one bottom) that secure the outlet to the electrical box. Gently pull the outlet straight out of the box, being careful not to tug on the wires.
- Tools: Phillips head screwdriver
-
Inspect All Wire Connections — With the outlet pulled partially out, carefully examine all wire connections. Check the black (hot) wires on the brass screws, the white (neutral) wires on the silver screws, and the bare copper or green (ground) wire on the green screw. Look for:
- Loose Connections: Wires that are not tightly wrapped around the screw terminals or that appear to be barely hanging on.
- Back-stab Wiring: If wires are pushed into small holes on the back of the outlet instead of wrapped around screws, this is a common failure point. These connections tend to loosen over time.
- Corrosion or Fraying: Signs of damaged insulation or corroded wire ends.
-
Tighten All Screw Terminals — Use your Phillips or flathead screwdriver to firmly tighten all screw terminals, even those that appear secure. For any wires connected via back-stab holes, it's highly recommended to cut off the stripped end, re-strip a fresh 3/4 inch of insulation, form a shepherd's hook, and connect the wire securely under the appropriate screw terminal. Tighten until snug, but do not overtighten, as this can strip the screw or damage the outlet.
- Quick Tip: Ensure wires are wrapped clockwise around screws so tightening the screw pulls the wire in, not out.
-
Check for Broken Tabs (Switched Outlet Scenario) — Look closely at the small metal tabs connecting the two brass screws and the two silver screws. If one of the brass tabs is broken or missing, it means the outlet was intentionally wired as a switched outlet, or it was broken accidentally. If the tab on the hot (brass) side is broken and you don't have a wall switch controlling it, this is likely the culprit.
- If you find a broken tab: Replace the outlet. If you discover a tab is broken and there is a wall switch, then the half not working is correctly switched off.
- If you want a switched outlet: Leave the hot tab broken and ensure the switch is on. If you don't want a switched outlet, ensure both tabs are intact or replace the outlet.
-
Look for a Tripped GFCI Upstream — Is the affected outlet near water (kitchen, bathroom, garage, outdoors)? It might be protected by an upstream GFCI outlet or GFCI breaker. Check all GFCI outlets in the vicinity. If any have a tripped 'RESET' button (it will be popped out), press it firmly. If the GFCI keeps tripping, there's a ground fault somewhere and you should call a professional.
-
Carefully Push the Outlet Back In and Reinstall — Once all connections are secure, gently fold the wires back into the electrical box. Push the outlet back into the box, aligning it with the screw holes. Reinstall the two mounting screws (top and bottom) and tighten until the outlet is flush and secure. Reattach the faceplate.
-
Restore Power and Test — Go back to your electrical panel and flip the breaker back on. Return to the outlet and test both receptacles with a known working device (like a lamp or phone charger). Confirm both halves now work.
Common Causes
- Loose Wire Connections: This is by far the most frequent culprit. Over time, vibrations, temperature changes, and house settling can cause screw terminal connections to loosen, leading to intermittent or complete loss of power to one side of the outlet. Back-stab connections are even more prone to this.
- Broken Hot Tab: The small metal tab connecting the two brass (hot) screws can break, especially if someone tried to convert the outlet to a switched receptacle and accidentally broke the wrong tab or broke it incompletely. If this tab is broken, one hot connection is severed.
- Tripped Upstream GFCI Outlet or Breaker: Outlets in certain locations (kitchens, bathrooms, garages, outdoors, basements) are required to be GFCI-protected. If a GFCI outlet or breaker on the same circuit (and upstream from your non-working outlet) has tripped, it can cut power to everything downstream, including one half of your un-tripped regular outlet.
- Hidden Switched Outlet: In many older homes, one half of a duplex outlet in a living room or bedroom might be intentionally wired to a wall switch to control a lamp. If that switch is off, that half of the outlet will appear dead.
- Damaged Outlet: Less common, but possible. The internal components of an outlet can wear out or become damaged, especially if it has been overloaded repeatedly or has experienced an internal short.
Common Mistakes
- Forgetting to Turn Off the Power: This is the most dangerous mistake. Always, always verify the power is off using a non-contact voltage tester before touching any wires or outlet components.
- Ignoring Back-Stab Connections: While convenient for electricians during installation, back-stab connections are notorious for loosening over time. Not converting these to screw terminal connections during troubleshooting is a missed opportunity for a more reliable fix.
- Overtightening Screws: Stripping screw heads or damaging the outlet housing by overtightening can create new problems or make existing ones worse.
- Assuming a Full Outlet Failure: Many homeowners immediately assume the outlet itself is entirely bad and replace it without checking for simpler causes like loose wires or tripped GFCIs. This can be an unnecessary expense and doesn't address the root cause.
- Not Checking for Switched Outlets: Failing to consider that one half of the outlet might be intentionally controlled by a wall switch can lead to fruitless troubleshooting.
Cost & Time Breakdown
| Task | DIY Cost | Pro Cost | Time |
|---|---|---|---|
| Diagnose Loose Wiring | $0 | $100–$250 | 15–20 min |
| Tighten Connections | $0 | Included in diag | 5–10 min |
| Replace Faulty Outlet | $2–$10 | $150–$300 | 20–30 min |
| Find & Reset GFCI | $0 | $100–$200 | 5–15 min |
| Convert Back-stab to Screw | $0 | $100–$250 | 15–20 min |
Tips & Prevention
- Regular Inspections: Periodically (e.g., annually) check outlets, especially those with heavy use, for loose plugs or signs of wear. If you're doing other electrical work in a box, take a moment to confirm all connections are snug.
- Proper Wiring Techniques: If you ever replace an outlet, always use the screw terminals and ensure wires are properly stripped and wrapped clockwise around the screws. Avoid back-stab connections for long-term reliability.
- Don't Overload Outlets: Consistent overloading can heat up connections and lead to premature wear or damage. Use surge protectors for multiple devices and distribute high-draw appliances across different circuits if possible.
- Know Your GFCI Locations: Familiarize yourself with all the GFCI outlets in your home. Knowing where they are can save you significant troubleshooting time when an outlet or device on that circuit stops working.
- Test GFCIs Monthly: Press the 'TEST' button on your GFCI outlets monthly to ensure they are functioning correctly. Press 'RESET' immediately afterward.
When to Call a Professional
While fixing a half-working outlet is often a DIY task, there are clear indicators when it's time to call a licensed electrician. If you've tried the troubleshooting steps and the problem persists, or if you encounter any signs of electrical damage such as burning smells, scorch marks on the outlet or wall, buzzing sounds, unusual warmth from the outlet, or frequent circuit breaker trips, stop immediately and contact a professional. Similarly, if you're uncomfortable working with electricity, are unsure about identifying the correct breaker, or find complex wiring beyond your expertise (e.g., more than two sets of wires in a box, aluminum wiring), an electrician's expertise is invaluable. They can safely diagnose hidden issues, ensure code compliance, and perform repairs that guarantee the safety of your home's electrical system.
Related Articles
Keep troubleshooting with these hand-picked guides from FixlyGuide:
- Why Only Half Your Outlet Works (And The Simple 15-Minute Fix) — Discover why only one receptacle of your electrical outlet might be working and how to fix this common issue in under 15 minutes.
- Only Half Your Outlet Works? The Hidden Split-Receptacle Culprit — Discover why only half of your electrical outlet might be working and how to safely troubleshoot and fix the common culprit: a split-recept…
- The Secret Reason Half Your Wall Outlet Dies (And It's Not What You Think) — Discover why only half of your electrical outlet might be working and how to diagnose and fix the common culprit, saving you from a costly…
- The 7 Head-Scratching Reasons Your Outlet Died (Even With The Breaker On) — Discover the surprising reasons why an electrical outlet might stop working even when its circuit breaker is fully engaged, and how to safe…
- The Single Most Common Reason Half Your Outlet Dies (and How to Fix It in 15 Minutes) — Before you call an electrician for a half-dead outlet, check this common culprit that's often a simple DIY fix.
- The Tiny Gap That Wastes Energy: Why Your Baseboards Pull Away (And the Simple, Permanent Fix) — Baseboards separating from walls are a common issue, often indicating underlying problems with moisture or house settling, but are typicall…
Get the print-ready PDF of this guide
A clean, ad-free, printable version you can keep on your phone or pin to the workshop wall. We'll also send occasional weekly tips matched to your home situation.
- Print-optimized layout
- Tools, materials & every step included
- Unsubscribe anytime
Frequently asked questions
Why would only one side of an outlet work?+
The most common reason for only one side of a duplex outlet to work is a loose wire connection on either the hot or neutral terminal for the non-working receptacle. Other causes include a broken internal tab, a tripped upstream GFCI, or the outlet being intentionally wired as a switched outlet where the switch is off.
Is a half-working outlet dangerous?+
Potentially, yes. A loose connection that causes one half of an outlet to fail can also generate heat, which is a fire hazard. If you notice any burning smells, scorch marks, buzzing, or excessive warmth, turn off the breaker immediately and do not use the outlet until it's repaired or replaced. Address the issue promptly.
Can I replace just one half of a duplex outlet?+
No, you cannot replace just one half. A standard duplex outlet is a single unit containing two receptacles. If one half is faulty due to internal damage, the entire outlet unit must be replaced. However, often the problem is external (loose wires) and doesn't require full replacement.
Should I call an electrician for a half-working outlet?+
You can often fix a half-working outlet with basic DIY troubleshooting, especially if it's due to a loose wire or tripped GFCI. However, if you're uncomfortable working with electricity, experience persistent issues, see signs of damage (scorching, burning smell), or suspect complex wiring, it's always safest to call a licensed electrician.
What if my outlet is controlled by a light switch?+
If your outlet is controlled by a light switch, it's usually only one of the two receptacles that is switched. If the non-working half of your outlet is the one controlled by the switch, simply ensure the wall switch is in the 'on' position. If it still doesn't work, proceed with checking the wiring as described for loose connections.


Discussion
Loading comments…