
Tools & materials you'll need
Affiliate links- AmazonLandscape edging (plastic, metal, or pavers)Varies by project · Type depends on preference
- AmazonEdging stakes/pins/spikesVaries by project · Matching your edging material
- AmazonCrushed gravel (paver base)Optional · For paver/stone edging only
- AmazonLeveling sandOptional · For paver/stone edging only
As an Amazon Associate FixlyGuide earns from qualifying purchases — at no extra cost to you. Prices and availability are accurate as of publication and subject to change.
Quick Answer
The most common landscape edging mistake homeowners make is improper preparation of the trench and inadequate anchoring, which results in edging that shifts, buckles, or lifts over time. To achieve a professional, durable finish, you must dig a consistently deep and level trench, compact the base, and securely fix the edging using the appropriate stakes or connectors. Backfilling correctly also plays a crucial role in maintaining stability, preventing future heaving and creating a seamless boundary between your lawn and garden beds.
The Problem
Many homeowners invest time and money in beautiful landscape edging only to find it migrating out of place after a season or two. This isn't just an aesthetic issue; migrating edging allows grass to creep into flower beds, makes mowing difficult, and can even become a tripping hazard. The root cause of this frustration almost always traces back to installation errors rather than faulty materials. Common symptoms include edging that stands proud in some sections and sinks in others, develops wavy lines instead of straight ones, or completely separates from its intended path. Ignoring these signs leads to a constant battle against an unruly garden border and undermines the tidy appearance you're striving for. Understanding the underlying mechanics of proper installation is key to avoiding these pitfalls and achieving a long-lasting, low-maintenance landscape.
How It Works
Landscape edging, whether plastic, metal, or stone, works based on a few simple principles: creating a physical barrier, maintaining stability, and providing a clean aesthetic line. The barrier function is straightforward: it physically blocks grass roots and mulch from migrating. For this barrier to be effective, it needs to be set at the correct depth and have no gaps underneath where roots can sneak through.
Stability is achieved through proper trenching and anchoring. A well-prepared trench provides a uniform base, distributing the weight and forces acting on the edging evenly. If the trench is uneven, some sections of the edging will bear more load or be more susceptible to frost heave (the upward movement of soil caused by freezing water). Anchors, usually stakes, pins, or interlocking mechanisms, tie the edging into the ground, resisting lateral movement and preventing the edging from pushing out or pulling away. These anchors need to penetrate deep enough into stable soil to be effective.
Different materials handle these forces differently. Flexible plastic or rubber edging relies heavily on stakes and the backfill material to maintain its shape. Metal edging (steel or aluminum) is more rigid and often uses a small lip or flange at the bottom to increase its stability in the trench, requiring fewer stakes. Paving stones or bricks rely on their weight and often a sand or gravel base for stability, sometimes with additional mortar or edge restraints. Regardless of material, the goal is always to create a system where the edging is held firmly in place, resisting the forces of soil expansion and contraction, root growth, and general wear and tear from foot traffic or garden maintenance.
Water management is also a critical component. A properly installed edge prevents rainwater from washing away soil or mulch from your beds, and in the case of a raised bed, helps contain irrigation water. The base of the trench can sometimes incorporate a thin layer of gravel or sand to aid drainage and prevent water from accumulating directly under the edging, which could lead to heaving during freeze-thaw cycles.
Step-by-Step Fix
1. Plan Your Layout — Define the exact path for your edging.
Before digging, use a garden hose or spray paint to lay out the desired curve or straight line for your flower bed. Step back and view it from different angles to ensure you're happy with the shape. This crucial step prevents wasted effort and material. For straight lines, use string stretched taut between two stakes.
2. Clear the Area Thoroughly — Remove all debris and vegetation.
Before you dig, clear all weeds, grass, rocks, and any other obstructions from your proposed edging path. A clear path is essential for a clean trench. Rake the area smooth.
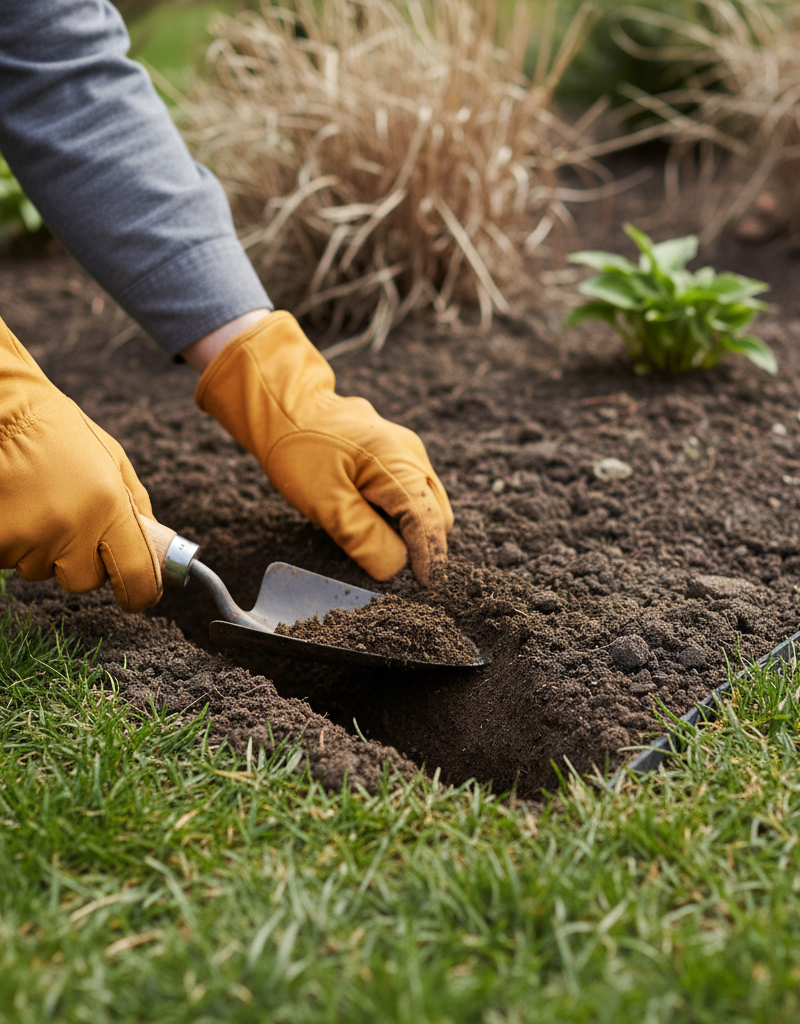
3. Dig a Consistent Trench — Create a stable, level base.
Using a spade or trenching tool, dig a trench along your marked line. The depth and width of the trench will depend on your edging material. For most plastic or metal edging, aim for a trench that allows the top edge of the edging to be about 1/2 to 1 inch above the soil level after installation. For pavers or bricks, dig deep enough to accommodate a 1-2 inch base of compacted gravel/sand plus the paver height, leaving 1/2 inch exposed. Use a hand trowel or edger for precision. Ensure the bottom of the trench is as level as possible, both horizontally and along its length.
- Tip: For long, straight runs, use a mason's line and a line level to ensure consistent depth.
- If this doesn't work: If you hit large rocks, carefully dig around them or remove them using a pry bar. Uneven soil can be remedied by adding or removing soil as needed to create a level base.
4. Create a Compacted Base (for rigid materials) — Ensure long-term stability.
If installing stone, brick, or paver edging, add 1-2 inches of paver base (crushed gravel) to the trench, followed by 1 inch of leveling sand. Mist lightly with water. Compact these layers thoroughly using a hand tamper. This prevents settling and shifting.
- Materials: Crushed gravel (paver base), leveling sand, hand tamper.
5. Install the Edging Material — Carefully place and connect.
Begin installing your chosen edging material. For roll-style plastic or rubber, unroll and gently bend it into your desired shape. For metal edging, connect sections according to manufacturer instructions. For pavers or bricks, lay them carefully, tapping them into the sand bed with a rubber mallet until level with each other and the desired height. Ensure the top edge is consistent.
- Tip: Overlap flexible plastic edging slightly at seams to prevent gaps.
- Safety Note: Wear sturdy gloves when handling sharp metal edging.
6. Secure the Edging — Anchor firmly to prevent movement.
For plastic or metal edging, insert the manufacturer's stakes or pins through the designated holes, driving them firmly into the ground with a rubber mallet or hammer. Space stakes according to instructions, typically every 2-4 feet, and at both sides of curves. For pavers or bricks, install plastic edge restraints on the outside, securing them with specialized spikes.
- Tools: Rubber mallet or hammer, appropriate stakes/pins/spikes.
7. Backfill and Level — Stabilize and provide a finished look.
Once the edging is secured, backfill the trench on both sides. On the lawn side, use the excavated soil, compacting it gently as you go to ensure no air pockets remain. On the garden bed side, backfill with fresh soil or mulch, feathered up to the top of the edging. Use a rake to spread and level the soil, ensuring the edging is firmly supported from both sides.
8. Check for Level and Adjust — Fine-tune your work.
Step back and visually inspect your entire run of edging. Use a 4-foot level to check for consistency, especially on straight sections. Make any necessary adjustments by gently tapping down high spots with a rubber mallet, or carefully lifting and adding soil underneath low spots before re-compacting and backfilling. The goal is a perfectly level, consistent line.
Common Causes
- Inconsistent Trench Depth: The most frequent culprit. If the trench isn't uniformly deep, the edging will settle unevenly, leading to wavy lines and gaps. Soil compaction over time exacerbates this.
- Lack of Compaction: Failing to compact the base layer (especially for rigid materials like pavers) or the backfill soil allows for future settling, causing the edging to sink or shift.
- Insufficient Anchoring: Not using enough stakes or stakes that are too short means the edging lacks stability and can be easily pushed out of alignment by foot traffic, mowers, or frost heave.
- Root Invasion: Aggressive tree or shrub roots growing directly under or against the edging can lift and displace it over time. This is more common with shallow edging materials.
- Poor Drainage: Water collecting in the trench, especially in colder climates, can lead to frost heave, where freezing water expands and pushes the edging upwards.
- Improper Material Selection: Using flimsy, thin plastic edging for high-traffic areas or areas with aggressive grass types might not provide the necessary long-term barrier and stability.
Common Mistakes
- Mistake 1: Not preparing the bed first. Many DIYers install edging before defining the bed, digging out turf, or amending soil. Instead: Complete all major bed preparation (shaping, digging, soil amendment) before installing edging. This ensures the edging is truly the final touch, not a hurdle.
- Mistake 2: Skimping on the trench. Digging a shallow, uneven, or too-narrow trench. Instead: Take the time to dig a trench that’s deep enough for your specific edging, consistently level, and just wide enough to allow for easy installation and backfilling. Use a spirit level to verify levelness.
- Mistake 3: Forgetting to compact. Simply placing pavers or laying flexible edging without compacting the base or backfill. Instead: Use a hand tamper or the back of a shovel to firmly compact any gravel, sand, or soil layered beneath or around the edging. This is crucial for long-term stability.
- Mistake 4: Not enough stakes/anchors. Spacing stakes too far apart or using too few can lead to buckling and shifting. Instead: Follow manufacturer recommendations precisely for stake spacing, especially on curves. When in doubt, add more stakes for greater stability.
- Mistake 5: Installing on a slope without special consideration. Trying to run a perfectly straight edge across a significant slope. Instead: For slopes, consider terracing with more rigid materials or using flexible edging that can follow the grade while being securely anchored at smaller intervals. You might also need deeper trenching uphill to prevent washing out.
- Mistake 6: Not considering grass creep. Installing edging that doesn't fully block grass roots or leaves gaps at the bottom. Instead: Ensure the edging extends deep enough into the soil (at least 2-3 inches for most grass types) and that there are no gaps between sections where grass can grow through.
Cost & Time Breakdown
| Task | DIY Cost | Pro Cost | Time |
|---|---|---|---|
| Edging Material (Plastic/Metal) | $20 - $100 per 100ft | N/A | N/A |
| Edging Material (Pavers/Stone) | $50 - $300 per 100ft | N/A | N/A |
| Trenching Tools | $0 - $30 (if renting) | N/A | N/A |
| Installation (100-200 linear ft) | $0 (labor) | $300 - $800+ | 4-8 hours |
| Base Materials (gravel/sand) | $20 - $50 | N/A | N/A |
Tips & Prevention
- Choose the Right Material: Match your edging to your landscape's needs and your aesthetic preferences. Flexible plastic or rubber is good for curves, while metal or stone provides a more rigid, formal look. Consider the depth capacity for grass root containment.
- Annual Inspection: Walk your garden beds annually, ideally in spring, to inspect the edging. Look for sections that have lifted, shifted, or become uneven. Address small issues before they become major problems.
- Edge Your Lawn Regularly: Use a string trimmer or edger along the lawn side of your landscape edging. This keeps grass from growing over or through the edging and maintains a crisp line.
- Consider Root Barriers: If you're near trees or shrubs with aggressive root systems, consider installing a specific root barrier in conjunction with your edging to prevent displacement.
- Proper Drainage: Ensure water drains away from your edging rather than pooling. If you have heavy clay soil, a small layer of gravel at the bottom of your trench can aid drainage.
- Gentle Compaction: When backfilling, don't just dump soil. Compact it in layers, gently, to remove air pockets without dislodging the newly installed edging.
When to Call a Professional
While installing landscape edging is a common DIY project, there are specific situations where calling a professional is recommended. If your landscape involves significant grading changes or steep slopes, designing and installing effective, erosion-resistant edging can be complex and may require retaining wall expertise. For large-scale projects consuming hundreds of linear feet, the sheer labor and material handling might be overwhelming for a single homeowner. Furthermore, if you're dealing with extremely rocky soil that makes proper trenching impossible with standard tools, professionals have specialized equipment. Lastly, if your goal is an integrated, intricate design involving custom stone work or unique materials, a landscape contractor can ensure aesthetics, structural integrity, and longevity, preventing costly mistakes and rework down the line.
Related Articles
Keep troubleshooting with these hand-picked guides from FixlyGuide:
- The 3 Hidden Mistakes That Make Landscape Edging Fail (And How to Fix Them) — Discover common mistakes homeowners make when installing landscape edging and learn the correct methods to achieve a durable, professional-…
- The #1 Mistake Homeowners Make with Landscape Edging (and How to Fix It) — Discover the most common error in landscape edging installation, leading to instability and an untidy appearance, and learn how to correct…
- The #1 Mistake Homeowners Make with Landscape Edging (and How to Fix It) — Discover the most common error in landscape edging installation and a simple, step-by-step fix to achieve a professional, long-lasting bord…
- The #1 Mistake Homeowners Make with Landscape Edging (and How to Fix It) — Discover the common pitfalls in landscape edging installation and how to avoid them for a clean, long-lasting garden border.
- The #1 Mistake Homeowners Make with Landscape Edging (and How to Fix It) — Discover the most common error in landscape edging installation that leads to weeds and an uneven look, and learn the easy fix for a clean,…
- The #1 Mistake Homeowners Make After Finding Missing Shingles (And How to Fix It Right) — Discover the crucial steps to take after a storm rips shingles from your roof, ensuring a proper, lasting repair and preventing costly futu…
Frequently asked questions
How deep should landscape edging be?+
For most flexible plastic or metal edging, the trench should be deep enough so that the top edge of the edging sits about 1/2 to 1 inch above the soil level after installation. For pavers or bricks, the trench needs to accommodate 1-2 inches of compacted base material plus the paver height, leaving about 1/2 inch exposed above ground.
Why does my landscape edging keep popping up?+
Landscape edging often pops up due to insufficient anchoring, inconsistent trench depth, or frost heave. If the base of the trench isn't level or stable, or if there aren't enough stakes to hold it down, it can shift. In cold climates, water freezing and expanding under the edging can push it upwards.
Can I install landscape edging without digging?+
While some very lightweight, decorative edging might be pushed directly into soft soil, for most effective and durable landscape edging that blocks grass and stays in place, digging a proper trench is essential. A trench provides a stable, level base and allows for proper anchoring, preventing shifting and an uneven appearance over time.


Discussion
Loading comments…