Tools & materials you'll need
Affiliate linksAs an Amazon Associate FixlyGuide earns from qualifying purchases — at no extra cost to you. Prices and availability are accurate as of publication and subject to change.
Quick Answer
Many homeowners struggle with landscape edging that won't stay put, buckles, or looks wavy shortly after installation. The primary culprit is often an inadequate trench and insufficient anchoring. By taking the time to excavate a uniform trench, installing the edging material correctly, and securing it with the right fasteners and backfill, you can achieve a professional-looking, durable border for your flower beds.
The Problem
You meticulously measure, cut, and place your beautiful new landscape edging around your flower beds, only to find it shifting, heaving, or developing unsightly gaps within weeks or months. Perhaps it pops out of the ground in places, creating a tripping hazard, or an uneven line that ruins the bed's aesthetic. This common and frustrating issue often stems from rushing the foundational steps of preparation and anchoring. Without a stable base and proper securing, even the most robust edging material will fail to maintain its intended shape and position, leading to continuous maintenance and a less-than-perfect looking landscape.
How It Works
Landscape edging functions by creating a physical barrier between different landscape elements, typically a lawn and a garden bed. To do this effectively, the edging needs to be held firmly in place against a variety of forces. Gravity is a factor, of course, but more importantly, sideward pressure from soil, mulch, and turf growth constantly push on the edging. Foot traffic, errant lawnmowers, and even natural soil expansion and contraction due to moisture and temperature changes all contribute to movement.
The installation process aims to counteract these forces. A trench provides a stable channel for the edging, ensuring it sits at the desired height and depth. The depth of the trench is critical: too shallow, and the edging won't have enough lateral support; too deep, and it might lean inwards or outwards. Most plastic or metal edgings are designed to have a significant portion buried, usually 3 to 4 inches below the soil line, with only an inch or two exposed above ground. This creates a "footing" that resists side-to-side movement.
Staking or anchoring further enhances stability. For flexible materials like plastic or composite, stakes driven through pre-made holes or tabs into the subsoil create a mechanical lock. These stakes are typically 8 to 10 inches long and are pushed or hammered in at an angle to increase their holding power. Metal edging often relies on its inherent rigidity and flanges, sometimes complemented by interlocking sections or built-in stakes. When the trench is backfilled, the compacted soil around the buried portion of the edging and against the stakes creates a solid block that resists the forces trying to dislodge it. Without this careful preparation and anchoring, the edging remains susceptible to the slightest disturbance, leading to the common problems of shifting, heaving, and an overall messy appearance.
Safety Note:
Always wear sturdy work gloves to protect your hands from blisters, cuts, and scrapes when digging and handling landscape edging. If using power tools for cutting, wear eye protection. Be aware of any underground utility lines before digging. Call 811 a few days before you plan to dig to have utilities marked.
Step-by-Step Fix
1. Clear the Area – Remove old edging and debris.
Before you can fix poorly installed edging, you need a clean slate. Remove any existing faulty edging, rocks, roots, or other obstructions from the proposed path of your new edge. Use a shovel or spade to clear a strip about 6-8 inches wide along the perimeter of your flower bed. This gives you ample room to work.
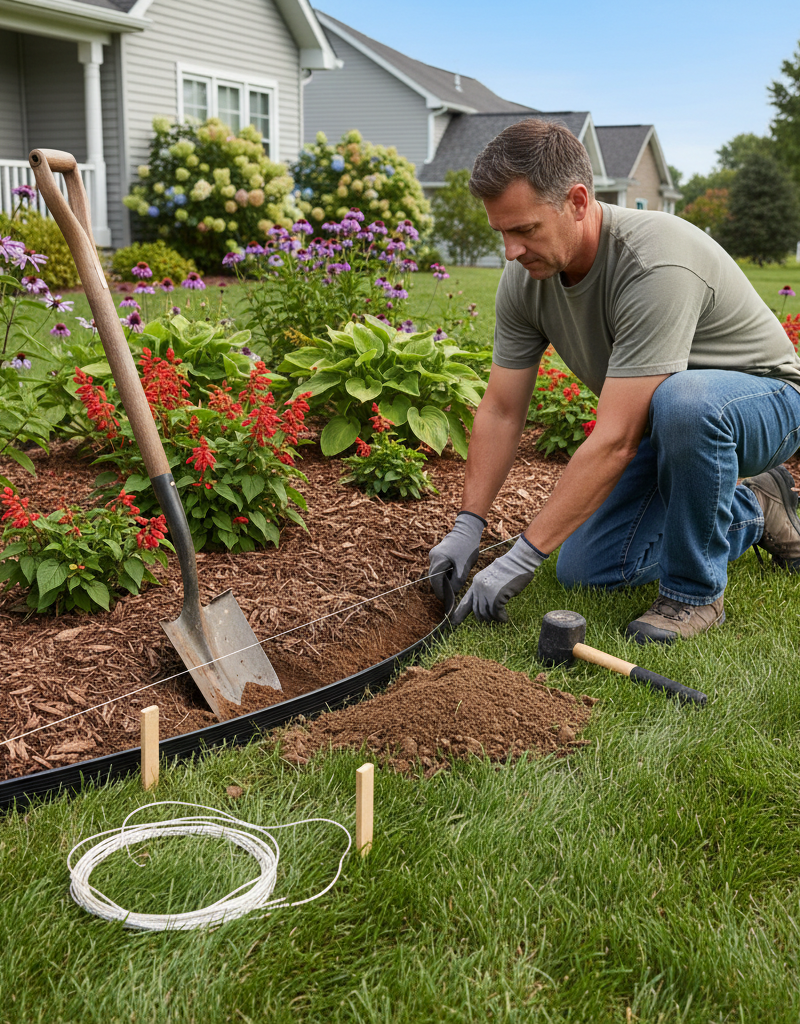
2. Mark the Line – Outline your desired edge precisely.
Achieving a straight or gracefully curved edge is crucial. For straight lines, use string stretched taut between two stakes. For curves, lay out a garden hose or spray paint a guide line. Take your time to get this exactly right, as it will determine the final look of your flower bed.
3. Dig a Consistent Trench – Create a stable foundation for your edging.
Use a garden spade or a trenching tool to dig a V-shaped or U-shaped trench along your marked line. The key here is consistency. For most landscape edgings (plastic, composite, metal), aim for a depth of 4-6 inches and a width that allows the base of the edging to sit snugly. The goal is for the top 1-2 inches of the edging to be visible above the soil line once installed. Use a measuring tape to check the depth frequently. Remove loose soil and debris from the trench.
4. Install the Edging Material – Position and connect your chosen edging.
Carefully unroll or place your landscape edging into the prepared trench. Start at one end and work your way around, ensuring the top edge is level. For plastic or composite edging, gently curve it to follow your lines. If using metal edging, it will be more rigid and may require careful bending for curves. Connect sections according to the manufacturer's instructions, usually with interlocking tabs or connectors. Ensure a tight fit at all seams to prevent gaps.
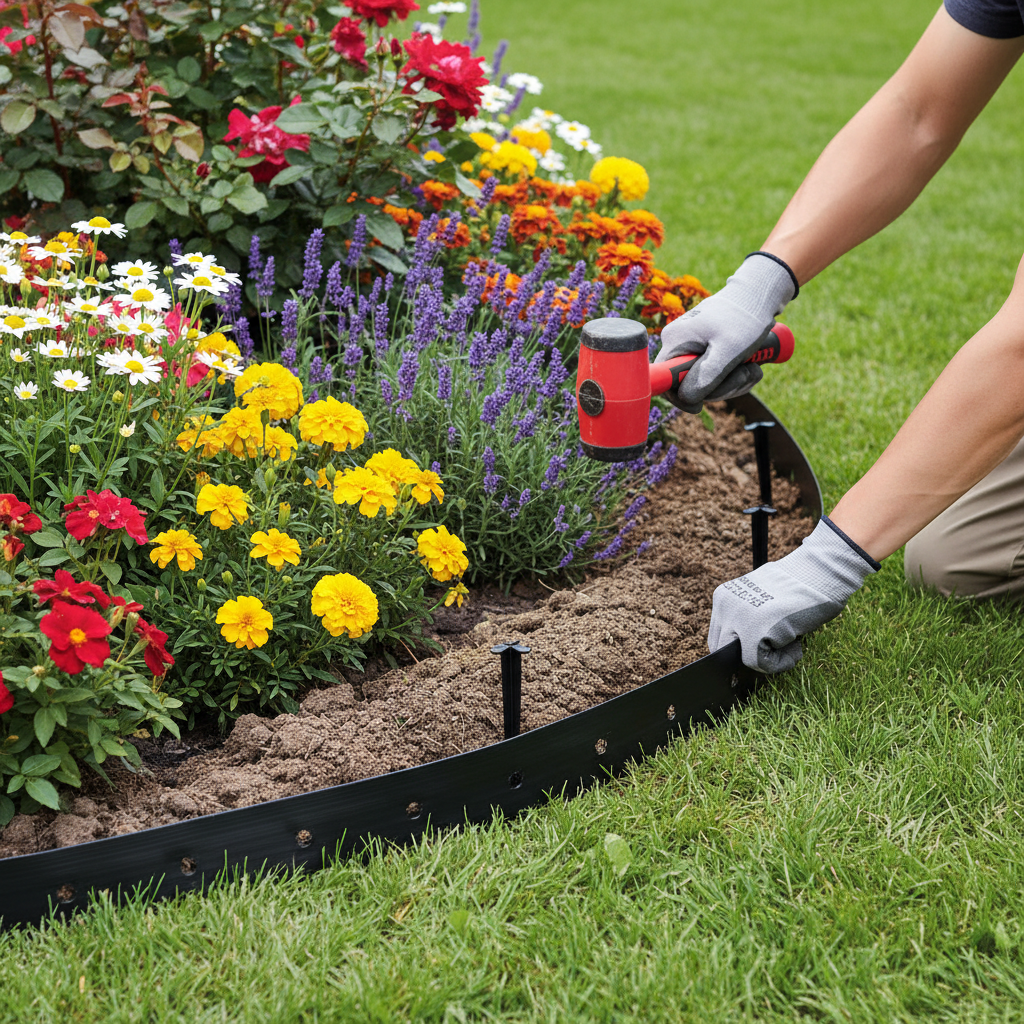
5. Anchor the Edging Securely – Prevent future shifting and heaving.
This is where many DIY projects fail. For flexible plastic or composite edging, insert anchoring stakes (typically included or sold separately) through the designated holes or tabs. Drive these stakes at an angle (45 degrees) every 2-3 feet along straight runs and every 1-2 feet around curves or corners. If using a mallet to drive them, be gentle to avoid damaging the edging. For metal edging, which may have built-in stakes or require separate ones, follow similar spacing guidelines. The stakes should be driven deep enough to fully engage the subsoil, usually 8-10 inches.
6. Backfill and Compact – Lock the edging in place.
Once the edging is fully installed and anchored, begin to backfill the trench. On the garden bed side, backfill with existing soil or fresh garden soil. On the lawn side, backfill with soil, ensuring it is level with the surrounding turf. As you backfill, use your foot or a tamper to compact the soil firmly against both sides of the edging. This compaction is vital for stability, removing air pockets and creating solid support. Water the area lightly to help settle the soil, then re-compact if necessary.
7. Level and Adjust – Final checks for a perfect finish.
Stand back and inspect your work. Are there any sections that appear uneven? Gently adjust the top of the edging using a rubber mallet if needed, tapping it down or slightly adjusting its position. If a section is consistently too high, you may need to remove some soil from beneath it. If too low, add soil and re-compact. The goal is a perfectly level and consistent top edge.
8. Apply Mulch or Ground Cover – Complete the look and add extra stability.
Once your edging is perfectly installed, finish your flower bed by adding a layer of mulch, gravel, or other ground cover. This not only enhances the aesthetic but also helps to hold the soil against the edging, providing an extra layer of stability and suppressing weeds.
Common Causes
- Insufficient Trench Depth: If the trench isn't deep enough, the edging lacks the necessary soil support to resist lateral forces from soil movement, foot traffic, or root growth.
- Uneven Trench: A trench with inconsistent depth or width means the edging won't sit level, leading to unsightly waves and weak points prone to shifting.
- Missing or Improper Anchoring: Relying solely on the soil to hold flexible edging is a recipe for failure. Without stakes driven deep into the subsoil, the edging can easily heave or shift, especially with freeze-thaw cycles.
- Poor Backfilling and Compaction: Simply pushing soil back into the trench without firm compaction leaves air pockets. These pockets allow the edging to move freely and settle unevenly over time.
- Incorrect Material for Application: Using lightweight, flexible plastic edging in a high-traffic area or where heavy decorative stone is used might not provide sufficient resistance, leading to deformation.
- Ignoring Soil Conditions: Hard clay soils can be difficult to stake effectively, requiring pre-drilling or more robust anchoring methods. Loose, sandy soils may require more closely spaced stakes and careful compaction.
Common Mistakes
- Eyeballing the Line: Trying to dig a trench without a marked guide leads to wavy, unprofessional-looking edges. Always use string, a hose, or spray paint to create a precise line.
- Skipping the Test Fit: Don't backfill immediately. Lay out and connect all your edging first to ensure all pieces fit and the curves are smooth before securing anything permanently.
- Using Too Few Stakes: Skimping on anchors, especially around curves and corners, almost guarantees that your edging will buckle or pop up. Err on the side of using more stakes than you think you need.
- Driving Stakes Vertically: Stakes offer more lateral resistance when driven at a slight angle (around 45 degrees) rather than straight down. This creates a stronger mechanical lock with the subsoil.
- Ignoring Expansion/Contraction: Some flexible plastic edgings can expand and contract with temperature changes. Leaving a tiny gap (1/8 inch) at connections can prevent buckling in hot weather. Check manufacturer guidelines.
- Not Considering Drainage: If your trench creates a low point for water to collect, it can undermine the edging over time. Ensure the trench and surrounding area allow for proper water drainage away from the bed.
Cost & Time Breakdown
| Task | DIY cost | Pro cost | Time |
|---|---|---|---|
| Edging materials (100 ft) | $30 – $150 | Included in labor | 1–3 hours |
| Anchoring stakes (per pack) | $10 – $30 | Included in labor | 30–60 minutes |
| Trenching (per 100 ft) | $0 (DIY labor) | $100 – $300 | 2–4 hours |
| Installation & Adjustment | $0 (DIY labor) | $200 – $500 | 2–5 hours |
| Backfill & Compaction | $0 (DIY labor) | Included in labor | 1–2 hours |
| Total (DIY vs. Pro) | $40 – $180 | $300 – $800+ | 5–14 hours |
Note: "Pro cost" is for installation only and can vary significantly based on location, material choice, and site conditions. These estimates do not include the cost of professional design or extensive site preparation.
Tips & Prevention
- Choose the Right Material: Select edging appropriate for your climate and usage. Rigid metal or composite is great for straight, permanent borders, while flexible plastic works well for intricate curves. Material with a deeper buried flange offers more stability.
- Regular Inspection: Periodically walk your garden beds and check the edging. Look for any signs of heaving, shifting, or gaps. Addressing small issues early prevents larger problems later.
- Edge Your Lawn Properly: When mowing, keep your mower deck slightly away from the edging. If using a string trimmer, be careful not to hit plastic edging repeatedly, as this can weaken it over time.
- Maintain Consistent Moisture: Extreme fluctuations in soil moisture (very wet then very dry) can cause soil to expand and contract, potentially stressing the edging. Consistent watering of nearby plants helps stabilize the soil.
- Consider a Sand Base for Pavers: If installing edging for pavers, a thin layer of compacted sand in the trench can provide an even more stable and level base, improving the long-term aesthetic and stability.
- Winter Protection: In areas with harsh winters and significant freeze-thaw cycles, mulch over the top of the edging in late fall can offer some insulation, reducing soil movement around the buried portion.
When to Call a Professional
While installing landscape edging is a common DIY project, there are specific situations where calling a professional landscaper or experienced contractor is advisable. If your project involves extensive trenching through very rocky or heavy clay soil, which can be incredibly labor-intensive and require specialized equipment, a pro can save you significant time and effort. Similarly, if you plan to incorporate complex design elements like intricate patterns, multiple levels, or materials such as natural stone or concrete curbing that require specialized skills and tools for cutting and setting, a professional will ensure a precise and durable outcome. If your landscape has significant slopes or drainage issues that need to be addressed in conjunction with the edging, a professional can design and implement a solution that prevents future erosion and water accumulation. Finally, for large-scale landscaping projects across your entire property, a contractor can provide a cohesive design and efficient installation, often with warranties on their work and materials, ensuring a long-lasting, beautiful result that enhances your home's curb appeal and value without the back-breaking DIY effort.
Related Articles
Keep troubleshooting with these hand-picked guides from FixlyGuide:
- The #1 Mistake Homeowners Make with Landscape Edging (and How to Fix It) — Discover the most common error in landscape edging installation, leading to instability and an untidy appearance, and learn how to correct…
- The #1 Mistake Homeowners Make with Landscape Edging (and How to Fix It) — Discover the most common error in landscape edging installation that leads to weeds and an uneven look, and learn the easy fix for a clean,…
- The #1 Mistake Homeowners Make with Landscape Edging (and How to Fix It) — Discover the most common error in landscape edging installation and a simple, step-by-step fix to achieve a professional, long-lasting bord…
- The 3 Hidden Mistakes That Make Landscape Edging Fail (And How to Fix Them) — Discover common mistakes homeowners make when installing landscape edging and learn the correct methods to achieve a durable, professional-…
- The 3 Glaring Mistakes Most Homeowners Make with Landscape Edging (and How to Fix Them) — Avoid common pitfalls when installing landscape edging to keep your flower beds neat and prevent grass invasion with these simple fixes.
- The #1 Mistake Homeowners Make After Finding Missing Shingles (And How to Fix It Right) — Discover the crucial steps to take after a storm rips shingles from your roof, ensuring a proper, lasting repair and preventing costly futu…
Frequently asked questions
Why does my landscape edging keep popping up?+
Landscape edging often pops up due to insufficient trench depth, improper anchoring, or poor soil compaction. The edging doesn't have enough buried support or isn't securely staked into the ground, allowing forces like soil expansion, foot traffic, or root growth to push it upwards.
How deep should landscape edging be buried?+
Most landscape edging should be buried so that only 1 to 2 inches are visible above the soil line. This typically means digging a trench 4 to 6 inches deep, depending on the specific product, to ensure adequate lateral support and stability.
What is the best way to keep landscape edging in place?+
The best way to keep landscape edging in place is by digging a consistently deep trench, using the appropriate anchoring stakes (driven at an angle) every 2-3 feet (more on curves), and thoroughly backfilling and compacting the soil on both sides of the edging.
Can I reuse old landscape edging?+
You can reuse old landscape edging if it is still in good condition – not cracked, brittle, significantly bent, or degraded by UV light. However, be aware that previously stressed material may be more prone to issues, so ensure it maintains its integrity and can still be adequately anchored.


Discussion
Loading comments…