- Wood Siding (e.g., cedar shingles, clapboard): Wood siding can suffer from dents, splintering, gouges, or chipped paint. These breaches expose the raw wood to moisture, accelerating decay and making it susceptible to insect infestation.
- Fiber Cement Siding (e.g., HardiePlank): This durable material can chip, crack, or fracture, particularly along edges or at attachment points. The impact can also compromise the paint or sealant, exposing the cementitious core to moisture.
- Aluminum Siding: Aluminum is prone to denting and creasing. While it doesn't absorb water like wood, dents collect water, impeding proper drainage and accelerating paint degradation. Severe impacts can also cause punctures.
Roofing · Hail damage
| Project category | Roofing |
|---|---|
| Problem type | Hail damage |
| Trade required | Roofing |
| Urgency | Urgent — within days |
| Safety risk | Moderate safety risk |
| DIY suitability | Licensed pro only |
| Cost category | High cost |
| Typical timeline | Inspection within days; claim and build often several weeks |
| Contractor type | Licensed roofing contractor |
Repair option
Spot repair for isolated slopes with limited impact marks.
Replacement option
Insurance-scope replacement when impacts exceed the carrier threshold per square.
Common causes
- Impact bruising that knocked granules loose
- Cracked mat under the surface, not visible from the ground
- Damaged soft metals: vents, gutters, flashing
Relevant tools:repair or replace roofcompare quotes
Published July 10, 2026Last updated August 17, 2026
Tools & materials you'll need
Affiliate links- AmazonExterior-grade sealant/caulkMatching color if possible
As an Amazon Associate FixlyGuide earns from qualifying purchases — at no extra cost to you. Prices and availability are accurate as of publication and subject to change.
Quick Answer
Hail-damaged siding often looks like minor cosmetic imperfections, but these seemingly small impacts can compromise your home's protective barrier, leading to significant water infiltration, rot, mold, and structural damage over time. The key is a diligent, often specialized, inspection process to identify hidden damage that might not be immediately obvious. Understanding the different types of damage and how to effectively assess them can save homeowners thousands of dollars in future repairs by addressing issues before they escalate.
The Problem
You've just experienced a hailstorm. After the initial assessment, your siding might look mostly intact, perhaps with a few dimples or minor scuffs. You might think, "It's just cosmetic," or "I'll deal with it later." This mindset is a common and potentially very expensive mistake. Hail impacts, even small ones, can create micro-fractures, delamination, or weaken the structural integrity of your siding material. For vinyl, this could mean tiny cracks that expand with temperature fluctuations. For wood, it could lead to splintering and exposed fibers that quickly absorb moisture. For fiber cement, it might cause chips or deep abrasions that compromise its protective coating. These seemingly insignificant points of damage become entryways for water, especially wind-driven rain, leading to a cascade of problems including rot in wall sheathing, mold growth within wall cavities, compromised insulation, and even structural wood damage to studs and framing. Left unaddressed, what appears to be a superficial problem can quickly evolve into a complex and costly repair involving not just siding replacement, but extensive remediation of interior structural elements, mold abatement, and insulation replacement. The real danger isn't the hail impact itself, but the hidden water intrusion it facilitates.
How It Works
To understand hail damage, it's helpful to know how siding protects your home. Siding serves as the primary weather barrier, the first line of defense against rain, wind, and impact. It’s designed to shed water and protect the underlying wall sheathing, which in turn protects the structural framing and interior finishes. When hail strikes siding, the impact energy can cause various forms of damage depending on the material:
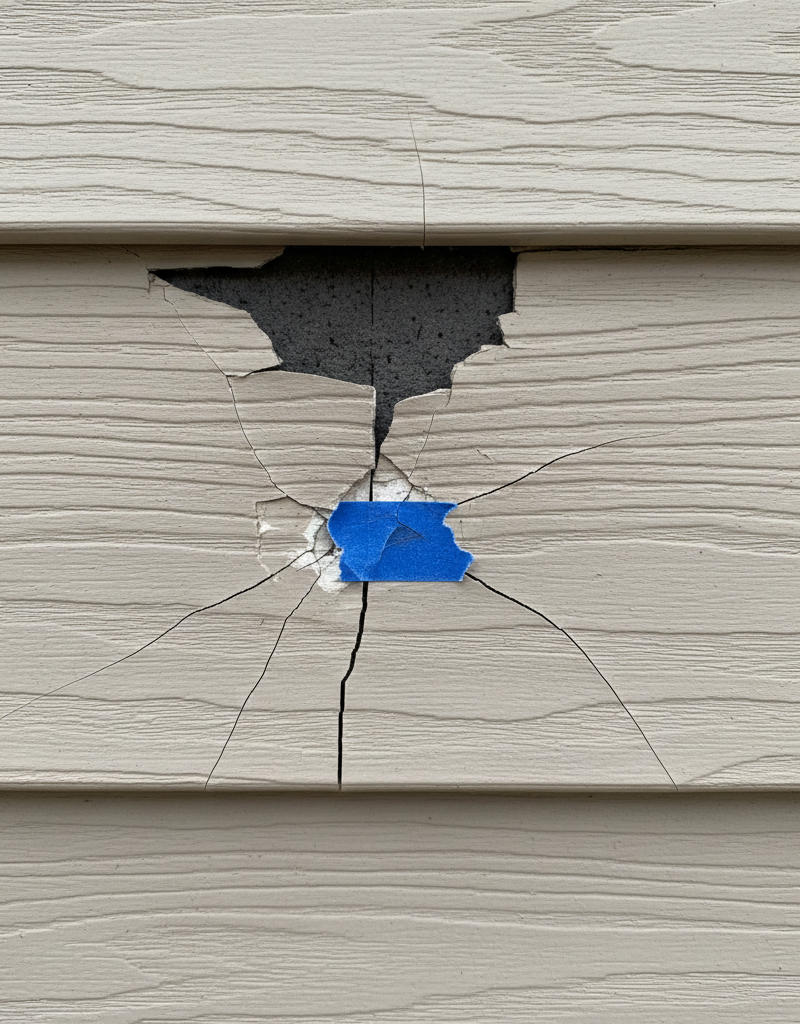
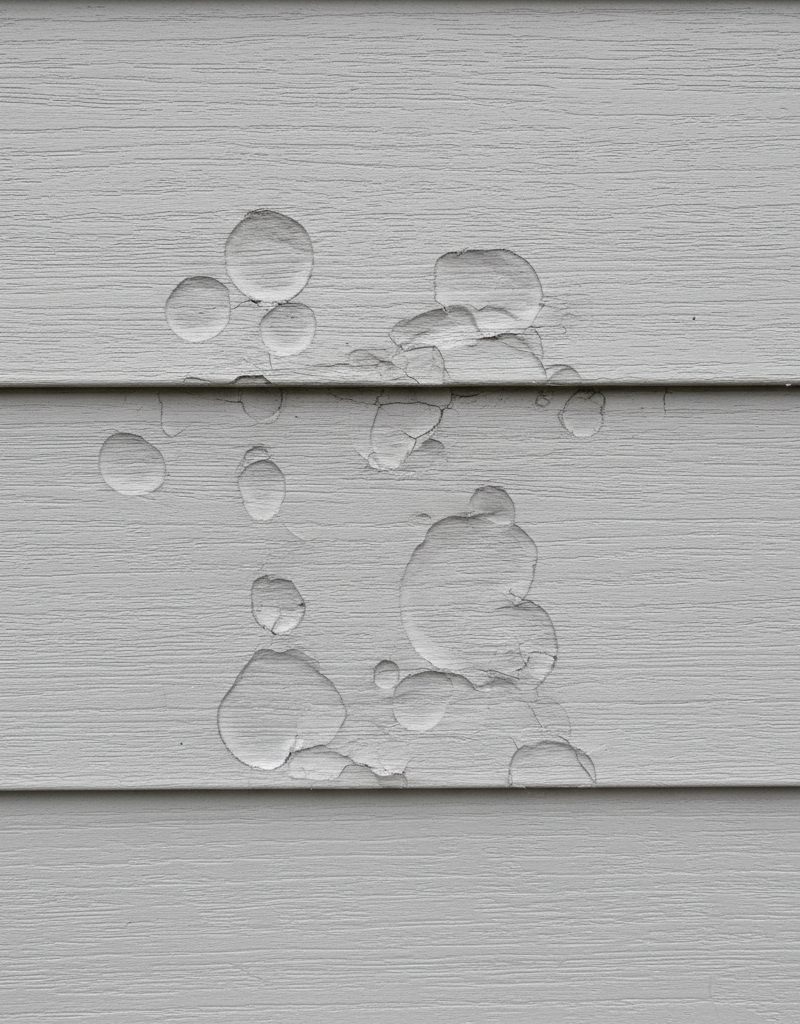
- Vinyl Siding: Hail can cause circular impact marks (dimples), cracks (especially in colder temperatures when vinyl becomes brittle), or even fracture panels. The impact can also loosen panels from their nailing strips, leading to them detaching during subsequent high winds.
- Wood Siding (e.g., cedar shingles, clapboard): Wood siding can suffer from dents, splintering, gouges, or chipped paint. These breaches expose the raw wood to moisture, accelerating decay and making it susceptible to insect infestation.
- Fiber Cement Siding (e.g., HardiePlank): This durable material can chip, crack, or fracture, particularly along edges or at attachment points. The impact can also compromise the paint or sealant, exposing the cementitious core to moisture.
- Aluminum Siding: Aluminum is prone to denting and creasing. While it doesn't absorb water like wood, dents collect water, impeding proper drainage and accelerating paint degradation. Severe impacts can also cause punctures.
The real issue arises when the damage creates an opening for water. Siding systems are designed to overlap, creating a continuous protective layer that directs water downwards and away from the building envelope. Even a small crack or a delaminated area can disrupt this system. Wind-driven rain can then be forced behind the siding, past the building wrap (tyvek or similar), and onto the wood sheathing. Once the sheathing gets wet, it can wick moisture into the wall cavity, promoting mold, mildew, and eventually rot in the wooden framing. This process often goes unnoticed for months or even years because the damage is hidden behind the water-resistant barrier. By the time signs like peeling interior paint, musty smells, or bulging walls appear, the damage is already extensive and costly.
Step-by-Step Fix
Safety First: Before starting any inspection or repair, always prioritize safety. If you need to use a ladder, ensure it is stable and on firm, level ground. Have a spotter if possible. Never work on a ladder in high winds or during a storm. If your home has multiple stories, consider hiring a professional for upper-level inspections to avoid falls.
-
Preparation and Initial Assessment – Gather your tools and perform a ground-level visual inspection.
- Tools: Notepad, pen, measuring tape, camera (phone is fine), binoculars (optional for high areas).
- Action: Walk around your entire home, looking closely at all siding surfaces. Note any obvious dents, cracks, chips, or detached panels. Take photos from a distance and close-ups of any suspicious areas. Pay special attention to corners, areas beneath eaves, and walls that face the direction of the storm's origin, as these often bear the brunt of the impact.
- Tip: Look for patterns. Random isolated damage might be something other than hail. Hail damage often appears in concentrated patterns over a single wall or across multiple walls facing the storm.
-
Angle of Light Inspection – Spot subtle imperfections by changing your perspective.
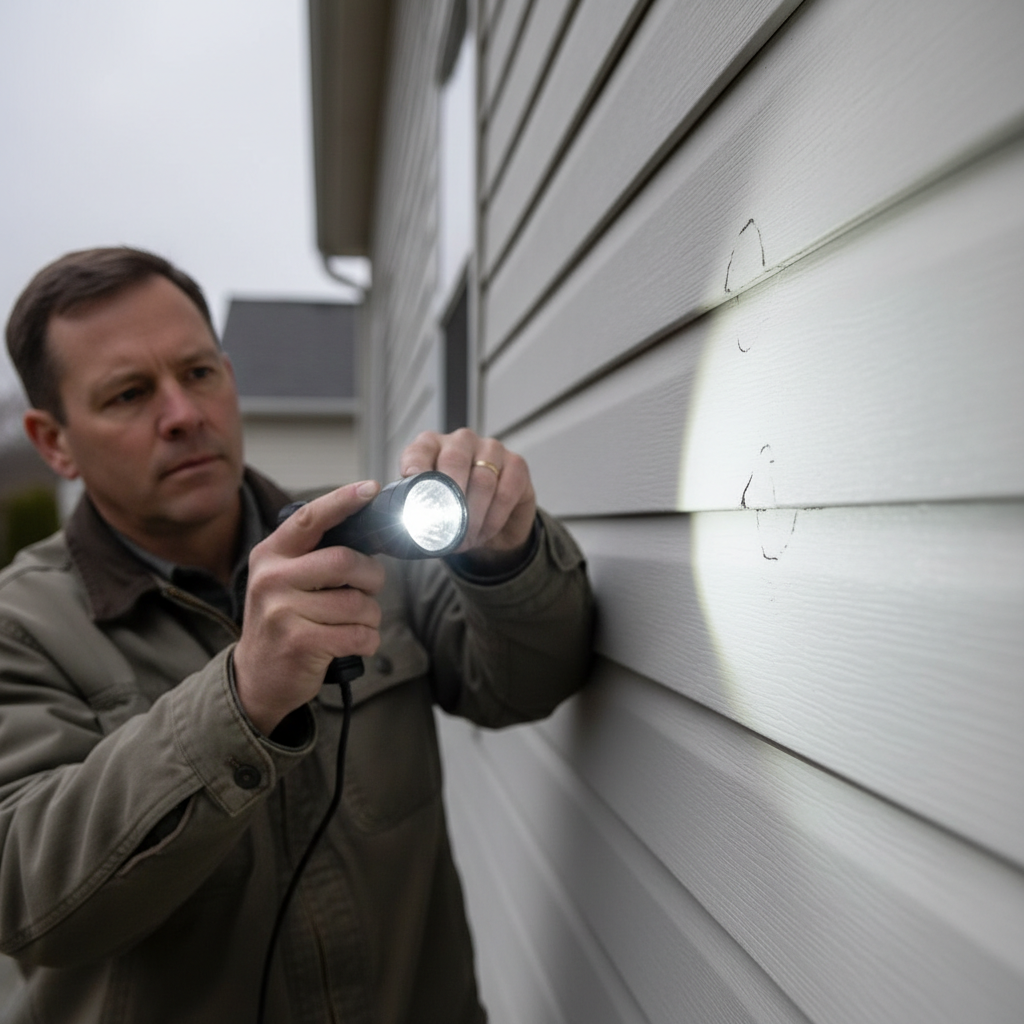
- Tools: Flashlight (high-powered LED is best).
- Action: On an overcast day or closer to dusk (when direct sunlight isn't harsh), use a strong flashlight to shine light across the siding surface at a very shallow angle. This technique causes subtle depressions or raised edges from impacts to cast shadows, making them more visible. This is particularly effective for vinyl, aluminum, and even painted wood siding.
- If this doesn't work: If you can't distinguish between hail damage and normal wear/tear or manufacturing inconsistencies, try lightly rubbing a piece of white chalk over suspect areas. The chalk will accumulate in depressions, highlighting them.
-
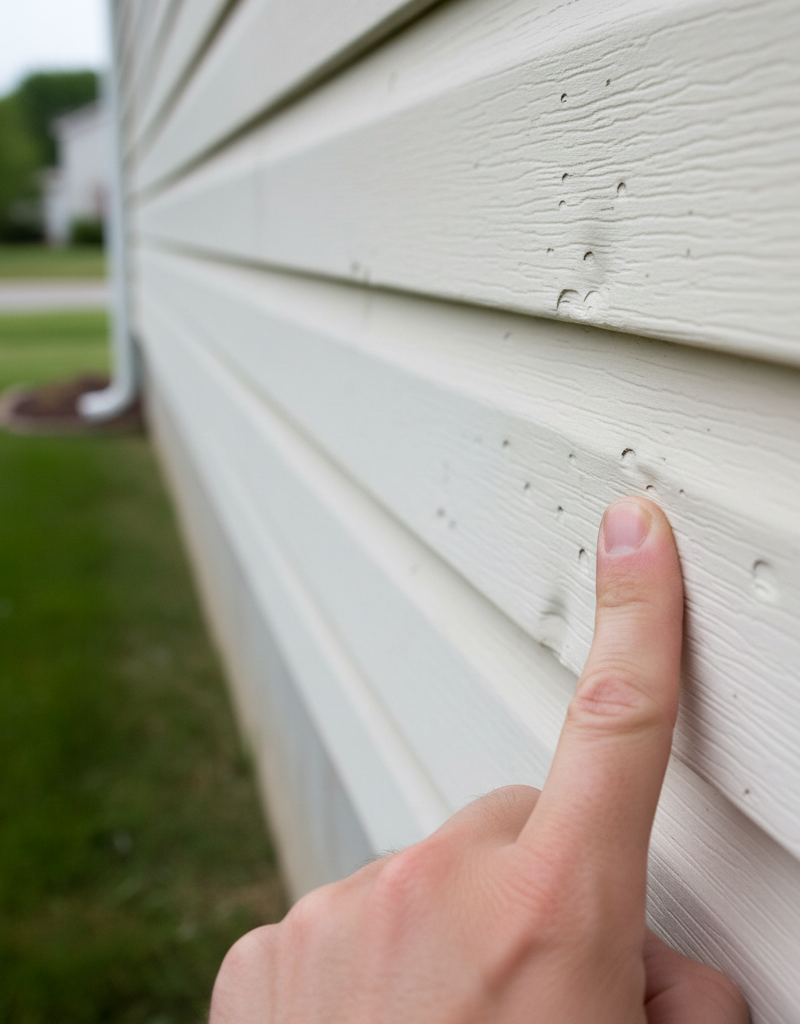
Physical Touch Test (Vinyl/Aluminum) – Feel for subtle damage that light might miss.
- Tools: Clean cloth or gloved hand.
- Action: Gently run your clean hand or a cloth over areas you suspect might be dented. Even minor impacts on vinyl or aluminum can leave a slight unevenness that is more easily felt than seen. For vinyl, also check for brittleness by gently pressing (do NOT press hard enough to cause damage) on a small unimpacted area vs. a suspect area. True hail damage can make vinyl feel thinner or more fragile.
-
Water Test (Wood/Fiber Cement) – Simulate rain to check for exposed areas.
- Tools: Garden hose with spray nozzle.
- Action: After identifying potential chips or cracks in wood or fiber cement, gently spray water onto the damaged area from a few feet away, mimicking rainfall. Observe if the water beads up and sheds properly or if it appears to soak into the damaged section. Soaking indicates a compromised protective layer and potential for water intrusion. You can also monitor inside the wall cavity if you have access (e.g., unfinished basement/attic wall) for signs of moisture.
- Safety Note: Be extremely careful when using water near electrical outlets or fixtures. If in doubt, skip this step.
-
Lift and Inspect (Vinyl Siding) – Check for damage to the nailing hem and underlying layers.
- Tools: Siding zip tool (available at hardware stores).
- Action: Carefully use a siding zip tool to unhook the bottom edge of a vinyl panel near a suspected damage area. Gently lift the panel to inspect the nailing hem (the top edge where it's nailed) for cracks or breaks, and the back side of the panel for impact marks that are not visible from the front. Also, inspect the panel beneath for impact marks, as hail can sometimes strike the overlap.
- Caution: Work slowly and gently. Cold vinyl is very brittle and can easily snap. If the temperature is below 50°F (10°C), consider waiting for warmer weather or exercising extreme caution.
-
Measure and Document – Create a clear record for insurance or repair.
- Tools: Measuring tape, camera, notepad.
- Action: For each damaged area, measure its dimensions (length, width, or diameter of dents/cracks). Take clear, well-lit photos. Compile a detailed list of all damaged sections, noting their location (e.g., “North wall, third panel from top, 18 inches from left corner”). This documentation is crucial for an insurance claim or for purchasing replacement materials.
-
Temporary Patching (Emergency only) – Prevent immediate water entry until permanent repairs.
- Tools: Exterior-grade sealant/caulk (matching color if possible), utility knife, vinyl patch kit (for vinyl siding).
- Action: For minor cracks or holes in vinyl or fiber cement, clean the area thoroughly and apply a small bead of exterior-grade sealant to bridge the gap. For larger holes in vinyl, a patch kit can offer a temporary solution. Do NOT use this as a long-term fix – it's only meant to prevent immediate water intrusion until proper repairs can be made.
- Pro Tip: For wood siding, temporary patching can involve a bit of exterior wood filler over small gouges, followed by a quick paint touch-up to seal the exposed wood.
-
Obtain Estimates and Plan Repairs – Decide on DIY vs. professional repair.
- Action: Based on your assessment and documentation, determine the extent of the damage. If it's widespread or severe, or if you're uncomfortable with ladder work or specific repair techniques, it's time to call in a professional siding contractor and potentially file an insurance claim. Obtain at least three detailed estimates from licensed and insured contractors. If the damage is minor and localized, you might opt for a DIY repair using replacement panels or sections. Compare the costs and your comfort level to make an informed decision.
Common Causes
The primary cause of this problem is, of course, hail. However, the extent and nature of the damage can be influenced by several factors:
- Hail Size and Density: Larger, denser hail (often accompanied by strong updrafts in the storm) causes more significant impact damage.
- Wind Speed and Direction: High winds can drive hail at an angle, increasing impact force and concentrating damage on specific sides of the house. Wind can also lift and tear already weakened siding.
- Siding Material and Age: Older siding, especially vinyl, becomes more brittle over time and is more susceptible to cracking. Softer materials like aluminum dent more easily than harder materials like fiber cement, though fiber cement chips more readily.
- Siding Installation Quality: Improperly installed siding (e.g., nails overtightened, panels not allowed for thermal expansion, incorrect fasteners) can be more prone to hail damage, as stress points are already present.
- Lack of Maintenance: Siding that is not regularly cleaned can have built-up grime that might obscure small cracks, preventing early detection. Damaged caulk or flashing can exacerbate water issues following hail impacts.
Common Mistakes
- Ignoring Minor Damage: Believing small dents or cracks are purely cosmetic is the biggest mistake. These are often precursors to significant water damage and structural issues.
- Delaying Inspection: Waiting too long after a hailstorm to inspect and document damage can make it harder to differentiate hail damage from normal wear and tear, complicating insurance claims. Insurance companies often have time limits for filing claims.
- Incomplete Inspection: Only looking for obvious damage from the ground level. Subtle damage often requires closer inspection, using specific lighting techniques, and potentially a ladder (with caution) or a professional.
- DIY for Extensive Damage: Attempting large-scale siding replacement or structural repairs without the necessary skills, tools, and safety equipment. This can lead to improper installation, increased water intrusion risk, and personal injury.
- Not Documenting Thoroughly: Failing to take clear photos, detailed measurements, and a written log of all damage. This evidence is crucial for insurance claims and for ensuring accurate repairs.
- Hiring Unlicensed Contractors: Choosing a contractor based solely on the lowest bid without verifying their license, insurance, and references. Unscrupulous contractors may do shoddy work that causes more problems down the line.
Cost & Time Breakdown
| Task | DIY cost | Pro cost | Time |
|---|---|---|---|
| Visual Inspection | $0 | $150–$300 | 30 min – 2 hrs |
| Detailed Ladder Inspection | $0 (if DIY capable) | $300–$600 | 1–3 hours |
| Minor Panel Replacement (1-3) | $30–$100 | $300–$800 | 1–3 hours |
| Extensive Siding Repair (per side) | $100–$500 | $1,000–$5,000+ | 1–3 days |
| Full Siding Replacement | $2,000–$8,000+ | $10,000–$30,000+ | 1–2 weeks |
| Water Damage Remediation | N/A | $2,000–$15,000+ | Varies |
Note: DIY costs are for materials only. Pro costs include labor and materials. Time estimates are for active work.
Tips & Prevention
- Regular Inspections: Periodically walk around your home and examine your siding, especially after any severe weather. Look for loose panels, cracks, or discoloration. Catching minor issues early can prevent them from becoming major problems.
- Proper Drainage: Ensure your gutters and downspouts are clean and directing water away from your foundation. This prevents water from pooling against your siding or splashing back onto it, which can exacerbate damage points.
- Keep Vegetation Trimmed: Overhanging tree branches can cause direct impact damage during storms (not just hail) and scratch siding over time. Trim branches that are close to your home.
- Understand Your Siding Material: Different materials have different vulnerabilities. Knowing whether your vinyl siding is prone to brittleness in cold, or if your wood siding needs regular sealing, can inform your preventative measures.
- Maintain Paint/Sealants: For wood and fiber cement siding, ensure paint and sealants are in good condition. These layers are crucial for protecting the underlying material from moisture. Reapply as needed.
- Document Before a Storm: Take photos of your siding when it's in good condition. This "before" documentation can be invaluable if you need to file an insurance claim after a storm, proving the extent of new damage.
When to Call a Professional
If your hail damage is extensive, covers multiple sides of your home, or you suspect underlying water damage, it is always best to call a licensed and insured siding professional. They have the expertise to safely conduct comprehensive ladder inspections, identify subtle damage that DIYers might miss, and accurately assess the full scope of repairs, including potential water intrusion and structural concerns. Furthermore, navigating insurance claims for hail damage can be complex, and a reputable contractor can often assist with the documentation and estimation processes. If you notice signs of interior water damage such as discoloration on ceilings or walls, musty odors, or bubbling paint, stop all DIY efforts and immediately contact a professional to assess for mold and structural compromise.
Related Articles
Keep troubleshooting with these hand-picked guides from FixlyGuide:
- The Invisible Hail Damage Mistake Most Homeowners Make (And How to Spot It) — Discover how to accurately assess hail damage on your home's siding, understand its hidden impacts, and perform essential repairs to protec…
- Is That Hail Damage to Your Siding—Or Something Worse? (And How to Know For Sure) — Distinguishing hail damage from other siding issues is crucial for proper repair and insurance claims. Learn how to identify hail damage an…
- Is That Hail Damage on Your Siding? 5 Hidden Signs Most Homeowners Miss — Discover how to inspect your siding for hidden hail damage, understand the different types, and navigate the repair or replacement process.
- Your Roof is Leaking. Now What? — A leaking roof after a storm is a homeowner's nightmare. Learn how to safely install a temporary roof tarp to prevent further water damage…
- The Urgent Truth About Missing Roof Shingles (And Your 3-Step Fix) — High winds can rip shingles off your roof, exposing your home to immediate water damage – here’s how to assess, temporary patch, and plan p…
- The #1 Mistake Homeowners Make When Spotting Soffit Damage — Ignoring early signs of soffit and fascia damage can lead to costly structural issues. Learn to identify and fix common problems the right…
Should you do this yourself?
Answer five quick questions before you start. Safety outranks savings every time.
Your experience with work like this
How high do you have to work?
Does the job involve any of these?
Will it need a permit?
Specialty tools
Free and instant. Educational guidance only — not a quote, inspection, or professional diagnosis.
Questions to ask before you sign
Ask every contractor the same questions and the cheapest bid stops looking cheapest. Check them off as you go — your progress is saved on this device.
Free, no signup. Bring this to every walkthrough so you compare bids on the same terms.
What should this project cost?
Enter your project details for a realistic cost range before you call anyone.
Spot repairs commonly run $400–$1,800; full replacement typically $9,000–$18,000 for an average home.
- Regional adjustment
- National average
- Labor share (typical)
- ~$2,948
- Quotes to collect
- 3 written estimates
Educational estimate based on national averages — not a binding quote. Always confirm with written local estimates.
Fixly Project Decision Box
- DIY difficulty
- Professional Recommended
- Estimated time
- Inspection 1–2 hours · repairs 1–3 days
- Cost level
- High
Main tools / materials
- Binoculars for a ground-level look
- Flashlight for attic checks
- Moisture meter
- Roofing cement (temporary patch only)
When to stop and call a pro
- Active leak near lights, fans, or any wiring
- Sagging, bulging, or water-filled ceiling
- Steep, wet, or two-story roof — do not climb it
- Storm or hail damage you plan to claim on insurance
Need professional help?
Free roof assessment first — no phone calls until you ask for them.
Get Local Roofing HelpGet help with your roof now
Stay off the roof. These free tools help you protect the house and reach the right professional fast.
- Emergency repair checklistThe first steps that limit damage before a pro arrives.Open
- Repair or replace your roof?Answer 10 questions about age, leaks, and damage to get a clear next step.Open
- Get local estimatesSend one request and compare written estimates from vetted pros.Open
Free, no signup required. Estimates are educational guidance, not a quote or an inspection.
Get the print-ready PDF of this guide
A clean, ad-free, printable version you can keep on your phone or pin to the workshop wall. Free with a FixlyGuide account.
- Print-optimized layout
- Tools, materials & every step included
- Saved to your account
Frequently asked questions
How do you check for hail damage on siding?+
Checking for hail damage involves a close visual inspection for dents, cracks, or chips, often using an angled light source to reveal subtle imperfections. A physical touch test can identify minor indentations, and for vinyl, carefully unzipping panels to inspect the nailing hem and underlying sections is crucial. Thorough documentation with photos is essential.
Can hail damage siding without it being obvious?+
Absolutely. Hail can cause micro-fractures, delamination, or weaken the material without immediate, obvious signs. These hidden damages become entry points for water, leading to more significant issues like rot, mold, and structural compromise over time.
When should I call my insurance for hail damage?+
You should call your insurance provider as soon as you suspect significant hail damage that could lead to a large repair bill or requires extensive professional intervention. Document all damage thoroughly before making the call, and be prepared to provide details and photos.
What kind of hail causes siding damage?+
Hail of any size can cause damage, but larger hail (typically 1-inch in diameter or greater) and hail driven by strong winds causes the most significant and widespread damage. Smaller hail can still cause cosmetic damage and micro-fractures, especially on older or brittle siding materials.
Discussion
Loading comments…