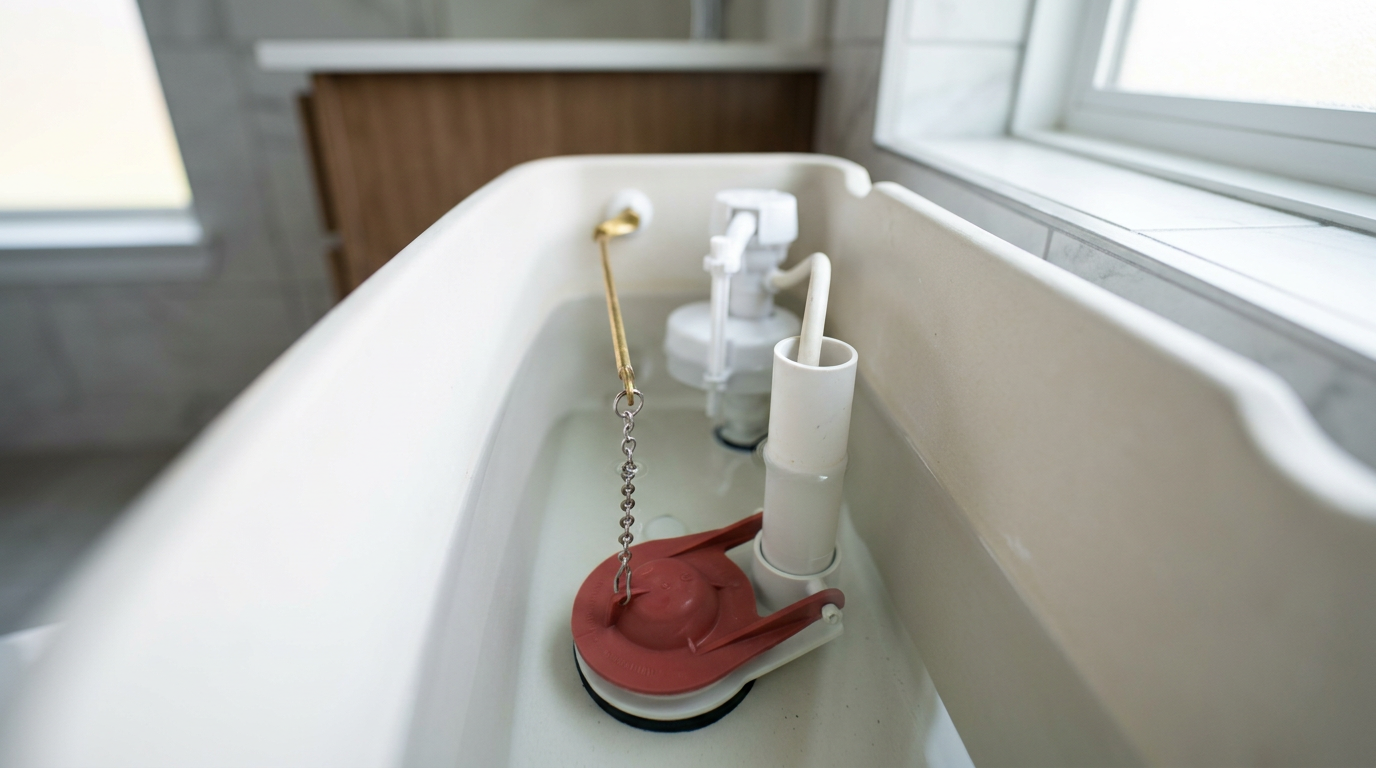
- Worn-Out Flapper: This is the 1 cause. Over time, water and chemicals break the rubber down until it’s warped or brittle.
- Incorrect Flapper Chain Length: Too tight and it keeps the flapper open; too long and it gets trapped underneath.
- Dirty Flush Valve Seat: Mineral scale or debris on the seat keeps the flapper from sealing like it should.
- High Water Level: If the float’s set too high, water keeps trickling into the overflow tube. The correct level is about one inch below the top of the tube.
- Cracked Overflow Tube: Not as common, but it happens. A small crack can let water leak into the bowl.
Plumbing · Leak
| Project category | Plumbing |
|---|---|
| Problem type | Leak |
| Trade required | Plumbing |
| Urgency | Emergency — act now |
| Safety risk | High safety risk |
| DIY suitability | DIY for experienced homeowners |
| Cost category | Low cost |
| Typical timeline | Shut water off now; repair usually same or next day |
| Contractor type | Licensed plumber |
Repair option
Isolate at the shutoff, replace the failed component, and dry the cavity fully.
Replacement option
Repipe the run or the branch when corrosion is widespread.
Common causes
- Failed supply line or shutoff valve
- Worn washers, cartridges, or P-trap connections
- Pinhole corrosion in older copper
Relevant tools:emergency checklistdiy or hire a pro
Published October 12, 2026Last updated October 12, 2026
Tools & materials you'll need
Affiliate linksAs an Amazon Associate FixlyGuide earns from qualifying purchases — at no extra cost to you. Prices and availability are accurate as of publication and subject to change.
Quick Answer
If your toilet fills every few minutes, I’d put money on a silent leak inside the tank. The water level drops, the fill valve kicks on, and before long you’re hearing that little refill noise again. Folks call it "ghost flushing," and that’s about as fitting a name as you’ll hear. Most of the time, it’s a tired flapper, a flapper chain that’s too tight or tangled, or a cracked overflow tube sneaking water into the bowl. Less often, the fill valve itself isn’t shutting off all the way. Good news? It’s usually a cheap fix, and you can knock it out in under an hour with parts that cost less than $20.
The Problem
You hear it from the other room—that familiar hiss of the toilet tank refilling. But you haven’t flushed it. Maybe it happens every ten minutes, maybe every hour. That sound isn’t just annoying; it means water’s moving when it shouldn’t, and your water bill’s paying the price. This is what people mean by "ghost flushing" or "phantom flushing," and it’s a dead giveaway that water’s leaking slowly and quietly from the tank into the bowl. Over a month, that tiny leak can waste hundreds of gallons. No joke.
Your toilet’s a simple machine, but it depends on a good seal to keep nearly two gallons of water ready for the next flush. When that seal fails, even a little bit, the tank level drops. Once it falls below a certain point, the float on the fill valve sinks just enough to open the valve and top the tank off. Then it does it again. And again. Over and over. It’s easy to ignore at first, but that thing’s chewing up parts and money both.
How It Works
Let’s crack the tank lid off and see what’s going on. A toilet tank is basically a small water reservoir running on a simple gravity-and-lever setup. When you press the flush handle, it lifts a lever inside the tank. That lever is hooked to a small chain and a rubber or silicone seal called a flapper (or sometimes a canister seal in newer toilets). When the flapper lifts, it exposes a big opening—the flush valve seat—at the bottom of the tank. Gravity takes it from there, dropping about 1.6 gallons of water (for most modern toilets) into the bowl in just a few seconds.
As the tank empties, the flapper falls back down onto the flush valve seat and seals the hole. At the same time, the water level drops, and that causes a float (either a ballcock on an arm or a column-style float) to sink. That drop activates the fill valve, which opens and lets fresh water into the tank through a supply line. As the tank refills, the float rises. When it hits its set height, it pushes a lever inside the fill valve and shuts the water off. A small refill tube also sends some water down the overflow tube to refill the bowl itself. When the ghost flush happens, the water level is dropping without a flush. The fill valve’s just doing its job—the leak is the real issue.
Step-by-Step Fix
Before you start, find the water shutoff valve for your toilet. It’s usually on the wall or floor behind the toilet, hooked to a flexible water line. Turn it clockwise to shut off the water. Flush the toilet once to drain the tank. You’ll still have a little water at the bottom, and that’s fine. Grab an old towel and you’re set.
1. The Food Coloring Test
- Before you replace a thing, let’s prove the leak is in the tank. If your tank’s full, just take the lid off. Add 5-6 drops of dark food coloring — blue or red works best — to the tank water. Don’t flush. Wait 20-30 minutes. Then look in the bowl. If any colored water shows up, you’ve got a leak from the tank. If the bowl’s still clear, the fill valve might be the culprit, but 9 times out of 10, you’ll see the color.
2. Inspect the Flapper Chain
- That little chain between the flush lever and the flapper causes plenty of headaches. Too short or too tight, and it holds the flapper open a hair. Too long, and it can tangle or get caught under the flapper, which is no better. You want a touch of slack — about 1/4 to 1/2 inch. Unhook it and tweak the length if you need to. Sometimes that’s all it takes. Easy money.
3. Check the Flapper Itself
- With the water off and the tank empty, run your finger around the underside of the rubber flapper. Feel for warping, mineral buildup (common in North Texas with our hard water), or plain old breakdown. Rubber flappers age out. They get brittle, misshapen, and they stop sealing the flush valve seat the way they should. If it feels anything other than smooth and flexible, replace it.
4. Replace the Flapper
- Tools: New universal flapper, scissors.
- Flappers are cheap and simple to swap out. Most unclip from two small posts on the sides of the overflow tube. Pop the old one off, then unhook the chain from the flush lever. I pulled a water heater in Frisco last month that had exactly this kind of crusty, hard-water buildup — same story, different fixture. Take the old flapper to the hardware store so you get the right match. Most are a standard 2-inch or 3-inch size. A "universal" kit usually does the trick. Clip the new one on, hook up the chain, and trim the extra so it won’t snag.
5. Clean the Flush Valve Seat
- Tools: Non-abrasive scrub pad or cloth.
- Before you put the new flapper on, clean the ring it seals against — the flush valve seat. It might be plastic or brass. Mineral scale, grime, and old residue can keep it from sealing tight. Gently scrub the rim with a non-abrasive pad. Don’t get aggressive with it. If you scratch that surface, you’ve made yourself a bigger problem. Clean and smooth is what you want.
6. Inspect the Overflow Tube
- Take a close look at the big vertical pipe in the middle of the tank. That’s the overflow tube. If the water level’s set too high, it’ll keep spilling into this tube, and you’ll have a silent leak whether you realize it or not. The water level should sit about 1 inch below the top of the overflow tube. If it’s too high, adjust the float on your fill valve. Most modern fill valves have an adjustment screw or clip for that. While you’re there, check the tube itself for hairline cracks. They’re sneaky, but they’ll leak.
7. Check the Refill Tube
- Find the small rubber tube running from the fill valve to the overflow tube. It should sit just above the overflow tube, held by a clip. It should not be shoved down inside the overflow tube. If it is, it can siphon water out of the tank and make the fill valve kick on again. Pull it out and clip it to the side so it drains into the tube from above. Simple fix.
8. Test Your Work
- Turn the water supply valve back on (counter-clockwise). Let the tank fill all the way. Listen for the shutoff. The fill valve should stop with a clean snap, not a lazy hiss. Wait 30 minutes. If you don’t hear the tank refill, you’ve probably nailed it. If you want to be extra sure, do the food coloring test one more time.
Common Causes
- Worn-Out Flapper: This is the #1 cause. Over time, water and chemicals break the rubber down until it’s warped or brittle.
- Incorrect Flapper Chain Length: Too tight and it keeps the flapper open; too long and it gets trapped underneath.
- Dirty Flush Valve Seat: Mineral scale or debris on the seat keeps the flapper from sealing like it should.
- High Water Level: If the float’s set too high, water keeps trickling into the overflow tube. The correct level is about one inch below the top of the tube.
- Cracked Overflow Tube: Not as common, but it happens. A small crack can let water leak into the bowl.
Common Mistakes
- Using Drop-in Bleach Tablets: Those chemical pucks are rough on the plastic and rubber parts in your tank. They speed up flapper and seal failure. Don’t use them.
- Scrubbing the Valve Seat with Abrasives: Steel wool or a harsh scrubber can scratch the plastic or brass seat and leave you with a permanent micro-leak that even a new flapper can’t fix.
- Ignoring the Problem: A ghost-flushing toilet can waste over 200 gallons of water a day in some cases. That’s a pile of water — and a nasty bill — by the end of the year.
- Buying the Wrong Size Flapper: Toilets use either a 2-inch or a 3-inch flapper. A 2-inch flapper on a 3-inch valve will never seal, and vice-versa. Bring the old one with you so you don’t guess wrong.
Cost & Time Breakdown
Fixing a ghost-flushing toilet is one of the cheapest, quickest home repairs you can make.
| Task | DIY Cost | Pro Cost | Time |
|---|---|---|---|
| Adjust Flapper Chain | $0 | $120–$180 (trip fee) | 5 minutes |
| Replace Flapper | $5–$15 | $150–$220 | 15 minutes |
| Clean Valve Seat | $0 | (included in above) | 5 minutes |
| Adjust Water Level | $0 | (included in above) | 10 minutes |
| Replace Entire Flush & Fill Valve Kit | $25–$40 | $250–$400 | 45-60 minutes |
Tips & Prevention
- Check Annually with Food Coloring: Once a year, drop food coloring in the tank and wait 30 minutes. It’s the fastest way to catch a silent leak before it wastes hundreds of gallons.
- Avoid In-Tank Cleaners: Clean the bowl directly instead. That’ll stretch the life of your flapper and seals a lot longer.
- Know Your Water Shutoff: Make sure everybody in the house knows where the toilet shutoff valve is and how to turn it. You’ll want that in a hurry during a plumbing emergency.
- Listen for Hissing: After a flush, the fill valve should stop right away. If you hear a faint hiss long after it should’ve shut off, the fill valve itself may be going bad.
When to Call a Professional
This is a pretty DIY-friendly repair, but there are times you should call it a day and bring in a plumber. If you see water pooling around the base of the toilet, the problem isn’t inside the tank — it’s probably a failed wax ring, and that’s a much bigger job. Also, if you replace the internal parts and the toilet still leaks, or if the shutoff valve itself is frozen or drips when you try to turn it, it’s time to call a pro. Don’t force a corroded valve and turn a small problem into a flood.
Related Articles
Keep troubleshooting with these hand-picked guides from FixlyGuide:
- Why Your Garbage Disposal Just Died (And the One Thing You Should Check First) — Don't panic if your garbage disposal went silent. Often, it's a simple, overlooked electrical issue you can fix in minutes without a plumbe…
- The 3 Hidden Reasons Your Bathroom Sink Stinks (And the 20-Minute Fix) — Uncover the surprising causes behind a foul-smelling bathroom sink drain and learn a simple, effective fix in just 20 minutes.
- The Drip You Can't Ignore: Why Your Garbage Disposal Leaks (And How to Stop It) — Don't let a leaky garbage disposal ruin your cabinets and create a mold problem; discover the real reasons behind the drips and how to fix…
- The Slow Drain Mystery: Why Your Garbage Disposal Backs Up (and the One Simple Tool That Saves the Day) — If your garbage disposal is draining slowly or backing up into your sink, it's likely a stubborn clog that you can tackle with a few basic…
- Why Your Hot Water Only Lasts 5 Minutes (And How to Fix It FAST) — If your hot showers are cut short, it's likely a simple issue with your water heater's dip tube, heating elements, or thermostat. Most home…
- The Dryer Fire Hazard Hiding in Plain Sight (and How to Eliminate It in 30 Minutes) — Lint buildup in your dryer vent is a silent fire hazard. Learn how to clean it thoroughly and prevent a potential disaster with simple tool…
Should you do this yourself?
Answer five quick questions before you start. Safety outranks savings every time.
Your experience with work like this
How high do you have to work?
Does the job involve any of these?
Will it need a permit?
Specialty tools
Free and instant. Educational guidance only — not a quote, inspection, or professional diagnosis.
What should this project cost?
Enter your project details for a realistic cost range before you call anyone.
Common repairs run $150–$650; repipes and water-heater replacements reach $1,500–$4,500.
- Regional adjustment
- National average
- Labor share (typical)
- ~$754
- Quotes to collect
- 3 written estimates
Educational estimate based on national averages — not a binding quote. Always confirm with written local estimates.
Fixly Project Decision Box
- DIY difficulty
- Moderate
- Estimated time
- 30 minutes – half a day
- Cost level
- Moderate
Main tools / materials
- Adjustable wrench
- Plunger or drain auger
- Bucket and towels
- Thread tape
When to stop and call a pro
- Water you cannot shut off at the fixture or main
- Sewage backing up into more than one fixture
- Water near electrical panels or outlets
- Gas water heater work beyond relighting a pilot
Need professional help?
Get a Licensed PlumberBefore you start
Check the difficulty, permits, and safety risk — then decide whether to call a pro.
- Estimate this projectGet a cost range for your scope and ZIP before you call anyone.Open
- Get local estimatesSend one request and compare written estimates from vetted pros.Open
Free, no signup required. Estimates are educational guidance, not a quote or an inspection.
Frequently asked questions
Why does my toilet sound like it's running for just a few seconds?+
That's the classic sign of a 'ghost flush.' A slow leak from the tank into the bowl causes the water level to drop, triggering the fill valve to run for a few seconds to top it off. It's usually a bad flapper seal.
How much water does a ghost-flushing toilet waste?+
It can be significant. Depending on the leak's speed, a single toilet can silently waste anywhere from 30 to over 200 gallons per day. This can add a surprising amount to your monthly water bill.
Is it okay to use bleach tablets in the toilet tank?+
No, plumbers strongly advise against it. The harsh chemicals in those tablets break down the rubber flapper and other plastic components in your tank, causing them to fail and leak much sooner.
What's the difference between a 2-inch and a 3-inch flapper?+
The size refers to the diameter of the flush valve opening at the bottom of the tank. Toilets made before 2005 typically use 2-inch flappers, while newer high-efficiency toilets often use 3-inch flappers for a more powerful flush. Using the wrong size will guarantee a leak.
How do I know if my toilet's water level is too high?+
Take the tank lid off. The water level should be about one inch *below* the top of the open overflow tube in the center of the tank. If it's at or above the top, it's constantly spilling over and needs to be adjusted down via the fill valve float.
Can a tangled flapper chain really cause a leak?+
Yes, absolutely. If the chain is too long, it can easily get caught under the flapper's edge when it falls, preventing a complete seal. The chain should have just enough slack to operate the lever without holding the flapper open or getting in the way.
How often should a toilet flapper be replaced?+
A good quality flapper should last about 4-5 years in normal water conditions. If you have very hard water or use chemical cleaners in the tank, you might only get 1-2 years out of one before it starts to warp or degrade.
What is the food coloring test for a toilet leak?+
It's a simple diagnostic. You add a few drops of dark food coloring to the water in your toilet tank, then wait 20-30 minutes without flushing. If any of that color appears in the toilet bowl, you have a confirmed leak from the tank.
Discussion
Loading comments…