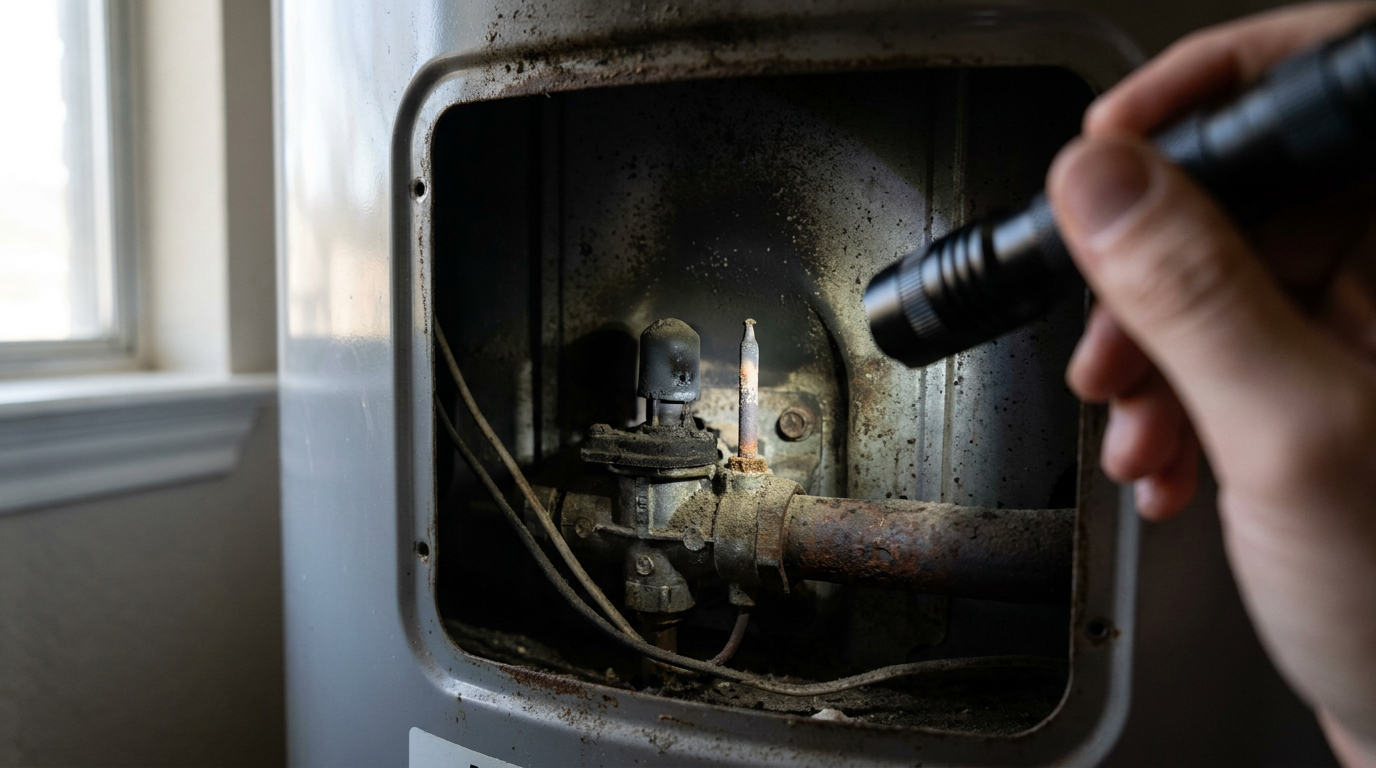
- Dirty Thermocouple: This is the big one. Soot coats the sensor and keeps the flame from heating it properly.
- Failed Thermocouple: These things wear out. Nothing fancy about it. They’ve got a finite lifespan, often 5-10 years, and then they just stop making enough voltage. Cheap part, common failure.
- Dirty or Clogged Pilot Orifice: If the pilot flame is weak, flickering, or yellow, it isn’t hot enough to do its job. Dust, cobwebs, and sediment can choke off that tiny opening.
- Drafts: A strong draft can blow the pilot out, especially on older units without sealed combustion chambers.
Plumbing · Water heater problem
| Project category | Plumbing |
|---|---|
| Problem type | Water heater problem |
| Trade required | Plumbing |
| Urgency | Urgent — within days |
| Safety risk | Moderate safety risk |
| DIY suitability | Pro recommended |
| Cost category | Moderate cost |
| Typical timeline | Diagnosis same day; replacement typically a half-day install |
| Contractor type | Licensed plumber |
Repair option
Element, thermostat, or thermocouple replacement on a tank still in good condition.
Replacement option
Full replacement once the tank leaks or passes roughly a decade of service.
Common causes
- Failed heating element or thermocouple
- Sediment buildup reducing capacity
- Tank corrosion at end of service life
Relevant tools:repair or replaceproject cost estimator
Published October 3, 2026Last updated October 3, 2026
Tools & materials you'll need
Affiliate linksAs an Amazon Associate FixlyGuide earns from qualifying purchases — at no extra cost to you. Prices and availability are accurate as of publication and subject to change.
The Problem
You relight the pilot on your gas water heater, hold the button down for a full minute, let go… and poof, the flame dies. So you try again. Same thing. Then you hold it longer, because maybe that’s all it needs, right? No dice. That little blue flame won’t stay lit, and now you’ve got no hot water. Annoying? Sure. But it’s also your water heater waving a red flag at you. The good news: this is usually a fixable problem, and it doesn’t automatically mean the whole heater’s toast.
How It Works
I like to think of the pilot light as the gatekeeper for the gas water heater. It’s that tiny flame standing watch, ready to light the main burner when the thermostat calls for heat. But the heater needs proof the flame’s actually there before it lets gas keep flowing. Otherwise, you could end up with raw gas hanging around in the cabinet — and that’s a bad scene. Real bad.
That’s where the thermocouple comes in. It’s a safety device, plain and simple. You’ve got two different metals joined at the tip, and when the pilot flame heats that tip, it makes a tiny electrical signal — just a few millivolts (typically 25-30 mV). That little signal keeps an electromagnet inside the gas control valve energized, which holds a small valve open so gas can keep feeding the pilot.
When the pilot goes out, the thermocouple cools off fast. The millivolt signal disappears. The electromagnet drops out, the spring-loaded valve shuts, and gas gets cut off to both the pilot and the main burner. That’s its whole gig: prove there’s a flame. So if your pilot won’t stay lit after you release the control knob, something’s interrupting that signal, and the gas valve is doing exactly what it’s supposed to do.
Step-by-Step Fix
Before you touch anything, turn the gas control knob on top of the water heater to the "OFF" position. Don’t skip that. Then wait at least 10 minutes so any leftover gas in the chamber can clear out.
-
Inspect the Area — Start with the easy stuff. Is a draft hitting the heater? A nearby dryer vent, an open window, or even a strong HVAC register can blow the pilot out. That flame is tiny. It doesn’t take much. If you find a draft, fix that first and try relighting before you go tearing into anything else.
-
Access the Burner Assembly — You need eyes on the pilot, thermocouple, and burner. Most water heaters have a metal cover plate at the very bottom, sometimes held with a couple screws, sometimes just clipped in. Pull that cover off and set it aside. A flashlight helps a lot here. These compartments are usually darker than a crawlspace in November.
-
Clean the Thermocouple — The thermocouple is the thin copper or steel probe sitting right next to the pilot flame, with its tip meant to sit right in the heat. Over time, soot and carbon can coat it. That buildup blocks the heat, and then it can’t make enough voltage.
- Tools: A strip of fine-grit sandpaper or an emery cloth. In a pinch, even the rough side of a dollar bill can do the trick.
- Action: Gently pinch the thermocouple tip with the sandpaper and clean just the top 1/2-inch. You’re trying to get that dark crust off and get back to shiny metal. Don’t get carried away — you’re not trying to grind it down. Also, make sure it hasn’t been bent out of the flame. It needs to be engulfed when the pilot’s lit.
-
Clean the Pilot Orifice — The pilot orifice can get gummed up too. Dust, lint, cobwebs, whatever finds its way in there — and then you get a weak, lazy flame that can’t heat the thermocouple right.
- Tools: A can of compressed air with a straw nozzle or a thin needle.
- Action: Find the pilot assembly — that’s the small tube the gas comes out of to make the flame. Blow some compressed air into the opening to clear out dust. If it’s really clogged, you can carefully use a needle to open it up, but go easy. Real easy. You don’t want to enlarge that hole and create a flame that’s too big for the job.
-
Check for a Loose Connection — Trace the thermocouple line back from the pilot assembly to the gas control valve. It looks like a thin copper tube. That connection can vibrate loose over time. I’ve seen it plenty.
- Tools: Small adjustable wrench.
- Action: See if the nut’s finger-tight. It should be snug. Give it a gentle 1/8-turn with the wrench so it’s solid. Don’t crank on it. Over-tightening can strip the soft brass threads, and then you’ve got a much bigger headache than you started with. Firm. Not gorilla-tight.
-
Relight and Test — Now you’ll see if the cleanup did anything. Follow the relighting instructions printed on your water heater. Usually, that means turning the knob to "PILOT," pressing and holding the button down, lighting the flame with a long lighter, and keeping the button held for 45-60 seconds. That gives the thermocouple time to heat up and send its signal.
-
Release and Observe — Ease off the button slowly. If the pilot stays lit, you’re in business. The flame should be steady and mostly blue, and it ought to wrap around the thermocouple tip. If it’s yellow, lazy, or noisy, something’s still not right — maybe more buildup, maybe a bigger problem.
-
Turn to "ON" — Once the pilot’s holding steady, turn the gas control knob from "PILOT" to your desired temperature setting (usually marked "ON" or with temperature numbers). You should hear a "whoosh" when the main burner kicks on. If you do, nice. Call it a day. Put the burner access door back on. If the pilot still won’t stay lit after all that, the thermocouple’s probably done for.
Common Causes
- Dirty Thermocouple: This is the big one. Soot coats the sensor and keeps the flame from heating it properly.
- Failed Thermocouple: These things wear out. Nothing fancy about it. They’ve got a finite lifespan, often 5-10 years, and then they just stop making enough voltage. Cheap part, common failure.
- Dirty or Clogged Pilot Orifice: If the pilot flame is weak, flickering, or yellow, it isn’t hot enough to do its job. Dust, cobwebs, and sediment can choke off that tiny opening.
- Drafts: A strong draft can blow the pilot out, especially on older units without sealed combustion chambers.
- Failing Gas Control Valve: This is the least common and the most expensive culprit. The internal electromagnet the thermocouple powers can fail. If you’ve already replaced the thermocouple and the pilot still won’t stay lit, the valve is the next suspect — but that’s usually pro territory.
Common Mistakes
- Not holding the pilot button long enough. You need that 45-60 seconds so the thermocouple can heat up properly. People rush it all the time.
- Bending the thermocouple too much. If you have to reposition it, keep it gentle. Kinking that copper line can damage the internal connection, and then the part’s junk.
- Over-tightening the thermocouple nut. The brass threads on the gas control valve are soft. If you muscle it down, you can strip them and turn a cheap fix into an expensive mess. Snug is enough.
- Using the wrong thermocouple. Bring the old one with you when you buy a replacement. They come in different lengths (from 18 inches to 48 inches) and different connection types. Wrong part, wrong fit, no dice.
- Poking the pilot orifice too aggressively. Never use a drill bit or anything that can enlarge that opening. You’ll end up with a dangerously large pilot flame that wastes gas and can damage the heater.
- Ignoring the smell of gas. If you smell gas, stop right there. Turn off the gas supply at the meter, ventilate the area, and call your gas company and a plumber from a safe location.
Cost & Time Breakdown
Fixing a pilot light issue is usually one of the cheaper repairs you can tackle around the house.
| Task | DIY Cost | Pro Cost | Time |
|---|---|---|---|
| Cleaning Thermocouple/Pilot | $0 - $5 (for sandpaper/canned air) | $125 – $250 (service call) | 20-30 minutes |
| Replacing Thermocouple | $10 – $25 (for the part) | $150 – $300 | 30-45 minutes |
| Replacing Pilot Assembly | $25 – $50 | $200 – $400 | 45-60 minutes |
| Replacing Gas Control Valve | Not recommended for DIY | $400 – $800+ | 1-2 hours |
Tips & Prevention
- Keep the area clean. I tell folks to vacuum dust and lint from around the base of the water heater now and then. Less junk down there means less junk getting pulled into the burner chamber.
- Look at your flame. Once or twice a year, check that pilot. A healthy flame is crisp and blue. If it’s yellow or wavering, something’s building up.
- Know your water heater's age. If your unit’s over 10 years old, parts like the thermocouple are living on borrowed time. Don’t be shocked when one gives up.
- Consider a sealed combustion unit. Next time you replace the water heater, look at models with a sealed combustion chamber. They pull air from outside, so basement dust and drafts don’t mess with them.
When to Call a Professional
You can fix a lot of pilot light issues yourself. But there are times to set the tools down and call a licensed plumber. If you smell gas at any point, that’s your stop sign. If you’ve already replaced the thermocouple with the correct part and the pilot still won’t stay lit, the trouble is probably deeper in the gas control valve. And I’m gonna say it straight: messing with the gas control valve isn’t a DIY move. It takes the right know-how to replace and test safely. If you see heavy rust, corrosion, or water leaking around the gas valve or the base of the tank, that’s a bigger failure, and it needs a pro looking at it right away. I pulled a water heater in Frisco last month that had exactly this leak — looked minor at first, but the valve body was rusted through. That thing was toast.
Related Articles
Keep troubleshooting with these hand-picked guides from FixlyGuide:
- The Secret Culprit Behind Your Leaky Refrigerator (It’s Not Always the Water Line) — Discover the most common, often overlooked, reasons your refrigerator is leaking water and how to fix them with simple DIY steps.
- The Secret Culprit Behind Your Leaking Refrigerator (It’s Not Always a Big Fix) — Discover the most common and often overlooked reasons why your refrigerator is leaking water on the floor, and how to fix them yourself.
- Your shower's cold? 3 sneaky reasons your hot water vanishes — Tired of your hot shower turning lukewarm unexpectedly? We uncover the three most common culprits, from a hidden part in your water heater…
- That Annoying Water Heater Popping Sound? It's Trying to Tell You This One Thing — A popping water heater usually signals a common issue: sediment buildup. Learn why it happens and how to fix it with a simple flush.
- Why Your Hot Water Only Lasts 5 Minutes (And How to Fix It FAST) — If your hot showers are cut short, it's likely a simple issue with your water heater's dip tube, heating elements, or thermostat. Most home…
- The Secret Reason Your Furnace Turns On and Off So Much (It's Not What You Think) — Short cycling strains your furnace and wastes energy. Learn the most common surprising causes and how to fix them to restore efficient heat…
Should you do this yourself?
Answer five quick questions before you start. Safety outranks savings every time.
Your experience with work like this
How high do you have to work?
Does the job involve any of these?
Will it need a permit?
Specialty tools
Free and instant. Educational guidance only — not a quote, inspection, or professional diagnosis.
Estimate your own project cost
National averages are a starting point. Enter your details for a range that fits your house.
Water heater replacement cost
- Unit$550 – $1,400
- Installation labor$350 – $900
- Removal & disposal$60 – $150
- Permit & inspection$50 – $200
These estimates reflect typical US installed costs. Get 2–3 written quotes before committing.
Educational estimate only — always confirm with written local bids.
What should this project cost?
Enter your project details for a realistic cost range before you call anyone.
Common repairs run $150–$650; repipes and water-heater replacements reach $1,500–$4,500.
- Regional adjustment
- National average
- Labor share (typical)
- ~$754
- Quotes to collect
- 3 written estimates
Educational estimate based on national averages — not a binding quote. Always confirm with written local estimates.
Fixly Project Decision Box
- DIY difficulty
- Moderate
- Estimated time
- 30 minutes – half a day
- Cost level
- Moderate
Main tools / materials
- Adjustable wrench
- Plunger or drain auger
- Bucket and towels
- Thread tape
When to stop and call a pro
- Water you cannot shut off at the fixture or main
- Sewage backing up into more than one fixture
- Water near electrical panels or outlets
- Gas water heater work beyond relighting a pilot
Need professional help?
Get a Licensed PlumberBefore you start
Check the difficulty, permits, and safety risk — then decide whether to call a pro.
Free, no signup required. Estimates are educational guidance, not a quote or an inspection.
Get the print-ready PDF of this guide
A clean, ad-free, printable version you can keep on your phone or pin to the workshop wall. Free with a FixlyGuide account.
- Print-optimized layout
- Tools, materials & every step included
- Saved to your account
Frequently asked questions
How long should I hold the pilot light button down?+
You need to hold it down for a full 45 to 60 seconds after the pilot is lit. This gives the thermocouple enough time to get hot and send the electrical signal needed to keep the gas valve open. Releasing it too early is a very common reason for it to go out.
What does a healthy pilot flame look like?+
A good, healthy pilot flame should be a steady, quiet, blue-ish flame. It should be strong enough to fully cover the top 1/2-inch of the thermocouple sensor. If your flame is yellow, noisy, or seems weak and lifts off the orifice, it's a sign of a dirty or clogged pilot tube.
Can I relight the pilot light myself?+
Yes, relighting the pilot is a standard homeowner task. Instructions are almost always printed directly on a label on the side of the water heater. Just be sure to turn the control knob to 'OFF' for several minutes first to let any unburned gas clear out.
Is a thermocouple expensive to replace?+
No, a thermocouple is one of the most inexpensive water heater parts. You can typically buy a universal replacement at any hardware or home improvement store for $10 to $25. It's a common wear-and-tear item.
Why does my pilot light go out when it's windy?+
This usually happens with older water heaters located in open basements or utility closets. Strong drafts can physically blow the flame out. Ensure there are no open windows or powerful vents pointed at the unit and that the burner access door is properly in place.
What's the difference between a thermocouple and a thermopile?+
They do the same job but a thermopile is a more robust version used in slightly different gas control systems. It's a stack of several thermocouples wired in series to produce a higher voltage (around 750 millivolts). Visually, it's a thicker, more rigid probe, but the principle is the same.
Could the problem be the gas company's fault?+
It's extremely rare, but a widespread gas pressure issue in your area could theoretically affect appliance performance. A more likely scenario is an issue with your own gas meter or regulator. If multiple gas appliances in your home (like your furnace and stove) are also acting up, then it might be time to call your gas provider.
How do I know if the gas control valve is bad?+
This is a process of elimination. If you have cleaned the pilot orifice and thermocouple, the flame is strong and blue, and you've replaced the thermocouple with a new one and the pilot *still* won't stay lit, the gas control valve is the most likely culprit. This is a job for a professional plumber.

Discussion
Loading comments…