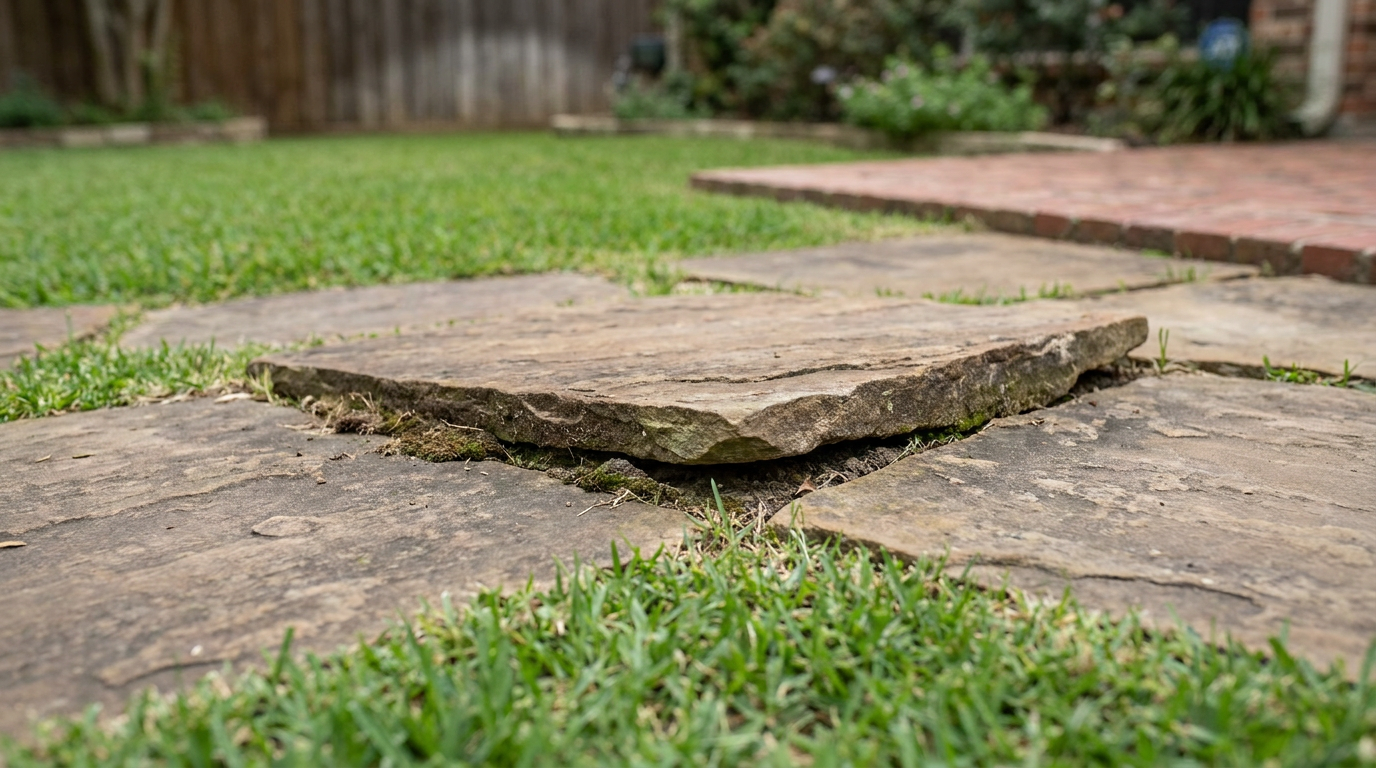
- Frost Heave: The big one anywhere winters freeze. Water expands by 9% when it turns to ice, and ice lenses under the surface can push with enough force to lift thousands of pounds.
- Expansive Clay Soil: Real common in North Texas and plenty of other places. It swells when it gets wet, shrinks when it dries, and slowly but surely moves footings and walls.
- Poor Drainage: If water can’t get away, you’re asking for trouble. Low spots, compacted soil, and downspouts dumping right next to a walkway all create soggy zones that heave.
- Shallow Footings: Fence posts, deck piers, and retaining wall footings that don’t go below the local frost line are sitting ducks for frost heave. Dallas is about 12 inches, but colder places run much deeper.
- Wrong Base Material: Soil, fine sand, or rounded pea gravel under pavers is a bad move. Those materials hold water and don’t lock together like angular crushed stone does.
Landscaping · Deck or fence project
| Project category | Landscaping |
|---|---|
| Problem type | Deck or fence project |
| Trade required | Landscaping |
| Urgency | Planned project |
| Safety risk | Moderate safety risk |
| DIY suitability | DIY for experienced homeowners |
| Cost category | High cost |
| Typical timeline | Most builds 3–10 days depending on size |
| Contractor type | Landscaping contractor |
Repair option
Replace failed boards, posts, and hardware; reseal the surface.
Replacement option
Rebuild when framing or the ledger connection is unsafe.
Common causes
- Rot at posts and ledger
- Storm damage
- Adding outdoor living space
Relevant tools:home improvement material pricesproject cost estimator
Published October 4, 2026Last updated October 4, 2026
Tools & materials you'll need
Affiliate linksAs an Amazon Associate FixlyGuide earns from qualifying purchases — at no extra cost to you. Prices and availability are accurate as of publication and subject to change.
Quick Answer
Landscape heaving is just the ground pushing back. Soil moves up and shoves pavers, fence posts, retaining walls, and even shallow-rooted plants right out of place. Around here, it usually comes from the freeze-thaw cycle in winter, where water in the soil expands as it freezes and forms those nasty ice lenses that jack everything upward. Expansive clay soils do it too, swelling hard when they get wet, and bad drainage makes the whole mess worse by keeping the ground soaked. The fix is pretty straightforward: pull the affected piece, rebuild the base with coarse gravel so water can move through, and set posts or footings below your local frost line.
The Problem
You spend a whole weekend laying those flagstone pavers for a walkway. Or maybe you finally get that fence post dead level. Then a season goes by, and nope — it’s off again. One paver pops up and turns into a trip hazard. A post leans and throws the gate out of square. A corner of your retaining wall starts bulging like it’s trying to escape.
That’s heaving. The soil’s moving your work around. I see it all the time in North Texas, especially after a wet spell followed by a hot, dry stretch. That clay out here can be a real handful. The forces behind it are no joke either — they can lift concrete slabs, crack mortar joints, and wreck a landscape job you thought was done. Ugly? Sure. Dangerous? You bet. A heaved paver can catch somebody’s toe, and a failing retaining wall is a structural problem, not just a cosmetic gripe.
How It Works
To understand heaving, you’ve gotta look a couple feet down, where nobody thinks to check until things start popping up. It comes down to water and soil type. Think of the ground like a giant sponge. Wet soil swells. Dry soil shrinks. Simple, right? But two things make that movement turn mean.
First, there’s the freeze-thaw cycle. When winter shows up, moisture in the top layer of soil freezes. Water expands when it turns to ice — about 9%, actually. That alone can nudge things. The real trouble is ice lenses. As the ground freezes from the top down, water from deeper, unfrozen soil gets pulled upward through capillary action. It freezes onto the bottom of the frozen layer and builds a sheet of pure ice that keeps growing. That upward pressure is brutal. It’ll lift asphalt, concrete, pavers — the whole nine yards. Then spring comes, the ground thaws, and everything turns soft and sloppy. A lot of times, what got heaved never settles back where it started.
Second, you’ve got expansive soil. If your place sits on clay — and a lot of homes in the Dallas-Fort Worth area do — that soil can swell up like a dry sponge soaking in water. Then it shrinks and cracks when it dries out. Over time, that shrink-swell cycle can tilt deck piers, move retaining wall footings, and make a paver patio wave up and down even if it never freezes.
I pulled a water heater in Frisco last month that had exactly this kind of movement around the slab nearby. Different job, same story — the ground had been doing its own thing for years.
Step-by-Step Fix for a Heaved Paver Patio
Let’s hit the most common one: a paver that’s pushed up in a walkway or patio. Don’t just beat it back into place and call it a day. You’ve got to fix what’s going on underneath, and nine times out of ten, that means water.
-
Mark the Problem Area — Before you start prying things up, mark the heaved paver and the pieces around it with chalk or a crayon. Keeps you honest and gives you a clean repair zone.
-
Pry Up the Heaved Paver — Use two flathead screwdrivers or, better yet, a pair of paver extractors. Work them down the sides and lift carefully. Don’t chip the edges if you can help it. Once that one’s out, pull the neighboring pavers you marked.
-
Excavate the Base — This is where the real work starts. Scoop out the sand and gravel base from the open spot. Dig at least 6-8 inches. What you’ll usually find is wet silt or compacted clay that’s holding water like a bucket. Get all of that out.
-
Assess the Drainage — With the hole open, take a good look. Is the soil below soggy? Is this a low spot where runoff naturally collects? If it’s a bigger drainage issue, you might need a French drain nearby. For a small paver repair, though, a better base usually does the trick.
-
Add a New Gravel Base — Fill the hole with proper paver base material. Don’t use sand or pea gravel all the way down. You want 3/4-inch angular crushed gravel for the bottom 4-5 inches. That stone locks together and leaves plenty of open space for water to move out instead of sitting under the pavers.
-
Compact the Gravel — Use a hand tamper and beat it down until it’s firm. No soft spots. No give. This part’s a mini workout, no sugarcoating it. Just make sure the compacted level leaves room for the next layers and the paver itself.
-
Add the Sand Layer — Put about 1 inch of coarse paver sand on top of the compacted gravel. Screed it flat with a small level or a straight 2x4. That’s your bedding layer, and it lets you set the paver at the right height.
-
Re-Set the Pavers — Put the paver back where it came from. It should sit a hair proud — about 1/8 to 1/4 inch higher than the ones around it. Wiggle it a little so it settles into the sand. Then tap it gently with a rubber mallet until it’s flush.
-
Replace Neighboring Pavers — Put the surrounding pavers back in place and keep the joint lines even. A few taps with the mallet will bring them all level with each other.
-
Sweep in Jointing Sand — Pour polymeric sand over the repair. That stuff’s got a polymer in it that hardens when you wet it, locking the pavers together and helping keep weeds down. Sweep it into the joints with a push broom until they’re full.
-
Compact and Final Sweep — Run the hand tamper or plate compactor over the area one more time. That shakes the sand down into the joints. Then sweep off the extra from the surface.
-
Activate the Polymeric Sand — Mist the area lightly with a hose fitted with a gentle shower nozzle. Don’t blast it — you’re wetting the sand, not washing it out. Follow the manufacturer’s instructions, but usually it takes a couple of light passes. Give it 24-48 hours before you walk on it.
Common Causes of Landscape Heaving
Knowing the why helps keep it from coming back. Most heaving problems come back to one of these troublemakers.
- Frost Heave: The big one anywhere winters freeze. Water expands by 9% when it turns to ice, and ice lenses under the surface can push with enough force to lift thousands of pounds.
- Expansive Clay Soil: Real common in North Texas and plenty of other places. It swells when it gets wet, shrinks when it dries, and slowly but surely moves footings and walls.
- Poor Drainage: If water can’t get away, you’re asking for trouble. Low spots, compacted soil, and downspouts dumping right next to a walkway all create soggy zones that heave.
- Shallow Footings: Fence posts, deck piers, and retaining wall footings that don’t go below the local frost line are sitting ducks for frost heave. Dallas is about 12 inches, but colder places run much deeper.
- Wrong Base Material: Soil, fine sand, or rounded pea gravel under pavers is a bad move. Those materials hold water and don’t lock together like angular crushed stone does.
- Tree Roots: A big thirsty tree planted too close to a patio or wall will send roots hunting for moisture. As those roots thicken up, they can lift pavers and even concrete slabs.
- Hydrostatic Pressure: That’s groundwater pressure building up behind a retaining wall. Without drainage — weep holes, gravel backfill, the works — the water-logged soil can shove the wall over or make it heave at the base.
Common Mistakes to Avoid
I’ve seen plenty of decent repairs go sideways because somebody rushed the job or took a shortcut. Don’t do these.
- Just Hammering It Down: The classic bad move. Smacking a heaved paver down with a sledgehammer might make it look fixed for a minute, but the water problem’s still there. It’ll come back, and you might crack the paver too.
- Reusing the Old Base: Don’t just scrape the top layer and drop the paver back in. That old base is usually loaded with silt and clay that hold water. Dig it out and replace it with clean gravel and sand that drain.
- Using the Wrong Sand: Play sand or all-purpose sand won’t hold up in the joints. It washes out. Polymeric sand is the right stuff there. For bedding, you need coarse, angular sand, not that dusty fine stuff.
- Ignoring Drainage: If that area turns into a swamp after rain, fixing one paver is only a patch. Step back and look at the whole yard. Does the downspout need an extension? Does the grade need to change so water moves away from the patio?
- Setting Posts in Concrete Alone: In a wet area, digging a hole and filling it with concrete can backfire. The footing can get grabbed by frost and lifted. Better to dig a wider hole, put a few inches of gravel at the bottom for drainage, set the post, then pour the concrete.
- Building Retaining Walls Without Drainage: A retaining wall is basically a dam. If water can’t get out, pressure builds and the wall starts failing. Any wall over 2 feet high needs a perforated drainpipe at the base and a gravel column behind it.
Cost & Time Breakdown
Fixing a small section of heaved pavers is a solid DIY project. Once you get into bigger drainage problems or a wall that’s failing, that’s pro territory.
| Task | DIY Cost | Pro Cost | Time |
|---|---|---|---|
| Repairing 1-3 Heaved Pavers | $20 - $50 (for gravel, polymeric sand) | $150 - $350 | 2-4 hours |
| Resetting a Heaved Fence Post | $30 - $60 (for concrete, gravel) | $200 - $400 | 3-5 hours |
| Fixing a Small, Bulging Retaining Wall Section (under 3 ft high) | $100 - $300 (for blocks, gravel, adhesive) | $750 - $1,500+ | 1-2 weekends |
| Installing a French Drain (50 ft) | $250 - $500 (for pipe, fabric, gravel) | $2,000 - $5,000+ | 1-2 weekends |
Tips & Prevention
An ounce of prevention saves you a pile of work later. Landscaping’s no different.
- Plan for Drainage First: Before you build anything, watch what water does in your yard during a hard rain. Don’t put a patio or walkway in a natural drainage path unless you’ve got a proper drainage system in place, like a French drain.
- Extend Your Downspouts: A ton of heaving next to a house starts with roof runoff. Use downspout extensions to move water at least 6-10 feet away from your foundation and any patios or walkways.
- Dig Deeper: Always check your local frost line. For anything structural — deck footings, fence posts, gate posts — the bottom of the footing has to be below that line. In North Texas, that’s about 12 inches, but in colder states it can be 48 inches or more.
- Use the Right Base: A proper paver base isn’t optional. Plan on 4-6 inches of compacted 3/4-inch crushed angular stone with 1 inch of coarse sand on top. No shortcuts.
- Compact in Lifts: When you’re building up the base, don’t dump 6 inches of gravel in the hole and hope for the best. Add it in 2-3 inch layers, or “lifts,” and compact each one before the next.
- Maintain Your Joints: Check your paver joints every spring. If the sand washed out, sweep in new polymeric sand so the pavers stay locked tight and water doesn’t sneak underneath.
When to Call a Professional
If you’re fixing a few pavers or one fence post, this is a good DIY job. But some situations are too big or too risky to mess with yourself. If you’ve got a retaining wall more than 3-4 feet high that’s leaning, bulging, or cracking, stop and call a licensed landscape contractor or structural engineer right away. A failing wall can let go without warning. Same goes for widespread heaving across a big patio or driveway, or if the problem is close to your home’s foundation. That’s when you need a pro to figure out the drainage or soil issue and bring in the right equipment to excavate and regrade if needed.
Related Articles
Keep troubleshooting with these hand-picked guides from FixlyGuide:
- The #1 Secret to Edging Flower Beds That Last Years (and Resist Weeds) — Discover the crucial, often-skipped step that ensures your landscape edging stays put and keeps weeds out for years, transforming your flow…
- The #1 Mistake Homeowners Make When Testing Soil pH (And How to Get It Right Every Time) — Learn the critical mistake most homeowners make when testing lawn soil pH and how to perform accurate tests at home for a healthier, greene…
- The #1 Mosquito Mistake Homeowners Make (and 3 Natural Fixes) — Discover the biggest mistake homeowners make in mosquito control and learn three natural, effective fixes to reclaim your backyard without…
- The 5 Spring Yard Prep Mistakes That Cost Homeowners Thousands Annually — Avoid costly landscaping errors by understanding common spring yard preparation mistakes and how to properly ready your lawn and garden for…
- The 3 Hidden Water Sources Breeding Mosquitoes in Your Yard (And How to Eliminate Them) — Naturally control mosquitoes in your backyard by targeting and eliminating hidden standing water sources where they breed, using simple, ec…
- Did Wind Damage Your Roof? Find Out Before It's Too Late — High winds can inflict serious, yet subtle, damage to your roof. Learn to spot the hidden signs of wind damage from the safety of the groun…
Should you do this yourself?
Answer five quick questions before you start. Safety outranks savings every time.
Your experience with work like this
How high do you have to work?
Does the job involve any of these?
Will it need a permit?
Specialty tools
Free and instant. Educational guidance only — not a quote, inspection, or professional diagnosis.
Estimate your own project cost
National averages are a starting point. Enter your details for a range that fits your house.
Concrete slab calculator
- Bagged mix (80 lb)$372 – $527
- Ready-mix delivery (1.5 cu yd)$210 – $300
Ready-mix is usually cheaper above ~1 cu yd. Most suppliers have a short-load fee under 3 yd.
Educational estimate only — always confirm with written local bids.
What should this project cost?
Enter your project details for a realistic cost range before you call anyone.
Maintenance projects start a few hundred dollars; full redesigns often $6,000–$15,000.
- Regional adjustment
- National average
- Labor share (typical)
- ~$2,453
- Quotes to collect
- 3 written estimates
Educational estimate based on national averages — not a binding quote. Always confirm with written local estimates.
Before you start
Check the difficulty, permits, and safety risk — then decide whether to call a pro.
Free, no signup required. Estimates are educational guidance, not a quote or an inspection.
Get the print-ready PDF of this guide
A clean, ad-free, printable version you can keep on your phone or pin to the workshop wall. Free with a FixlyGuide account.
- Print-optimized layout
- Tools, materials & every step included
- Saved to your account
Frequently asked questions
Can I just use a sledgehammer to knock a heaved paver back down?+
No, this is the most common mistake. It doesn't fix the underlying water issue that caused the heave, and the paver will just pop back up next season. You also risk cracking the paver or the ones next to it.
How deep should a fence post be to prevent heaving?+
The bottom of the post's concrete footing must be below your local frost line. In a place like Dallas, this is about 12 inches, but in colder climates, it can be 48 inches or more. Always check your local building codes.
What's the best base for a paver patio to prevent heaving?+
The best practice is a 4-6 inch layer of compacted, 3/4-inch angular crushed stone. This provides a stable, interlocking base that allows water to drain through freely, which is the key to preventing frost heave.
My whole patio seems wavy. Is that heaving?+
Yes, widespread waviness is a sign of a systemic issue, likely related to expansive clay soil or improper base preparation across the entire area. A spot fix won't work; you may need to have the entire patio re-leveled by a professional.
Why is my retaining wall bulging in the middle?+
A bulge in a retaining wall is often caused by hydrostatic pressure—water building up in the soil behind it. This indicates a lack of proper drainage, like a missing or clogged drainpipe and gravel backfill. This is a serious issue that needs professional assessment.
Do I have to use polymeric sand between my pavers?+
You don't *have* to, but you definitely should. Regular sand will wash out quickly, allowing water to get underneath and letting weeds grow. Polymeric sand hardens to lock pavers together and seal the joints, dramatically improving stability.
Can tree roots cause heaving?+
Absolutely. Large tree roots growing under a patio or walkway are a common cause of heaving. If you suspect a root is the culprit, you'll have to pry up the pavers and assess the situation, which may involve cutting out the offending root.
Is landscape heaving covered by homeowner's insurance?+
Generally, no. Landscape heaving is typically considered a maintenance issue related to soil movement, which is often excluded from standard homeowner's insurance policies. However, if a heaving-related issue causes sudden, direct damage to your home, there may be some coverage.
Discussion
Loading comments…