
Tools & materials you'll need
Affiliate linksAs an Amazon Associate FixlyGuide earns from qualifying purchases — at no extra cost to you. Prices and availability are accurate as of publication and subject to change.
Quick Answer
Overseeding is the process of spreading new grass seed over your existing lawn to fill in bare spots, improve turf density, and enhance the lawn's overall health and appearance. The most common mistake homeowners make is skipping crucial prep steps like dethatching and aeration, which prevent new seeds from contacting the soil. By properly preparing the soil, applying high-quality seed, and following a precise watering schedule, you can rejuvenate a thin lawn, making it thicker, greener, and more resilient to weeds and pests.
The Problem
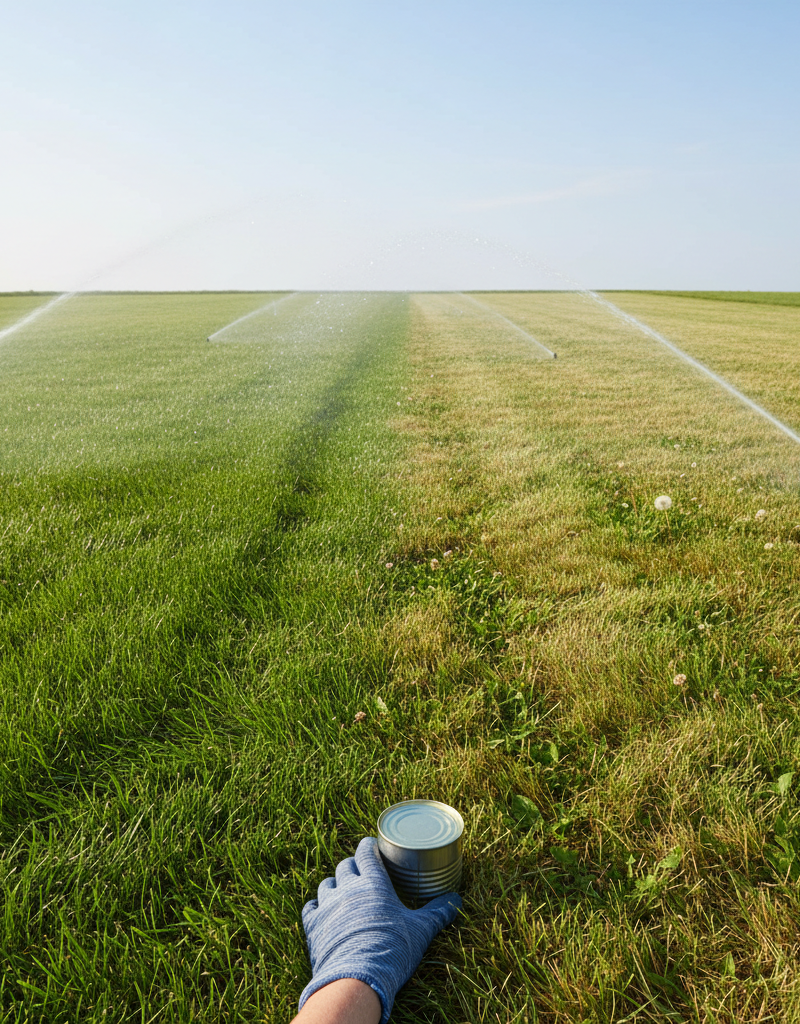
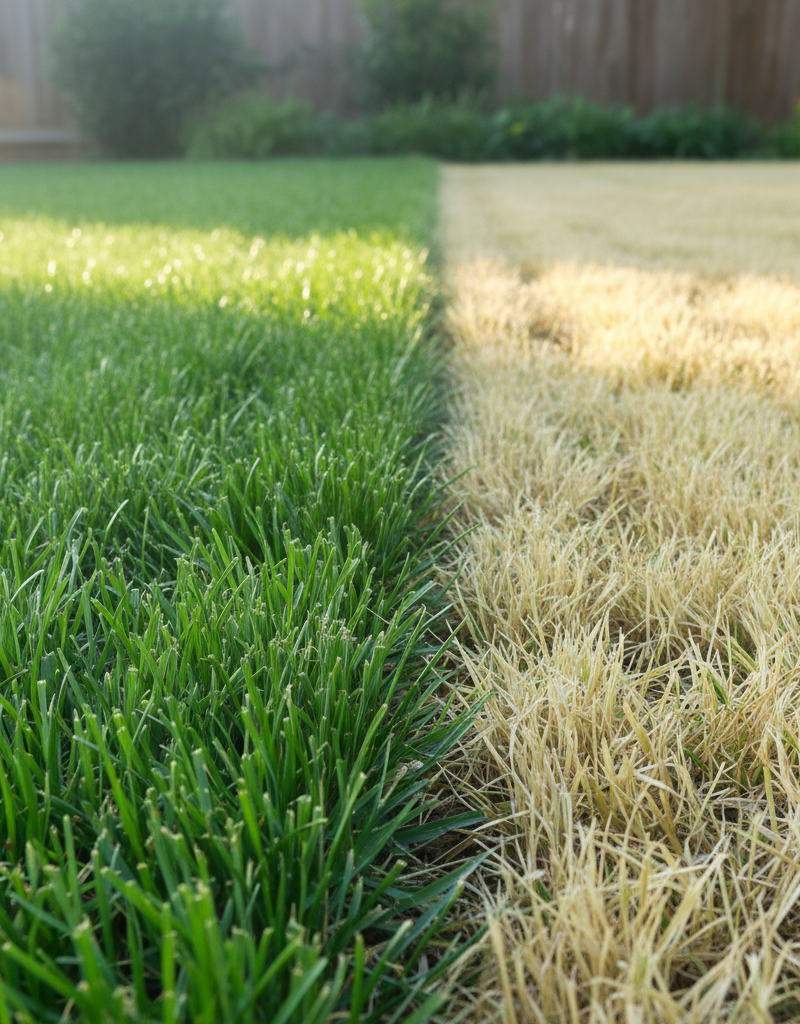
Many homeowners stare out at a lawn that simply isn't what they envisioned: patchy, thin, and often struggling with weeds. This isn't just an aesthetic issue; a thin lawn is a weak lawn. When grass is sparse, it leaves ample room for weeds to take root and thrive, competing for essential nutrients and water. The soil is more exposed, leading to increased evaporation and a higher risk of erosion, especially on slopes. Furthermore, a thin lawn is more susceptible to disease and insect damage because the individual grass plants are under stress and lack the collective resilience of a dense turf. Factors like compacted soil, excessive thatch buildup, insufficient sunlight, improper mowing, inadequate fertilization, and even seasonal stress from heat or drought can contribute to a lawn's thinning over time. Without intervention, these issues perpetuate a cycle of decline, making it harder and harder for your grass to recover and flourish.
How It Works
Overseeding works by introducing new grass plants into an existing lawn, effectively increasing the overall density of turf. When you spread new grass seed, the goal is for these seeds to germinate and establish themselves alongside the mature grass. For this to happen, several environmental factors must align. First, the seeds need direct contact with the soil. This is where preparation steps like dethatching and aeration become critical. Dethatching removes the thick layer of dead grass, stems, and roots (thatch) that can accumulate above the soil line, preventing water, nutrients, and sunlight from reaching the soil and new seeds. Aeration, on the other hand, involves creating small holes in the lawn to alleviate soil compaction. Compacted soil restricts root growth and reduces the availability of oxygen, water, and nutrients. By breaking up compaction, aeration allows roots to penetrate deeper, and it creates ideal pockets for new seeds to settle into, ensuring good seed-to-soil contact.
Once the seeds are properly situated on or slightly within the soil, they need consistent moisture and appropriate temperatures to germinate. Germination is the process where the seed sprouts, sending out a radical (root) and a plumule (shoot). This initial growth relies on the energy stored within the seed. After germination, the seedling begins to photosynthesize, producing its own food, and develops a stronger root system. Regular, light watering is essential during this phase, as the young seedlings are delicate and can dry out quickly. As the seedlings mature, they will grow to blend with the existing grass, filling in thin areas and contributing to a thicker, healthier turf. The new grass introduces genetic diversity, which can improve the lawn's resistance to disease and environmental stressors, leading to a more vibrant and resilient lawn overall.
Step-by-Step Fix
Step 1: Assess Your Lawn & Choose the Right Time – Identify thin areas and schedule your overseeding for optimal conditions.
Walk your lawn and note the areas that are particularly thin, patchy, or where weeds seem to dominate. Pay attention to areas with heavy foot traffic, shade, or sun exposure, as these conditions influence seed selection. The absolute best time to overseed cool-season grasses (like fescue, rye, bluegrass) is late summer to early fall (August to October), when soil temperatures are still warm enough for germination (55-65°F or 13-18°C), but air temperatures are cooler. This timing allows new seedlings to establish strong root systems before the onset of winter and avoids the intense heat and weed competition of summer. For warm-season grasses (like Bermuda, Zoysia, St. Augustine), late spring to early summer is ideal, when soil temperatures consistently reach 65-80°F (18-27°C).
- Tip: Use a soil thermometer to accurately gauge soil temperature, not just air temperature.
- If this doesn't work: If you miss the ideal window, it's generally better to wait for the next optimal season rather than overseeding at the wrong time, which can lead to poor germination and wasted seed.
Step 2: Mow Low & Rake Thoroughly – Prepare the existing lawn for maximum seed-to-soil contact.
Mow your existing lawn shorter than usual, aiming for a height of 1.5 to 2 inches. This reduced height allows more sunlight to reach the new seedlings and minimizes competition from established grass. After mowing, rake the lawn vigorously. The goal here is to remove any loose debris, thatch (the spongy layer of dead grass, roots, and stems above the soil), and dead grass blades that could impede seed-to-soil contact. For significant thatch buildup (more than 0.5 inches thick), consider using a dethatcher or verticutter, which can be rented from home improvement stores. A good raking session after dethatching will remove all the loosened debris.
- Safety Note: When operating power equipment like a dethatcher, wear eye protection and sturdy footwear.
- Tools: Lawn mower, sturdy leaf rake, (optional) dethatcher/verticutter.
Step 3: Aerate Compacted Areas – Improve soil health and create ideal pockets for seed germination.
If your lawn feels hard and compacted, or if water tends to puddle after rain, aeration is highly beneficial. Rent a core aerator (the kind that pulls out small plugs of soil, not just punches holes) from a local equipment rental store. Go over the lawn once or twice, ensuring good coverage. The small holes created by the aerator provide excellent pockets for seeds to fall into, protect them from drying out, and allow roots to grow deeper. Leave the soil plugs on the lawn; they will break down and provide beneficial organic matter.
- If this doesn't work: Without aeration, seeds may struggle to establish in compacted soil, leading to a less dense outcome.
- Pro Tip: Water your lawn a day or two before aerating to soften the soil, making the process easier and more effective.
Step 4: Spread Quality Grass Seed & Starter Fertilizer – Evenly distribute seed and provide essential nutrients for young growth.
Choose a high-quality grass seed appropriate for your climate and sun exposure. Look for blends that fit your specific lawn conditions (e.g., 'shade tolerant' for shady areas, 'drought-resistant' for sunny spots). Read the bag's coverage rate carefully. Using a broadcast spreader for larger areas, or a hand spreader for smaller patches, apply the seed evenly. For most overseeding projects, a rate of 3-5 pounds per 1,000 square feet is typical, but always follow the manufacturer's recommendations. Immediately after seeding, apply a 'starter fertilizer' rich in phosphorus, which promotes root development. Lightly rake the newly seeded areas to ensure good seed-to-soil contact, but avoid burying the seeds too deeply.
- Materials: High-quality grass seed (25–50 lbs for a typical lawn), starter fertilizer.
- Tools: Broadcast spreader or handheld spreader, lightweight rake.
Step 5: Water Diligently & Consistently – Provide the crucial moisture needed for germination and establishment.
This is arguably the most critical step. New grass seeds need constant moisture to germinate and establish. Immediately after seeding and fertilizing, lightly water the entire lawn to moisten the top inch of soil without washing away the seeds. For the next 2-3 weeks, you'll need to water frequently – usually 2-3 times a day – but lightly. The goal is to keep the top inch of soil consistently moist, not saturated. Avoid heavy watering that creates puddles or runoff. As the seedlings emerge and grow, gradually reduce the frequency of watering while increasing the duration, encouraging deeper root growth. After about 4-6 weeks, you can transition back to your regular watering schedule.
- Safety Note: Be mindful of slippery conditions when watering, especially on sloped areas.
- If this doesn't work: Insufficient or inconsistent watering is the most common reason for overseeding failure. Seeds will dry out and die before germinating, or young seedlings will shrivel.
Common Causes
- Soil Compaction: Heavy foot traffic, equipment use, or clay soils can compact the soil, restricting root growth and nutrient uptake, leading to thin grass.
- Thatch Buildup: A thick layer of thatch acts as a barrier, preventing water, nutrients, and air from reaching the soil and grass roots.
- Improper Mowing: Cutting grass too short (scalping) stresses the plants, weakens their root systems, and makes them more susceptible to disease and thinning. Mowing with dull blades can also tear grass, inviting disease.
- Inadequate Fertilization: Lawns require a balanced diet of nitrogen, phosphorus, and potassium. Insufficient or incorrect fertilization can lead to weak, sparse grass.
- Environmental Stressors: Drought, excessive heat, shade from trees or buildings, and even pooling water can cause grass to thin and die back.
- Pests and Diseases: Grubs, chinch bugs, fungal diseases like brown patch or dollar spot can severely damage and thin out a lawn if not addressed.
- Poor Seed Selection: Using grass seed not suited to your climate, soil type, or sun exposure will result in a struggle for the grass to thrive.
Common Mistakes
- Skipping Soil Preparation: The biggest mistake is not dethatching or aerating. Seeds need direct soil contact to germinate. Simply scattering seeds on thick thatch or compacted soil is largely a waste of time and money.
- Wrong Timing: Overseeding during the heat of summer or too late in the fall (for cool-season grasses) causes poor germination rates. New seedlings struggle with heat stress, drought, or lack enough time to establish before winter.
- Inconsistent Watering: New seeds and seedlings need constant, light moisture. Allowing the soil to dry out between waterings, or overwatering to the point of puddling, will kill developing grass.
- Using the Wrong Seed: Applying a shade-tolerant mix to a full-sun area, or vice-versa, will lead to a struggling lawn. Not matching the seed type to your existing lawn also results in an inconsistent appearance.
- Applying Too Much Seed: While it seems counterintuitive, too much seed can lead to overcrowding. Seedlings compete intensely for resources, resulting in weaker, thinner plants that are more prone to disease.
- Fertilizing with the Wrong Product: Using a high-nitrogen 'weed and feed' product immediately after overseeding can damage new seedlings. A starter fertilizer specifically designed for new grass is crucial.
Cost & Time Breakdown
| Task | DIY Cost | Pro Cost | Time |
|---|---|---|---|
| Lawn Assessment & Prep | $0–$100 | $100–$300 | 1–3 hours |
| Dethatching (rental) | $40–$80 | Included in service | 1–2 hours |
| Aeration (rental) | $60–$100 | Included in service | 1–3 hours |
| Grass Seed | $50–$250 | Included in service | N/A |
| Starter Fertilizer | $30–$60 | Included in service | N/A |
| Spreading & Raking | $0 | Included in service | 1–2 hours |
| Watering (initial 3 weeks) | $10–$50 (water bill) | Included in service | 10–20 min/day |
| Total Estimated | $130–$640 | $300–$1,000+ | 5–10 hours + watering |
Tips & Prevention
- Mow High: Keep your grass at a taller height (2.5-3.5 inches) during regular mowing. Taller grass shades the soil, retains moisture, and promotes deeper root growth, making it more resilient to stress and less prone to thinning.
- Water Deeply and Infrequently: Instead of daily shallow watering, water deeply 1-2 times a week (about 1 inch of water) to encourage robust, deep root systems. This makes your lawn more drought-tolerant.
- Soil Test Regularly: Perform a soil test every 2-3 years to understand your soil's pH and nutrient levels. This allows you to amend the soil with the correct fertilizers and amendments, addressing specific deficiencies.
- Fertilize Strategically: Follow a seasonal fertilization schedule tailored to your grass type. Use a slow-release fertilizer in fall and spring to provide consistent nutrients without forcing excessive top growth.
- Address Shade Issues: If parts of your lawn are thin due to excessive shade, consider pruning tree branches to allow more sunlight, or select a grass variety specifically bred for shade tolerance.
- Control Weeds Early: Proactively manage weeds as they emerge. A dense, healthy lawn is the best defense against weeds, but spot-treating or pulling weeds early prevents them from outcompeting grass for resources.
When to Call a Professional
While overseeding is a manageable DIY project, there are situations where calling a professional lawn care service is advisable. If your lawn's thinning is severe and widespread, covering more than 50% of the area, a professional can offer a more comprehensive restoration plan, potentially involving slit seeding or complete resodding. If you suspect underlying issues like significant soil drainage problems, persistent pest infestations (e.g., grubs that don't respond to DIY treatments), or recurring fungal diseases, a professional can accurately diagnose the problem and apply targeted, often commercial-grade, treatments not available to homeowners. Additionally, if you lack the time, proper equipment, or physical ability to perform the necessary dethatching and aeration, a pro can handle these labor-intensive tasks efficiently and effectively, ensuring the best possible start for your new grass seed and saving you potential frustration and wasted resources.
Related Articles
Keep troubleshooting with these hand-picked guides from FixlyGuide:
- The #1 Mistake Killing Your Lawn's Thickness (and 5 Steps to a Lush Comeback) — Discover the crucial error most homeowners make when trying to thicken a thin lawn and follow five simple steps to revive it.
- The #1 Mistake Killing Your Lawn's Thickness (and How to Fix It for $50) — Overseeding can transform a thin, patchy lawn into a lush, vibrant carpet, but many homeowners miss a critical step, hindering success.
- The #1 Mistake Killing Your Thin Lawn (And How to Fix It in a Weekend) — Overseeding your lawn can transform it from thin and patchy to lush, but many homeowners make a crucial mistake that hinders success. Learn…
- The #1 Mistake Killing Your Thin Lawn (and How to Fix It in a Weekend) — Overseeding a thin lawn is crucial for a lush yard, but a common mistake can ruin your efforts before they even begin. Learn how to diagnos…
- The #1 Mistake Killing Your Lawn's Grass (and How to Fix Patchy Spots) — Discover the most common reason for patchy grass and learn how to revive your lawn with targeted, easy-to-follow steps.
- The #1 Mistake Homeowners Make After Finding Missing Shingles (And How to Fix It Right) — Discover the crucial steps to take after a storm rips shingles from your roof, ensuring a proper, lasting repair and preventing costly futu…
Frequently asked questions
How soon can I mow after overseeding?+
Wait until the new seedlings have grown to at least 3 inches tall, usually 3-4 weeks after germination. Make sure to use a sharp blade, and only remove the top third of the grass height to avoid stressing the young plants. Avoid turning sharply with the mower to protect the delicate new grass.
Can I overseed without aerating or dethatching?+
While you can, it's not recommended and significantly reduces success. Without proper preparation, seeds often sit on top of thatch or compacted soil, preventing good seed-to-soil contact, which is essential for germination. You'll get much better results with these prep steps.
How much grass seed do I need for overseeding?+
The amount varies by grass type and the existing condition of your lawn. As a general guideline for overseeding, cool-season grasses typically require 3-5 pounds per 1,000 square feet, while warm-season grasses might need 2-3 pounds per 1,000 square feet. Always check the specific recommendations on your seed bag.
What's the best time of year to overseed?+
For cool-season grasses (fescue, rye, bluegrass), late summer to early fall (August to October) is ideal. For warm-season grasses (Bermuda, Zoysia), late spring to early summer is best. This timing ensures warm soil temperatures for germination and cooler air temperatures for establishment, minimizing weed competition.
Why didn't my new grass grow after overseeding?+
The most common reasons for failure are poor seed-to-soil contact (due to skipping dethatching/aeration), inconsistent watering (seeds dried out or washed away), incorrect timing (too hot or too cold), using expired or low-quality seed, or applying the wrong type of fertilizer (like a 'weed and feed' that harms new sprouts).

Discussion
Loading comments…