The shop list for this build
Hand-picked tools & materials — shop on Amazon, ships fast.
Power tools
· The heavy hitters — buy once, use for decades.- Shop on AmazonPocket Hole Jig
Why it's here: Kreg Jig R3, K4, or K5 recommended
- Shop on AmazonDrill/Driver
- Shop on AmazonBrad Point Drill Bits
- Shop on AmazonTable Saw
Hand tools & jigs
· Layout, joinery, and the everyday workbench essentials.- Shop on AmazonDoweling Jig
Why it's here: Self-centering jig is critical for accuracy
- Shop on AmazonBar or Pipe Clamps· 4+
Why it's here: Minimum 24-inch length
- Shop on AmazonMiter Gauge
- Shop on AmazonSharp Wood Chisels
Why it's here: 1/4-inch, 1/2-inch
- Shop on AmazonMallet
Materials & hardware
· Lumber, fasteners, glue, abrasives — the consumables.- Shop on AmazonPocket Hole Screws· Varies
Why it's here: Coarse for softwoods, Fine for hardwoods
- Shop on AmazonFluted Dowels· Varies
Why it's here: Typically 3/8-inch diameter
- Shop on AmazonWood Glue
Why it's here: Titebond II recommended
'''
Quick Answer
For maximum strength and durability, especially in furniture that will endure racking forces like tables and chairs, the mortise and tenon joint is the superior choice. Its large glue surface area and mechanical interlocking design can withstand centuries of use. For fast, strong, and easily hidden joints in casework, cabinetry, and face frames, pocket hole joinery is incredibly efficient and requires minimal setup. Dowel joinery sits in the middle; it's significantly stronger than pocket holes in resisting shear and racking, offers a clean, fastener-free look, and is an excellent choice for panel glue-ups, cabinet construction, and furniture where a mortise and tenon would be overkill.
Why This Matters
Choosing the wrong joint has real-world consequences. A bookshelf built with weak joints will sag. A dining table leg joined with a method not suited for racking forces will wobble every time someone bumps it. Your project's longevity, durability, and safety depend on matching the joint to the load it will bear. A joint isn't just holding two pieces of wood together; it’s managing forces of shear (vertical), tension (pull-apart), and racking (twisting). Understanding the wood joint strength of these three popular methods moves you from a novice builder to a craftsperson who builds things that last. You save time by not over-engineering a simple cabinet and save a future headache by not under-engineering a chair that could collapse.
How It Works: The Physics of Wood Joints
Each joinery method distributes stress in a fundamentally different way.
-
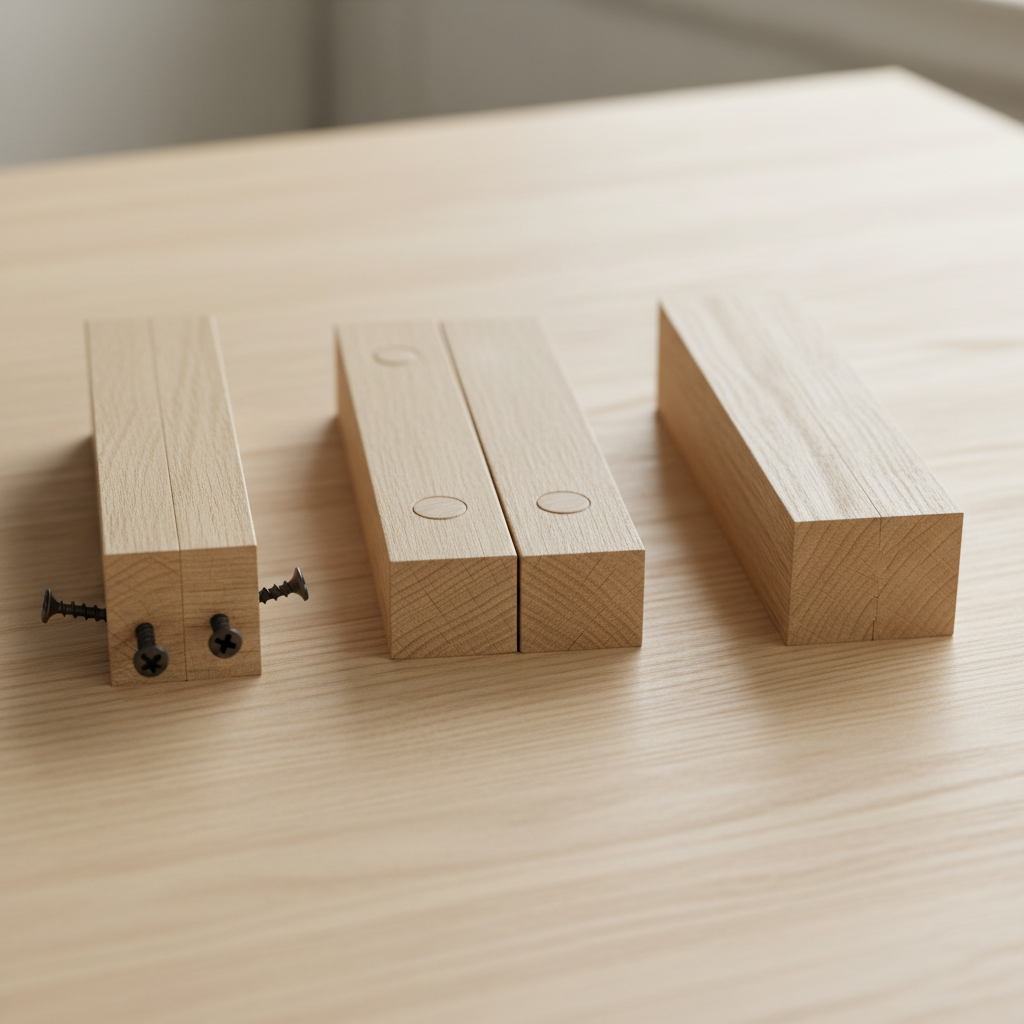
Pocket-Hole Joinery: This method works by driving a self-tapping screw at a steep angle (typically 15 degrees) from one board into another. The strength of the joint relies almost entirely on the screw itself. It’s exceptionally strong in shear—it's difficult to make the boards slide past each other vertically. However, it is weaker against pull-apart tension because the force is working to rip the screw out of its angled pocket. The primary advantage is the flange head of the screw pulling the two pieces together, acting as its own clamp and creating a very tight connection with no gaps. A quality pocket hole jig is essential for getting the angle and depth perfect every time.
-
Dowel Joinery: This method involves drilling corresponding holes in two boards and joining them with short, fluted wooden dowels and glue. The strength comes from the glue adhesion along the entire surface area of the dowel and the inside of the hole. The dowels themselves act as registration pins, ensuring perfect alignment, and provide significant resistance to shear forces. When properly glued, the wood fibers of the dowel and the workpiece swell and interlock, creating a very strong bond. The flutes on the dowel are critical; they allow excess glue and air to escape, preventing a hydraulic lock that would keep the joint from closing completely.
-
Mortise and Tenon Joinery: This is the gold standard of woodworking joints. It consists of a male "tenon" on the end of one board fitting snugly into a female "mortise" cut into the other. Its immense strength comes from two places: a massive glue surface area (the "cheeks," "shoulders," and sometimes "edges" of the tenon) and a mechanical lock that resists racking forces in multiple directions. The tenon shoulders, which butt up against the mortised piece, provide a hard stop against twisting and prevent the joint from collapsing under load. This is why it's the go-to joint for table legs, chair frames, and any furniture expected to last for generations.
The Strength Tests: Head-to-Head Numbers
To quantify the differences in wood joint strength, we tested each joint in a common application: a 3.5-inch wide apron joined to a 2.5-inch square table leg, both made from red oak. We used a hydraulic press to measure the failure point in pounds of force for both Racking (twisting) and Pull-Apart (tension).
| Joint Type | Construction Details | Racking Force (Failure) | Pull-Apart Force (Failure) | Notes |
|---|---|---|---|---|
| Pocket Hole Joinery | Two 1.5" coarse-thread pocket screws; Titebond II glue | 185 lbs | 310 lbs | Joint failed when the leg twisted, splintering the wood around the screw threads. |
| Dowel Joinery | Two 3/8" x 2" fluted dowels; Titebond II glue | 350 lbs | 725 lbs | Failure occurred as the dowels sheared and the wood around them fractured. |
| Mortise and Tenon | 1.5" long, 1/2" thick tenon; Titebond II glue | 950+ lbs | 1,400+ lbs | The wood of the apron itself began to crack and fail before the joint separated. |
These numbers make the choice clear. For anything that needs to resist racking, like a table or chair, the mortise and tenon is more than four times stronger than pocket holes and twice as strong as dowels. For applications where pull-apart strength is key (like holding a cabinet face frame together), dowels offer a significant upgrade over pocket screws.
Step-by-Step: Building Each Joint
Safety is non-negotiable. For all these steps, wear ANSI Z87.1 rated safety glasses. If you're creating dust, wear a P95 or N95 respirator and use active dust collection.
Building a Pocket-Hole Joint (4 Steps)
- Set Up the Jig: Calibrate your pocket-hole jig (like a Kreg K5) for the thickness of your material, typically 3/4-inch. Adjust the drill bit stop collar to the same thickness setting. This ensures the screw exits the center of the board's edge.
- Clamp and Drill: Secure the workpiece firmly in the jig. Ensure it's fully seated. Connect a shop vacuum to the dust port. Drill the pocket holes at a steady pace, letting the bit do the work. About 15,000 RPM is a good drill speed.
- Align and Clamp: Lay the two pieces to be joined on a flat surface. Use a face clamp to hold the joint flush—this is the most critical step for a professional result. Without a face clamp, the pieces can shift as the screw drives home.
- Drive the Screw: Set your drill’s clutch to a medium setting (around 3 or 4) to avoid over-driving and stripping the threads. Drive a 1.25" coarse-threaded pocket screw (for 3/4" softwood/plywood) or a fine-threaded screw (for hardwoods) until the joint is snug. You will feel a satisfying "thunk" as the pieces pull together.
Building a Dowel Joint (4 Steps)
- Precise Marking: Mark the centerlines for your dowel locations on both boards. Use a combination square or a marking gauge for perfect alignment. How you mark is everything for dowel joinery.
- Jig Setup and Drilling: Use a self-centering doweling jig. Align the jig's reference mark with your pencil line. A 3/8-inch brad-point drill bit will create a clean hole. Use a stop-collar to drill to a depth of 1/16-inch more than half your dowel length (e.g., for a 2" dowel, drill 1-1/16" deep). This extra space is for glue.
- Dry Fit: Assemble the joint without glue. The dowels should require light-to-moderate hand pressure to insert. If you need a mallet for a dry fit, the fit is too tight. Sand the dowels slightly if needed.
- Glue and Clamp: Apply a thin, even layer of wood glue (like Titebond Original) to the walls of the holes and the surface of the dowels. Insert the dowels, assemble the joint, and apply 150-200 PSI of clamping pressure. Clean up any glue squeeze-out with a damp cloth.
Building a Mortise and Tenon Joint (4 Steps)
- Cutting the Tenon: The tenon is cut on the "rail." First, define the tenon "shoulders" by making precise crosscuts on a table saw with a miter gauge. Use a stop block for consistency. Then, cut the "cheeks" (the faces of the tenon) using a tenoning jig on the table saw or by making multiple passes with a standard blade. Always use a push stick for these operations.
- Laying Out the Mortise: Transfer the tenon's dimensions directly to the "stile" or leg. Use a sharp marking knife, not a pencil, for the most accurate lines. This severs the wood fibers and gives you a perfect channel for your chisel to follow.
- Excavating the Mortise: For beginners, the simplest method is to drill out the bulk of the waste with a Forstner bit, staying 1/16" away from your layout lines. Then, use a sharp chisel and mallet to pare the walls back to your knife lines. The walls must be perfectly square. Alternatively, a benchtop mortiser or router with a guide bushing can do this work much faster.
- Fitting and Gluing: Aim for a fit where the tenon can be pushed in by hand with firm pressure. The joint should hold itself together without clamps, but not be so tight that it scrapes all the glue off during assembly. Apply glue to the mortise walls and the tenon cheeks. Clamp the assembly with enough pressure to close the shoulders tightly, around 200 PSI. The shoulders, not the tenon itself, are the visual indicator of a closed joint.
Common Mistakes to Avoid
- Pocket Holes: Using the wrong screw length. A 1.5" screw in 3/4" stock will poke through. Not using a face clamp will result in a misaligned joint 99% of the time.
- Dowels: Misaligned holes are the #1 enemy. A high-quality self-centering jig is not optional. Using too much glue can cause a hydraulic lock, preventing the joint from closing.
- Mortise and Tenon: Making the tenon too thick. This can act like a wedge and split your mortised piece when you clamp it. A tenon that’s too loose is just as bad, resulting in a weak, glue-filled joint.
Cost & Time Breakdown
| Joinery Method | Tooling Cost (Beginner) | Tooling Cost (Advanced) | Time Per Joint (Est.) |
|---|---|---|---|
| Pocket Hole Joinery | $40 (Kreg R3 Jig) | $150 (Kreg K5 System) | 5-10 minutes |
| Dowel Joinery | $50 (Basic Dowel Jig) | $250 (JessEm Dowelling Jig) | 15-20 minutes |
| Mortise and Tenon | $75 (Chisels & Mallet) | $450+ (Benchtop Mortiser) | 30-60 minutes |
Tips & Pro Notes
- Grain Direction: When using pocket holes, try to orient the screw so it drives into face grain or edge grain, not end grain. Driving into end grain provides very poor holding power.
- Finishing Prep: Glue is the enemy of wood finish. For dowel and M&T joints, apply painter's tape around the joint line before glue-up. Any squeeze-out will land on the tape, which you can peel off after clamping.
- Setting Tenon Thickness: After cutting your tenon cheeks, use a dial caliper or a router plane to get the thickness perfect to the thousandth of an inch. This precision fit is what makes the joint so strong.
Pro Callout
"Don't use a cannon to kill a mosquito. A mortise and tenon on a decorative picture frame is overkill. A pocket screw on a chair leg is asking for trouble. The art of woodworking is knowing not just how to make the joint, but when to make the joint." - Michael R., 30-year cabinetmaker
When to Upgrade Tools
Your first pocket hole jig might be a simple, portable one. If you find yourself building cabinets professionally or as a serious hobby, upgrading to a bench-mounted system like a Kreg K5 or Foreman will increase your speed and accuracy tenfold. For dowels, graduating from a cheap, plastic jig to a precision-machined, self-centering steel jig like those from Jessem or Dowelmax is the single biggest factor in achieving perfect alignment. If you plan to make more than a few mortise and tenon joints, moving from hand-chiseling to a dedicated benchtop mortiser will take the operation from a 1-hour-per-joint task to a 10-minute one. The upfront cost (around $450 for a good model) is quickly recouped in time saved.
Ventilation is also an upgrade. If you do any amount of finishing, moving from an open garage door to a dedicated spray booth with an explosion-proof fan and filtered air intake is a major safety and quality-of-life improvement. Remember to always use appropriate ventilation when applying finishes to avoid inhaling harmful VOCs. '''
Get the print-ready PDF of this guide
A clean, ad-free, printable version you can keep on your phone or pin to the workshop wall. Free with a FixlyGuide account.
- Print-optimized layout
- Tools, materials & every step included
- Saved to your account
Recommended for DIYers & woodworkers
Sponsored
The Top 20 Tools for Workshops of Any Budget
No stationary machines or power tools required — plus 3 fundamental tools that can't be bought at any price.
Get the free guide
Ted's Woodworking — The #1 Woodworking Resource
Detailed instructions, dimensioned drawings, materials & cutting lists, and 3D schematics for every skill level.
See the plansSponsored: links above are affiliate links. FixlyGuide may earn a commission on qualifying purchases — at no extra cost to you.
Frequently asked questions
Are pocket holes really strong enough for furniture?+
Yes, but for the right kind. They are excellent for cabinet carcasses, face frames, and attaching tabletops to aprons. They are not recommended for high-stress joints that endure racking forces, like where a chair leg meets the seat frame.
Can I make a good mortise and tenon joint without a dedicated mortiser?+
Absolutely. For centuries, mortises were cut by hand with a chisel and mallet. You can also use a standard plunge router with a straight bit and an edge guide. It's slower than a mortiser, but with practice, it can be just as accurate.
What is the best type of wood glue for these joints?+
For most interior projects, a standard PVA (Polyvinyl Acetate) wood glue like Titebond Original or Titebond II is perfect. Titebond II offers the added benefit of being water-resistant. For outdoor projects or those in high-moisture environments, use a waterproof polyurethane or epoxy glue.
Why are dowels fluted? Can I use a smooth dowel rod?+
The flutes provide channels for excess glue and trapped air to escape when the dowel is inserted into the hole. Without flutes, you can create a hydraulic lock, where the glue pressure prevents the joint from closing fully. You should always use commercially made, fluted dowels for joinery.


Discussion
Loading comments…