Tools & materials you'll need
Affiliate linksAs an Amazon Associate FixlyGuide earns from qualifying purchases — at no extra cost to you. Prices and availability are accurate as of publication and subject to change.
Quick Answer
If your light switch isn't working, the most common culprits are a tripped circuit breaker, a loose wire connection, or a worn-out switch mechanism. By safely cutting power and checking these elements, you can often restore function in less than an hour, most often requiring only a screwdriver and a voltage tester to ensure safety.
The Problem
You flip the switch, and nothing happens. No light, no fan—just silence. A dead light switch can be a frustrating mystery, especially when power seems to be working elsewhere in the room or house. It's more than an inconvenience; it can disrupt daily routines and even pose a minor safety concern if it's a primary light source in a high-traffic area. While it might seem like a complex electrical issue, often the problem lies in a few common and relatively straightforward areas that a homeowner can safely diagnose and fix.
How It Works
To understand how to fix a light switch, it helps to understand its basic operation. A light switch acts as an on/off valve for electricity. When you flip a switch to the 'on' position, it completes an electrical circuit, allowing current to flow from your home's electrical panel, through the switch, to the light fixture, and then back to the panel. When you flip it 'off,' it breaks this circuit, stopping the flow of electricity. Most standard household switches are single-pole switches, meaning they control one light or outlet from one location. They typically have two screw terminals (one for incoming 'hot' wire, one for outgoing 'hot' wire to the fixture) and a ground screw. Three-way switches, used to control a light from two locations, have an additional 'common' screw and two 'traveler' screws. The switch itself is a mechanical device, containing internal contacts that physically connect or disconnect the wires. Over time, these contacts can wear out, corrode, or a wire connection can loosen due to vibration, heat, or improper installation, leading to intermittent function or complete failure.
Step-by-Step Fix
Safety First – *Always prioritize safety when working with electricity. Ensure the power is OFF at the breaker.
-
Kill the Power – *Locate the correct breaker and switch it off.
- Go to your main electrical panel.
- Flip the breaker for the affected room or the entire house if you're unsure.
- Pro-Tip: If your panel isn't clearly labeled, turn off the main breaker temporarily. Never assume the power is off without testing.
-
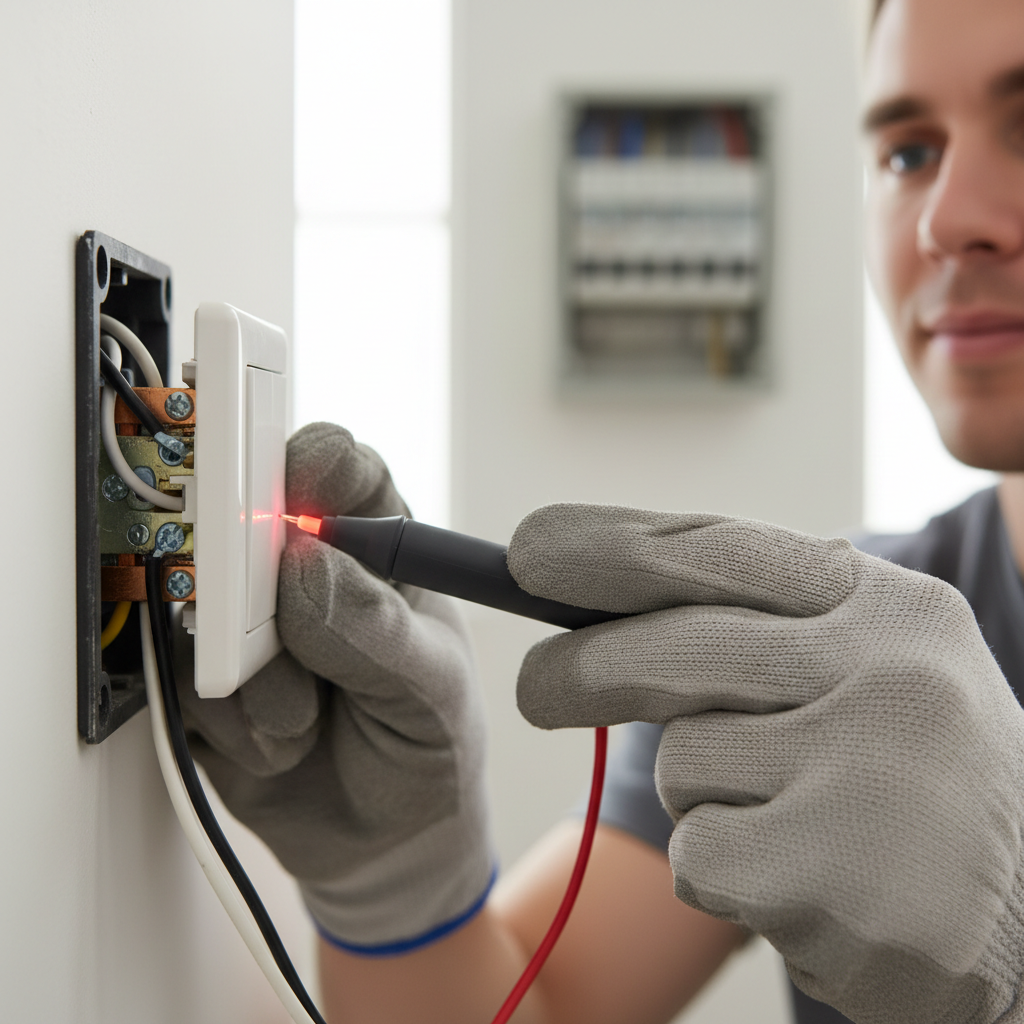
Verify Power is Off – *Use a non-contact voltage tester.
- Before touching any wires, press the non-contact voltage tester against the switch plate.
- If it beeps or lights up, the power is still on. Do NOT proceed; recheck the breaker.
- Once you've confirmed no voltage, you can safely remove the switch plate.
-
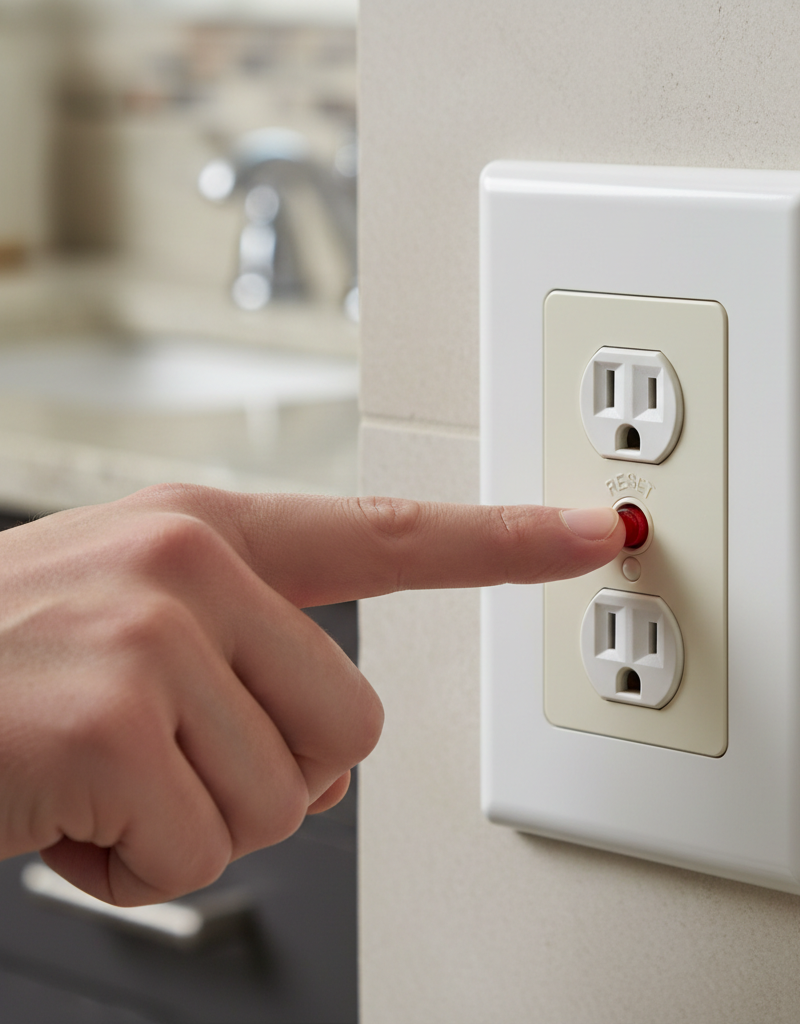
Inspect for Tripped Breaker or GFCI/AFCI – *Check your electrical panel and nearby outlets.
- Sometimes, the problem isn't the switch itself but a tripped breaker or a tripped GFCI (Ground Fault Circuit Interrupter) or AFCI (Arc Fault Circuit Interrupter) outlet upstream.
- Go to your electrical panel and look for any breaker handles that are in the 'off' position or halfway between 'on' and 'off.' Reset any tripped breakers by pushing them firmly to the 'off' position, then to 'on.'
- Check any GFCI or AFCI outlets in the circuit (often found in bathrooms, kitchens, basements, or garages) and press the 'RESET' button if it's popped out.
-
Remove the Switch Plate and Pull Out the Switch – *Unscrew and gently pull.
- Carefully unscrew the two small screws holding the switch plate in place and set the plate aside.
- Using a screwdriver, loosen the screws holding the switch to the electrical box.
- Gently pull the switch out from the box, being careful not to tug on the wires.
-
Examine Wire Connections – *Look for loose or corroded wires.
- With the switch pulled out, visually inspect all the wire connections, especially at the screw terminals.
- Look for loose wires that seem to be barely hanging on, or wires that have pulled out of the terminal screws.
- Also, check for any signs of corrosion or discoloration (darkening or scorch marks) around the wires or terminals, which could indicate a bad connection or overheating.
- If you see any scorch marks or melted plastic, DO NOT attempt to fix it yourself. This indicates a serious electrical fault, and you should call a licensed electrician immediately.
-
Tighten Loose Connections – *Secure all connections.
- If you found any loose wires, use your screwdriver to firmly tighten the terminal screws.
- Ensure the wire is fully wrapped clockwise around the screw terminal (the direction the screw tightens) if it's not a back-wired switch (where the wire pushes into a hole).
- Give each wire a gentle tug to confirm it's secure. Sometimes, a wire can appear tight but still have poor contact.
-
Test for Continuity (Optional, but Recommended) – *Use a multimeter.
- If you have a multimeter, set it to the continuity or ohm setting.
- With the power still off, touch one probe to each of the switch's terminal screws (not the ground).
- Flip the switch. In the 'on' position, the meter should show continuity (a beep or a very low resistance reading). In the 'off' position, it should show no continuity (infinite resistance).
- If it doesn't, the switch itself might be faulty.
-
Replace a Faulty Switch – *If the switch is bad, swap it out.
- If testing indicates a faulty switch, or if tightening connections didn't resolve the issue, it’s time for a replacement.
- Note how the old switch is wired (take a photo with your phone if helpful).
- Carefully disconnect each wire from the old switch.
- Connect the wires to the new switch in the exact same configuration: usually, one black 'hot' wire to one terminal, and the other black 'hot' wire (going to the fixture) to the other terminal. The bare copper or green wire is the ground, connecting to the green ground screw.
- Tool Tip: Use needle-nose pliers to make a tight loop in the wire for screw terminals.
-
Reinstall and Test – *Mount the switch, restore power, and check.
- Once all connections are secure, gently push the switch back into the electrical box.
- Screw the switch securely to the box, ensuring the wires are neatly folded behind it and not pinched.
- Reattach the switch plate.
- Return to your electrical panel and restore power by flipping the breaker back to 'on.'
- Test the light switch. If it works, congratulations! If not, proceed to common causes or consider professional help.
Common Causes
- Tripped Circuit Breaker: The most common and easiest fix. An overloaded circuit or a fault can cause the breaker to trip, cutting power to the switch and everything on that circuit.
- Loose Wire Connections: Over time, electrical connections can loosen due to vibration, expansion, and contraction from heat, or simply improper tightening during initial installation. A loose connection prevents current from flowing reliably.
- Faulty Switch Mechanism: The internal components of a light switch, particularly the contact points, can wear out or corrode after years of use, leading to intermittent or complete failure.
- Wire Damage: Less common, but sometimes a wire inside the wall or within the electrical box can be damaged (e.g., kinked, cut, or chewed by pests), interrupting the circuit.
- Faulty Fixture or Bulb: It might not be the switch at all! The light fixture itself could be bad, or simply the bulb needs replacing. Always rule out the simplest causes first.
Common Mistakes
- Forgetting to Turn Off Power: The most dangerous mistake. Always verify power is off with a voltage tester before touching any wires.
- Not Checking the Breaker First: Many homeowners jump straight to examining the switch when a simple breaker reset would have solved the problem.
- Ignoring GFCI/AFCI Outlets: Forgetting to check and reset GFCI or AFCI outlets in the circuit can lead to unnecessary troubleshooting of the switch.
- Over-tightening or Under-tightening Screws: Screws that are too tight can damage wires; screws that are too loose lead to poor contact and potential hazards.
- Improper Wire Stripping: Stripping too much insulation can create a short; stripping too little can lead to inadequate contact.
- Miswiring a New Switch: Mixing up the 'line' and 'load' wires, or misconnecting traveler wires on a 3-way switch, will prevent it from working correctly.
Cost & Time Breakdown
| Task | DIY Cost | Pro Cost | Time |
|---|---|---|---|
| Reset Breaker / GFCI | $0 | $0 | 5 minutes |
| Tighten Loose Connections | $0 | $75–$150 | 10–20 minutes |
| Replace Standard Switch | $5–$20 | $100–$250 | 20–45 minutes |
| Diagnose Complex Wiring | $0 | $150–$300+ | 30–60 minutes |
| Replace Specialty Switch (Dimmer) | $15–$50 | $150–$300 | 30–60 minutes |
Tips & Prevention
- Regular Breaker Panel Check: Periodically (e.g., quarterly) check your electrical panel for tripped breakers. This can help you identify overloading issues before they cause larger problems.
- Upgrade Old Switches: If you have very old, brittle switches, consider replacing them with newer, higher-quality ones during other electrical projects. Modern switches often have better internal components and easier-to-use screw terminals or push-in connections.
- Proper Wire Installation: When installing or replacing switches, ensure wires are properly stripped (about 1/2 to 3/4 inch of insulation) and securely wrapped clockwise around terminal screws or fully inserted into back-wire holes.
- Don't Overload Circuits: Be mindful of how many high-wattage appliances or lights are on a single circuit. Overloading can repeatedly trip breakers and put stress on your wiring and switches.
- Use Quality Components: Don't skimp on cheap switches or electrical components. Quality materials last longer and perform more reliably.
- Label Your Panel: Keep your electrical panel clearly labeled so you can quickly identify and cut power to specific circuits when needed.
When to Call a Professional
While replacing a standard light switch is a common DIY task, there are clear instances when you should immediately call a licensed electrician. If you encounter any scorch marks, melted wiring, or a burning smell when inspecting the switch or electrical box, it indicates a serious fault that requires professional attention. Similarly, if you've followed all the troubleshooting steps and the switch still isn't working, or if you're dealing with multiple dead switches or flickering lights across several rooms, it suggests a more complex wiring issue within your home's electrical system that extends beyond a simple switch replacement. Any uncertainty about proper wiring, especially with multi-way switches or older, unfamiliar wiring systems, warrants a professional assessment to ensure safety and code compliance. Finally, if you do not feel comfortable working with electricity at any point, always err on the side of caution and contact a qualified professional.
Related Articles
Keep troubleshooting with these hand-picked guides from FixlyGuide:
- Why Your Wall Switch Feels Hot: The Hidden Danger Most Homeowners Miss — A hot light switch isn't just uncomfortable; it's a critical warning sign of potential electrical hazards that demand immediate attention.
- The #1 Mistake Homeowners Make Replacing a Light Switch (And How to Avoid It) — Avoid the most common — and dangerous — DIY light switch replacement mistake with this step-by-step guide.
- The Surprising Culprit Behind Your Wobbling Ceiling Fan (It's Not Always Loose Screws) — A wobbling ceiling fan is annoying and potentially dangerous. Learn how to diagnose and fix the most common causes, from imbalanced blades…
- The #1 Mistake Homeowners Make When a Gas Burner Won't Light (And the Easy Fix) — Before you call a technician, discover the most common, overlooked reason your gas stove burner isn't lighting and how to fix it yourself i…
- Why is Your Light Switch Hot? (The Hidden Danger Most Homeowners Miss) — A hot light switch isn't just uncomfortable; it's a critical warning sign of electrical issues that should never be ignored due to fire ris…
- The $5 Single-Handle Faucet Fix Most Homeowners Ignore (And Pros Charge $200 For) — A single-handle leaky faucet can often be fixed with a simple, inexpensive DIY repair, saving you hundreds on a plumber.
Get the print-ready PDF of this guide
A clean, ad-free, printable version you can keep on your phone or pin to the workshop wall. We'll also send occasional weekly tips matched to your home situation.
- Print-optimized layout
- Tools, materials & every step included
- Unsubscribe anytime
Frequently asked questions
Why would my light switch suddenly stop working?+
The most common reasons a light switch suddenly stops working include a tripped circuit breaker, loose wire connections within the switch box, or the internal mechanism of the switch itself has failed due to wear and tear. Less commonly, there could be an issue with the light fixture or bulb.
Is it safe to replace a light switch myself?+
Yes, for a standard single-pole light switch, it is generally safe for an experienced DIYer to replace it, provided you follow strict safety protocols. Always turn off the power at the circuit breaker and verify it's off with a non-contact voltage tester before touching any wires. If you are unsure or uncomfortable, call a licensed electrician.
What tools do I need to replace a light switch?+
To replace a light switch, you'll typically need a Phillips head screwdriver, a flathead screwdriver, a non-contact voltage tester, and potentially a wire stripper/cutter if you need to re-strip wires. A new replacement light switch will also be necessary.


Discussion
Loading comments…