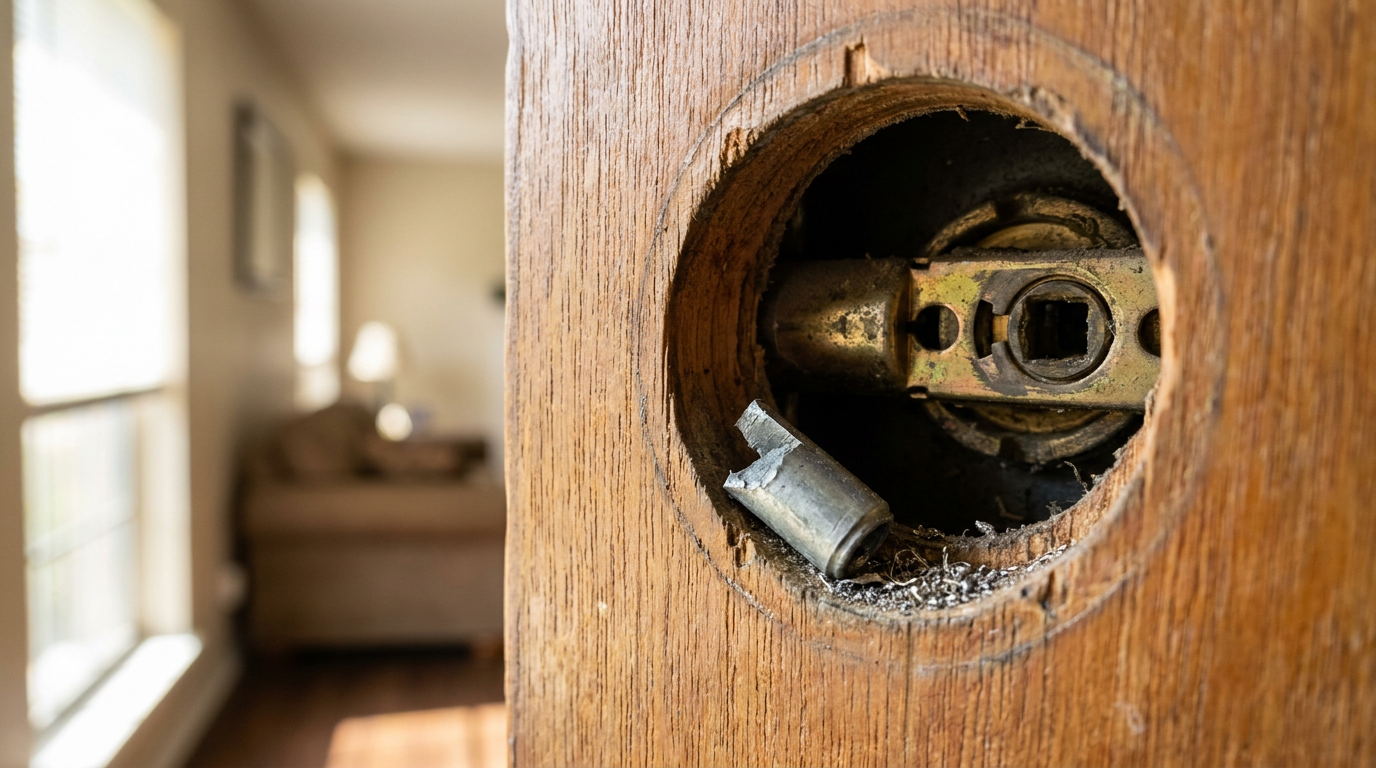
- Sheared Cylinder Tailpiece: Cheap zinc die-cast tailpieces get tired after years of forced turning against a crooked frame. Once the micro-fractures run through that thin bar, one hard twist snaps the metal in half.
- Broken Internal Latch Hub: The cam-gear inside the latch takes a beating every time you turn the key. When the bolt binds against a settling doorframe, too much torque cracks the stamped hub arms and leaves the hole freewheeling.
- Dislodged Plug Retainer Clip: On the back of the cylinder, a little stamped brass or spring-steel C-clip keeps the plug and tailpiece seated. If that clip pops off, the plug pulls forward and disconnects the tailpiece from the latch.
- Stripped Spindle Threads: In older mortise locks and cheaper interior knobs, the square steel spindle depends on set screws threaded right into the shaft. If the set screw loosens or strips, the knob spins freely over the square shaft.
General remodeling · Renovation planning
| Project category | General remodeling |
|---|---|
| Problem type | Renovation planning |
| Trade required | General contracting |
| Urgency | Planned project |
| Safety risk | Low safety risk |
| DIY suitability | Pro recommended |
| Cost category | Major investment |
| Typical timeline | Design and permitting often 2–4 months before work starts |
| Contractor type | General contractor |
Repair option
Phase the work and fix the building envelope first.
Replacement option
Full renovation with permits, design, and a general contractor.
Common causes
- Space no longer fits how the household lives
- Resale preparation
- Deferred maintenance stacking up
Relevant tools:project cost estimatorcompare quoteshome improvement material prices
Published October 22, 2026Last updated October 22, 2026
Tools & materials you'll need
Affiliate linksAs an Amazon Associate FixlyGuide earns from qualifying purchases — at no extra cost to you. Prices and availability are accurate as of publication and subject to change.
Quick Answer
A door lock that turns forever without throwing the bolt or pulling back the latch usually means you’ve got a snapped spindle, a broken tailpiece, or stripped gears inside the lock body. To fix it, pull the interior mounting screws, take off the handle or escutcheon plate, and look at the drive bar in the middle. If the tailpiece isn’t hooked to the latch cam anymore, seat it back where it belongs; if the metal’s sheared, stripped, or cracked, you’re swapping the internal cylinder or putting in a new latch assembly.
The Problem
Not much gets your heart going like turning a key or twisting a deadbolt thumbturn and feeling absolutely nothing. The knob just spins and spins. Or the key slides around smooth as butter in the keyway without catching, while the door stays locked shut—or worse, won’t latch at all.
That’s what we call “freewheeling.” Somewhere between the part you touch—the key cylinder or exterior lever—and the bolt buried in the door edge, the mechanical link broke or let go. The lock cylinder might still read your key’s bitting just fine, but the rotation’s got nowhere to go. No dice.
If the door’s open, that’s a nuisance you can usually handle before supper. If the door’s locked shut with you outside, now you’ve got to be careful or you’ll chew up the jamb. Either way, keep cranking and you’re only grinding broken pot metal into shavings, and that makes the whole mess worse.
How It Works
Every normal residential lock—tubular, cylindrical, or mortise—runs on a mechanical drivetrain. Stick a key into a pin-tumbler cylinder, and the bottom pins line up at the shear line. That frees the plug to turn. Coming out the back of that rotating plug is a flat or cross-shaped steel bar called the tailpiece (or spindle in lever and knob locks).
[Key Cylinder] ──> [Tailpiece / Spindle] ──> [Latch Cam Hub] ──> [Deadbolt / Latch]
 (Rotates plug)       (Flat drive bar)        (Cruciform / slot)    (Extends into frame)
That tailpiece slides right into a stamped-metal hub inside the latch body. The hub acts like a cam: turn it 90 to 180 degrees and it catches an internal retractor slide tied to a return spring, pulling the deadbolt or spring latch back out of the strike plate.
If that flat tailpiece twists off from fatigue, or the stamped hub inside the latch cracks—which I see a lot in zinc-alloy parts—the plug just spins in empty space. The cam never gets the word to move. On commercial gear or heavier residential hardware, a clutch can also slip on purpose to stop brute-force attacks, and then the handle spins free without moving the latch.
Step-by-Step Fix
Follow these steps to find the disconnect, pull back the stuck bolt, and get the lock working right again.
1. Isolate the Failure Point
Open the door if you can, or work from whichever side gives you access to the mounting fasteners. Turn the exterior key and watch it: does it spin with zero resistance, or does it hit a rubbery, “spongy” stop? Then try the interior thumbturn or knob. If the interior side works and the exterior key spins forever, the issue is right in the cylinder tailpiece or the exterior drive cam. If neither side moves the bolt, the latch itself has blown apart inside.
- Shine a bright flashlight into the gap between the door and the jamb.
- Check whether the bolt’s partly thrown or fully jammed into the frame.
2. Retract a Trapped Bolt (If Door Is Stuck Shut)
If the mechanism freewheels and you’re locked out with the door latched, you’ve got to bypass the disconnect. For an interior passage or privacy knob, slide a flexible plastic shim or putty knife between the door and strike plate at a 45-degree angle to depress the spring latch. If it’s a deadbolt, you can’t shim it; you’ll need to remove the accessible handle or escutcheon plate and grab the drive hub directly.
- Work a stiff 1-inch putty knife against the bevel of the latch bolt to push it back.
- If you’re on the inside, skip straight to Step 3 and take the lock off the door face.
3. Back Out the Interior Mounting Screws
Find the two machine screws that hold the interior rose plate or thumbturn assembly to the door face. They’re usually Phillips-head screws spaced about 1-1/2 to 2 inches apart. Back them out counterclockwise with a manual #2 Phillips screwdriver, not an impact driver—those things love stripping screw heads.
- Tool requirement: Standard #2 Phillips screwdriver.
- Caution: Keep one hand on the outside side; once those screws come out, the exterior cylinder can drop right onto your floor or porch.
Door Exterior           Door Core             Door Interior
┌──────────────┐    ┌──────────────┐    ┌──────────────────────┐
│ Key Cylinder │───>│ Latch / Cam  │<───│ Thumbturn / Knob     │
│  & Tailpiece │    │  Drive Hole  │    │  (Remove 2 screws)   │
└──────────────┘    └──────────────┘    └──────────────────────┘
4. Pull Both Trim Halves Off the Door
Slide the interior knob or thumbturn straight off the door. Then pull the exterior lock body out from the outside face. At that point, you should see the bare 2-1/8-inch cross-bore hole running through the door, with the rectangular latch housing hanging in the core.
- Set the loose parts on a clean rag or magnetic tray so tiny detent springs and screws don’t disappear.
- Wipe out any loose metal filings or gray zinc powder inside the bore with a shop towel.
5. Inspect the Cylinder Tailpiece and Spindle
Look at the metal rod sticking out the back of the cylinder or handle you just removed. On deadbolts, that’s a flat, ribbon-like steel blade about 1/8-inch thick and 1 to 1-1/2 inches long. On doorknobs, it’s often a square or half-round spindle. Check for twisting, hairline stress cracks, or a clean snap.
- If the tailpiece’s broken in two, you’ll probably find the other half still jammed in the latch hub.
- If the tailpiece looks fine, check the C-clip or retaining ring at the base of the lock cylinder plug; if that clip slipped off, the tailpiece simply backed out of the plug.
6. Test and Manually Actuate the Latch Hub
Look straight through the door bore hole at the latch mechanism. In the center, you’ll see a stamped hub with either a horizontal slot, a cruciform (+ shape), or a square cutout. Stick a flathead screwdriver right into that slot and turn it toward the door jamb—usually 90 to 180 degrees.
- If the bolt moves in and out smoothly, the latch is fine and the problem was just a slipped or sheared tailpiece.
- If the hub just spins in circles without moving the bolt, the internal linkage is broken—the latch itself is toast and needs replacement.
7. Remove the Faulty Latch Assembly
To pull a busted latch, take out the two wood screws holding the latch faceplate to the edge of the door. If the latch is stuck in the bore, slide a screwdriver through the center drive hub hole and tug firmly toward the door edge. The whole cartridge should come out of the 1-inch edge-bore hole.
- If the bolt won’t retract and keeps the door locked against the frame, use a flat screwdriver in that hub hole to pry the slider arm back toward the hinges with moderate force.
- Verify the backset measurement: measure from the edge of the door to the center of the 2-1/8-inch hole. It’ll measure either 2-3/8 inches or 2-3/4 inches.
 Door Edge                      Backset Distance
 ┌──────┐          │<──────────────────────────────────────>│
 │ Face │          │                                        │
 │ Plate│          ▼                                        ▼
 │  ┌───┴───────────────────┐                         (Center of)
 │  │      Latch Body       │                          2-1/8" Hole
 │  │                       │      ┌────────────┐           │
 │==│   Deadbolt / Latch    │======│ Drive Hub  │           │
 │  │                       │      └────────────┘           │
 │  └───┬───────────────────┘                               │
 └──────┘                                                   │
8. Prep and Configure the Replacement Latch
Grab your new latch—most off-the-shelf replacements are adjustable—and make sure the backset matches your door. Most modern units flip between 2-3/8 inches and 2-3/4 inches with a simple twist-and-pull on the housing. Make sure the bolt’s beveled face points the right way: the ramp has to face the door jamb so it depresses automatically as the door shuts.
- Set the deadbolt latch to the retracted position before you put it into the door.
- Slide the latch into the edge hole and fasten it flush with two 3/4-inch wood screws.
9. Realign the Tailpiece and Cylinder
Take the exterior cylinder and feed the tailpiece straight through the cross-shaped or slotted hub in the latch. If you’re working on a deadbolt, watch the orientation closely: a lot of brands want the tailpiece horizontal when the bolt’s retracted and vertical when it’s thrown, or the other way around depending on the cam design.
- If the tailpiece is loose, seat its notched end back into the plug retainer and lock it in with the factory retaining ring or E-clip.
- Hold the exterior rose plate snug against the door skin so the tailpiece stays fully inserted through the latch hub.
10. Mount the Interior Trim and Fasten
Line up the interior turn piece or knob with the tailpiece sticking through. Push the interior plate flush against the door face. Start both machine screws by hand through the interior plate and into the threaded bosses on the exterior housing so you don’t cross-thread anything.
- Tighten the screws evenly—three turns on the top, three turns on the bottom—to keep pressure balanced across the door face.
- Snug them until firm (roughly 25 to 30 inch-lbs of torque); don’t reef on them with a power driver, or you’ll bow the latch housing and bind the works.
11. Complete Dynamic Alignment Checks
Leave the door wide open. Turn the key three or four times and make sure the bolt throws and retracts cleanly. Turn the inside thumbturn. You want solid stops at both ends of the rotation—no endless spinning, no sloppy play. Then close the door and test it again.
- If the lock works fine open but spins or binds when closed, the bolt’s hitting the frame; shift the strike plate on the jamb.
- Spray a quick 0.5-second burst of dry PTFE or lock-grade graphite powder right into the keyway to keep the tumbler plug moving with minimal friction.
Common Causes
So why do locks suddenly spin without grabbing? Nine times out of ten, it comes back to a mechanical disconnect inside the drive:
- Sheared Cylinder Tailpiece: Cheap zinc die-cast tailpieces get tired after years of forced turning against a crooked frame. Once the micro-fractures run through that thin bar, one hard twist snaps the metal in half.
- Broken Internal Latch Hub: The cam-gear inside the latch takes a beating every time you turn the key. When the bolt binds against a settling doorframe, too much torque cracks the stamped hub arms and leaves the hole freewheeling.
- Dislodged Plug Retainer Clip: On the back of the cylinder, a little stamped brass or spring-steel C-clip keeps the plug and tailpiece seated. If that clip pops off, the plug pulls forward and disconnects the tailpiece from the latch.
- Stripped Spindle Threads: In older mortise locks and cheaper interior knobs, the square steel spindle depends on set screws threaded right into the shaft. If the set screw loosens or strips, the knob spins freely over the square shaft.
- Clutched Lever Disengagement: Better exterior levers use a breakaway clutch for vandal resistance. If somebody forces it without a key, the handle drops or spins without throwing the latch. That part’s intentional, but worn spring cartridges can make the clutch slip for good.
- Incorrect Backset Installation: Forcing a lock set built for a 2-3/8-inch backset into a 2-3/4-inch prep leaves the tailpiece barely catching the edge of the latch hub. One good door slam can shake it loose and you’re back to endless spinning.
Common Mistakes
Here’s where DIY repairs usually go sideways:
- Forcing the key with pliers when it spins. Once a lock freewheels, wrenching on it won’t magically catch an internal gear. You’ll just snap the key off inside the brass cylinder plug and turn a cheap latch swap into an expensive cylinder extraction or rekey job.
- Blaming the cylinder when the latch is broken. Homeowners buy pricey replacement locks all the time because the key spins freely, only to find the original cylinder was perfectly fine. Always pull the lock and test the latch hub with a screwdriver before you buy new hardware.
- Overtightening the mounting screws. Cranking the two interior machine screws down with an 18-volt drill crushes the hollow-core door skin and pinches the latch body inside the bore. That pinch stops the internal slider from moving and makes the spindle bind or shear off early.
- Using sticky lubricants like WD-40 Multi-Use. Reaching for standard water-displacing oil inside a slipping lock attracts dust, pocket lint, and grit. After a few weeks, it gums up the cylinder wafers and tumbler springs. Stick with dry graphite or dry PTFE sprays.
- Discarding manufacturer-specific tailpieces. If you buy a universal cylinder replacement, don’t toss the broken lock’s parts until the new one’s installed. A lot of locks use brand-specific tailpiece lengths or orientations, and aftermarket kits only work if you reuse or modify the modular pieces.
Cost & Time Breakdown
| Task | DIY Cost | Pro Cost | Time |
|---|---|---|---|
| Tailpiece / C-Clip Reattachment | $0–$5 | $90–$150 | 15–20 minutes |
| Standard Latch Mechanism Replacement | $12–$25 | $110–$175 | 20–30 minutes |
| Full Deadbolt / Knob Hardware Swap | $35–$120 | $150–$260 | 30–45 minutes |
| Mortise Lock Spindle / Hub Rebuild | $15–$40 | $175–$300 | 45–60 minutes |
| Jammed Door Bypass & Latch Drill-out | $20–$40 | $175–$350 | 45–75 minutes |
Tips & Prevention
- Fix latch alignment before parts snap. If you’ve gotta hip-check, shoulder-bump, or lift the knob while turning the deadbolt, the lock’s under serious side load. That daily stress is exactly what twists and snaps tailpieces. Get the strike plate lined up now.
- Keep seasonal wood movement in mind. In humid summers or rainy weather, exterior wood doors can swell by up to 1/8 inch. If the lock starts binding or feels stiff as the weather changes, adjust the strike plate or hinge shims before the latch mechanism gives up.
- Inspect the cylinder retaining clip annually. When you’re tightening loose handle screws, spend two extra minutes checking that the exterior cylinder doesn’t have any in-and-out play. Forward play means the rear C-clip is loosening.
- Apply dry PTFE lubricant biannually. A three-second spray into the edge-latch bolt mechanism and the keyway keeps the sliding cams moving freely. Skip silicone or oil-based lubricants entirely.
- Upgrade to ANSI Grade 1 or Grade 2 hardware. Cheap Grade 3 builder-pack locks lean hard on porous zinc die-cast parts. Upgrading to solid forged brass or steel-reinforced deadbolts helps keep those brittle stress fractures from starting in the first place.
When to Call a Professional
If your lock’s freewheeling while deadlocked on an expensive solid-wood or fiberglass exterior door, and you can’t retract the bolt through the latch hub or faceplate, call a licensed locksmith. Heavy prying or drilling without the right lock-opening tools can chew up the custom jamb, ruin the weatherstripping, or split the door edge—then a simple mechanical failure turns into a multi-hundred-dollar carpentry repair. I pulled a water heater in Frisco last month that had exactly this kind of “just turn it harder” damage pattern around a nearby utility door, and it was a mess nobody wanted to pay for twice.
You should also bring in a pro if your house uses high-end multipoint locking systems (common on modern 8-foot patio doors) or antique mortise lock boxes. Multipoint systems tie the handle to gearboxes running top-to-bottom through the door edge; when those gears slip or break, forcing the mechanism will strip out internal drive rods buried inside the custom door stile. A pro’s got the bypass wedges and replacement gearboxes to service these setups without wrecking the frame.
Related Articles
Keep troubleshooting with these hand-picked guides from FixlyGuide:
- The 5-Minute Secret to a Smooth-Turning Door Lock (Stop Jiggling That Key!) — Restore your sticky door lock to butter-smooth operation with this simple, five-minute lubricant trick, saving you frustration and potentia…
- The 15-Minute Deadbolt Swap: Why Your Old Lock Is a Security Risk (And the Cheap Fix) — Upgrade your home security in minutes by learning how to replace a deadbolt lock yourself with this easy-to-follow guide.
- The 3 Hidden Reasons Your Door Won't Latch (And the Easy DIY Fixes) — Frustrated by a door that refuses to latch? Discover the common culprits behind this annoying problem and learn simple, effective DIY fixes…
- The 3 Hidden Reasons Your Window Won't Stay Up (And the Easy Fixes) — Before you call a repairman, learn the three most common reasons your double-hung window won't stay open and how to fix them yourself.
- The #1 Reason Your Doorbell Suddenly Dies (and the 10-Minute Fix) — A non-functioning doorbell is often caused by a tripped transformer, a simple issue homeowners can usually resolve in minutes.
- Bathroom Faucet Handle Stuck? 12 Steps to Free It Without Breaking the Stem — Stuck bathroom faucet handle won't budge? Learn how to safely dissolve hard water scale, use a handle puller, and rebuild the valve cartrid…
Should you do this yourself?
Answer five quick questions before you start. Safety outranks savings every time.
Your experience with work like this
How high do you have to work?
Does the job involve any of these?
Will it need a permit?
Specialty tools
Free and instant. Educational guidance only — not a quote, inspection, or professional diagnosis.
What should this project cost?
Enter your project details for a realistic cost range before you call anyone.
Cost depends heavily on which system turns out to be the source.
- Regional adjustment
- National average
- Labor share (typical)
- ~$1,620
- Quotes to collect
- 3 written estimates
Educational estimate based on national averages — not a binding quote. Always confirm with written local estimates.
Before you start
Check the difficulty, permits, and safety risk — then decide whether to call a pro.
- Estimate this projectGet a cost range for your scope and ZIP before you call anyone.Open
- Get local estimatesSend one request and compare written estimates from vetted pros.Open
Free, no signup required. Estimates are educational guidance, not a quote or an inspection.
Recommended for DIYers & woodworkers
Sponsored
The Top 20 Tools for Workshops of Any Budget
No stationary machines or power tools required — plus 3 fundamental tools that can't be bought at any price.
Get the free guide
Ted's Woodworking — The #1 Woodworking Resource
Detailed instructions, dimensioned drawings, materials & cutting lists, and 3D schematics for every skill level.
See the plansSponsored: links above are affiliate links. FixlyGuide may earn a commission on qualifying purchases — at no extra cost to you.
Frequently asked questions
Why does my key just spin around in the lock without unlocking?+
The key spins freely when the metal tailpiece connecting the key cylinder to the latch shears off, or when the drive hub inside the latch mechanism cracks. Without this physical bridge, the key plug rotates smoothly without transferring torque to the bolt.
Can I open a locked door if the handle is spinning freely?+
Yes, if it's a standard spring latch on an interior door, you can often push it back using a flexible plastic card or a thin putty knife slipped between the door and the frame. For a deadbolt, you must remove the interior trim screws to access the latch drive hub directly.
Is a door lock supposed to turn 360 degrees?+
Standard deadbolts and tubular knob latches are not designed to spin 360 degrees; they should have firm physical stops around 90 or 180 degrees. If your lock turns in infinite loops, a retaining clip, spindle, or internal cam stop is broken.
Do I need to rekey my lock if the handle or key is spinning?+
Usually, no. If the key turns smoothly, the pin tumblers and cylinder plug are intact. The broken component is almost always the flat tailpiece bar on the back or the separate latch cartridge embedded inside the edge of the door.
Why does my interior door knob turn without opening the latch?+
In antique mortise hardware or modular door knobs, a loose set screw on the base of the knob lets the knob rotate freely around the square steel spindle. Tightening the set screw onto the flat or threaded side of the spindle solves the issue in minutes.
What does it mean if a door lever drops or spins down without opening?+
Some commercial and high-grade residential handles feature a freewheeling clutch that deliberately disengages the lever from the latch when locked to prevent forced-entry damage. If the lever spins while unlocked, however, the internal return spring or clutch assembly has failed.
Can I replace just the broken latch without buying a whole new lock?+
Yes, almost all reputable brands sell standalone replacement latch mechanisms that match standard 2-3/8-inch and 2-3/4-inch backsets. You can swap out the failed latch assembly while keeping your existing decorative exterior handle and keyed cylinder.
How do I know what size replacement latch to buy?+
Standard locks use either a 2-3/8-inch or 2-3/4-inch backset. Measure from the flat edge of the door to the exact center of the large 2-1/8-inch bore hole where your knob or deadbolt mounts.
Discussion
Loading comments…