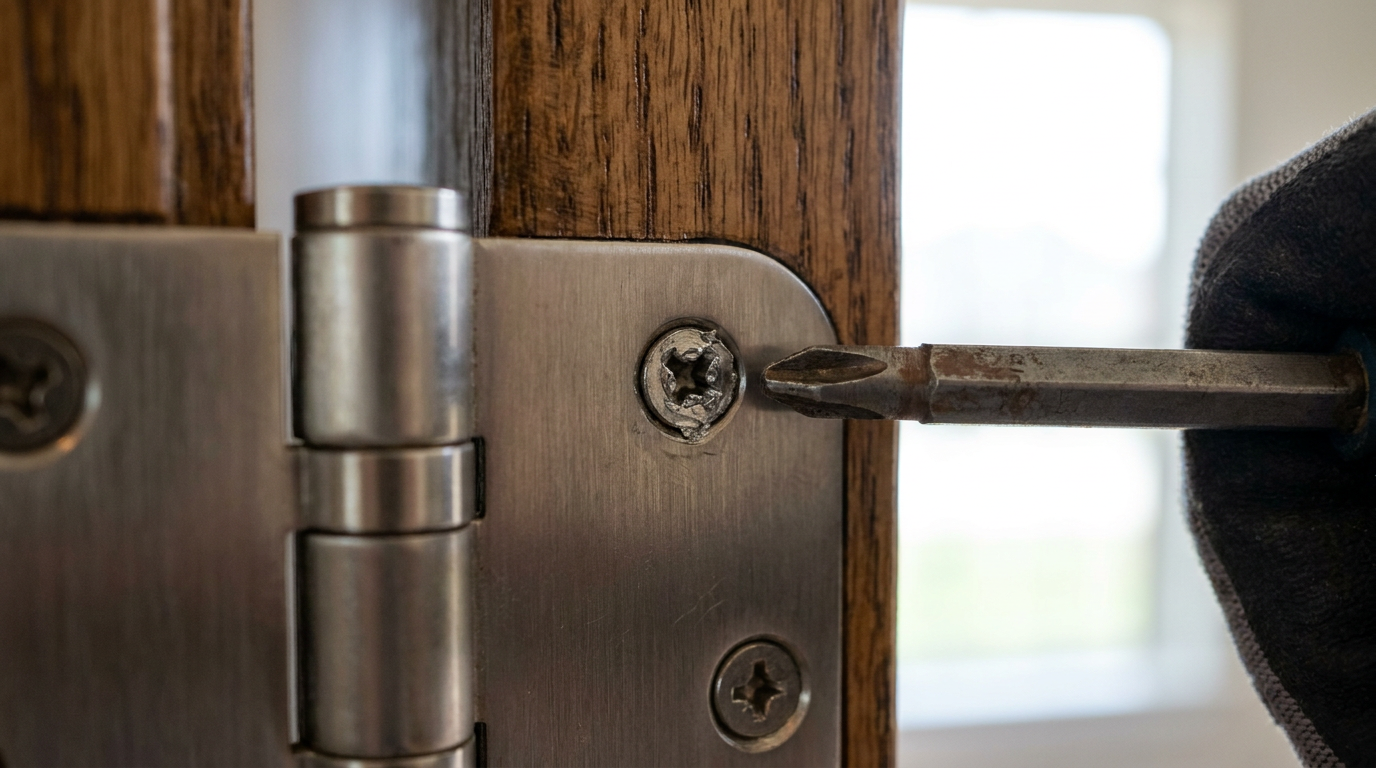
- Using the Wrong-Sized Bit: A 1 Phillips bit in a 2 Phillips screw head is asking for trouble. You get gaps, the bit slips, and it grinds away the metal.
- Low-Quality Screws: The screws that come with a lot of consumer-grade hinges are soft. They look fine, but they won’t take much torque.
- Paint Seal: Years of paint over hinges can glue the screw in place, so you need a big hit of force just to get it moving.
- Applying Force at an Angle: If your drill isn’t dead perpendicular to the screw head, the bit won’t engage all four points of the Phillips head. Then all the force gets dumped onto one or two points, and they strip right out.
- Using a Worn-Out Drill Bit: Drill bits wear down. A rounded tip camming out is no surprise, and a fresh bit usually bites a whole lot better.
General remodeling · Renovation planning
| Project category | General remodeling |
|---|---|
| Problem type | Renovation planning |
| Trade required | General contracting |
| Urgency | Planned project |
| Safety risk | Low safety risk |
| DIY suitability | Pro recommended |
| Cost category | Major investment |
| Typical timeline | Design and permitting often 2–4 months before work starts |
| Contractor type | General contractor |
Repair option
Phase the work and fix the building envelope first.
Replacement option
Full renovation with permits, design, and a general contractor.
Common causes
- Space no longer fits how the household lives
- Resale preparation
- Deferred maintenance stacking up
Relevant tools:project cost estimatorcompare quoteshome improvement material prices
Published October 9, 2026Last updated October 9, 2026
Tools & materials you'll need
Affiliate linksAs an Amazon Associate FixlyGuide earns from qualifying purchases — at no extra cost to you. Prices and availability are accurate as of publication and subject to change.
Quick Answer
To remove a stripped screw from a door hinge, I’d start with a manual impact driver or a screw extractor kit, since those are made to bite into a chewed-up head. If that thing’s still laughing at you, cut a new slot in the screw head with a rotary tool and grab it with a flathead screwdriver. For the ugly ones—the screws that are basically round already—drill the head off or use locking pliers, then fix the wood the right way before you call it a day.
The Problem
You’re replacing an old door, tightening up a sagging one, or maybe just swapping out some brass hinges for a cleaner finish. You grab your drill, flip it into reverse, and... whirrrr-click-click-click. Bit spins. No bite. That Phillips head on the old hinge screw is now a smooth little crater of disappointment. That’s a stripped screw, and it can stop a simple 15-minute door adjustment dead in its tracks.
That soft, cheap metal used in a lot of factory screws—usually brass or low-grade steel—just doesn’t hold up against modern tools or even a stubborn hand with a drill. One slip, and the slots are gone. I pulled a water heater in Frisco last month that had exactly this kind of soft fastener situation—different job, same kind of headache. It’s especially common in older homes where hinges have been painted over a bunch of times, which is basically glue, if we’re being honest. The force needed to break it loose is more than the screw head can take. Now you can’t get the hinge off, and you can’t tighten it. Door’s stuck in limbo. Screw won’t budge.
How It Works
If you understand why a screw strips, you’ve got a better shot at getting it out. A screw turns rotational force, or torque, into linear force, pulling two materials together. The slots in the screw head—Phillips, flathead, star-drive, whatever—are there to give your tool enough bite to apply that torque. When you use the wrong size bit, a worn-out bit, or you come in at an angle, the bit never seats right. Instead of turning the screw, it just chews up the edges.
Hinge screws are often made from softer metals like brass so they match the hinge finish, and that means they deform easy. A hardened steel drill bit will win that fight every time, reaming out the soft metal until there’s nothing left for the bit to grab. That’s called "camming out." Then you’ve got wood sap, humidity-driven corrosion, or layers of paint acting like a lock on the threads in the jamb or the door itself. The torque needed to break that bond can be way more than the screw head can handle. So your job is simple in theory, ugly in practice: find a new way to apply enough torque to break the bond and back the screw out, even though the head’s trashed.
Step-by-Step Fix
Before you start, take the door off the other two hinges. It makes the stuck screw way easier to get at. Drive the hinge pins out with a nail set and a hammer, starting with the bottom hinge. Have somebody hold the door steady as you pull the last pin. Set the door on a pair of sawhorses.
Here are five methods to try, from least destructive to most aggressive.
1. The Rubber Band Trick
- This is the first thing I’d try if the screw’s only partly stripped. Lay a wide rubber band flat over the screw head. Press your drill bit—a fresh, sharp #2 Phillips usually works best—firmly into the rubber band and the screw. That rubber can fill the busted-up gaps and buy you just enough friction to get movement. Go slow, in reverse, with steady downward pressure. Don’t drag an impact driver into this one—just use a regular drill on a low-speed setting.
2. Get a Grip with Locking Pliers
- If the screw head isn’t flush with the hinge, you might be able to grab the sides. Use locking pliers like Vise-Grips and clamp them down as hard as you can on the outside of the screw head. Sometimes you’ll need to pry the hinge leaf up a hair—just a millimeter or so—to get a better bite. Once you’ve got it, don’t yank on it like a screwdriver. Rock the pliers back and forth first to break the screw’s grip in the wood, then turn counter-clockwise.
3. Cut a New Slot with a Rotary Tool
- This one works pretty well. Put a small metal-cutting wheel on a rotary tool, like a Dremel. Carefully cut a new, straight slot across the top of the stripped screw head. Take your time and make a few light passes. Basically, you’re turning that Phillips into a flathead. After that, use a big flathead screwdriver—one that fits tight in the new slot—to get the leverage you need. Put firm pressure on it and turn slow. Safety first: Wear eye protection. Metal-cutting wheels can shatter and send tiny fragments flying.
4. Use a Screw Extractor
- This is the pro move. A screw extractor set is a specialized kit with double-ended bits. First end, the burnisher, drills a clean, centered, conical hole in the screw head. Then you flip the bit to the extractor end. That side has reversed, tapered threads that bite into the hole you just made as you run the drill in reverse. As the extractor goes deeper, it tightens its grip until it overpowers the screw and backs it out. Slow speed matters here. So does pressure. Go too fast and you’ll just wreck the hole you made for the extractor.
5. Drill the Head Off (The Last Resort)
- When the screw is truly mangled, this is your final play. Pick a metal drill bit that’s a little bigger than the screw’s shank but smaller than the head. A 1/4-inch bit is often about right for a standard hinge screw. Center the bit on the screw head and drill straight down. You only want the head, not the wood behind it. After a few seconds, the head’ll separate from the shaft and pop off. Then you can pull the hinge away. The remaining shaft can usually be grabbed with locking pliers and twisted out of the wood.
After the Screw Is Out: Repair the Hole
- Don’t just run a new screw into that widened, beat-up hole. It won’t hold. Fill it properly. The best fix is wood glue and a hardwood dowel, or even a few golf tees in a pinch. Dip the tees in wood glue and tap them into the hole. Let the glue dry completely (at least an hour), then trim the plugs flush with a flush-cut saw or a sharp utility knife. Now you’ve got a solid base to drill a small pilot hole and drive your new hinge screw. That repair will be stronger than the original particleboard or soft pine frame.
Common Causes
- Using the Wrong-Sized Bit: A #1 Phillips bit in a #2 Phillips screw head is asking for trouble. You get gaps, the bit slips, and it grinds away the metal.
- Low-Quality Screws: The screws that come with a lot of consumer-grade hinges are soft. They look fine, but they won’t take much torque.
- Paint Seal: Years of paint over hinges can glue the screw in place, so you need a big hit of force just to get it moving.
- Applying Force at an Angle: If your drill isn’t dead perpendicular to the screw head, the bit won’t engage all four points of the Phillips head. Then all the force gets dumped onto one or two points, and they strip right out.
- Using a Worn-Out Drill Bit: Drill bits wear down. A rounded tip camming out is no surprise, and a fresh bit usually bites a whole lot better.
Common Mistakes
- Increasing the Speed: Once the screw starts to strip, going faster is the last thing you want. That just makes the damage worse. Stop, slow down, and lean into it with more downward pressure.
- Using an Impact Driver on Old Screws: Impact drivers are great for driving screws, but they can be too aggressive for old, soft, or painted-in screws. The hammering can blow the head apart before it breaks loose.
- Ignoring a Partially Stripped Screw: If the bit slips even once, stop right there. Don’t muscle through it. Every extra spin makes the mess bigger and harder to fix.
- Choosing Too Large an Extractor: Use an extractor bit that’s too big and you can crack the screw head completely. Then you’ve got fewer options and a lot more cussing.
- Drilling a Crooked Extractor Hole: If the pilot hole isn’t centered, the extractor goes in crooked and can’t apply even torque. It may snap off inside the screw, and that’s a much uglier problem.
- Re-using the Stripped Hole: Driving a new screw into the old stripped-out hole without filling it first is a waste of time. It’ll never tighten right, and the door’ll sag again in short order.
Cost & Time Breakdown
Your cost will mostly be tools you don’t already own. The repair itself is cheap.
| Task | DIY Cost | Pro Cost (Locksmith/Handyman) | Time (Hands-On) |
|---|---|---|---|
| Remove Single Stripped Screw | $0–$5 (rubber band/pliers) | $125–$200 (service call fee) | 5–20 minutes |
| Screw Extractor Kit Method | $15–$30 (for a decent kit) | Included in service call | 15 minutes |
| Rotary Tool Method | $50–$100 (if you need the tool) | Included in service call | 15–20 minutes |
| Drill-Out & Repair Method | $5–$10 (drill bit, wood glue) | Included in service call | 25–45 minutes (incl. drying) |
Tips & Prevention
- Always Use the Right Bit: Match your bit to the screw head. For most door hinges, a #2 Phillips is standard. A #3 is often used for larger 4-inch commercial hinges. If it wobbles, it’s the wrong size.
- Start Screws by Hand: When you’re installing new hinges, always turn the first few rotations by hand so you know they aren’t cross-threading.
- Upgrade Your Screws: If you’re replacing hinges, toss the cheap screws that came in the box. Buy a box of high-quality steel screws in the same size. A No. 9 x 3/4" screw is a common hinge size, but I’d still take an old one to the hardware store and match it up.
- Drill Pilot Holes: In hardwood doors and jambs, always drill a pilot hole that’s slightly smaller than the screw’s shank. It cuts down friction and the torque needed to drive the screw.
- Use Wax or Soap: For stubborn screws going into hardwood, rub the threads on a bar of soap or some paraffin wax. That little bit of lubrication can cut driving torque by up to 50%.
- Score Paint Around Hinges: Before you yank an old painted-over hinge, use a sharp utility knife and score the paint around the hinge leaf. That breaks the seal and makes screw removal a lot easier.
When to Call a Professional
A single stripped screw is almost always a manageable DIY job. But if you’ve used a screw extractor and the extractor itself snapped off inside the screw, stop there. Drilling out a hardened steel extractor bit without chewing up the door or frame is a whole different animal. A locksmith or a good handyman’s got the specialized tools for that. And if you’re dealing with a heavy solid-core exterior door or a fire-rated door, I’d lean toward calling a pro anyway so the final repair’s strong and secure. A bad exterior-door hang can turn into a security problem, and it can mess with weather-stripping and sealing down the line.
Related Articles
Keep troubleshooting with these hand-picked guides from FixlyGuide:
- That Drywall Hole Isn't Just Ugly, It's a Bat Signal — Learn the pro-approved method for patching drywall holes of any size. We cover the surprising science behind a lasting repair and common mi…
- The Mystery of the Spongy Floor: Is Your Subfloor Failing? — A spongy or bouncy floor can be more than just annoying; it often signals a hidden problem with your subfloor or joists that needs immediat…
- That Annoying Nail Pop Is Back? Your Home's Telling You Something — Nail pops in drywall are a common nuisance, but if they keep reappearing, it's often a sign of deeper structural movement or improper insta…
- The 5-Minute Trick That Often Fixes a Dead Doorbell (No Electrician Needed) — Before you call an electrician for a dead doorbell, learn the surprising common culprit homeowners overlook and how to fix it in minutes.
- That Softball-Sized Hole in Your Wall? Make It Vanish — A softball-sized hole in the drywall is an eyesore, but you can make it disappear. Learn the pro method for a seamless patch that vanishes…
- The Mystery of Your Stripped Cabinet Hinge: One Simple Fix — Don't let a stripped screw hole ruin your kitchen cabinets. I'll show you how to fix that loose hinge fast, often with just a few household…
What should this project cost?
Enter your project details for a realistic cost range before you call anyone.
Cost depends heavily on which system turns out to be the source.
- Regional adjustment
- National average
- Labor share (typical)
- ~$1,620
- Quotes to collect
- 3 written estimates
Educational estimate based on national averages — not a binding quote. Always confirm with written local estimates.
Recommended for DIYers & woodworkers
Sponsored
The Top 20 Tools for Workshops of Any Budget
No stationary machines or power tools required — plus 3 fundamental tools that can't be bought at any price.
Get the free guide
Ted's Woodworking — The #1 Woodworking Resource
Detailed instructions, dimensioned drawings, materials & cutting lists, and 3D schematics for every skill level.
See the plansSponsored: links above are affiliate links. FixlyGuide may earn a commission on qualifying purchases — at no extra cost to you.
Frequently asked questions
What's the best tool for removing a stripped screw?+
A dedicated screw extractor kit is the most reliable tool. It's designed specifically for this job, creating a new hole for a reverse-threaded bit to bite into and remove the screw cleanly.
Can I use WD-40 on a stripped hinge screw?+
It's unlikely to help. WD-40 is a water displacer and lubricant, but the screw is stuck due to stripped metal and thread friction in wood, not rust. It won't hurt, but it probably won't solve the problem.
How do I prevent stripping hinge screws in the first place?+
Use a high-quality, correctly-sized screwdriver or drill bit and apply firm, direct pressure. Always start screws by hand, and for hardwood, lubricate the threads with wax and drill a pilot hole.
What size screw do door hinges use?+
The most common size for residential interior doors is a #9 screw, usually 3/4-inch or 1-inch long. However, it's always best to take one of the old screws to the hardware store to match the size perfectly.
Is it okay to leave an old screw shank in the wall after drilling the head off?+
No, you must remove the remaining shaft. If you can't get it out with pliers, you'll need to drill it out and then fill the hole properly with a dowel and wood glue before installing the new hinge.
Why do my hinge screws keep coming loose?+
This usually means the screw hole in the wood jamb is stripped out. You need to remove the screw, fill the hole with a glued hardwood dowel or golf tees, and then re-drive the screw into that solid repair.
Can I just use a bigger screw in a stripped hole?+
While sometimes a temporary fix, it's not the right way. A larger screw can act like a wedge and may split the door frame, especially on older homes. The proper fix is to fill the hole and re-use the correct screw size.
What's the 'golf tee trick' for stripped screw holes?+
It's a classic woodworking fix. You coat a wooden golf tee in wood glue and tap it into the stripped screw hole. Once the glue dries, you cut the tee flush with the wood, creating a solid plug to drill a new hole into.
Discussion
Loading comments…