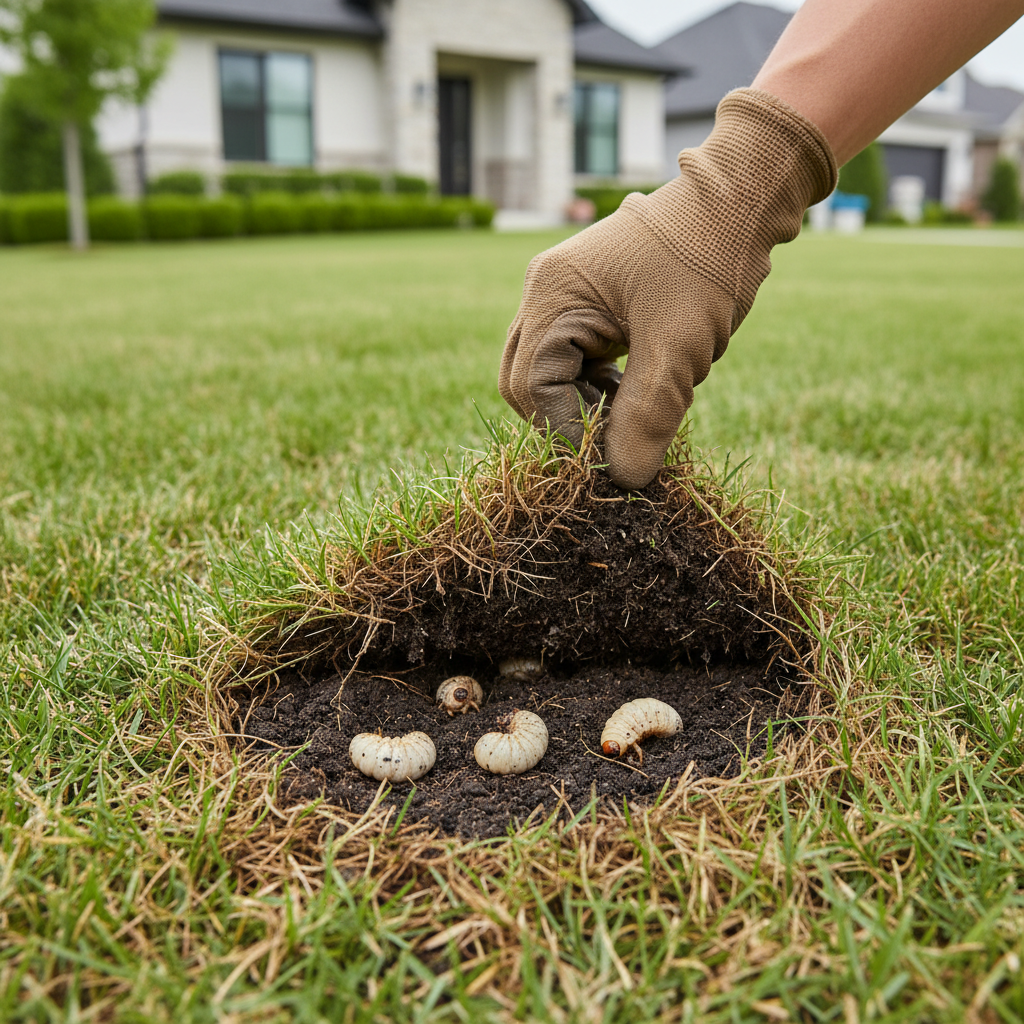
- Confirm the Culprit — It’s not always grubs, folks.
- Before you touch anything else, make sure you’ve actually got grubs. Grab a shovel and dig up a 1-foot by 1-foot section of the damaged area, about 3-4 inches deep. Peel it back slow, like you’re opening up a carpet.
- You’re looking for whitish larvae with brown heads curled into a C. That’s the giveaway.
Landscaping · Deck or fence project
| Project category | Landscaping |
|---|---|
| Problem type | Deck or fence project |
| Trade required | Landscaping |
| Urgency | Planned project |
| Safety risk | Moderate safety risk |
| DIY suitability | DIY for experienced homeowners |
| Cost category | High cost |
| Typical timeline | Most builds 3–10 days depending on size |
| Contractor type | Landscaping contractor |
Repair option
Replace failed boards, posts, and hardware; reseal the surface.
Replacement option
Rebuild when framing or the ledger connection is unsafe.
Common causes
- Rot at posts and ledger
- Storm damage
- Adding outdoor living space
Relevant tools:home improvement material pricesproject cost estimator
Published September 19, 2026Last updated September 19, 2026
Tools & materials you'll need
Affiliate links- AmazonShovel or trowelFor inspecting turf
- AmazonBroadcast or drop spreaderFor even application of granular products
- AmazonGarden hose with sprayerFor liquid products or watering in granules
- AmazonWork glovesProtect hands during digging and chemical application
- AmazonSafety glassesProtect eyes when spreading granules or spraying liquids
- AmazonRakeTo prepare soil for reseeding
As an Amazon Associate FixlyGuide earns from qualifying purchases — at no extra cost to you. Prices and availability are accurate as of publication and subject to change.
Quick Answer
Alright, so you’ve got those ugly brown patches popping up in the lawn, right? You water, you fertilize, and that one spot still won’t green up. I’ve seen it a hundred times. Most of the time, those stubborn dead areas aren’t drought or disease — they’re grubs chewing away under the surface. These little C-shaped pests eat the grass roots, which is basically like cutting off the lawn’s water line from below. The good news? Once you know what you’re looking at, getting rid of them isn’t rocket science. A quick check, the right treatment at the right time, and you can get that yard looking decent again.
The Problem
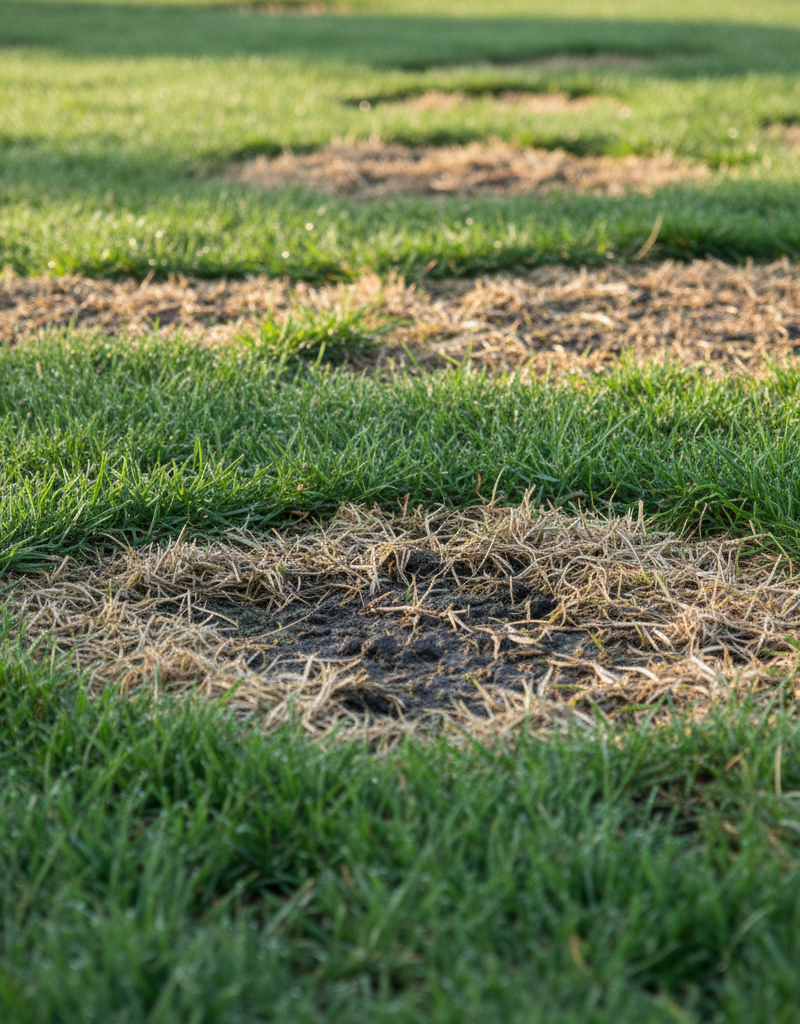
Picture this: it’s a hot summer day, you’re staring out at your yard, and there it is — another brown patch spreading like a bad stain. It looks like drought, but you’ve been watering. Or maybe it’s fungus? You start second-guessing everything. I’ve been on plenty of calls where folks swear the sprinkler’s failing or the dog’s the culprit. Then I peel back a chunk of turf and, sure enough, there they are: fat, white, C-shaped grubs wriggling in the soil. Not pretty. Not harmless, either. They’re tearing up the lawn by eating the root system. If you can lift sections of grass like it’s a loose rug, that’s a big clue. The grass isn’t anchored anymore — it’s been cut loose from the soil by those underground little pests.
How It Works
So how do these little devils wreck a perfectly good lawn? It starts with beetles. Japanese beetles, June bugs, chafers — they lay eggs in the grass, usually in mid to late summer. A couple weeks later, those eggs hatch into larvae, and that’s your grubs. From there, they start feeding on the tender roots of your turf. Think of roots like the straws the lawn uses to drink water and pull up nutrients. Once the grubs chew through them, the straws are gone. The grass can’t take in what it needs, and no amount of watering fixes that. That’s why those spots stay brown and crunchy even after a good rain or a long soak from the sprinkler.
They usually sit about 1 to 3 inches deep in the soil, right where most turf roots are doing their work. As they get bigger, they’ll move closer to the surface and keep feeding. You’ll usually see the worst damage in late summer and early fall, when they’re bigger and hungrier. They stay active until the ground starts freezing, then they go deeper to overwinter and come back up in spring for another round before turning into adult beetles. It’s a nasty little cycle if you don’t break it. I pulled a water-heater-style patch of sod in Frisco last month that had exactly this leak in the lawn — homeowner thought it was irrigation. Nope. Grubs. The raccoons had already found them, too, and the yard looked like somebody’d taken a rake to it.
Step-by-Step Fix
Alright, let’s get these pests out of your lawn. It’s not hard, but you do need to do it right.
-
Confirm the Culprit — It’s not always grubs, folks.
- Before you touch anything else, make sure you’ve actually got grubs. Grab a shovel and dig up a 1-foot by 1-foot section of the damaged area, about 3-4 inches deep. Peel it back slow, like you’re opening up a carpet.
- If you find fewer than 5-6 grubs in that square foot, the damage may be light enough that the lawn can bounce back with good care. More than 10-12, and yeah, you’ve got a real problem on your hands. If you’re somewhere between 6 and 10, it comes down to how rough the lawn looks and how patient you want to be.
- You’re looking for whitish larvae with brown heads curled into a C. That’s the giveaway.
-
Pick Your Weapon — Biological or chemical, know what you’re using.
- You’ve got two main routes: biological options like beneficial nematodes or milky spore, and chemical options like insecticides. Biological treatments run slower but they’re good for prevention and easier on the environment. Chemical products work faster, but you’ve got to apply them carefully.
- For quick knockdown on an active infestation: I usually recommend a chemical grub killer containing trichlorfon or carbaryl. Those work best while the grubs are feeding, which is usually late summer to early fall (August to early October in most northern climates). Read the label for the active ingredient and timing for your area — don’t guess.
- For long-term prevention: Beneficial nematodes, like Heterorhabditis bacteriophora, are microscopic worms that hunt grubs down and kill them. Apply them in late summer or early fall when soil temperatures are between 55-90°F. Milky spore is another biological option, but it only targets Japanese beetle grubs and takes years to really build up.
-
Prep the Lawn — Get it ready for the fight.
- Mow the grass to its normal height. Make sure the soil’s got some moisture in it. If it hasn’t rained recently, water it well for about 20-30 minutes the day before you treat. That helps the product move down into the soil instead of sitting on top like dead weight.
-
Apply the Treatment — Follow those label directions like they’re gospel.
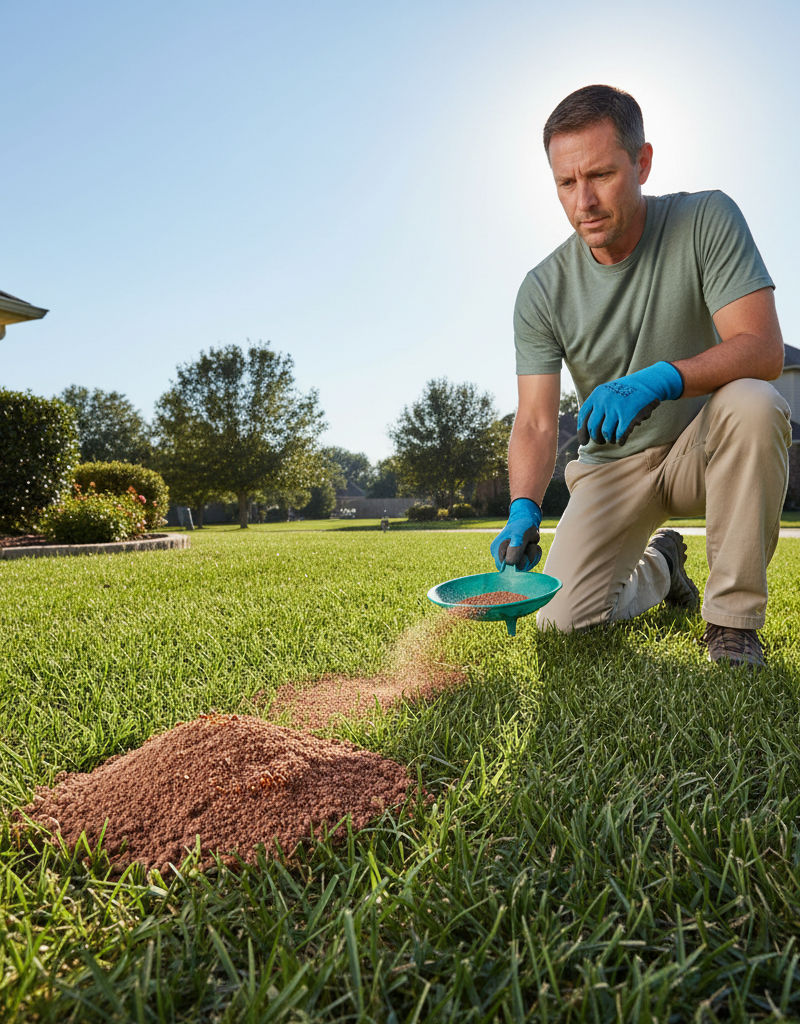
- Chemical Granules: If you’re using granular grub killer, spread it evenly over the bad areas and a bit beyond them too, since grubs don’t stop at the property line. Use a broadcast or drop spreader. Calibrate that spreader based on the label — too little won’t do squat, and too much can burn the lawn or cause trouble for the environment.
- Liquid Sprays: For liquid concentrates, mix them in a sprayer exactly like the instructions say. Apply them evenly. Some products come in hose-end sprayers, which sure do make life easier.
- Beneficial Nematodes: Mix the packet with water as directed and spray it out. Early morning, evening, or a cloudy day is best, because nematodes hate UV light. Water them in right after you apply them.
-
Water it In — Don’t skip this step!
- This part matters for granular products and nematodes. After you spread them, water the area with about 1/2 inch of water. That gets the treatment down where the grubs are feeding. If you’re using a liquid spray, a light watering might be enough, but check the label — every product’s a little different.
-
Maintain Moisture (and patience) — Give it time to do its job.
- Keep the treated area moist for at least a week after application, especially if you used nematodes. Don’t let it dry out. Chemical treatments usually show results in a week or two, while nematodes can take longer.
-
Re-seed or Repair — Bring the lawn back around.
- Once you’re sure the grubs are gone — check again in a couple of weeks by digging up a small patch — you’ll need to fix the damage. Rake out the dead grass, loosen the soil, and overseed with fresh grass seed. Keep the seeded area damp until the new grass gets established. If the damage is pretty bad, you might be better off laying sod instead.
Common Causes
- Beetle Infestations: Simple as that — grubs come from beetles. If you’ve seen a bunch of Japanese beetles, May/June beetles, or European chafers around your yard in late spring or early summer, odds are they’re laying eggs in your grass.
- Over-Irrigation/Lush Lawns: Beetles like healthy, lush lawns for egg-laying. So yeah, a well-kept yard can actually invite them in. Kind of a pain, I know.
- Lighted Areas: Adult beetles, especially June bugs, get drawn to outdoor lights at night, which can bump up egg-laying around those spots.
- Lack of Predators: If your yard doesn’t have birds, moles, or beneficial nematodes helping out, grub numbers can blow up fast.
- Previous Infestations: If you had grubs last year and never treated them, there’s a good chance they’re back in the same area. They tend to return to familiar ground.
Common Mistakes
- Misdiagnosing the Problem: A lot of homeowners think brown patches mean dry soil or fungus. Don’t go spraying fungicide if it’s grubs, and don’t overwater if the roots are already gone. Figure out what’s actually happening first.
- Applying at the Wrong Time: This one gets people all the time. Grub killers work best when the grubs are young and feeding near the surface. If you treat in spring for an active infestation, the grubs may already be bigger, tougher, or close to pupating. Late summer to early fall is the sweet spot for preventative and curative work.
- Not Watering In: I’ve seen folks spread granular grub killer and just leave it sitting on top of the soil. That stuff has to get down to the roots where the grubs are. Water it in, plain and simple.
- Ignoring the Label: Every product has its own directions, rates, and safety steps. Skip that, and you can waste money, miss the problem, or hurt the lawn, pets, or family.
- Treating the Entire Lawn Unnecessarily: If the infestation is only in one small area, you don’t need to blanket the whole yard. Spot treat the damaged area and a buffer around it. Saves money. Cuts down on chemical use too.
- Not Addressing the Root Cause: If beetles keep coming back, killing the grubs alone won’t fix the pattern. You may need to deal with the adult beetles or set up prevention before the next cycle starts.
Cost & Time Breakdown
When it comes to grub control, you’ve got options, and they all cost a little different and take a different amount of time.
| Task | DIY Cost ($) | Pro Cost ($) | Time |
|---|---|---|---|
| Grub Killer (Granular) | 20-50 | N/A | 30-60 min |
| Grub Killer (Liquid/Hose-End) | 15-40 | N/A | 20-45 min |
| Beneficial Nematodes | 25-60 | N/A | 45-90 min |
| Soil Prep & Application | 0 | N/A | 30-90 min |
| Watering & Monitoring | 0 | N/A | Ongoing |
| Re-seeding/Repair | 30-100+ | 150-500+ | 2-4 hours + days |
| Professional Treatment | N/A | 200-600 | 1-2 hours |
Tips & Prevention
- Mow High: Keep the grass a little taller, around 3 inches. That gives the soil more shade and makes it less attractive for beetles to lay eggs. Longer grass usually has deeper roots too, and that helps the lawn handle a little grub pressure.
- Proper Watering: Beetles love lush lawns, but don’t drown the place. Water deeply and less often so the roots grow down instead of staying shallow. About 1 inch of water per week, from rain or irrigation, is a solid target.
- Timely Treatment: The best time for preventative grub control, using products with active ingredients like chlorantraniliprole, is usually June or early July, before the eggs hatch. For curative treatments like trichlorfon or carbaryl, your window is late summer to early fall (August to early October), when the grubs are small and feeding hard.
- Beetle Traps: If you’ve got a real Japanese beetle problem, beetle traps can help, but keep them away from the plants you care about. They attract beetles, so if you hang one right next to your roses, you may just make things worse.
- Introduce Beneficial Insects: Build a healthier little ecosystem in the yard. Encourage birds that eat grubs and beetles, and think about applying beneficial nematodes preventatively each year.
- Regular Inspections: Watch for irregular brown patches, spongy turf, or more animal digging than usual. Skunks, raccoons, and birds love a grub buffet. Catching it early always makes life easier.
When to Call a Professional
Look, I’m all for DIY, but some jobs are better left to the pros. If you’ve treated for grubs once or twice and the brown patches keep coming back, or if the problem is spread across a big area, it’s time to call a licensed lawn care pro. They’ve got commercial-grade products and equipment most homeowners can’t buy, and they know the local pest cycle like it’s written on the back of their hand. Same goes if you’re dealing with a high-value lawn — golf course turf, prize sod, that sort of thing — and you don’t want to risk making it worse. If you’re not sure what pest you’re looking at or you’re uneasy about applying chemicals, don’t mess around. You can do more harm than good. A good pro can diagnose it right, pick the best treatment for your turf, and apply it safely without turning your yard into a science experiment.
Related Articles
Keep troubleshooting with these hand-picked guides from FixlyGuide:
- The #1 Mistake Turning Your Healthy Lawn Brown After Watering — Discover the hidden culprit behind brown spots appearing in your lawn immediately after watering and learn how to correct this common mista…
- The #1 Mistake Homeowners Make When a Lawn Mower Won't Start (And the Easy Fix) — Before you despair, discover the most common culprit behind a non-starting lawn mower and how to fix it in minutes.
- The Weird White Powder Killing Your Lawn (And How to Stop It Fast) — Battling mysterious white powder on your grass? It's likely powdery mildew or white mold. Learn how to identify, treat, and prevent this co…
- The #1 Mistake Turning Your Healthy Lawn Brown After Watering — Discover the crucial mistake many homeowners make that causes brown spots in their lawn right after watering, and how to fix it.
- The #1 Mistake Killing Your Summer Lawn (And How to Fix It in a Weekend) — Overwatering is the silent killer behind many yellow summer lawns, often mistaken for drought. Learn how to diagnose and correct drainage i…
- The Grimy Secret Behind Your Dull Bathroom Faucet — And How to Make It Shine — Discover the real culprit behind your bathroom faucet's dull, grimy appearance and how to quickly restore its shine with a few common house…
Should you do this yourself?
Answer five quick questions before you start. Safety outranks savings every time.
Your experience with work like this
How high do you have to work?
Does the job involve any of these?
Will it need a permit?
Specialty tools
Free and instant. Educational guidance only — not a quote, inspection, or professional diagnosis.
Questions to ask before you sign
Ask every contractor the same questions and the cheapest bid stops looking cheapest. Check them off as you go — your progress is saved on this device.
Free, no signup. Bring this to every walkthrough so you compare bids on the same terms.
What should this project cost?
Enter your project details for a realistic cost range before you call anyone.
Cost depends heavily on which system turns out to be the source.
- Regional adjustment
- National average
- Labor share (typical)
- ~$1,620
- Quotes to collect
- 3 written estimates
Educational estimate based on national averages — not a binding quote. Always confirm with written local estimates.
Handle this before it gets worse
First steps that limit damage, then a way to reach a qualified pro.
- Emergency repair checklistThe first steps that limit damage before a pro arrives.Open
- Get local estimatesSend one request and compare written estimates from vetted pros.Open
- Estimate this projectGet a cost range for your scope and ZIP before you call anyone.Open
Free, no signup required. Estimates are educational guidance, not a quote or an inspection.
Get the print-ready PDF of this guide
A clean, ad-free, printable version you can keep on your phone or pin to the workshop wall. Free with a FixlyGuide account.
- Print-optimized layout
- Tools, materials & every step included
- Saved to your account
Frequently asked questions
How do I know if I have grubs?+
The easiest way is to dig up a square foot of turf about 3-4 inches deep. If you find more than 5-6 C-shaped, whitish grubs with brown heads, you likely have an infestation. Also, look for spongy turf or sections that peel back easily like carpet.
When is the best time to treat for grubs?+
For active infestations, late summer to early fall (August to early October) is ideal when grubs are small and feeding. For preventative measures, applying products in June or early July can stop eggs from hatching and causing damage later.
Are grub killers safe for pets and children?+
It depends on the product. Always read the label carefully for specific safety instructions, re-entry times, and precautions. Some products require pets and children to stay off the treated area for a certain period after application.
Can I use natural methods to get rid of grubs?+
Yes, beneficial nematodes are a popular natural option that works by parasitizing grubs. Milky spore is also effective against Japanese beetle grubs, but it takes longer to establish and build up its efficacy.
Will grubs go away on their own?+
Small populations (fewer than 5-6 per square foot) might not cause significant damage, and your lawn may recover. However, larger infestations will continue to feed and cause widespread damage if not treated.
Why do I keep getting grubs every year?+
Grubs tend to return to areas where adult beetles previously laid eggs. If you have a high population of beetles in your area, or if you haven't implemented preventative measures, reinfestation is common.
Can my lawn recover after grub damage?+
Yes, with proper treatment and care. Once the grubs are eliminated, you'll need to reseed or resod the damaged areas and provide consistent watering and fertilization to help the new grass establish.
What kind of beetles cause grubs?+
Common culprits include Japanese beetles, May/June beetles, European chafers, and oriental beetles. They all lay eggs in the soil that hatch into the destructive C-shaped larvae we call grubs.
Discussion
Loading comments…