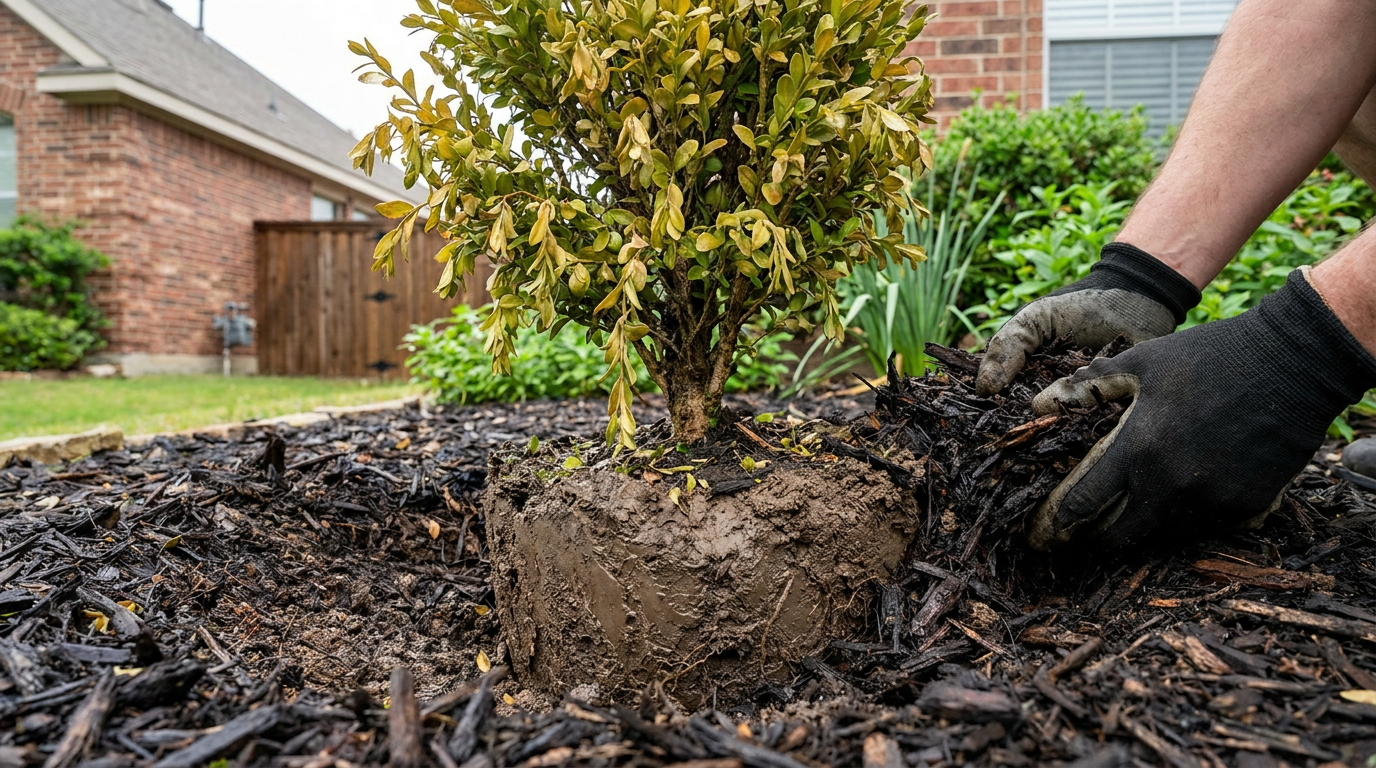
- Dumping potting soil into the planting hole. You want roots to leave the hole and explore native dirt; creating a pocket of potting soil traps roots inside a cozy underground pot and sets up the bathtub effect.
- Stomping down the soil with your boots. You do want to knock out big air voids, but crushing wet backfill turns the soil as dense as brick. Pack it firmly with your bare hands, then let a slow stream of water settle everything naturally.
- Pruning top growth to "balance" root loss. Old-school myth, plain and simple. Leaves make auxin hormones that tell roots to grow and expand; cutting healthy branches removes the plant’s food factories and weakens recovering roots.
Landscaping · Deck or fence project
| Project category | Landscaping |
|---|---|
| Problem type | Deck or fence project |
| Trade required | Landscaping |
| Urgency | Planned project |
| Safety risk | Moderate safety risk |
| DIY suitability | DIY for experienced homeowners |
| Cost category | High cost |
| Typical timeline | Most builds 3–10 days depending on size |
| Contractor type | Landscaping contractor |
Repair option
Replace failed boards, posts, and hardware; reseal the surface.
Replacement option
Rebuild when framing or the ledger connection is unsafe.
Common causes
- Rot at posts and ledger
- Storm damage
- Adding outdoor living space
Relevant tools:home improvement material pricesproject cost estimator
Published November 21, 2026Last updated November 21, 2026
Tools & materials you'll need
Affiliate linksAs an Amazon Associate FixlyGuide earns from qualifying purchases — at no extra cost to you. Prices and availability are accurate as of publication and subject to change.
Quick Answer
If new landscape plants are dying right after you set them, I’d start by gently digging down 3 to 4 inches beside the root ball and checking two things: root depth and whether the thing’s sitting in a swamp. In over 80% of residential failures, shrubs and perennials are either stuck in glazed clay holes that work like underground bathtubs, or the root flare got buried under nursery potting soil and mulch, which smothers the crown and cuts off oxygen. Pull smothered plants up so the top of the root flare sits 1 to 2 inches above the existing soil grade, slice the bound outer roots, backfill with unamended native dirt, and quit doing those daily light sprinkles—go to deep soaking once or twice per week.
The Problem
Not much bugs a homeowner more than dropping a few hundred bucks at the nursery on boxwoods, hydrangeas, or native perennials, then watching them shed leaves, yellow out, or turn into brittle sticks three weeks later. You watered every day. You poured premium potting mix in the hole. You put down fresh dark mulch. Still, the plant looks like it’s on its last leg.
Most folks figure a struggling shrub just got “transplant shock” and there’s nothing to do about it. That’s not really how it works. Transplant shock isn’t some random act of nature—it’s a stress response. When a plant goes from a loose, automated nursery pot into compacted residential soil, its vascular system gets hammered.
In heavy native soils—especially the dense Houston black clay across North Texas and compacted subsoils across newer suburban tracts nationwide—the usual homeowner method can straight-up kill the plant. Dig a little hole, dump loose organic soil in there, and plant too deep, and you’ve built a submerged reservoir that holds stagnant water, rots root caps, and suffocates feeder roots before they ever get a chance to grab hold.
I pulled a water heater in Frisco last month that had exactly this kind of “looks fine from the top, dead underneath” problem—different job, same lesson. If the roots can’t breathe, that plant’s toast.
How It Works
If you want a newly planted shrub or perennial to live, you’ve got to understand how roots actually work. They don’t just drink water. They breathe too. Root systems need gas exchange through macropores in the upper 6 to 12 inches of soil.
INCORRECT: The Bathtub Effect            CORRECT: Raised & Feathered
(Digging a bowl into clay)             (Sitting proud, native backfill)

  Surface      [Mulch Piled High]         Surface      [2-3" Mulch Donut]
  ====v===================v====          ====v===================v====
     |  Amended Topsoil   |                 \   Native Backfill   /
     |    (Peat/Compost)  |                  \                   /
     |     +---------+    |                   \   +---------+   /
     |     | Smothered|    |                    \ |  Exposed |  /
     |     | Rootball |    |                     \|Root Flare| /
     +-----+---------+----+                      +---------+--+
     | Standing Water Line|                      | Undisturbed|
     | (Clay Bathtub)     |                      | Base Soil  |
     +--------------------+                      +------------+
When you dig a deep, smooth-sided hole in compacted soil and fill it with fluffy, porous garden soil, you make what landscapers call the “bathtub effect.” Water moves fast through the loose potting mix, hits the dense native soil at the sides and bottom, and stops cold. The hole fills up like a bucket. Now the roots are sitting in anaerobic muck, starved for oxygen. The good aerobic bacteria die off, and water molds like Phytophthora and Pythium move in and start chewing through the roots from the tips inward.
Flip side? Water doesn’t always move nicely from one soil type to another. When peat from the nursery sits against dense clay without real root-to-soil contact, water often runs around the root ball during runoff instead of soaking into it. So the outside gets wet, and the core stays dry. No dice.
The spot where the top-most main root comes out of the stem—the root flare—needs to stay exposed to air. If you bury it under even 2 inches of soil or mulch, the bark stays damp all the time, oxygen can’t get in, and adventitious girdling roots start wrapping the trunk. Slow death. That’s the game.
Step-by-Step Fix
Here’s the field-tested way I’d dig out, correct, and reset a struggling new plant before root rot makes the decision for you.
1. Perform the Excavation Moisture & Depth Check —
Use a hand trowel and carefully scrape back mulch and soil 2 inches away from the main stem until you find the first primary woody lateral root. Check whether that root flare is sitting below the surrounding lawn grade, and feel the soil 4 inches deep to see if the root zone is swampy or bone-dry.
- Tool: Hand trowel or thin wooden dowel.
- Indicator: If the root flare is hidden more than 1 inch under dirt, or if water glistens in the hole after light rain, the plant was installed wrong.
2. Excavate the Plant Carefully —
Drive a sharp spade straight down into the soil 6 inches beyond the outer edge of the original nursery root ball to cut only a few new feeder roots. Tilt the spade handle backward and pop the whole root mass out of the hole without smashing the internal soil core.
- Safety note: Don’t yank a shrub up by the stems or trunk; that tears the anchor roots. Lift from underneath the root ball with both hands or a flat shovel.
3. Wash Away the Nursery Cap and Inspect Root Health —
Use a gentle spray nozzle on a garden hose to strip off any extra nursery potting soil sitting above the real root flare. Then look at the roots: healthy ones are white, tan, or light cream and firm, while dead or rotting roots are dark brown or black and slough off like wet noodles when you tug them.
- Remedy: If more than 40% of the root system is black, mushy, and smells like sewer gas, trim those dead sections off with bypass pruners wiped down with 70% isopropyl alcohol.
4. Break the Root Cage —
Nursery-grown plants almost always wrap roots around the container shape; if you leave that alone, those roots keep circling until they girdle the plant. Use a soil knife, Japanese hori-hori, or hand shears to make four vertical slices 1/2 to 1 inch deep along the sides of the root ball, then tease the ends outward.
- Alternative approach: For badly root-bound woody plants, use your fingers to “box” or fan out the bottom third of the root mass into a flat disk.
5. Re-dig the Hole Twice as Wide, Not Deeper —
Dig the new planting hole two to three times the width of the root ball, but stop digging down once the depth matches 80% to 90% of the root ball’s height. Keep the bottom flat and undisturbed so the plant doesn’t sink later as the soil settles.
- Rule of thumb: The top surface of the root ball must sit 1 to 2 inches higher than the surrounding lawn grade, never flush, and never below.
6. Score and Scarify the Hole's Sidewalls —
Use the edge of your shovel or a pick mattock to aggressively gouge the smooth, clay-glazed walls of the planting hole. Slick sides made by round shovels act like underground concrete; scoring gives young root tips a place to push into the native yard.
7. Backfill Using Exclusively Native Dirt —
Skip the bags of rich planting compost or black potting soil for backfill and put the exact soil you dug out of the yard right back into the hole. Mixing rich amendments into a small hole just teaches the roots to stay put instead of spreading into the surrounding yard soil.
- Technique: Fill the hole halfway, lightly tamp it with your hands (never stomp with work boots, which crush soil pores), and fill the hole with water to settle air pockets before adding the final layer of dirt.
8. Build a Water Retention Ring (Berm) —
Pile a 3-inch-tall ring of native soil around the outer edge of the backfilled hole, roughly 12 to 18 inches away from the plant stem. This little earthen dike holds water over the root zone during deep soaking instead of letting it sheet off across the yard.
9. Apply a Flat Mulch Donut —
Spread 2 to 3 inches of shredded hardwood or pine bark mulch across the disturbed root area, keeping it at least 3 inches away from the plant stems or woody trunk.
- Warning: Don’t build a “mulch volcano.” Packing wood mulch against the base traps moisture against the bark and invites fungal cankers and boring insects.
10. Administer a Deep Root-Drench —
Slowly apply 3 to 5 gallons of water directly inside the berm using a hose on a trickle, or fill a 5-gallon bucket with a 1/4-inch hole drilled near the bottom edge. That gives you steady water pressure that soaks the dry nursery core without blowing out your berm.
Common Causes
Why do new landscape installs look great at the garden center but start dropping leaves a month later? These five problems cover nearly all the failures I see:
1. Planted Below Grade (Crown Suffocation)
When plants are set too deep, the stem bark stays wet all the time. Soil microbes attack the cambium layer, and the root system suffocates without oxygen, which starts leaf drop from the inside branches outward.
2. The Native Soil Interface Barrier
When fine, moisture-holding peat moss in a container meets dense clay around it, physical tension keeps water from crossing that boundary. Rain and sprinkler water take the easy path around the root ball, leaving the plant core dry while the lawn stays soggy.
3. Circling and Girdling Root Systems
Container plants left too long in retail stock grow root coils that follow the pot walls. If you drop them straight into a hole without scarifying and unwinding those strands, the roots keep twisting in circles and eventually choke off the main tap and lateral roots as they thicken.
       CIRCLING ROOTS                  CORRECTED (SCARIFIED)
     (Strangle plant within 1-2 yrs)   (Feathered outward into soil)

        |  Stem  |                        |  Stem  |
        |        |                        |        |
     +---+-v--v--+---+                 +---+-v--v--+---+
     | ( ( (  ) ) )  |                 |  \  |  /  /   |
     | ( ( ROOT ) )  |      ====>      | ---\--/--/--  |
     | ( ( COIL ) )  |                 |   / \/ \      |
     +---------------+                 +---------------+
4. Overwatering on an Automated Sprinkler Cycle
Running normal turf irrigation for 10 minutes every morning wets the top 1/2 inch of soil but never reaches the 8-inch depth of a shrub root ball. Worse, in clay soils, daily shallow cycles keep the upper layer wet all the time, which breeds fungus and starves deep roots.
5. High-Nitrogen Fertilizer Burn
Dumping synthetic high-nitrogen granular turf food into the planting hole burns tender new root tips. Fertilizers pull moisture out of plant tissues through chemical osmosis, and the foliage can turn brown and crispy within 48 hours of application.
Common Mistakes
- Dumping potting soil into the planting hole. You want roots to leave the hole and explore native dirt; creating a pocket of potting soil traps roots inside a cozy underground pot and sets up the bathtub effect.
- Leaving the nursery burlap or plastic twine on the ball. Burlap treated with copper preservatives doesn’t rot quickly underground, and synthetic twine turns into a wire garrote around the root flare as the trunk expands. Cut away at least the top two-thirds of all wire baskets and remove every piece of synthetic wrap.
- Stomping down the soil with your boots. You do want to knock out big air voids, but crushing wet backfill turns the soil as dense as brick. Pack it firmly with your bare hands, then let a slow stream of water settle everything naturally.
- Pruning top growth to "balance" root loss. Old-school myth, plain and simple. Leaves make auxin hormones that tell roots to grow and expand; cutting healthy branches removes the plant’s food factories and weakens recovering roots.
- Using root stimulator containing high nitrogen. Most chemical “root stimulators” sold in big-box stores are just watered-down fertilizer. Use plain water or seaweed kelp extract; skip synthetic nitrogen until the plant’s been through one full growing season.
Cost & Time Breakdown
| Task | DIY Cost | Pro Cost | Active Time |
|---|---|---|---|
| Inspect, Lift & Re-set 1–3 Shrubs | $0–$15 (trowel/knife) | $150–$350 | 1.5–3 hours |
| Soil Correction & Sidewall Scoring | $0 (native soil) | $100–$250 | 45 minutes |
| Mulch Ring & Berm Installation | $10–$25 (2 bags mulch) | $75–$150 | 30 minutes |
| Severing Circling Roots / Root Prune | $15–$30 (hori-hori/pruners) | $100–$200 | 20 minutes |
| Replacement of Fully Dead Shrub | $35–$90 (replacement plant) | $150–$300 | 1 hour |
Tips & Prevention
- Follow the "proud" rule for planting height. Set woody ornamentals and trees 1 to 2 inches higher than the surrounding lawn surface so they can settle without sinking.
- Test your site's drainage before buying. Dig a test hole 12 inches deep and fill it to the brim with water; if it takes longer than 4 hours to drain completely, you’ve got poor drainage and need raised beds or berm plantings.
- Water by the calendar and moisture feel, not a timer. Push a 6-inch screwdriver into the ground 3 inches outside the root ball; if it slides in easy and comes out cool with dark soil on the tip, skip watering that day.
- Keep mulch 3 inches away from wood tissue. Think donut, never volcano; leaves and root flares need breathing room to avoid bacterial infections.
- Plant in early autumn whenever possible. Planting in October or November gives shrubs six to eight months of root growth during cool dormancy before hot summer temperatures hit.
When to Call a Professional
If you’re working with container-grown shrubs or small 3-gallon to 5-gallon perennials, lifting and resetting them is usually simple DIY work. But if you’ve got big balled-and-burlapped (B&B) trees with root balls over 150 pounds, trying to move them by hand can mess you up bad or crack the root plate if you drop them.
Call a certified landscape contractor or ISA Certified Arborist if trees larger than 2-inch caliper are tilting, if hardpan caliche or solid bedrock is sitting 6 inches beneath your yard, or if standing water keeps coming back and points to a grading problem across the property.
Frequently Asked Questions
How can I tell if my dying plant is getting too much water or not enough?
The easiest check is leaf texture and soil feel. Drought-stressed plants show dry, crispy leaf edges that curl inward, and the soil several inches down feels hard, dusty, and hot. Overwatered plants get limp, pale yellow or dull-green leaves that feel soft or mushy, often dropping from the bottom first while the surrounding soil feels cool, spongy, and a little swampy.
Should I pull off yellow and brown leaves on a stressed shrub?
Yes, you can gently snip off fully brown, dried leaves to help track whether the decline is continuing or settling down. Leave yellowing leaves alone until they drop naturally; the plant is still reclaiming nitrogen and mobile carbohydrates from those dying leaves to support new root growth underneath.
Is it normal for a newly planted shrub to lose some leaves right after planting?
A little leaf drop—up to 10% or 15% of interior foliage—is normal within the first two weeks while the plant adjusts to local light, wind, and humidity. If leaf loss goes past 25%, shoots start wilting at the growing tips, or whole branches turn brittle and snap cleanly, you’re looking at root-level stress that needs immediate attention.
How much water does a newly planted 3-gallon shrub actually need?
As a baseline, apply 2 to 3 gallons of water per application, two times a week during moderate spring or autumn weather (70°F to 85°F). During hot summer conditions exceeding 90°F, bump that to three applications per week, always applying water slowly at the base through a drip line, soaker hose, or trickle instead of overhead spray.
Do I need to add vitamin B1 or root stimulator to revive struggling plants?
Scientific studies have shown that over-the-counter vitamin B1 formulas don’t give woody landscape plants any measurable benefit. The best “stimulators” are proper planting depth, enough oxygen in the root zone, and steady deep watering. If you want an additive, a light drench of cold-water kelp meal or humic acid can help root development without risking chemical burn.
What should I do if my native soil is solid, sticky clay?
Don’t dig a narrow hole and fill it with bagged potting soil, because that creates an underground swamp. Instead, build up: set your shrub so the top half of the root ball sits above the existing clay grade, then mound native soil mixed with 20% coarse expanded shale or compost around the perimeter at a gentle slope. That gives you an elevated, better-aerated planting bed where water can drain freely.
Can I save a plant if all its leaves have turned brown and crispy?
Check the cambium layer before you toss the plant. Use your thumbnail or a sharp utility knife to scrape a tiny sliver of bark off a main stem 4 inches above the soil line. If you see bright, moist green tissue underneath, the vascular system is still alive and the plant can push new growth; if it looks dry, tan, or woody throughout all major stems, that plant is toast.
When is the absolute best time of day to water new landscape installations?
Water early in the morning, ideally between 5:00 AM and 9:00 AM. Morning watering lets moisture soak deep into the root zone before the midday heat burns it off, and it keeps foliage dry as the sun comes up, which helps prevent fungal foliar diseases like powdery mildew and leaf spot.
Related Articles
Keep troubleshooting with these hand-picked guides from FixlyGuide:
- Water Pooling in Landscape Beds? 10 Steps to Stop Foundation Flooding — Fix standing water and poor drainage in landscape beds around your foundation with pro-tested regrading, downspout extensions, and sub-surf…
- Dandelions Keep Coming Back? 5 Taproot Traps and the Permanent 10-Step Fix — Stop snapping dandelion taproots and watching them double. Learn how to extract or chemically eliminate deep roots permanently to keep your…
- The #1 Watering Mistake That Kills Lawns (And How to Fix Yours in 10 Minutes) — Discover the most common watering mistake homeowners make and how to adjust your watering routine for a healthier, more resilient lawn.
- The #1 Mistake Killing Your Lawn's Crabgrass Defense (And the Easy Fix) — Discover why common crabgrass removal methods fail and how to naturally eliminate this stubborn weed for a healthier lawn.
- The #1 Mistake Killing Your Thin Lawn (And How to Fix It in a Weekend) — Overseeding your lawn can transform it from thin and patchy to lush, but many homeowners make a crucial mistake that hinders success. Learn…
- The Secret to Lush Raised Beds? It's Not Just About How You Water — Smart irrigation for raised garden beds isn't just about automation; it's about delivering the right amount of water precisely when your pl…
Should you do this yourself?
Answer five quick questions before you start. Safety outranks savings every time.
Your experience with work like this
How high do you have to work?
Does the job involve any of these?
Will it need a permit?
Specialty tools
Free and instant. Educational guidance only — not a quote, inspection, or professional diagnosis.
What should this project cost?
Enter your project details for a realistic cost range before you call anyone.
Cost depends heavily on which system turns out to be the source.
- Regional adjustment
- National average
- Labor share (typical)
- ~$1,620
- Quotes to collect
- 3 written estimates
Educational estimate based on national averages — not a binding quote. Always confirm with written local estimates.
Before you start
Check the difficulty, permits, and safety risk — then decide whether to call a pro.
- Estimate this projectGet a cost range for your scope and ZIP before you call anyone.Open
- Get local estimatesSend one request and compare written estimates from vetted pros.Open
Free, no signup required. Estimates are educational guidance, not a quote or an inspection.
Frequently asked questions
How can I tell if my dying plant is getting too much water or not enough?+
The simplest test is leaf texture and soil feel. Drought-stressed plants show dry, crispy leaf margins that curl inward, and the soil several inches down will feel hard, dusty, and hot. Overwatered plants develop limp, pale yellow or dull-green leaves that feel soft or mushy, often dropping from the bottom of the plant first while the surrounding soil feels cool, spongy, and smells slightly swampy.
Should I pull off yellow and brown leaves on a stressed shrub?+
Yes, you can gently snip off fully brown, dried leaves to help track whether the decline is continuing or stabilizing. However, leave yellowing leaves alone until they drop naturally; the plant is actively reclaiming nitrogen and mobile carbohydrates from those dying leaves to support new root growth underneath.
Is it normal for a newly planted shrub to lose some leaves right after planting?+
Minor leaf drop—up to 10% or 15% of interior foliage—is common within the first two weeks as the plant adjusts to local light levels, wind, and humidity. If leaf loss exceeds 25%, shoots start wilting at the growing tips, or entire branches turn brittle and snap cleanly, you're looking at root-level distress that needs immediate intervention.
How much water does a newly planted 3-gallon shrub actually need?+
As a baseline rule, apply 2 to 3 gallons of water per application, two times a week during moderate spring or autumn weather (70°F to 85°F). During hot summer conditions exceeding 90°F, increase to three applications per week, always applying water slowly at the base through a drip line, soaker hose, or trickle rather than overhead spray.
Do I need to add vitamin B1 or root stimulator to revive struggling plants?+
Scientific studies have shown that over-the-counter vitamin B1 formulations provide no measurable benefit for woody landscape plants. The most effective "stimulators" are proper planting depth, adequate oxygen in the root zone, and consistent deep watering. If you want to use an additive, a light drench of cold-water kelp meal or humic acid helps root development without risking chemical burn.
What should I do if my native soil is solid, sticky clay?+
Do not dig a narrow hole and fill it with bagged potting soil, which creates an underground swamp. Instead, build up: plant your shrub so the top half of the root ball sits above the existing clay grade, then mound native soil mixed with 20% coarse expanded shale or compost around the perimeter at a gentle slope. This creates an elevated, well-aerated planting bed where water drains freely.
Can I save a plant if all its leaves have turned brown and crispy?+
Check the cambium layer before throwing the plant away. Use your thumbnail or a sharp utility knife to gently scrape a tiny sliver of bark off a main stem 4 inches above the soil line. If you see bright, moist green tissue underneath, the vascular system is still alive and the plant can push new growth; if it looks dry, tan, or woody throughout all major stems, that plant is toast.
When is the absolute best time of day to water new landscape installations?+
Always water early in the morning, ideally between 5:00 AM and 9:00 AM. Morning watering allows moisture to soak deep into the root zone before midday heat evaporates it, while keeping foliage dry as the sun comes up, which prevents fungal foliar diseases like powdery mildew and leaf spot.
Discussion
Loading comments…