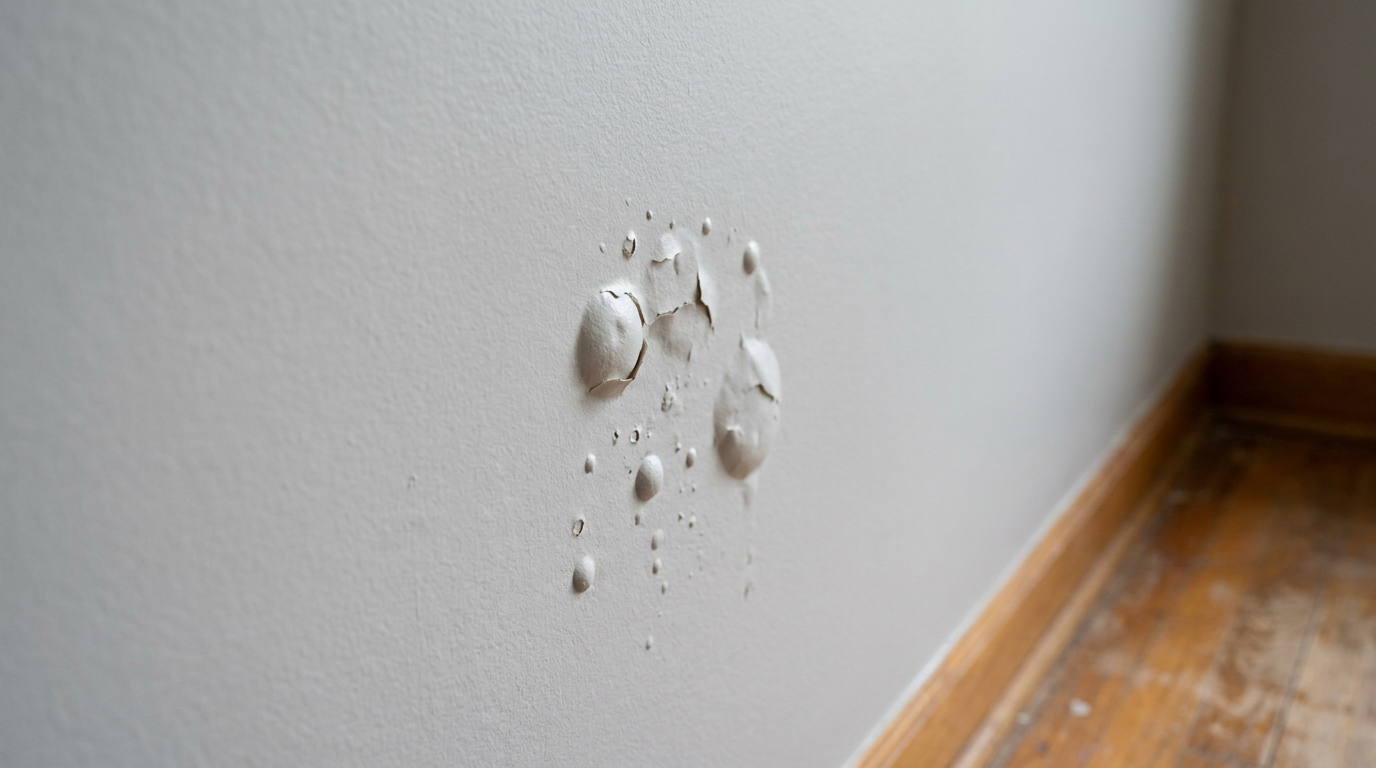
- Moisture: This is the 1 cause. It can come from high humidity in a bathroom, a leaky pipe in the wall, or even painting over drywall that wasn’t fully cured. Water vapor pushes its way out and takes the paint with it.
- Heat: If you paint in direct, hot sunlight (over 90°F), the top layer can skin over too fast. That traps solvents and vapor underneath, and they blister as they try to escape that fast-forming “skin.”
- Contamination: Painting over dust, grease, soap scum, or wax is like trying to stick a label to a sandy driveway. The paint sticks to the grime, not the wall, and the whole thing lifts.
- Incompatibility: If you put a water-based (latex) paint right over old, glossy oil-based paint without sanding and priming first, you’re asking for trouble. That latex just can’t get a grip on the slick surface.
General remodeling · Renovation planning
| Project category | General remodeling |
|---|---|
| Problem type | Renovation planning |
| Trade required | General contracting |
| Urgency | Planned project |
| Safety risk | Low safety risk |
| DIY suitability | Pro recommended |
| Cost category | Major investment |
| Typical timeline | Design and permitting often 2–4 months before work starts |
| Contractor type | General contractor |
Repair option
Phase the work and fix the building envelope first.
Replacement option
Full renovation with permits, design, and a general contractor.
Common causes
- Space no longer fits how the household lives
- Resale preparation
- Deferred maintenance stacking up
Relevant tools:project cost estimatorcompare quoteshome improvement material prices
Published October 17, 2026Last updated October 17, 2026
Tools & materials you'll need
Affiliate linksAs an Amazon Associate FixlyGuide earns from qualifying purchases — at no extra cost to you. Prices and availability are accurate as of publication and subject to change.
Quick Answer
Paint bubbles or blisters are little pockets of paint that’ve lifted off the surface underneath. Nine times out of ten, it’s an adhesion problem — the paint just didn’t get a solid bite. Usual suspects? Moisture trying to work its way out of the wall, painting over a dirty or greasy surface, or rolling latex paint right over an unprimed oil-based finish. To fix it, you’ve got to scrape off the bubbles, clean and sand the area smooth, prime it right, and repaint.
The Problem
You spent all weekend getting the color just right, and it looked great. For a day. Then you spot it — one bubble. Then a whole patch of them. Paint blisters can be tiny little pimples or big, palm-sized pockets of air. They’ll feel soft and squishy when you press on them, and if you pop one, you might even get a little bead of water. That’s a bad sign. It means the bond between the paint and the wall went sideways. The paint’s lifting clean off. Don’t just roll over it and call it a day — that won’t hold. You’ve got to figure out why it happened first, or those bubbles’ll be back before you know it.
How It Works
Paint acts like a thin film that needs to grab the surface below it and hang on. For that to happen, the substrate has to be clean, dry, and prepped properly. If the paint can’t stick, you get a weak spot. Then something simple — sun hitting a wall, or moisture inside the drywall trying to escape — can make that weak spot lift and stretch into a bubble. It’s just a pocket of trapped air or moisture pushing the paint film outward. No mystery there.
This is a physical failure, not a chemical one. The paint itself is usually fine. What’s broken is the connection to whatever’s underneath. Common triggers include:
- Moisture: This is the #1 cause. It can come from high humidity in a bathroom, a leaky pipe in the wall, or even painting over drywall that wasn’t fully cured. Water vapor pushes its way out and takes the paint with it.
- Heat: If you paint in direct, hot sunlight (over 90°F), the top layer can skin over too fast. That traps solvents and vapor underneath, and they blister as they try to escape that fast-forming “skin.”
- Contamination: Painting over dust, grease, soap scum, or wax is like trying to stick a label to a sandy driveway. The paint sticks to the grime, not the wall, and the whole thing lifts.
- Incompatibility: If you put a water-based (latex) paint right over old, glossy oil-based paint without sanding and priming first, you’re asking for trouble. That latex just can’t get a grip on the slick surface.
You’ve got to find the cause before you fix the symptom. Cut one open and it’ll usually tell you plenty. Wet inside? Moisture. Glossy layer underneath? Probably old oil paint. Soft drywall? Then you’ve got a bigger leak to track down first. I pulled a water heater in Frisco last month that had exactly this kind of bubbling on the garage wall — turned out the pan had been leaking slow for weeks. Nasty little surprise.
Step-by-Step Fix
Fixing paint bubbles isn’t hard, but it does take patience. Don’t skip steps. That’s where guys get burned.
1. Scrape Away the Bubbles
- Em-dash: Put on your safety glasses. Grab a sharp putty knife or a 5-in-1 painter's tool and scrape off every blister. Start at the edge of a bubble and work inward. The loose paint should come off pretty easy. Keep going until you hit paint that’s really stuck to the wall. You want every bit that’s even a little loose gone.
2. Feather the Edges
- Em-dash: Now you’ll have a crater with a hard paint edge around it. If you leave that sharp line, you’ll see the patch forever. Use a medium-grit sanding sponge (around 120-grit) to knock that edge down and make a smooth, tapered transition from the scraped spot to the surrounding wall. Run your fingers over it — it should feel smooth, not like a cliff.
3. Clean the Area Thoroughly
- Em-dash: This part matters. Mix up a solution of a degreasing cleaner (like TSP substitute or just a few drops of dish soap in warm water). Scrub the whole patched area with a sponge to get rid of dust, oils, and residue. Then wipe it down with a clean, damp cloth to rinse it. Let it dry all the way — don’t get impatient here. Give it at least 2-4 hours, or longer if the air’s damp.
4. Identify and Solve the Root Cause
- Em-dash: Time to play detective. If you found moisture, you have to fix that first. Bathroom with no exhaust fan? Get one installed. Near a window? Check the caulking and the exterior seal. If the drywall feels soft, you may need to cut out a section and find the plumbing leak. If you scraped to a shiny, hard surface, you’re probably dealing with old oil paint.
5. Spot-Prime the Patches
- Em-dash: Never paint straight over the scraped area. Primer seals the surface and gives the new paint something to hang onto.
- For moisture issues or stains: Use a shellac-based or oil-based stain-blocking primer. It helps stop the stain or vapor from bleeding through.
- For painting over oil-based paint: Use a dedicated "bonding" primer. That stuff is made to grab glossy, tricky surfaces.
- Brush or roll on a thin, even coat of primer just on the scraped and sanded spots. Let it dry by the manufacturer’s directions (usually at least an hour).
6. Skim Coat if Necessary
- Em-dash: If the scraped area’s deep, primer alone isn’t gonna hide it. You may need a thin "skim coat" of joint compound or spackle. Use a flexible putty knife and spread it thin across the primed patch. Let it dry, then sand it smooth with a fine-grit (220-grit) sanding sponge. Wipe off all the dust with a tack cloth or damp rag.
7. Re-Prime the Skim Coat
- Em-dash: Yep, you prime again. Fresh joint compound is thirsty, and if you skip this step it’ll suck the moisture out of your topcoat and leave a dull spot called "flashing." Put another thin coat of your chosen primer over the spackled areas. Let it dry completely.
8. Apply the Topcoat
- Em-dash: Now you’re ready for paint. Use the exact same paint color and sheen that’s already on the wall. Put on a thin first coat over the primed spots with a brush or mini-roller. Let it dry. Then roll on a second, final coat, feathering it a bit into the surrounding wall so it blends. If you want it dead perfect, you may need to paint the whole wall corner to corner.
Common Causes
- Trapped Moisture: The #1 culprit. Leaks, high humidity (bathrooms, kitchens), or uncured drywall all release water vapor that pushes paint off the wall.
- Surface Contamination: Painting over dust, grease, soap residue, or even fingerprints. The paint sticks to the grime, not the wall, leading to easy failure.
- High Heat or Direct Sun: Applying paint to a hot surface (above 90°F) or in direct sun. The outer layer dries too fast, trapping solvents and creating blisters.
- Painting Over Glossy/Oil Paint: Latex and acrylic paints can't bond to old, slick oil-based paints without proper cleaning, sanding, and a coat of bonding primer.
- Using the Wrong Roller Cover: Using a roller with too long a nap can introduce air into the paint film, which can manifest as tiny bubbles.
- Rushing the Job: Not letting primer or previous coats of paint dry completely before applying the next coat. Trapped moisture and solvents have to go somewhere.
Common Mistakes
- Just Painting Over It: The worst move, hands down. It doesn’t fix the adhesion problem, and the new paint’ll bubble right back up, leaving you with an even uglier mess to scrape later.
- Not Scraping Enough: It’s tempting to only take off the obvious bubble, but anything around it that’s even a little loose is next in line to fail. You’ve got to get back to a solid, firmly bonded edge.
- Skipping the Cleaning Step: Sanding dust and hand oils are invisible paint-killers. A quick wipe with a degreaser isn’t optional if you want the repair to last.
- Using the Wrong Primer: A standard latex primer over a water stain or old oil paint won’t do squat. You need a stain-blocking or bonding primer made for the problem you’re actually fixing.
- Ignoring the Moisture Source: If you fix the bubble but leave the leak in the wall or don’t improve bathroom ventilation, you’re only treating the symptom. The cause is still there, and the bubbles’ll be back.
- Creating a Hard Edge: If you don’t feather the sanded area, you’ll leave a visible outline that shows through the final coat no matter how many layers you put on.
Cost & Time Breakdown
This is a very DIY-friendly fix. Most of the cost is just small amounts of stuff you may already have in the garage.
| Task | DIY Cost | Pro Cost | Time |
|---|---|---|---|
| Scrape & Sand Small Area (< 1 sq ft) | $5–$10 for sandpaper/putty knife | $75–$125 | 20 minutes |
| Clean & Prime Patches | $15–$25 for cleaner & primer | (Included) | 30 minutes + dry time |
| Skim Coat & Sand (if needed) | $10–$20 for spackle | $50–$100 | 20 minutes + dry time |
| Final Touch-Up Painting | $5–$15 for a quart of paint | $75–$150 | 30 minutes + dry time |
| Total | $35–$70 | $200–$400+ | 2–3 hours active, 24 hours total |
Tips & Prevention
- Control Humidity: In bathrooms and kitchens, run the exhaust fan for at least 20-30 minutes after a shower or boiling water. If you don’t have one, get one installed. That’s your best defense against moisture-related paint failure.
- Prep is Everything: Always clean walls with a degreasing cleaner before painting, even if they look spotless. A quick wipe-down is cheap insurance for the whole job.
- Test for Oil Paint: Not sure if the old paint is oil or latex? Rub a cotton ball soaked in denatured alcohol on a small, hidden spot. If the paint comes off, it’s latex. If it stays put, it’s oil, and you’ll need to sand and use a bonding primer.
- Mind the Weather: Don’t paint outside when it’s scorching hot, in direct sun, or if rain’s coming. Inside, keep the temperature between 50°F and 85°F for best results.
- Allow for Proper Dry Times: Paint cans list recoat times for a reason. Follow them. Rushing leaves you with a weak paint film that’s prone to trouble.
- Buy Good Paint: Better paints have stronger binders and resins, which means better adhesion and flexibility, and fewer blistering problems down the road.
When to Call a Professional
The bubbling itself is usually an easy DIY fix. The cause might not be. Call a licensed pro if you think the moisture is coming from inside the wall. Look for soft or crumbling drywall, discoloration that keeps growing, or bubbling paint on a ceiling below an upstairs bathroom or appliance. Those are classic signs of a plumbing or roof leak. Don’t just patch the paint — you could be ignoring something a whole lot worse, like hidden mold or wood rot. A plumber or roofer can find and fix the source of the water, and that’s the only real long-term answer.
Should you do this yourself?
Answer five quick questions before you start. Safety outranks savings every time.
Your experience with work like this
How high do you have to work?
Does the job involve any of these?
Will it need a permit?
Specialty tools
Free and instant. Educational guidance only — not a quote, inspection, or professional diagnosis.
Estimate your own project cost
National averages are a starting point. Enter your details for a range that fits your house.
Interior paint estimator
- Paint$96
- Supplies (tape, rollers, drop cloth)$35
- Estimated total (DIY)$131
Hiring a pro? Add roughly $1.50–$4.00/sq ft for labor depending on prep work and trim detail.
Educational estimate only — always confirm with written local bids.
What should this project cost?
Enter your project details for a realistic cost range before you call anyone.
Cost depends heavily on which system turns out to be the source.
- Regional adjustment
- National average
- Labor share (typical)
- ~$1,620
- Quotes to collect
- 3 written estimates
Educational estimate based on national averages — not a binding quote. Always confirm with written local estimates.
Before you start
Check the difficulty, permits, and safety risk — then decide whether to call a pro.
Free, no signup required. Estimates are educational guidance, not a quote or an inspection.
Recommended for DIYers & woodworkers
Sponsored
The Top 20 Tools for Workshops of Any Budget
No stationary machines or power tools required — plus 3 fundamental tools that can't be bought at any price.
Get the free guide
Ted's Woodworking — The #1 Woodworking Resource
Detailed instructions, dimensioned drawings, materials & cutting lists, and 3D schematics for every skill level.
See the plansSponsored: links above are affiliate links. FixlyGuide may earn a commission on qualifying purchases — at no extra cost to you.
Frequently asked questions
Can I just poke the bubble and flatten it out?+
No, this won't work. Poking the bubble releases the trapped air or moisture, but it doesn't fix the underlying lack of adhesion. The edges of the bubble are still loose, and the blemish will be visible. The bubble will likely reappear, and you'll have to scrape it off anyway.
Why did my paint bubble months after I painted?+
This almost always points to a new moisture problem. A small, slow leak inside the wall may have finally saturated the drywall enough to cause a problem, or a change in season could have increased indoor humidity. Check for new water sources near the bubbling area.
What's the difference between a paint bubble and a blister?+
The terms are often used interchangeably. Generally, 'blisters' are smaller, pimple-like bumps, often caused by heat or solvent trapping. 'Bubbles' can be larger pockets that feel soft and are more commonly associated with moisture pushing the paint from the wall.
Is it okay to paint over bubbles if the wall is dry?+
No. Even if the original cause (like high humidity) is gone, the paint has already separated from the wall. It has lost its bond forever. Painting over it just adds weight to the loose section, making it more likely to peel off in a larger sheet later.
Do I need to prime the whole wall or just the patch?+
For most repairs, you only need to spot-prime the area you scraped and sanded. However, if you're dealing with major stains or are priming over an old oil-based paint, it's safer and more effective to prime the entire wall to ensure a uniform, well-bonded surface.
My bubbles are on an exterior wall. Is the fix the same?+
The process is the same, but the cause is more likely to be external. Rainwater getting behind siding, failed caulking around windows, or direct, intense sun are common culprits. Ensure you use an exterior-grade primer and paint for the repair.
Can using cheap paint cause bubbles?+
Yes, it can be a contributing factor. Bargain-bin paints often have fewer high-quality binders—the 'glue' that makes paint stick. While poor prep is the primary cause, premium paint is more flexible and has better adhesion, making it more forgiving and resistant to minor bubbling.
How soon can I paint after the wall gets wet?+
You must wait until the wall is completely dry, not just to the touch. For drywall that has been significantly wet from a leak, you should wait several days, even after the leak is fixed. Using a moisture meter is the only way to be 100% sure the substrate is dry enough to paint.
Discussion
Loading comments…