- Low-Quality or Wrong Paint: Using cheap wall paint on a ceiling is a mistake I see all the time. Ceiling paints have a flatter sheen and they spread light better.
- No Primer: Painting straight over drywall patches, stains, or a darker color without primer leaves you with different levels of porosity, and that makes the paint dry unevenly.
- Applying Paint Too Thinly: Trying to stretch the paint to save a few bucks will leave you with a thin, patchy coat that shows every roller mark.
- Improper Roller Technique: Leaning too hard on the roller, not keeping it loaded, or losing your wet edge are the big technique problems.
- Wrong Roller Cover: A thin-nap roller (1/4" or 3/8") won’t hold enough paint to lay down an even coat on something as big as a ceiling.
Roofing · Flashing failure
| Project category | Roofing |
|---|---|
| Problem type | Flashing failure |
| Trade required | Roofing |
| Urgency | Soon — within weeks |
| Safety risk | Moderate safety risk |
| DIY suitability | Pro recommended |
| Cost category | Low cost |
| Typical timeline | Usually a half-day repair |
| Contractor type | Licensed roofing contractor |
Repair option
Replace the boot or step flashing and re-weave shingles around it.
Replacement option
Address during a full replacement when several details have failed at once.
Common causes
- Cracked pipe boots — the single most common roof leak source
- Rusted step flashing at walls and chimneys
- Sealant used as a substitute for proper metal
Relevant tools:project cost estimatordiy or hire a pro
Published October 16, 2026Last updated October 16, 2026
Tools & materials you'll need
Affiliate linksAs an Amazon Associate FixlyGuide earns from qualifying purchases — at no extra cost to you. Prices and availability are accurate as of publication and subject to change.
Quick Answer
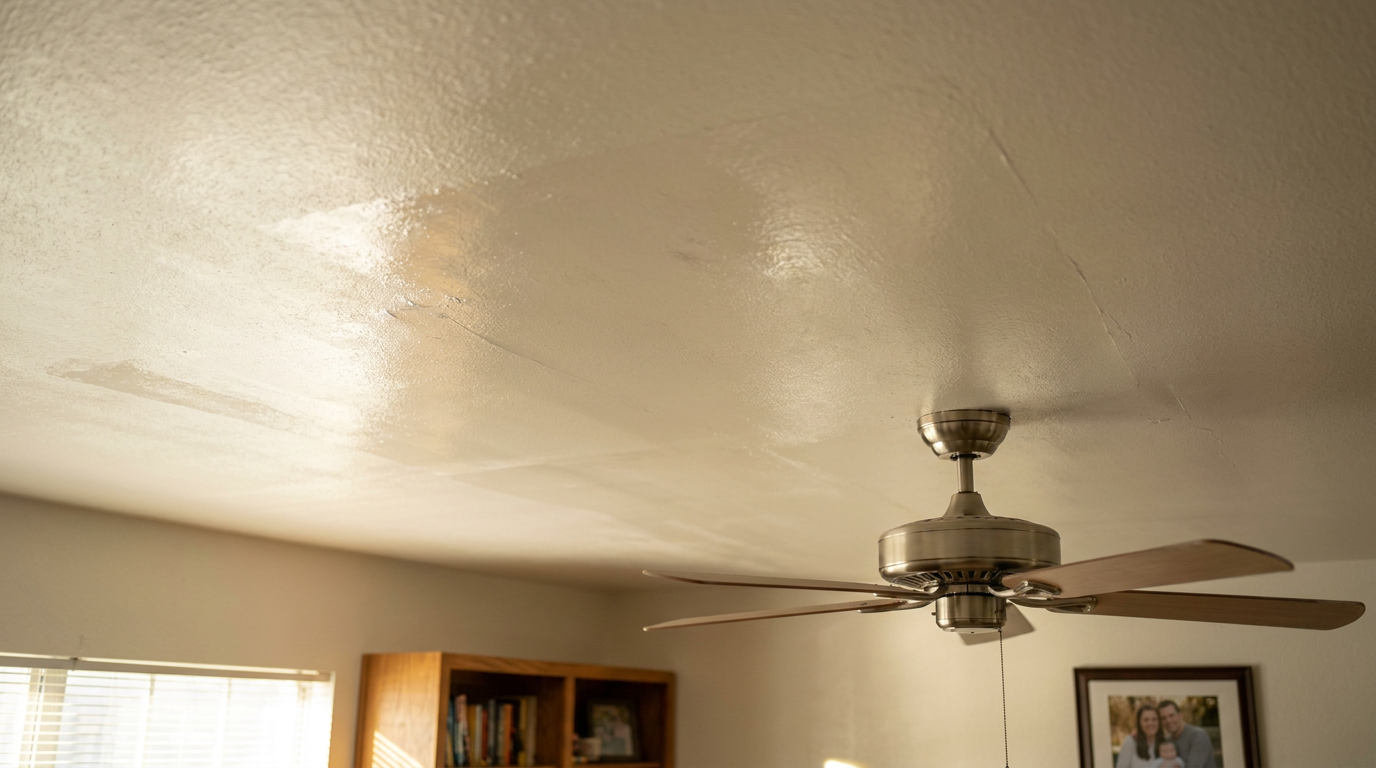
Flashing—that annoying look where you see shiny patches, streaks, or lap marks on a freshly painted ceiling—shows up when the paint film dries at different rates. It’s all about light bouncing off the surface unevenly. The usual suspects are cheap paint, putting it on too thin, using the wrong roller cover, or skipping a solid prime coat, especially over new drywall or patch work. To fix a flashing ceiling, I’d lightly scuff-sand the whole thing so you’ve got a uniform base, prime it with a good ceiling-specific primer, then roll on two even coats of a premium flat ceiling paint. Work in sections, and always roll back into the wet edge of the last section.
The Problem
You spend the weekend painting the ceiling, then step back and realize it’s a streaky mess that only shows up in certain light. From one angle, it looks fine. Then the afternoon sun hits it, and every roller mark jumps out at you. That’s flashing, or lap marks, and it’s one of the most common headaches for DIY painters. It makes the job look rough, and if you don’t know what caused it, it can feel impossible to chase down. What’s really happening is the sheen isn’t consistent—one spot of paint is thicker, thinner, or dried out different than the next.
How It Works
To get why flashing happens, you’ve got to think of paint as a liquid film loaded with pigments and binders that hardens as the solvents, usually water, evaporate. For a clean, even finish, that film has to dry at the same rate everywhere. Flashing starts when something throws that off.
Say you paint one section, then move on. The edge of that first section starts to set up. When you come back and overlap it, you’re laying fresh paint over a half-dry edge. Now you’ve got a double-thick strip of paint—your lap mark—and it dries slower and reflects light differently. That’s the big one. But there are other troublemakers, too. A thirsty surface, like unprimed drywall mud, will suck the moisture out too fast and make the paint flash. Cheap paint with fewer solids and binders doesn’t forgive sloppy application. Even the way you roll, or the roller cover you pick, can leave a subtle texture that catches the light and shows up like a sore thumb. Ceilings get hit especially hard because they’re exposed to that “critical light” — long, low-angle light from windows that picks out every little flaw. I pulled a ceiling in Frisco last month that had exactly this problem after a patch repair, and the homeowner could only see it at 4 p.m. with the blinds open. Classic.
Step-by-Step Fix
-
Assess and Prep the Room. - Move the furniture out if you can, or bunch it up in the center and cover it with a heavy-duty plastic drop cloth. Cover the floors all the way. Tape plastic over any light fixtures you can’t take down. Kill the power to the room at the breaker just to be safe.
-
Scuff-Sand the Entire Ceiling. - You’re not trying to strip the paint. Just dull it down and knock off any high spots. A pole sander with a 120-grit sanding screen is the ticket. Work in overlapping passes across the whole ceiling. What you want is a consistent, slightly scratched surface so the new primer can grab onto it.
-
Wipe Down the Dust. - Use a damp microfiber cloth, not soaking wet, or a tack cloth on a pole to wipe the whole ceiling. That gets rid of the fine dust that’ll otherwise gum up your primer and mess with the finish. Let it dry all the way, which usually takes about 20–30 minutes.
-
Cut in with Primer. - With a good 2.5-inch angled brush, brush a cut-in band of primer around the perimeter of the ceiling. Hit around light fixtures and any obstacles while you’re at it. Keep that band about 3 inches wide.
- Safety: Wear safety glasses, especially when you’re working overhead. Primer in the eye is no joke.
-
Roll the Primer Coat. - Put a 1/2-inch nap roller cover on your roller frame and pole. Don’t cheap out here; bargain covers shed lint and make you chase fuzz all day. Load it up with primer so it’s fully saturated. Start in a corner and roll out a small 3x3 foot section, starting from your cut-in band. Don’t bear down on it—let the roller do the work.
-
Maintain a Wet Edge. - This part matters. As soon as you finish one section, move right into the next and roll back into the still-wet edge of the previous section. That blending step is what keeps new lap marks from showing up. Keep going across the whole ceiling. Let the primer dry for the manufacturer-recommended time, usually 2-4 hours.
-
Apply the First Coat of Ceiling Paint. - Swap to a brand new, high-quality 1/2-inch nap roller cover. Do the same routine as the primer: cut in the edges first with your finish paint, then roll the main field while keeping a wet edge the whole time. Use a premium, flat-finish ceiling paint. Those are made to cut down on spatter and have a dead-flat sheen that hides imperfections better than wall paint ever will.
-
Evaluate and Apply the Second Coat. - Let the first coat dry completely (check the can, but 4 hours is a solid rule). Look at the ceiling from a few angles with different light on it. Don’t lose your mind if you still see a little something here and there. The second coat is what evens it all out and fixes the flashing. Apply that second coat the exact same way you did the first. Don’t just dab at bad spots—you need to recoat the whole ceiling if you want it to look right.
Common Causes
- Low-Quality or Wrong Paint: Using cheap wall paint on a ceiling is a mistake I see all the time. Ceiling paints have a flatter sheen and they spread light better.
- No Primer: Painting straight over drywall patches, stains, or a darker color without primer leaves you with different levels of porosity, and that makes the paint dry unevenly.
- Applying Paint Too Thinly: Trying to stretch the paint to save a few bucks will leave you with a thin, patchy coat that shows every roller mark.
- Improper Roller Technique: Leaning too hard on the roller, not keeping it loaded, or losing your wet edge are the big technique problems.
- Wrong Roller Cover: A thin-nap roller (1/4" or 3/8") won’t hold enough paint to lay down an even coat on something as big as a ceiling.
- Painting in Direct Sunlight or High Heat: Heat makes the paint dry too fast, and then you can’t keep a wet edge. Don’t paint ceilings when the sun’s blasting through the windows. An ideal temperature is around 70°F.
Common Mistakes
- "Touching Up" Instead of Recoating: Dabbing a little paint on a streak just makes it worse. That spot will flash differently because the texture and sheen won’t match. The real fix is recoating the entire surface.
- Using Old or Poorly Stored Paint: Paint that’s been frozen or sitting around for years can lose its binding strength, and the finish goes sideways.
- Not Stirring Paint Thoroughly: The solids and binders separate over time. If you don’t mix it well, you’re basically painting with different materials out of the same can.
- Ignoring the Recoat Time: If you hit the second coat before the first one’s fully dry, you can re-wet the bottom layer and pull it up. That’s a bad day. Be patient and wait the recommended time.
Cost & Time Breakdown
| Task | DIY Cost | Pro Cost | Time |
|---|---|---|---|
| Scuff-sanding & Prep | $20–$40 | Included | 1-2 hours |
| Priming (10x12 room) | $30–$50 | $150–$250 | 1-2 hours |
| Painting (2 Coats) | $60–$100 | $300–$500 | 3-5 hours (plus dry time) |
| Total | $110–$190 | $450–$750 | 1 Day |
Tips & Prevention
- Always Buy Ceiling Paint: Spend the extra $10 for a gallon of dedicated ceiling paint. You’ll be glad you did.
- Buy High-Quality Rollers: A premium roller cover, like a Purdy White Dove, holds more paint and lays it down evenly. That’s half the battle right there.
- Tint Your Primer: Ask the paint store to tint your primer with about 25% of the color of your ceiling paint. It helps the top coat cover better and gives you a more even finish.
- Control the Environment: Close the windows so breezes don’t dry the paint too fast. If it’s a hot North Texas summer day, run the AC and keep the temperature below 80°F.
- Roll Perpendicular to the Main Window: On the final coat, roll in a direction that’s perpendicular to the main light source. That way, any roller marks are a lot less obvious.
When to Call a Professional
Fixing flashing is usually a DIY job, but there are times I’d tell you to call it in. If the ceiling’s got heavy water damage, cracks that look structural, or you think there’s lead paint in a house built before 1978, don’t mess around. And if the ceilings are over 10 feet high, the ladder and scaffold risk starts climbing fast—hiring an insured pro is the smarter, safer move.
Related Articles
Keep troubleshooting with these hand-picked guides from FixlyGuide:
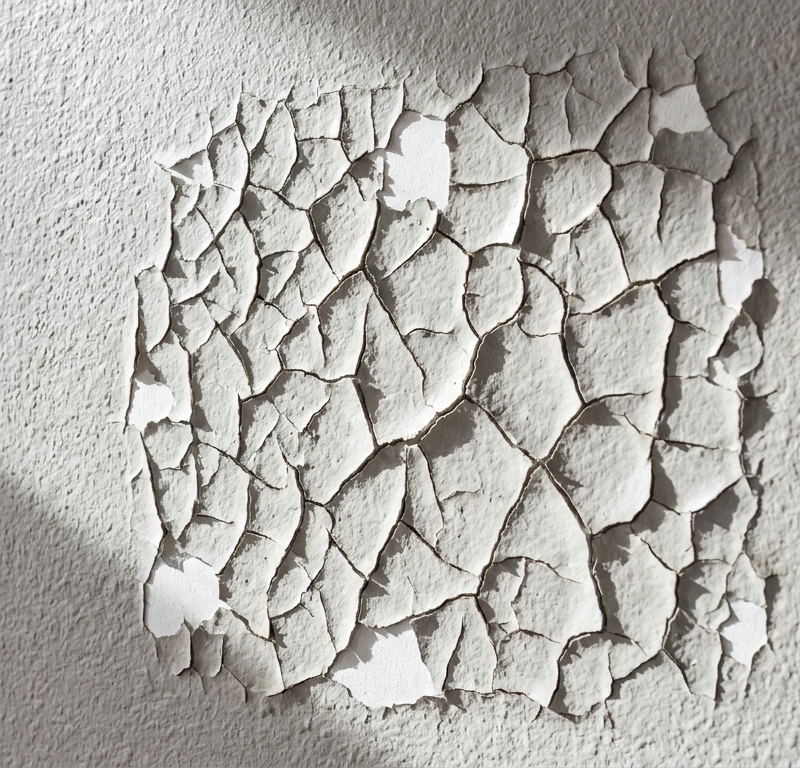
- Why Is My New Paint Cracking? 9 Causes of 'Alligatoring' and How to Fix It — Seeing fine, alligator-skin cracks in your new paint? It's a common problem called 'alligatoring'—here are the nine most likely causes and…
- Why Your New Inductor Cooktop Won't Turn On (And the Easy Fix) — Don't panic if your new induction cooktop isn't firing up after installation; it's a common issue with a straightforward electrical cause.
- Wood Glue Not Drying? 7 Reasons Your Project Is Still Tacky (And How to Fix It) — Wondering why your wood glue is still wet hours or even days later? It's usually due to temperature, wood type, or clamp pressure—here are…
- Stain Blotching Your Pine Project? 5 Causes of Splotchy Finishes (And How to Prevent It) — Tired of your pine projects turning out splotchy and uneven? Understand the 5 key reasons pine blotches and learn the pro-level preparation…
- Toilet Keeps Running? 7 Causes and the Fix for Each — A running toilet is a common annoyance that wastes water and money. Most causes are easy to fix in under 30 minutes with a few basic parts…
- Why Your New Sod Is Disappearing (The Grub Problem Plumbers Don't Talk About) — If your freshly laid sod is dying in patches or easily pulls up, you're likely dealing with a hidden grub infestation, a common problem oft…
Should you do this yourself?
Answer five quick questions before you start. Safety outranks savings every time.
Your experience with work like this
How high do you have to work?
Does the job involve any of these?
Will it need a permit?
Specialty tools
Free and instant. Educational guidance only — not a quote, inspection, or professional diagnosis.
Estimate your own project cost
National averages are a starting point. Enter your details for a range that fits your house.
Interior paint estimator
- Paint$96
- Supplies (tape, rollers, drop cloth)$35
- Estimated total (DIY)$131
Hiring a pro? Add roughly $1.50–$4.00/sq ft for labor depending on prep work and trim detail.
Educational estimate only — always confirm with written local bids.
What should this project cost?
Enter your project details for a realistic cost range before you call anyone.
Interior rooms run $400–$1,200; whole-home exterior painting commonly $4,000–$12,000.
- Regional adjustment
- National average
- Labor share (typical)
- ~$2,003
- Quotes to collect
- 3 written estimates
Educational estimate based on national averages — not a binding quote. Always confirm with written local estimates.
Fixly Project Decision Box
- DIY difficulty
- Professional Recommended
- Estimated time
- Inspection 1–2 hours · repairs 1–3 days
- Cost level
- High
Main tools / materials
- Binoculars for a ground-level look
- Flashlight for attic checks
- Moisture meter
- Roofing cement (temporary patch only)
When to stop and call a pro
- Active leak near lights, fans, or any wiring
- Sagging, bulging, or water-filled ceiling
- Steep, wet, or two-story roof — do not climb it
- Storm or hail damage you plan to claim on insurance
Need professional help?
Free roof assessment first — no phone calls until you ask for them.
Get Local Roofing HelpDecide what your roof needs
Two minutes of questions turns "something is wrong up there" into a clear next step.
- Repair or replace your roof?Answer 10 questions about age, leaks, and damage to get a clear next step.Open
- Compare contractor quotesScore up to four bids on price, warranty, licensing, and timeline.Open
- Get local estimatesSend one request and compare written estimates from vetted pros.Open
Free, no signup required. Estimates are educational guidance, not a quote or an inspection.
Get the print-ready PDF of this guide
A clean, ad-free, printable version you can keep on your phone or pin to the workshop wall. Free with a FixlyGuide account.
- Print-optimized layout
- Tools, materials & every step included
- Saved to your account
Recommended for DIYers & woodworkers
Sponsored
The Top 20 Tools for Workshops of Any Budget
No stationary machines or power tools required — plus 3 fundamental tools that can't be bought at any price.
Get the free guide
Ted's Woodworking — The #1 Woodworking Resource
Detailed instructions, dimensioned drawings, materials & cutting lists, and 3D schematics for every skill level.
See the plansSponsored: links above are affiliate links. FixlyGuide may earn a commission on qualifying purchases — at no extra cost to you.
Frequently asked questions
Can I just paint another coat to fix flashing?+
Sometimes, but it's risky. If the problem is just that the coat was too thin, a second coat *might* work. However, if the cause is an unprimed patch or surface texture difference, you'll just be wasting paint. It's always better to sand and prime first.
What's the best roller nap for a smooth ceiling?+
For a previously painted, smooth drywall ceiling, a 1/2-inch nap roller is the perfect balance. It holds enough paint for good coverage without creating too much texture. Avoid 3/8-inch naps as they don't hold enough paint and force you to press, causing streaks.
Is there a paint that's guaranteed not to flash?+
No paint is truly 'guaranteed,' but premium, dead-flat ceiling paints are your best bet. They are formulated to absorb light and minimize reflection, which makes imperfections much less visible. Look for products specifically marketed as 'ultra-flat' or 'for ceilings'.
Why do my ceiling streaks only show up when the light hits it?+
This is the definition of flashing. The streaks are subtle differences in paint texture and sheen. In low, indirect light, the surface looks uniform. But when a strong, low-angle light source (like afternoon sun) hits it, that light reflects off the texture differences, making them visible.
Do I have to sand the ceiling before repainting?+
Yes, it's a critical step. You're not trying to strip the paint, just 'scuff' the surface. This light sanding dulls the existing sheen and creates a microscopic texture that gives the new primer a much better grip, ensuring a uniform finish.
How long should I wait between coats of ceiling paint?+
Always read the can, but a good rule of thumb is at least 4 hours. Painting the second coat too soon can re-wet the first coat and cause it to peel or lift off with the roller. Patience is key for a good finish.
Is it better to roll in one direction?+
Yes, for the final coat, it's a good practice to roll all your final passes in the same direction, preferably perpendicular to the primary window. This creates a more uniform final texture and can help disguise minor lap marks.
Can I use a paint and primer in one to fix flashing?+
It's not recommended for fixing a flashing problem. 'Paint and primer in one' products are really just thicker paints. To solve flashing, you need a dedicated primer to seal the surface completely and create a uniform base for your topcoat.
Discussion
Loading comments…