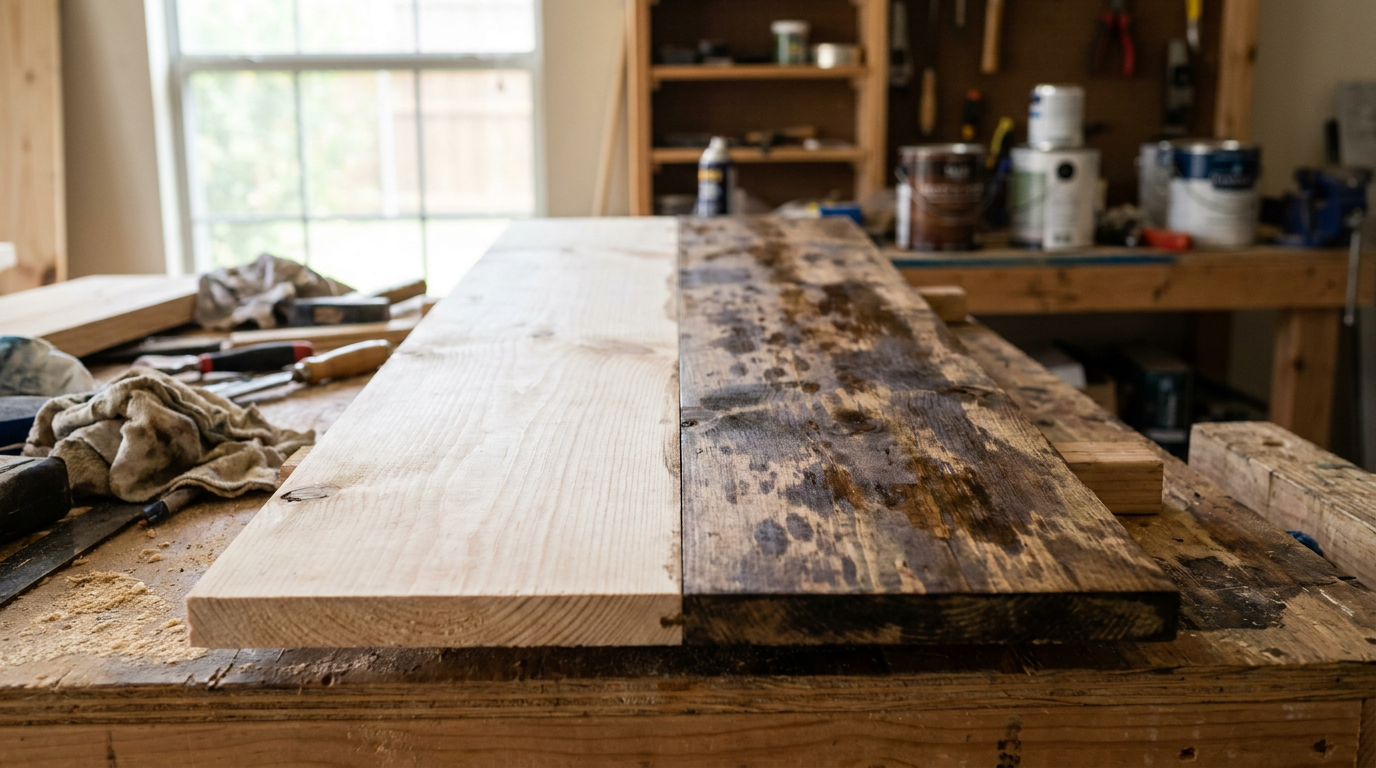
- You Skipped the Conditioner: The 1 culprit. Raw pine will blotch with most liquid stains. You’ve gotta use a conditioner or switch to a gel stain.
- Uneven Sanding: Different grits in different spots, or leaning too hard with a fine grit, can burnish the wood and leave blotchy areas.
- You Waited Too Long: After conditioner goes on, you only get a short window (usually <2 hours) to stain before it cures and seals the surface.
- You Didn't Wipe the Excess: Leaving puddles of conditioner or stain on the surface creates its own blotching, where some spots end up too light or too dark.
- End Grain Absorption: End grain is basically the open end of a thousand straws. It’ll suck up stain like crazy and go almost black. Sand end grain finer (e.g., 320-grit) than the faces and give it extra conditioner.
General remodeling · Renovation planning
| Project category | General remodeling |
|---|---|
| Problem type | Renovation planning |
| Trade required | General contracting |
| Urgency | Planned project |
| Safety risk | Low safety risk |
| DIY suitability | Pro recommended |
| Cost category | Major investment |
| Typical timeline | Design and permitting often 2–4 months before work starts |
| Contractor type | General contractor |
Repair option
Phase the work and fix the building envelope first.
Replacement option
Full renovation with permits, design, and a general contractor.
Common causes
- Space no longer fits how the household lives
- Resale preparation
- Deferred maintenance stacking up
Relevant tools:project cost estimatorcompare quoteshome improvement material prices
Published October 2, 2026Last updated October 2, 2026
The shop list for this build
Hand-picked tools & materials — shop on Amazon, ships fast.
Power tools
· The heavy hitters — buy once, use for decades.- Shop on AmazonRandom orbit sander
Hand tools & jigs
· Layout, joinery, and the everyday workbench essentials.- Shop on AmazonFoam brushes
Materials & hardware
· Lumber, fasteners, glue, abrasives — the consumables.- Shop on Amazon180-grit sanding discs
- Shop on AmazonClean, lint-free rags
- Shop on AmazonNitrile gloves
- Shop on AmazonTack cloth
Why it's here: Optional, but helpful for removing all dust before finishing.
Finishes & coatings
· Stains, dyes, top-coats, and prep products.- Shop on AmazonPre-stain wood conditioner
Why it's here: Oil-based or water-based, to match your stain.
- Shop on AmazonGel stain or oil-based stain
Quick Answer
Pine blotches when you apply stain because its density isn’t consistent, so some spots drink up a lot more pigment than others and you end up with a splotchy, uneven finish. I see this all the time in softwoods like pine, poplar, and birch. The fix is pretty straightforward: use a pre-stain wood conditioner, which seals the fibers just enough that the stain goes on more evenly.
The Problem
You spend hours, maybe days, building that new pine bookshelf or coffee table. The joints are tight, the edges are crisp, and the whole thing’s sanded smooth. Then you put on the stain, step back to admire it, and your stomach drops. Dark blotches here, pale spots there. It looks cheap, and it sure doesn’t look like the sample on the can.
That’s not you screwing it up. That’s pine being pine. Hardwood like oak or walnut has a more even grain structure, but pine’s got a weird mix of hard and soft areas. The soft parts act like a sponge and soak up way more pigment, while the harder parts fight it off. That’s where that ugly splotchy look comes from, and it’s been annoying woodworkers forever.
How It Works
To get why pine blotches, you’ve gotta think microscopic. Picture a bundle of millions of tiny straws. In a hardwood like oak, those straws are about the same size and packed pretty tight. When you apply stain, it wicks into the pores in a fairly even way, so the color comes out consistent.
Pine’s a different animal. It’s a mix of different-sized straws all jumbled together. The dense, dark parts of the grain (the "latewood" from the tree's slow winter growth) have tiny pores. The lighter, softer parts (the "earlywood" from the fast spring growth) have huge, open pores. So when you wipe on stain, the earlywood sucks it down hard, and that’s where the dark blotches come from. The latewood barely takes anything, so it stays light. That wild difference in absorption is what we call blotching.
And yeah, sanding can make it worse. I’ve seen spots get oversanded with a finer grit and burnished so hard they acted almost sealed. Then the stain just sat there and looked angry. It’s the wood’s structure and your prep work both teaming up against you — nasty little combo.
Step-by-Step Fix
Here’s the method I use when I want a clean, even finish on pine. Don’t skip steps. The money’s in the prep, not the stain can.
-
Final Sanding — Your last pass should be 180-grit sandpaper. Do not go finer than 220-grit. Sanding too fine polishes (burnishes) the wood, and then the conditioner and stain won’t penetrate evenly. Sand with the grain, nice and steady. A random orbit sander’s great here. After that, vacuum the whole surface, then wipe it down with a microfiber cloth or tack cloth so there’s no dust hanging around.
-
Raise the Grain — Lightly spray or wipe the surface with distilled water. Don’t soak it; just a fine mist will do. You’ll see the fibers swell and stand up a bit, and the surface gets fuzzy. That pre-raises the grain so the water-based conditioner doesn’t do it later and leave you with roughness. Let it dry out fully for about 1-2 hours.
-
Knock Down the Raised Grain — Once it’s bone dry, hand-sand it very lightly with your last-used grit (180-grit). You’re just knocking off the fuzz you raised. Easy pressure. No muscle. The surface should feel silky again. Clean off the dust one more time.
-
Apply Wood Conditioner — This is the step that saves your bacon. Use a pre-stain wood conditioner (sometimes called "stain controller"). You’ll find oil-based and water-based versions, so match it to your stain type. Put it on with a foam brush or clean rag in a liberal, even coat. Let it sit for the time on the can, usually 5-15 minutes.
-
Wipe Off Excess Conditioner — After the wait, wipe off all the extra conditioner. Don’t leave puddles. That’ll cause its own mess and keep the stain from grabbing right. The surface should feel a little damp, not wet.
-
Apply the Stain — Put the stain on within the "re-coat" window listed by the conditioner, usually within 2 hours. If you wait too long, the conditioner can fully seal the wood and then you’re dead in the water. Apply the stain per the directions, then wipe off the excess after the recommended time. You should see a much more even color. Way less drama.
-
Consider a Second Coat (Or a Gel Stain) — Since conditioner limits how much the wood drinks up, the color can end up lighter than you hoped. You can do a second coat for more depth. Or, if you want even better blotch control, use a gel stain. Gel stains are thick, like mayonnaise, and they sit more on top of the wood instead of soaking in deep. For blotch-prone woods, they’re about as good as it gets.
-
Apply Your Topcoat — After the stain cures fully (check the can, this can be 8 to 24 hours), put on your protective topcoat like polyurethane, shellac, or lacquer. That protects the wood and stain and gives you the sheen you’re after.
Common Causes
Why did your project blotch? Usually it’s one of these:
- You Skipped the Conditioner: The #1 culprit. Raw pine will blotch with most liquid stains. You’ve gotta use a conditioner or switch to a gel stain.
- Uneven Sanding: Different grits in different spots, or leaning too hard with a fine grit, can burnish the wood and leave blotchy areas.
- You Waited Too Long: After conditioner goes on, you only get a short window (usually <2 hours) to stain before it cures and seals the surface.
- You Didn't Wipe the Excess: Leaving puddles of conditioner or stain on the surface creates its own blotching, where some spots end up too light or too dark.
- End Grain Absorption: End grain is basically the open end of a thousand straws. It’ll suck up stain like crazy and go almost black. Sand end grain finer (e.g., 320-grit) than the faces and give it extra conditioner.
Common Mistakes
These are the mistakes I see DIYers make all the time trying to fix this problem.
- Trying to "Fix" Blotches by Adding More Stain. That’s like pouring gas on a fire. The dark spots get darker and the light spots get uglier. Sand it back and start over with conditioner.
- Sanding to a Super-Fine Grit. It sounds logical that smoother would stain better, but nope. Go beyond 220-grit and you’ll burnish the wood, close off the pores, and keep any stain from soaking in.
- Using a "Stain and Poly in One" Product. Those all-in-one products are a pain and the results usually stink. The polyurethane starts setting before the stain has a chance to level out, so you get streaks and blotches. Keep the stain and topcoat separate.
- Believing the "Conditioner is a Scam" Myth. Some old-timers—or internet forum warriors—will tell you conditioner is just thinned-down varnish and you can whip up your own. Technically, sure, but commercial conditioners are made for specific open times and compatibility. For a few bucks, you cut way down on variables. Just buy the can.
- Not Testing on Scrap. Never apply a new finishing schedule to your final piece without testing it on matching scrap first. Every single step.
Cost & Time Breakdown
Here’s what you’re looking at for a typical small project like a side table or bookshelf.
| Task | DIY Cost | Pro Cost (Finish only) | Time |
|---|---|---|---|
| Sandpaper (Assorted Grits) | $10–$20 | - | 30-60 mins |
| Pre-Stain Wood Conditioner | $12–$18 per quart | - | 20-30 mins |
| Wood Stain (Oil or Gel) | $15–$25 per quart | $250–$500+ | 30-45 mins |
| Rags, Brushes, Gloves | $10–$15 | - | - |
| Total | $47–$78 | $250–$500+ | 2–4 hours (plus drying) |
Tips & Prevention
- Embrace Gel Stains: If you’re new to finishing pine, start with a gel stain. It’s almost impossible to make it blotch. Wipe it on, wipe it off. Hard to mess up.
- Use a Shellac Seal Coat: Another option is dewaxed shellac, like Zinsser SealCoat. Apply a thin 1-pound cut (mix the SealCoat 50/50 with denatured alcohol). It seals the wood nicely and gives you a solid base for stain, especially gel stains or glazing.
- Don't Over-Sand: Stop at 180-grit on surfaces that’ll be stained. That keeps the pores open enough for color but still leaves you with a smooth feel.
- Wipe-On, Wipe-Off: For any stain—liquid or gel—put it on generously and then wipe off all the excess. Whatever color stays behind is what you get. More stain doesn’t mean deeper color; usually it just means a sticky mess.
When to Call a Professional
Finishing is a skill, but it’s one you can learn. There’s almost no reason to call a pro just to stain a piece of furniture you built yourself. I’d call one in for refinishing valuable antiques, where one bad move can wreck the value, or for big jobs like kitchen cabinets or hardwood floors that need spray gear and proper ventilation to get a durable, clean result. I pulled a water heater in Frisco last month that had exactly this kind of uneven finish on a shop-made cabinet panel — owner had sanded it like glass and wondered why it went blotchy. Same story every time.
Related Articles
Keep troubleshooting with these hand-picked guides from FixlyGuide:
- The Grain Tear-Out That Makes Your Wood Look Like Trash — Grain tear-out isn't just ugly; it ruins projects. I'll show you why it happens and the simple tricks I use to get clean, crisp cuts every…
- Why Your Fresh Paint Looks Blotchy & Uneven (It’s Not Just Your Technique) — Discover the surprising culprits behind blotchy, uneven paint finishes and learn the contractor-approved steps to achieve a smooth, profess…
- Wood Glue Not Drying? 7 Reasons Your Project Is Still Tacky (And How to Fix It) — Wondering why your wood glue is still wet hours or even days later? It's usually due to temperature, wood type, or clamp pressure—here are…
- The Shower Door Secret: Stop Leaks Without a Pro — Tired of puddles outside your shower? I'll show you the pro trick to stop leaks cold, without calling in a handyman or ripping out your sho…
- The 7 Critical Wall Prep Mistakes Most DIY Painters Make (And How to Fix Them) — Discover the common wall preparation mistakes DIY painters make and how to avoid them for a flawless finish that lasts.
- The Invisible Film Making Your Bathroom Mirror Streaky – And How to See Clearly — Discover why your bathroom mirror always looks streaky, even after cleaning, and learn the pro trick to get a perfectly clear, fog-free ref…
Your seasonal maintenance checklist
The small jobs that prevent the expensive repairs. Tick them off — progress saves on this device.
Free, no signup. Skip anything that requires roof access or working near live electrical.
What should this project cost?
Enter your project details for a realistic cost range before you call anyone.
Cost depends heavily on which system turns out to be the source.
- Regional adjustment
- National average
- Labor share (typical)
- ~$1,620
- Quotes to collect
- 3 written estimates
Educational estimate based on national averages — not a binding quote. Always confirm with written local estimates.
Before you start
Check the difficulty, permits, and safety risk — then decide whether to call a pro.
- Is this a safe DIY job?Check permits, tools, and risk before you start the steps below.Open
- Estimate this projectGet a cost range for your scope and ZIP before you call anyone.Open
- Get local estimatesSend one request and compare written estimates from vetted pros.Open
Free, no signup required. Estimates are educational guidance, not a quote or an inspection.
Get the print-ready PDF of this guide
A clean, ad-free, printable version you can keep on your phone or pin to the workshop wall. Free with a FixlyGuide account.
- Print-optimized layout
- Tools, materials & every step included
- Saved to your account
Recommended for DIYers & woodworkers
Sponsored
The Top 20 Tools for Workshops of Any Budget
No stationary machines or power tools required — plus 3 fundamental tools that can't be bought at any price.
Get the free guide
Ted's Woodworking — The #1 Woodworking Resource
Detailed instructions, dimensioned drawings, materials & cutting lists, and 3D schematics for every skill level.
See the plansSponsored: links above are affiliate links. FixlyGuide may earn a commission on qualifying purchases — at no extra cost to you.
Frequently asked questions
Can I just use a darker stain to hide the blotches?+
No, this will actually make it worse. A darker stain contains more pigment, so the splotchy areas will just absorb more and become even darker and more noticeable compared to the lighter areas.
What if I already stained my pine project and it's blotchy? How do I fix it?+
Unfortunately, the only reliable fix is to remove the finish and start over. This usually means chemically stripping it or sanding it all the way back down to raw wood. Then, you can follow the proper prep steps with a wood conditioner before re-staining.
Is pre-stain conditioner the same as sanding sealer?+
No, they are different. A pre-stain conditioner is designed to be applied, and then stained within a couple of hours. A sanding sealer is a thinned topcoat (like lacquer or polyurethane) designed to seal the wood completely and be sanded smooth before the final topcoats are applied. You can't stain *over* a sanding sealer.
Do I need to use a wood conditioner on oak or other hardwoods?+
Generally, no. Hardwoods like oak, walnut, and mahogany have a more uniform pore structure and don't tend to blotch. However, softer hardwoods like cherry, maple, birch, and alder are notorious for blotching and will benefit greatly from a pre-stain conditioner.
Can I make my own pre-stain wood conditioner?+
You can, but it's often not worth the trouble. For oil-based stains, a homemade conditioner is just mineral spirits mixed with a small amount of oil-based varnish. For the low cost of a commercial product formulated for ideal performance, it's usually better to just buy it.
Is there a type of stain that doesn't cause blotching?+
Yes! Gel stains are the best choice for blotch-prone woods like pine. They are very thick and sit on the surface rather than soaking in deeply, which results in a much more even color. Wood dye is another option that can provide more even results than a traditional pigment stain.
Why did the end grain of my board turn almost black?+
The end grain of wood is like a bundle of straws viewed from the end—it's incredibly absorbent. It can soak up 10 times more stain than the face of the board. To prevent this, sand the end grain to a higher grit (like 320) and apply an extra coat of conditioner before staining.
How long should I wait to stain after applying conditioner?+
This is critical: follow the directions on the can. Typically, you apply stain within 15 minutes to 2 hours of applying the conditioner. If you wait too long, the conditioner can fully dry and seal the wood, preventing the stain from penetrating at all.
Discussion
Loading comments…