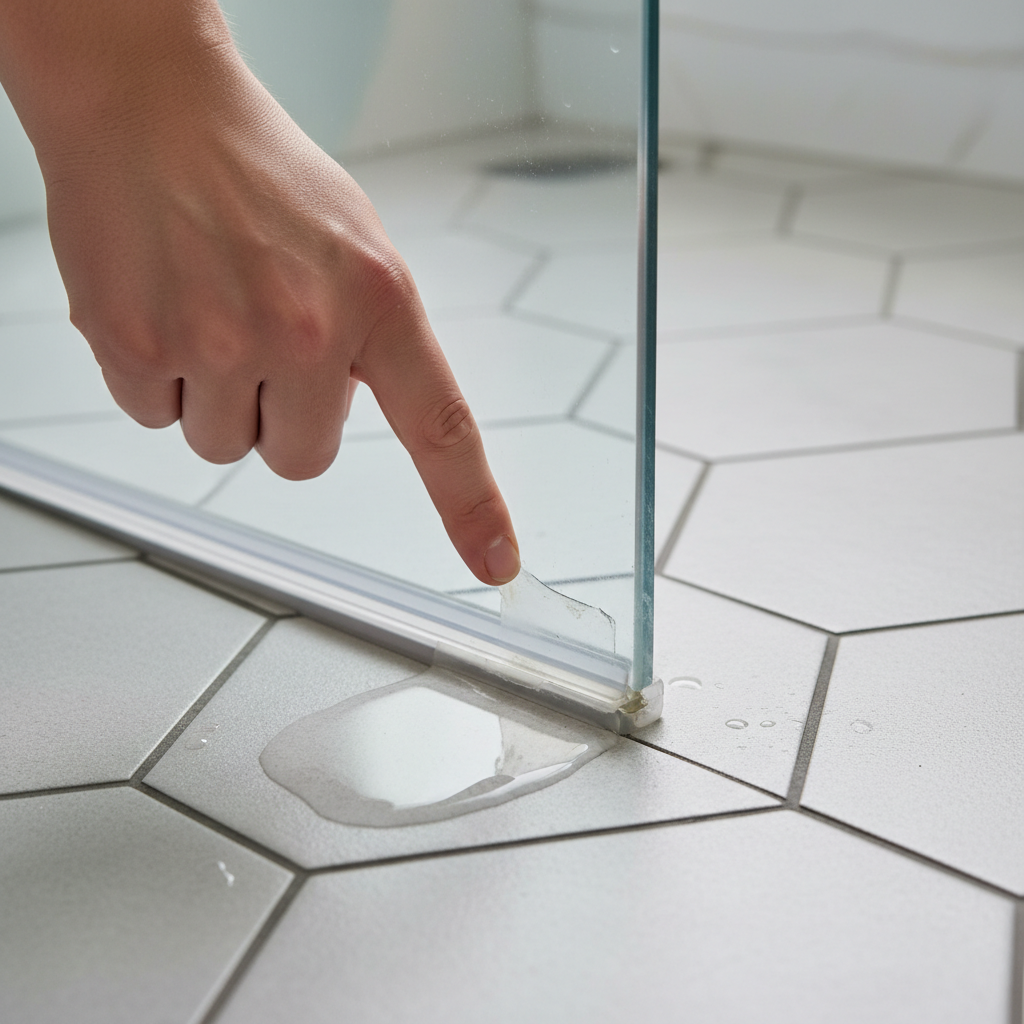
- Replace Bottom Shower Sweeps — The most common culprit
- Tools: Utility knife, new shower sweep (measure width and thickness of your old one).
- If this doesn't work: Check the threshold itself. If it’s sloped away from the shower, water’ll always find a way out.
Plumbing · Leak
| Project category | Plumbing |
|---|---|
| Problem type | Leak |
| Trade required | Plumbing |
| Urgency | Emergency — act now |
| Safety risk | High safety risk |
| DIY suitability | DIY for experienced homeowners |
| Cost category | Low cost |
| Typical timeline | Shut water off now; repair usually same or next day |
| Contractor type | Licensed plumber |
Repair option
Isolate at the shutoff, replace the failed component, and dry the cavity fully.
Replacement option
Repipe the run or the branch when corrosion is widespread.
Common causes
- Failed supply line or shutoff valve
- Worn washers, cartridges, or P-trap connections
- Pinhole corrosion in older copper
Relevant tools:emergency checklistdiy or hire a pro
Published September 18, 2026Last updated September 18, 2026
Tools & materials you'll need
Affiliate linksAs an Amazon Associate FixlyGuide earns from qualifying purchases — at no extra cost to you. Prices and availability are accurate as of publication and subject to change.
Quick Answer
Look, nobody likes mopping up puddles after a shower. Most shower door leaks aren’t some plumbing disaster; they’re usually worn-out seals or a door that’s drifted a hair out of alignment. The good news? You can usually track down the leak and fix it yourself with a few bucks and about an hour of work. Most of the time, you’re swapping out tired old seals that just aren’t sealing anymore, or you’re snugging up a hinge that’s gone a little loose. It’s a lot simpler than folks think, and honestly, it feels pretty darn good to beat it yourself.
The Problem
You step out of a hot shower, grab your towel, and there it is: a puddle growing on the bathroom floor. Not exactly a great start to the morning. And it’s not just annoying. That standing water can chew up your bathroom over time. I’m talking rotten baseboards, warped flooring, mildew creeping into the subfloor, or sneaking behind drywall where you can’t see it. I’ve had homeowners in North Ridgeville brush off a little leak for months, then call me when the floor felt soft underfoot or the trim started buckling. What starts as a small drip can turn into a real mess fast, especially if water’s making its way under tile or into a vanity cabinet. You can’t just shrug it off; you’ve gotta get on it before it turns into a five-figure headache.
How It Works
Your shower door assembly, whether it’s framed, frameless, or semi-frameless, depends on a mix of seals and tight alignment to keep water where it belongs. Think of it like a puzzle that only works if every piece is lined up right. You’ve got the glass panels, hinges or rollers, and a handful of different seals doing the heavy lifting. On a hinged door, there’s usually a bottom sweep — often vinyl, with a bulb or fin — that brushes the threshold and blocks splash. Along the vertical edges where the door meets a fixed panel or the wall, you’ll find vinyl or polycarbonate seals, sometimes called strips or wipes. Those pieces make the barrier that keeps water inside the enclosure. Frameless doors lean on those clear vinyl seals even harder, since they don’t have a metal frame helping contain the splash. Sliding doors use rollers to move smoothly, but if those rollers get even a little out of line, you can end up with a gap at the bottom or along the sides. Then there’s the caulk, usually silicone, which seals the joints where the fixed panels meet the curb or wall. That stuff matters. It’s what keeps the seams watertight. Over time, all of it wears out. Vinyl hardens, cracks, or loses its shape. Silicone shrinks, peels, or grows mold and breaks its bond. Hinges loosen and the door starts to sag. It’s built to be watertight, but hot water, soap scum, and cleaning chemicals are brutal on it. That’s why even a nice install — like a custom shower I put in a Strongsville house about five years back — still needs some TLC now and then. Daily use beats the daylights out of these parts.
Step-by-Step Fix
Before you grab a screwdriver, take a dry towel and wipe down the whole outside perimeter of the shower. Then run the shower like normal and watch closely for where the water’s sneaking out. A flashlight helps. A lot. You’d be surprised how easy it is to miss a tiny drip until it’s already made a mess.
-
Identify the Leak Source — Look for the drips Once you’ve run the shower, step out and check the whole perimeter from the outside. Look along the bottom of the door, around the hinges, and where the fixed panels meet the wall or curb. Dab suspicious spots with a dry paper towel; if there’s water, you’ll know right away. Don’t wing this one. Guessing burns time.
-
Clean the Area Thoroughly — Prep for a good seal Before you replace seals or lay new caulk, the surface’s gotta be clean. Use a spray bottle with a 50/50 mix of white vinegar and water, or a shower cleaner made for the job, to strip off soap scum and mineral buildup. Scrub it with a non-abrasive pad. Rinse it well and let it dry all the way. If you leave residue behind, the new seal or caulk won’t stick worth a darn.
-
Replace Bottom Shower Sweeps — The most common culprit
- Tools: Utility knife, new shower sweep (measure width and thickness of your old one).
- Most bottom sweeps slide right onto the glass. Sometimes you’ve gotta gently pry the old one off with a flathead screwdriver or a utility knife, but don’t go scratching the glass. Measure it carefully, cut the new sweep to length, and slide it onto the bottom of the door. Make sure the drip rail or 'fin' is pointing inward so it sends water back into the shower pan.
- If this doesn't work: Check the threshold itself. If it’s sloped away from the shower, water’ll always find a way out.
-
Inspect and Replace Vertical Seals — Side protection
- Tools: Utility knife, new vertical seal strips (match profile of existing).
- These are the seals running up the sides of a hinged door or between sliding panels. They usually have a 'bulb' or 'fin' that creates a compression seal. After a while, they harden up and crack. Pull the old ones off carefully. Measure, cut the new strips to length, then press them firmly onto the glass edge. Some need a little silicone to stay put, but plenty of them are just a friction fit.
-
Tighten Loose Hinges/Rollers — Sagging doors cause gaps
- Tools: Screwdriver (Phillips or flathead, depending on your hardware), Allen wrench set.
- If the door feels wobbly or sags, the hinges are probably loose. Open the door and check every screw on the hinges. Tighten them gently. Don’t crank on them, especially on frameless glass doors — you can crack the glass if you get too aggressive. On sliding doors, check the roller assemblies for play and snug their mounting screws. Sometimes a simple roller-height adjustment fixes a sag that’s causing the leak.
-
Re-caulk Problematic Seams — The last line of defense
- Tools: Utility knife or caulk removal tool, masking tape, caulk gun, 100% silicone sealant (mildew-resistant, clear or matching fixture color), paper towels, rubbing alcohol.
- Safety: Always wear gloves and keep the room ventilated when you’re working with silicone caulk.
- Scrape out every bit of the old caulk from the leaky seams — where the fixed glass panels meet the wall or curb — using your utility knife or a caulk removal tool. Clean the joint with rubbing alcohol and let it dry. Run masking tape neatly along both sides of the seam, leaving the gap as wide as you want the finished bead. Cut the silicone tube tip at a 45-degree angle, about a 1/8-inch opening. Lay down a steady bead and keep the gun moving. Smooth it right away with a wet finger or a caulk tool. Pull the tape before the caulk skins over. Let it cure for at least 24 hours (check product instructions) before you use the shower.
- Pro Tip: Stick with a good 100% silicone sealant. It’s flexible, waterproof, and bonds well to glass and tile. Acrylic caulk won’t last in a wet shower. No dice.
Common Causes
- Worn-Out Bottom Sweep: This is the one I see most. The vinyl or rubber at the bottom hardens, cracks, or loses its shape, and then water slips right through the gap. These things usually last a few years before they’re toast.
- Degraded Vertical Seals: Just like bottom sweeps, the side seals along a door or between panels can turn brittle and stop doing their job, especially after repeated cleaning and constant temperature swings.
- Loose Hinges or Rollers: If the door isn’t hanging plumb and level, gaps open up. Once that door starts sagging, the bottom sweep stops making solid contact with the threshold.
- Cracked or Mildewed Caulk: The silicone around the fixed panels and curb is your main waterproof barrier. If it’s cracked, peeling, or covered in black mildew, it’s not sealing anything.
- Improper Installation: Sometimes the problem’s baked in from day one. If the shower curb isn’t level or the fixed panels aren’t plumb, the seals can’t bridge the gaps the way they should. That one usually takes a pro.
Common Mistakes
- Using the Wrong Caulk: Don’t grab acrylic latex caulk for a shower. It won’t hold up to constant water and it’ll break down and mold up fast. You need 100% silicone sealant, preferably mildew-resistant.
- Not Cleaning Surfaces: Trying to stick new caulk or seals over old soap scum, mildew, or grime is a recipe for failure. The new material won’t bond right, and it’ll give up early.
- Ignoring the Cure Time: Silicone caulk needs time to cure and form a watertight bond. Hop in the shower too soon and you’ll wreck the new bead, then you’re right back where you started.
- Overtightening Hinges: Especially on frameless glass, overtightening hinge screws can crack the glass. Snug is fine. Straining it is not.
- Buying the Wrong Replacement Seals: Shower door seals come in a bunch of profiles and thicknesses. Guessing usually means wasted money and a trip back to the store. Bring a piece of the old seal with you, or measure it carefully.
- Applying Too Much Caulk: A fat, sloppy bead doesn’t seal better; it just looks rough and gives mold more surface area to grab onto. Aim for a thin, even bead.
Cost & Time Breakdown
| Task | DIY cost | Pro cost | Time |
|---|---|---|---|
| Diagnose Leak | $0 | $50–$100 | 15–30 min |
| Replace Bottom Sweep | $15–$40 | $100–$150 | 30–60 min |
| Replace Vertical Seals | $20–$60 | $120–$180 | 45–90 min |
| Re-caulk Entire Shower Door | $10–$30 | $150–$250 | 1–2 hours |
| Minor Hinge Adjustment | $0 | $50–$100 | 10–20 min |
| Total DIY (typical scenario) | $25–$80 | N/A | 1–3 hours |
| Total Pro (typical scenario) | N/A | $200–$400 | 1–3 hours |
Note: Pro costs generally include materials and labor. DIY costs are for materials only.
Tips & Prevention
- Regular Cleaning: A quick wipe-down of your shower door after each use keeps soap scum and mineral buildup from chewing up the seals. I tell every client to keep a squeegee in the shower and actually use it. Takes maybe 30 seconds, and it’ll stretch the life of your seals a lot.
- Check Seals Annually: Make it a habit to look over all the shower door seals once a year. Watch for hardening, cracking, or discoloration. Catching small wear early can save you from a bigger leak later.
- Ventilate: Good bathroom ventilation cuts humidity, which slows mold growth and helps the caulk and seals last longer. Run the exhaust fan during the shower and for at least 15-20 minutes after.
- Gentle Cleaners: Skip the harsh, abrasive stuff on shower door seals and caulk. Those chemicals can speed up breakdown. Stick with mild, pH-neutral cleaners or a vinegar-water mix.
- Don't Slam the Door: Treat the shower door with a little care. Repeated slamming can loosen hinges and beat up the seals, and those tiny gaps add up over time.
When to Call a Professional
If you’ve replaced the seals and re-caulked everything and the leak still won’t quit, it might be time to bring in a pro. A stubborn leak can point to a bigger issue with the shower pan, a problem with the door frame itself if it’s not frameless, or trouble with the wall tile or waterproofing behind it. If you see cracked grout, soft spots in the bathroom floor, or water damage showing up on the ceiling below, you’re past simple seal work. A real pro — a glazier for tricky door problems or a general contractor if you suspect structural water damage — has the tools and experience to sort out the bigger stuff. Don’t let a little leak snowball into a huge renovation. Sometimes the smartest move is knowing when to call it a day on the DIY project.
Related Articles
Keep troubleshooting with these hand-picked guides from FixlyGuide:
- That 'Stud-Only' Belief? A Myth for Heavy Shelves — Tired of shelves ripping out of your drywall? The common advice to 'only use studs' is incomplete. Discover the modern anchoring techniques…
- The Secret to a Flawless Drywall Patch Is In the Paper — Frustrated by drywall patches that always show through? That telltale bump or sanding mark can ruin a perfect wall. Discover the 'Californi…
- The $10 Shower Fix Plumbers Don't Want You to Know — Stop that annoying drip! I'll show you how to fix a leaky shower faucet yourself, saving you money and preventing water waste.
- Why Your Paint Just Won't Cover (and How to Stop the Struggle) — Struggling with paint that just won't cover the old color, even after multiple coats? I'll show you why it happens and how to fix it for go…
- The $10 Secret to Never Fixing a Stripped Screw Hole in Your Shelves Again — I'll show you how a common, cheap material can permanently fix stripped screw holes in shelves and furniture, saving you from wobbly repair…
- The Invisible Film Making Your Bathroom Mirror Streaky – And How to See Clearly — Discover why your bathroom mirror always looks streaky, even after cleaning, and learn the pro trick to get a perfectly clear, fog-free ref…
Should you do this yourself?
Answer five quick questions before you start. Safety outranks savings every time.
Your experience with work like this
How high do you have to work?
Does the job involve any of these?
Will it need a permit?
Specialty tools
Free and instant. Educational guidance only — not a quote, inspection, or professional diagnosis.
Questions to ask before you sign
Ask every contractor the same questions and the cheapest bid stops looking cheapest. Check them off as you go — your progress is saved on this device.
Free, no signup. Bring this to every walkthrough so you compare bids on the same terms.
What should this project cost?
Enter your project details for a realistic cost range before you call anyone.
Cost depends heavily on which system turns out to be the source.
- Regional adjustment
- National average
- Labor share (typical)
- ~$1,620
- Quotes to collect
- 3 written estimates
Educational estimate based on national averages — not a binding quote. Always confirm with written local estimates.
Handle this before it gets worse
First steps that limit damage, then a way to reach a qualified pro.
- Emergency repair checklistThe first steps that limit damage before a pro arrives.Open
- Get local estimatesSend one request and compare written estimates from vetted pros.Open
- Estimate this projectGet a cost range for your scope and ZIP before you call anyone.Open
Free, no signup required. Estimates are educational guidance, not a quote or an inspection.
Get the print-ready PDF of this guide
A clean, ad-free, printable version you can keep on your phone or pin to the workshop wall. Free with a FixlyGuide account.
- Print-optimized layout
- Tools, materials & every step included
- Saved to your account
Recommended for DIYers & woodworkers
Sponsored
The Top 20 Tools for Workshops of Any Budget
No stationary machines or power tools required — plus 3 fundamental tools that can't be bought at any price.
Get the free guide
Ted's Woodworking — The #1 Woodworking Resource
Detailed instructions, dimensioned drawings, materials & cutting lists, and 3D schematics for every skill level.
See the plansSponsored: links above are affiliate links. FixlyGuide may earn a commission on qualifying purchases — at no extra cost to you.
Frequently asked questions
How do I know if my shower door is leaking?+
The easiest way is to dry the outside of your shower thoroughly, then run the shower as usual. After a few minutes, check for visible puddles, drips, or wet spots on the floor, baseboards, or near the door frame outside the shower enclosure.
What kind of caulk should I use for my shower door?+
Always use 100% silicone sealant for shower door seams. It's waterproof, flexible, and more resistant to mildew than acrylic or latex caulks. Look for a product specifically labeled for bathroom or kitchen and bath use.
How often should I replace shower door seals?+
It varies, but generally, shower door seals (like bottom sweeps and vertical strips) should be inspected annually and typically last 3-7 years. Heavy use, harsh cleaners, and mineral-rich water can shorten their lifespan.
Can a loose shower door cause a leak?+
Absolutely. If hinges are loose or rollers are out of alignment, the door can sag or move improperly, creating gaps where water can easily escape. Tightening hinges or adjusting rollers is often an overlooked fix.
Why does my frameless shower door leak?+
Frameless shower doors rely heavily on clear vinyl or polycarbonate seals that press against the glass or threshold. If these seals harden, crack, or lose their shape over time, water will find its way out. They also need precise installation to prevent gaps.
What's the difference between a shower sweep and a seal?+
A shower sweep typically refers to the vinyl or rubber strip along the bottom edge of a hinged shower door, designed to deflect water. 'Seals' is a broader term that can include sweeps, as well as the vertical strips that go along the sides of the door or between fixed panels.
Can I prevent future shower door leaks?+
Yes, regular maintenance is key. Wipe down your shower door after each use to prevent mineral buildup, avoid harsh chemical cleaners, ensure good bathroom ventilation, and annually inspect your seals for signs of wear and tear.
My shower door leaks from the wall. What does that mean?+
If water is seeping from where the fixed glass panel meets the wall, it's likely a problem with the silicone caulk seal in that area. The caulk may have degraded, cracked, or peeled away, requiring removal and re-application. If the leak seems to be coming *through* the wall, it's a more serious issue that might require a professional to investigate for plumbing or waterproofing failures behind the tile.

Discussion
Loading comments…