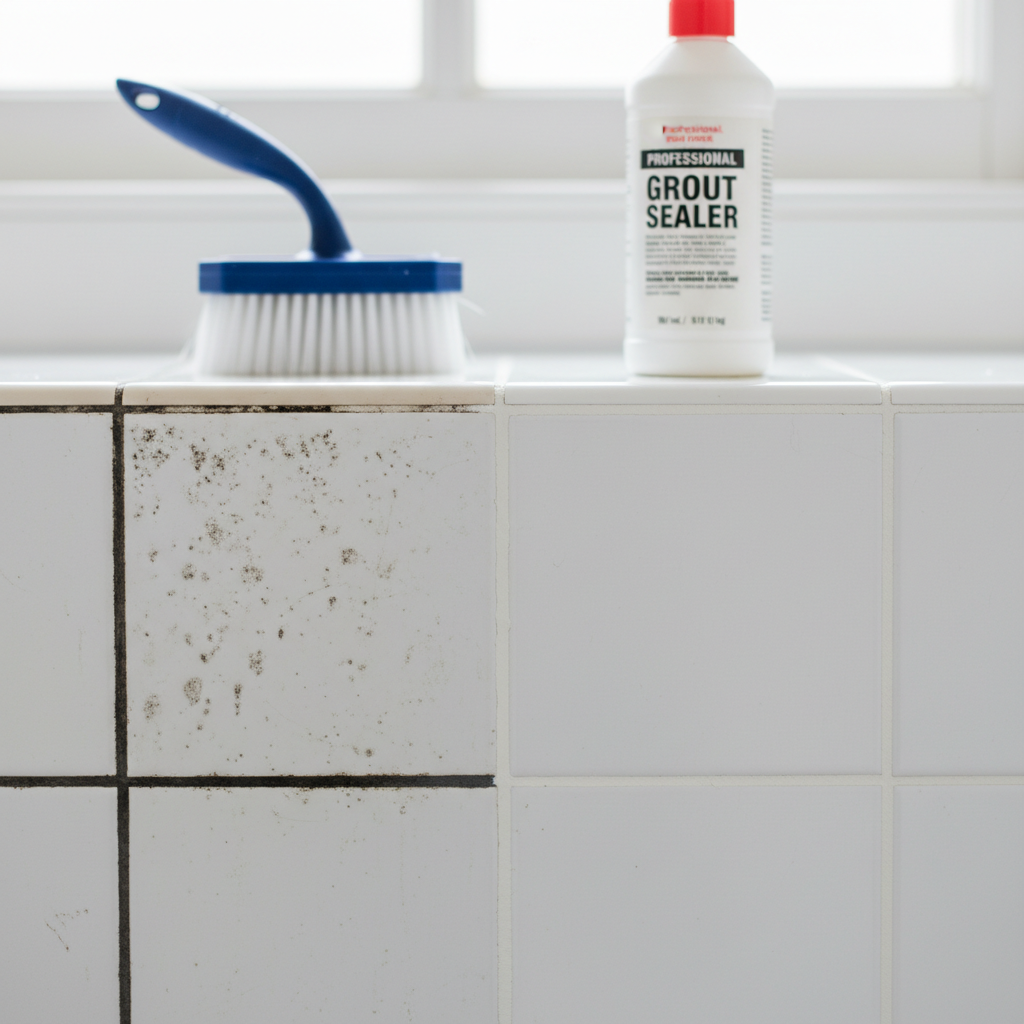
- Apply a Specialized Grout Cleaner — Don’t skimp on this part.
- Safety First: Wear gloves and eye protection. Keep the air moving.
- Pro Tip: If the mildew’s really ugly, a thick bleach-based gel cleaner made for grout clings better on vertical surfaces.
General remodeling · Renovation planning
| Project category | General remodeling |
|---|---|
| Problem type | Renovation planning |
| Trade required | General contracting |
| Urgency | Planned project |
| Safety risk | Low safety risk |
| DIY suitability | Pro recommended |
| Cost category | Major investment |
| Typical timeline | Design and permitting often 2–4 months before work starts |
| Contractor type | General contractor |
Repair option
Phase the work and fix the building envelope first.
Replacement option
Full renovation with permits, design, and a general contractor.
Common causes
- Space no longer fits how the household lives
- Resale preparation
- Deferred maintenance stacking up
Relevant tools:project cost estimatorcompare quoteshome improvement material prices
Published September 22, 2026Last updated September 22, 2026
Tools & materials you'll need
Affiliate linksAs an Amazon Associate FixlyGuide earns from qualifying purchases — at no extra cost to you. Prices and availability are accurate as of publication and subject to change.
Quick Answer
I hear this one all the time from folks who’ve spent way too long on their hands and knees, scrubbing bathroom grout that just won’t come clean. What gives? Usually, it’s not just surface dirt. Your grout’s probably drinking up grime like a sponge, or the sealant’s gone missing long ago. Sometimes it’s mildew that’s taken hold, or plain old worn-out, porous grout that’s past its prime. The real fix? You’ve got to give it a proper deep clean, maybe reseal it, and if it’s truly toast, you’re looking at regrouting. Don’t sweat it; we can get it looking decent again.
The Problem
There’s nothing more aggravating than cleaning a bathroom tile floor or shower surround, only to have the grout lines look just as dingy as they did before you started. You’ve tried every cleaner under the sun, a toothbrush, even a steam cleaner, and still that dark, patchy discoloration is staring right back at you. It’s not just a looks problem either. Dirty grout can hold mildew, bacteria, and a musty smell that’ll make the whole bathroom feel off. Once grout gets porous and unsealed, it works like a magnet for moisture, soap scum, and body oils, locking all that junk in. Leave it alone long enough, and it can start messing with the tile installation itself.
How It Works
Alright, let’s talk grout. Most tile installs, especially in bathrooms, use sanded or unsanded cementitious grout. Think of it as a very fine concrete. New grout’s pretty dense, but here’s the catch — it’s still porous. That’s where sealer comes in. A good penetrating sealer soaks into the grout and forms a barrier that pushes back water, oils, and stains. It doesn’t just sit on top; it actually fills those microscopic pores so grime’s got a harder time grabbing on.
Over time, though, especially in high-traffic, high-moisture spots like showers and bathroom floors, that sealer wears down. Every scrub, every chemical cleaner, every hot shower takes a little bite out of it. Once that seal’s broken, your grout is basically an open invite for soap scum, hard water minerals, mildew spores, and whatever else gets splashed around. Those tiny particles get buried deep in the pores, way past the reach of surface cleaning. Mildew, especially, loves damp, dark, porous surfaces, and it’ll send roots right into the grout lines — that’s where those stubborn black or green spots come from. Until you deal with the porosity and the deep-set grime, you’re just spinning your wheels. I pulled a shower in Frisco last month that had exactly this leak-look on the grout — same story, same old fight. Understanding how grout drinks up moisture is the whole ballgame if you want to protect the job.
Step-by-Step Fix
Here’s how I handle stubborn dirty grout. This isn’t a fast wipe-down; this is a full reset.
-
Prep the Area — Clear everything out and get ready. Before you touch a cleaner, yank out the bath mats, toiletries, and anything else sitting on the floor or in the shower. You want the whole area wide open. Crack a window or kick on the exhaust fan so you’ve got decent ventilation—because, yeah, you’re gonna be using some strong stuff. If you’re worried about overspray, toss down old towels or plastic sheeting, though if you work carefully, you usually won’t need to get fancy.
-
Initial Rinse — Wash away surface junk. Give the tile a good rinse with plain water. No need to blast it. You just want loose dirt, hair, and soap scum off the surface so you’re not grinding it deeper into the grout. A spray bottle works fine for shower walls, and a bucket with a mop does the trick on floors. Simple.
-
Apply a Specialized Grout Cleaner — Don’t skimp on this part. This is where a lot of DIYers go sideways. You can’t just grab any old bathroom cleaner and call it a day. You need an alkaline-based grout cleaner for soap scum and grease, or an acid-based cleaner for hard water stains and efflorescence. Always test in an inconspicuous spot first. For most grimy bathroom grout, an alkaline cleaner with hydrogen peroxide or bleach does a solid job on mildew and organic stains. Put it right on the grout lines and follow the manufacturer’s dwell time, usually around 10-15 minutes. Keep the area wet while it’s working.
- Safety First: Wear gloves and eye protection. Keep the air moving.
- Pro Tip: If the mildew’s really ugly, a thick bleach-based gel cleaner made for grout clings better on vertical surfaces.
-
Agitate the Grout — Scrub smart, not hard. Once the cleaner’s had a chance to loosen things up, grab a stiff-bristled grout brush. Do not use a wire brush — it’ll chew up the grout. Work in small sections and scrub along the grout lines with some pressure. You should see the dirt starting to lift. For corners and tight spots, an old toothbrush can save you a headache. That scrubbing step matters. It’s what gets the loosened grime out instead of just smearing it around.
-
Rinse Thoroughly — Get all that cleaner out. After you’ve scrubbed an area, rinse it clean with fresh water. Don’t leave cleaner residue behind. That stuff can attract more dirt or even wear the grout down over time. A wet/dry vac is great for pulling dirty water off floors. For showers, just let clean water run and flush it out. If it still looks rough, repeat steps 3-5. Bad grout sometimes needs a second pass, especially if nobody’s touched it in years.
-
Assess and Dry — See where you’re at. Let the grout dry all the way. That can take several hours, maybe overnight if the humidity’s up. Once it’s dry, take a good look at the lines. Clean? Great. If you still see dark spots that look like mildew, you may need a dedicated mildew remover or a stronger bleach mix used carefully on just those spots. If it’s clean but still stained, then the color’s probably soaked in for good. That’s where color sealing or regrouting comes in.
-
Apply Grout Sealer — Protect your hard work! This isn’t optional for cementitious grout in bathrooms. Once the grout’s bone dry and clean, roll on a high-quality penetrating grout sealer. Use a small applicator brush or roller and put it on evenly, wiping off excess from the tile right away before it dries. Most sealers need two coats, spaced about 2-4 hours apart. Follow the label. Let the sealer cure for at least 24-48 hours before water hits it. I usually tell people to wait a full 72 hours before taking a shower.
- Tool Tip: A small foam brush or a grout sealer applicator bottle makes the whole thing a lot cleaner.
-
Consider Grout Color Sealer — For a uniform, fresh look. If the grout’s permanently discolored or you just want a full refresh, grout color sealer is your ace in the hole. This isn’t just sealer; it’s a durable epoxy-based coating that recolors and seals the grout at the same time. It basically covers the old grout and gives you a fresh, even look, plus better stain resistance. It takes more effort than regular sealing, but it can make 20-year-old grout look new. Pick a color that matches what you’ve got now, or change the whole look if you want.
Common Causes
- Lack of Sealer or Worn-Out Sealer: This is the big one. If the grout was never sealed, or the original sealer wore off years ago, the grout turns into a sponge for everything. You see this a lot in rental units and older houses.
- Improper Cleaning Products: Harsh, abrasive, or acid-based cleaners (like vinegar) can strip sealer and even etch cementitious grout, which makes staining worse.
- Poor Ventilation: A steamy bathroom without a decent exhaust fan or open window is basically a mildew nursery.
- Soap Scum and Body Oils: These pile up fast in showers and tubs, clinging to porous surfaces and feeding mildew.
- Hard Water: Mineral deposits from hard water can stain grout and leave behind rusty or whitish discoloration that’s a pain to get out.
- Colored Products: Hair dyes, bath bombs, or even bright cleaning products can stain grout for good if they’re not rinsed off quick.
Common Mistakes
- Using Bleach Undiluted or Improperly: Bleach can help with mildew, sure, but straight bleach can be too aggressive. Leave it on too long and you can weaken the grout or discolor it. Follow the product directions.
- Ignoring Ventilation: Cleaning grout without fixing the bathroom airflow is like mopping up after the pipe’s still broken. The mildew’ll just come right back.
- Using Abrasive Tools: Steel wool, wire brushes, or harsh scouring pads will scratch and damage the grout, making it rougher and even more likely to trap dirt later.
- Skipping the Sealing Step: You’ve done all that work cleaning, then left the grout exposed. That’s asking for trouble. Sealing matters.
- Applying Sealer to Wet Grout: The grout’s got to be bone dry before sealing, or you’re locking moisture underneath and inviting future mildew.
- Using Acidic Cleaners on Cementitious Grout: Vinegar and strong acid-based tile cleaners can dissolve the cement in the grout, weakening it and making it more porous. Save those for specific hard water issues on tile, not on grout.
Cost & Time Breakdown
Here
Related Articles
Keep troubleshooting with these hand-picked guides from FixlyGuide:
- Why Your Paint Just Won't Cover (and How to Stop the Struggle) — Struggling with paint that just won't cover the old color, even after multiple coats? I'll show you why it happens and how to fix it for go…
- That New Grout Is Already Cracking? Here’s the Hidden Cause — Cracked grout weeks after a renovation is often a sign of a deeper issue with your subfloor or tile installation, not just a problem with t…
- The $10 Shower Fix Plumbers Don't Want You to Know — Stop that annoying drip! I'll show you how to fix a leaky shower faucet yourself, saving you money and preventing water waste.
- That Annoying Sawhorse Wobble: The Simple Fix Your Shop Needs — Don't let a wobbly sawhorse ruin your cuts or—worse—cause an accident. I'll walk you through the real reasons your sawhorses are unstable a…
- The Grimy Secret Under Your Bathroom Sink: Why Your Faucet Is Slow — A slow-flowing bathroom faucet is often more than just an annoyance; it's a clear sign of mineral buildup or internal damage that's surpris…
- The Invisible Film Making Your Bathroom Mirror Streaky – And How to See Clearly — Discover why your bathroom mirror always looks streaky, even after cleaning, and learn the pro trick to get a perfectly clear, fog-free ref…
Should you do this yourself?
Answer five quick questions before you start. Safety outranks savings every time.
Your experience with work like this
How high do you have to work?
Does the job involve any of these?
Will it need a permit?
Specialty tools
Free and instant. Educational guidance only — not a quote, inspection, or professional diagnosis.
What should this project cost?
Enter your project details for a realistic cost range before you call anyone.
Mid-range remodels commonly $12,000–$22,000; small repairs often under $600.
- Regional adjustment
- National average
- Labor share (typical)
- ~$5,603
- Quotes to collect
- 3 written estimates
Educational estimate based on national averages — not a binding quote. Always confirm with written local estimates.
Get the print-ready PDF of this guide
A clean, ad-free, printable version you can keep on your phone or pin to the workshop wall. Free with a FixlyGuide account.
- Print-optimized layout
- Tools, materials & every step included
- Saved to your account
Recommended for DIYers & woodworkers
Sponsored
The Top 20 Tools for Workshops of Any Budget
No stationary machines or power tools required — plus 3 fundamental tools that can't be bought at any price.
Get the free guide
Ted's Woodworking — The #1 Woodworking Resource
Detailed instructions, dimensioned drawings, materials & cutting lists, and 3D schematics for every skill level.
See the plansSponsored: links above are affiliate links. FixlyGuide may earn a commission on qualifying purchases — at no extra cost to you.
Frequently asked questions
Why does my bathroom grout keep getting dirty?+
Your grout likely keeps getting dirty because its protective sealant has worn off, making it porous. This allows moisture, soap scum, and mildew spores to penetrate deep into the grout lines, where surface cleaning can't reach.
Can I just paint over dirty grout?+
While you can't just 'paint' over truly dirty grout, you can use a grout color sealer. This product cleans, recolors, and seals the grout all at once, providing a durable, fresh look and excellent stain resistance.
How often should I seal bathroom grout?+
Most cementitious grout in bathrooms should be re-sealed every 1-3 years. High-traffic or high-moisture areas like shower floors might need it annually, while less-used areas like splashbacks can go longer. It depends on the sealer quality and usage.
What's the best cleaner for black mold in shower grout?+
For black mold (mildew) in shower grout, a specialized alkaline-based grout cleaner containing hydrogen peroxide or a bleach-based gel cleaner is often most effective. Always ensure good ventilation and wear protective gear when using these products.
Is vinegar good for cleaning grout?+
No, generally avoid using vinegar on cementitious grout. While it's a natural cleaner, its acidity can etch and weaken the grout over time, making it more porous and susceptible to future staining and damage.
When do I need to regrout instead of just cleaning?+
You need to regrout when the existing grout is severely cracked, crumbling, or has deep, permanent staining that cleaning and color sealing can't fix. Also, if the grout is failing and allowing water penetration, regrouting is necessary to prevent structural damage.
Can I apply new grout over old grout?+
No, you cannot successfully apply new grout over old grout. The new layer won't bond properly and will quickly crack and fail. To regrout, you must carefully remove the old grout first, typically to a depth of about 1/8 inch, before applying fresh material.
How long does grout sealer need to cure before showering?+
Most grout sealers need at least 24-48 hours to cure properly before being exposed to water. For best results and maximum protection, I usually tell homeowners to wait a full 72 hours before taking a shower.
Discussion
Loading comments…