- Infrequent Cleaning: If you let it go until the thing’s half plugged, the buildup gets a lot tougher to remove. A little routine cleaning keeps it from turning into a headache.
- Old Plumbing/Corrosion: In older homes, corrosion from galvanized steel pipes can flake off and ride all the way to the shower head, adding to the clog. Not as common in homes with modern PEX or copper.
- Well Water: Private well water often carries more minerals and sediment, so clogging shows up more often.
- Incorrect Shower Head Material: Some cheaper shower heads use plastics or internal designs that cling to mineral buildup or break down faster, which just makes the problem worse.
General remodeling · Renovation planning
| Project category | General remodeling |
|---|---|
| Problem type | Renovation planning |
| Trade required | General contracting |
| Urgency | Planned project |
| Safety risk | Low safety risk |
| DIY suitability | Pro recommended |
| Cost category | Major investment |
| Typical timeline | Design and permitting often 2–4 months before work starts |
| Contractor type | General contractor |
Repair option
Phase the work and fix the building envelope first.
Replacement option
Full renovation with permits, design, and a general contractor.
Common causes
- Space no longer fits how the household lives
- Resale preparation
- Deferred maintenance stacking up
Relevant tools:project cost estimatorcompare quoteshome improvement material prices
Published September 25, 2026Last updated September 25, 2026
Tools & materials you'll need
Affiliate linksAs an Amazon Associate FixlyGuide earns from qualifying purchases — at no extra cost to you. Prices and availability are accurate as of publication and subject to change.
Quick Answer
You know the drill. You hop in the shower expecting a solid, even spray, and instead you get dribbles, a couple rogue streams blasting off to the side, and a pretty sad excuse for a shower. Nine times out of ten, that’s hard water mineral buildup — usually calcium and magnesium — clogging the nozzles in your shower head. Good news? You don’t need a new shower head, and you sure don’t need a plumber. A quick soak in plain old household vinegar, maybe a scrub with an old toothbrush, and you’ll have that thing spraying like new in about 10 minutes of actual work.
The Problem
I’ve seen this hundreds of times over the years, from high-end custom homes in Scottsdale to tract houses out in Gilbert. Folks call me, scratching their heads, saying their shower just isn’t acting right anymore. They figure the water pressure’s gone bad, or the shower head’s simply worn out. But a lot of the time, it’s just hard water doing what hard water does. That water coming into your home, especially around the desert Southwest, is loaded with dissolved minerals like calcium and magnesium. It’s not harmful, but it’s a real nuisance for plumbing fixtures. Over time, those minerals come out of the water and leave behind stubborn crusty deposits. Same junk you see on a coffee maker or inside a tea kettle. In a shower head, that scale clogs the tiny spray holes, chokes down the flow, and kicks the water out at odd angles. That’s why you end up with those weak little streams and sideways jets hitting the wall instead of you. Pretty annoying, and it sure doesn’t feel like you’re getting clean.
How It Works
To fix it, you’ve got to know what’s going on inside that head. Most modern shower heads are simple enough: a hollow body with a faceplate full of tiny, carefully drilled or molded nozzles. Water comes in, fills the chamber, then pushes out through those little openings. The size and shape of the holes, along with the internal baffles, are set up to give you that nice spray pattern. Water pressure does the heavy lifting. Once hard water gets involved, the dissolved minerals — mainly calcium carbonate (CaCO₃) and magnesium carbonate (MgCO₃) — get left behind as the water moves through or evaporates. Those minerals bond up and turn into a hard crystalline scale. That scale starts stacking up inside the nozzles, slowly squeezing the openings down. It’s like trying to shove a garden hose’s worth of water through a drinking straw — no dice. And because the buildup isn’t even, some nozzles clog worse than others, or the scale steers the stream off to one side, which is where those goofy sideways jets come from. The total flow can drop from, say, 2.5 gallons per minute (GPM) down to 1.5 GPM or even less, and then your shower feels weak and miserable. The whole point of cleaning is to dissolve that mineral junk without wrecking the shower head itself.
Step-by-Step Fix
Here’s how I tell homeowners to handle it. Straightforward job. No special skills. Just a little patience and a few basic things you probably already have.
-
Prep the Area – No need for a full hazmat suit. Before you start prying and poking around, move any shampoo bottles, soap, or other junk out of the shower caddy or off the ledge under the shower head. You don’t want vinegar or loose scale dripping on all that. Toss an old towel in the tub or shower pan to catch drips and gunk. Makes cleanup easier. Why make more work for yourself?
-
Choose Your Method: Bag Soak or Detach & Soak – One's easier, one's better for a deep clean. You’ve got two main routes. If the shower head won’t come off, or you just want a quick fix, the bag soak method gets it done. If the head twists off easily, or it’s really crusted up, pulling it down gives you a better clean. Most modern shower heads are made to come off by hand or with a crescent wrench. Look for the big hex nut where the shower head meets the arm — that’s your connection point.
-
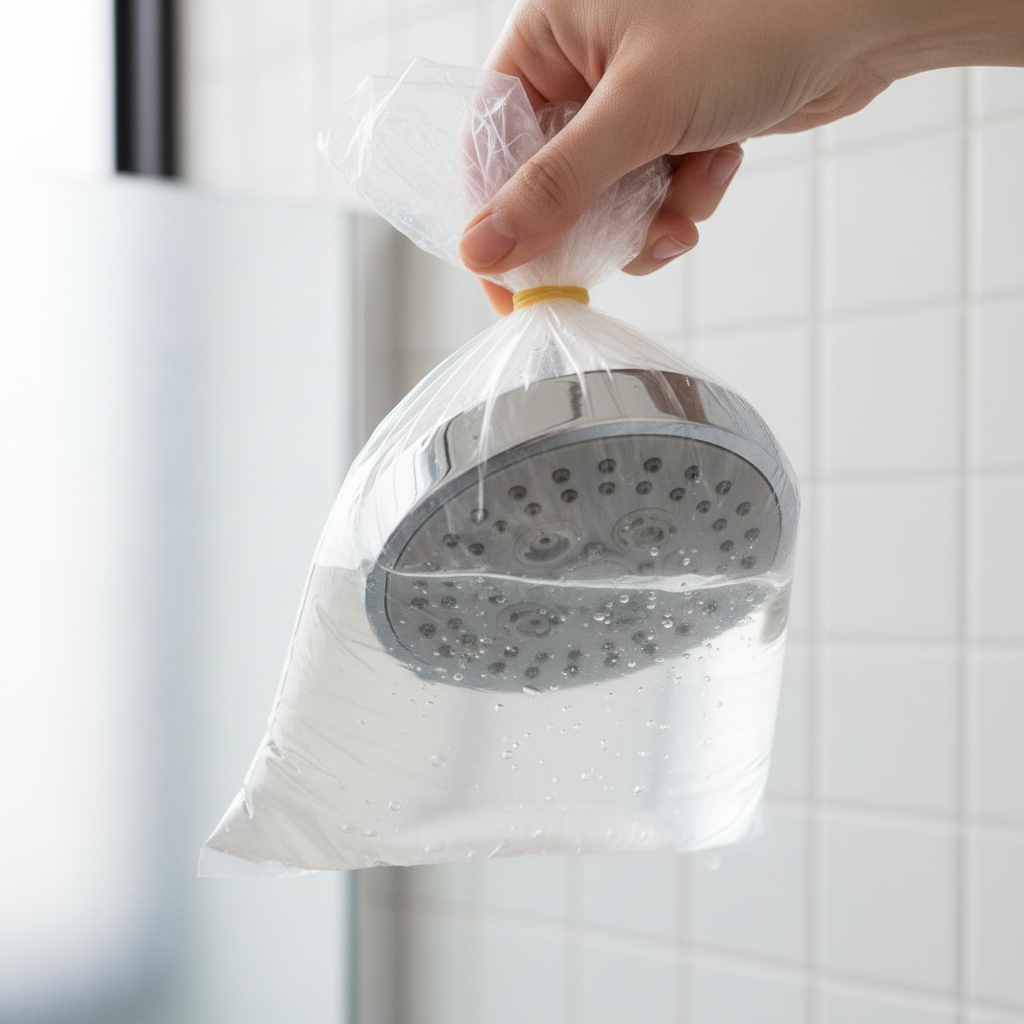
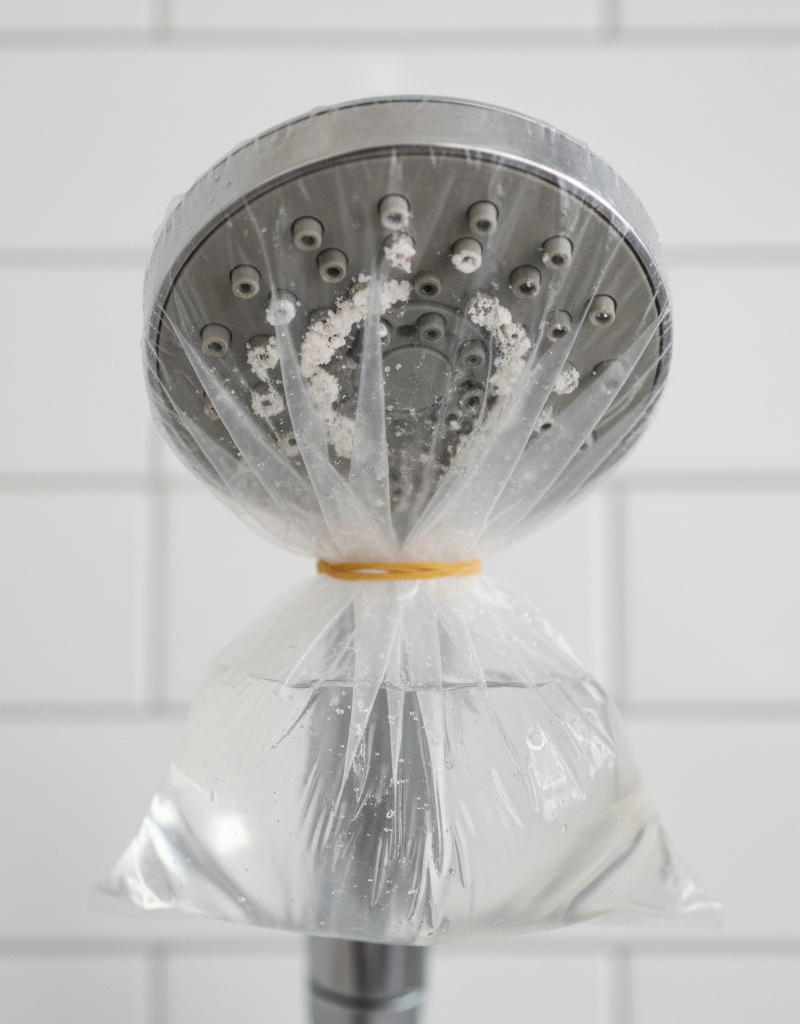
The Bag Soak (If Keeping It Attached) – The lazy person's way, and it works. Grab a sturdy plastic sandwich bag or freezer bag. Fill it with enough plain white vinegar to cover the face of the shower head. Lift the bag up around the head and use a rubber band, zip tie, or even a little duct tape to secure it tight around the shower arm, making sure the shower head is fully submerged in the vinegar. You want that thing sealed up so it doesn’t leak all over the place. Let it soak 2-4 hours, or overnight if it’s really crusted over. For heavy buildup, I’ve told folks in nasty hard-water spots — like a house I worked on in Mesa last month that tested at 18 grains per gallon — to let it sit a full 8 hours. The vinegar’s acidity starts chewing through that mineral scale.
-
The Detach & Soak (If Removing) – My preferred method for a thorough job. If you can, twist the shower head counter-clockwise to remove it. You might need an adjustable crescent wrench — wrap some painter’s tape or a rag around the nut first so you don’t scratch the finish. Once it’s off, drop the whole shower head into a bucket or bowl filled with white vinegar. Make sure it’s fully submerged. Let it soak 2-4 hours. You can add a little hot water to the vinegar if you want to speed things up, but don’t boil it. Once it’s soaked, if your shower head has a removable faceplate or rubber nozzles, now’s the time to gently pry them off or push them out and clean each one. A lot of modern heads have soft rubber nozzles you can just rub with your thumb to knock loose the mineral flakes.
-
Scrub Away the Gunk – Elbow grease time. After soaking, pull the shower head out of the vinegar. You’ll probably see softened mineral deposits hanging on by a thread. Take an old toothbrush — don’t use it for your teeth again, obviously — or a small nylon brush and scrub the spray nozzles, the faceplate, and any internal spots you can reach. For stubborn bits, a wooden toothpick or a safety pin can help clear individual clogged holes, but take it easy. You don’t want to scratch up the spray openings. Rinse the shower head really well under running water and let the water flush out all the loosened junk.
-
Reassemble and Reinstall – Putting it back together. If you took the shower head off, clean the threads on the shower arm and on the shower head itself. I always tell people to put on a fresh layer of plumber's tape (PTFE tape) on the shower arm threads before screwing the head back on. Wrap it clockwise 3-4 times around the threads. That helps seal things up and makes the next removal easier. Hand-tighten the shower head, then give it an extra quarter turn with your wrench if you need to, but don’t crank it down too hard — you can crack plastic or strip the threads. If you used the bag method, just take the bag off.
-
Flush the System – Get rid of the last bits. Turn the shower on to its hottest setting and let it run for a minute or two. That flushes out any leftover vinegar and loose mineral bits from the shower head and pipe. Watch the spray pattern — it ought to be strong, even, and consistent across all the nozzles. If you still see a couple weak spots, you may need another quick scrub or a longer soak on those stubborn areas.
Common Causes
- Hard Water: This is the big one, no question. The more calcium and magnesium in your water, the faster that shower head clogs up. If your area’s water hardness is over 7 grains per gallon, you’re fighting hard water. I’ve worked places where it hit 20 grains per gallon — those people end up cleaning shower heads every month.
- Infrequent Cleaning: If you let it go until the thing’s half plugged, the buildup gets a lot tougher to remove. A little routine cleaning keeps it from turning into a headache.
- Old Plumbing/Corrosion: In older homes, corrosion from galvanized steel pipes can flake off and ride all the way to the shower head, adding to the clog. Not as common in homes with modern PEX or copper.
- Well Water: Private well water often carries more minerals and sediment, so clogging shows up more often.
- Incorrect Shower Head Material: Some cheaper shower heads use plastics or internal designs that cling to mineral buildup or break down faster, which just makes the problem worse.
Common Mistakes
- Using Harsh Chemicals: Don’t grab drain cleaner or abrasive bathroom stuff. They can wreck the finish, corrode internal parts, and even kick off toxic fumes. Vinegar’s acidic enough to handle it safely.
- Forgetting the Plumber's Tape: Skip the PTFE tape on the threads when you put it back, and you may end up with leaks at the connection. That means wasted water and possible damage down the road.
- Overtightening: If you’re using a wrench, don’t gorilla-grip it. Cranking too hard can strip the shower arm threads or crack the shower head body, and now you’ve got a bigger mess than a clogged nozzle.
- Ignoring the Problem: Letting the buildup sit too long makes the job harder every time. What should’ve been a 10-minute fix turns into a fight, or you end up replacing the whole head.
- Not Flushing: Skip the final flush and all those loosened bits stay in there, ready to clog things back up the first time you turn it on.
Cost & Time Breakdown
Here’s what you’re looking at for this little annoyance:
| Task | DIY Cost | Pro Cost | Time |
|---|---|---|---|
| White Vinegar | $3–$5 | N/A | 5 minutes prep |
| Plumber's Tape | $1–$2 | N/A | 1 minute |
| Old Toothbrush/Small Brush | $0 (recycled) | N/A | 5 minutes scrub |
| Plastic Bag/Bowl | $0 (recycled) | N/A | 1 minute |
| Shower Head Removal/Reinstall | $0 | $150–$300 (min) | 5–10 minutes |
| Soaking Time | N/A | N/A | 2–8 hours |
Tips & Prevention
- Regular Cleaning: Wipe down your shower head once a week with a damp cloth so mineral buildup doesn’t get a foothold. Every 3-6 months, give it a quick vinegar soak — saves you a pile of trouble later.
- Soft Bristle Brush: Keep a small soft-bristled brush, like a dedicated cleaning toothbrush, in the shower and hit the nozzles now and then. Takes 10 seconds. Easy money.
- Water Softener: If hard water is a constant battle in your house, think about a whole-house water softener. Sure, it costs money, but it helps your plumbing fixtures, your water heater, and even makes soap work better. I put one in for a client in Chandler last year who was swapping faucets every three years — fixed that mess overnight.
- Rub-Clean Nozzles: If you’re buying a new shower head, look for “rub-clean” or “self-cleaning” rubber nozzles. You can just rub them with your thumb and knock loose the mineral junk. Handy little feature.
- Filter Options: Some shower heads have in-line filters that cut down sediment and some mineral content. They’re not as good as a whole-house softener, but they can help with localized problems.
When to Call a Professional
Look, this is a pretty simple DIY fix, but there are times you should stop and call a licensed plumber. If you’ve cleaned the shower head well and the pressure is still low or jumping around through the whole house — not just that shower — you may have a bigger issue, like a partly closed main water valve, a problem with your pressure regulator, or sediment buildup in the water heater. If you can’t remove the shower head without risking damage to the shower arm or wall, or if you notice water leaking from behind the wall plate after you reinstall it, don’t mess around — a leak inside the wall can turn into mold and structural damage pretty quick. And if the shower head is metal and badly corroded or rusted, or any plastic parts are cracked and leaking, it’s time to replace it. A plumber can help you pick the right one and get it installed right so everything’s tight and leak-free.
Related Articles
Keep troubleshooting with these hand-picked guides from FixlyGuide:
- The Nasty Truth About Your Slow Kitchen Drain (And How to Unclog It for Free) — Don't let a sluggish kitchen sink drain ruin your day—most clogs are easy fixes with common household items, saving you a costly plumber's…
- The Grimy Secret Under Your Bathroom Sink: Why Your Faucet Is Slow — A slow-flowing bathroom faucet is often more than just an annoyance; it's a clear sign of mineral buildup or internal damage that's surpris…
- The Mystery of Your Stripped Cabinet Hinge: One Simple Fix — Don't let a stripped screw hole ruin your kitchen cabinets. I'll show you how to fix that loose hinge fast, often with just a few household…
- The $10 Shower Fix Plumbers Don't Want You to Know — Stop that annoying drip! I'll show you how to fix a leaky shower faucet yourself, saving you money and preventing water waste.
- Why Your New Inductor Cooktop Won't Turn On (And the Easy Fix) — Don't panic if your new induction cooktop isn't firing up after installation; it's a common issue with a straightforward electrical cause.
- The One Trick Plumbers Use When Your Garbage Disposal Hums But Won't Spin — When your garbage disposal hums but the blades aren't spinning, it's usually a simple jam that you can fix in minutes with common household…
Should you do this yourself?
Answer five quick questions before you start. Safety outranks savings every time.
Your experience with work like this
How high do you have to work?
Does the job involve any of these?
Will it need a permit?
Specialty tools
Free and instant. Educational guidance only — not a quote, inspection, or professional diagnosis.
What should this project cost?
Enter your project details for a realistic cost range before you call anyone.
Mid-range remodels commonly $12,000–$22,000; small repairs often under $600.
- Regional adjustment
- National average
- Labor share (typical)
- ~$5,603
- Quotes to collect
- 3 written estimates
Educational estimate based on national averages — not a binding quote. Always confirm with written local estimates.
Before you start
Check the difficulty, permits, and safety risk — then decide whether to call a pro.
- Estimate this projectGet a cost range for your scope and ZIP before you call anyone.Open
- Get local estimatesSend one request and compare written estimates from vetted pros.Open
Free, no signup required. Estimates are educational guidance, not a quote or an inspection.
Get the print-ready PDF of this guide
A clean, ad-free, printable version you can keep on your phone or pin to the workshop wall. Free with a FixlyGuide account.
- Print-optimized layout
- Tools, materials & every step included
- Saved to your account
Recommended for DIYers & woodworkers
Sponsored
The Top 20 Tools for Workshops of Any Budget
No stationary machines or power tools required — plus 3 fundamental tools that can't be bought at any price.
Get the free guide
Ted's Woodworking — The #1 Woodworking Resource
Detailed instructions, dimensioned drawings, materials & cutting lists, and 3D schematics for every skill level.
See the plansSponsored: links above are affiliate links. FixlyGuide may earn a commission on qualifying purchases — at no extra cost to you.
Frequently asked questions
How often should I clean my shower head?+
For areas with moderate to hard water, I recommend a quick vinegar soak every 3-6 months. If your water is extremely hard, you might need to do it monthly. Regular wiping of the nozzles between deep cleans will also help.
Can I use something other than vinegar to clean my shower head?+
While commercial descalers exist, white vinegar is usually the safest and most effective option. Its mild acidity dissolves mineral deposits without harming most finishes. Avoid harsh chemicals like bleach or drain cleaners, as they can damage your fixture.
My shower head is plastic. Will vinegar damage it?+
No, white vinegar is generally safe for plastic shower heads. Just make sure it's regular household white vinegar (typically 5% acetic acid) and not a stronger industrial-grade acid. Avoid prolonged soaking for more than 8-12 hours, just to be safe, especially with older, more brittle plastics.
What if my shower head is still clogged after soaking in vinegar?+
If a single soak doesn't do the trick, it might be heavily caked. Try soaking it again for a longer period, perhaps overnight. You can also gently use a wooden toothpick or a small safety pin to poke out stubborn clogs from individual nozzles after a good soak, then flush thoroughly.
My entire house has low water pressure, not just the shower head. What's wrong?+
If low pressure is a house-wide issue, cleaning your shower head won't solve it. The problem could be a partially closed main water shut-off valve, a failing pressure reducing valve (PRV), or sediment buildup in your main lines. This is definitely a job for a licensed plumber.
How can I prevent hard water buildup in the future?+
Regular, light cleaning is your best defense. Consider installing a whole-house water softener if hard water is a widespread problem. Otherwise, look for shower heads with rubber 'rub-clean' nozzles, which make maintenance much easier.
Can I boil vinegar to make it work faster?+
No, don't boil vinegar! While warmth can accelerate the reaction, boiling it can create strong, irritating fumes and can potentially damage certain plastics or finishes on your shower head. Use warm water if you want to, but keep it well below boiling.
My shower head is leaking where it connects to the shower arm. How do I fix that?+
This usually means the seal isn't tight enough. Unscrew the shower head, clean off any old plumber's tape or debris from the threads on the shower arm, and then reapply 3-4 layers of fresh plumber's tape clockwise around the threads. Reattach the shower head, hand-tighten, and then give it a slight snug with a wrench (don't overtighten!).
Discussion
Loading comments…