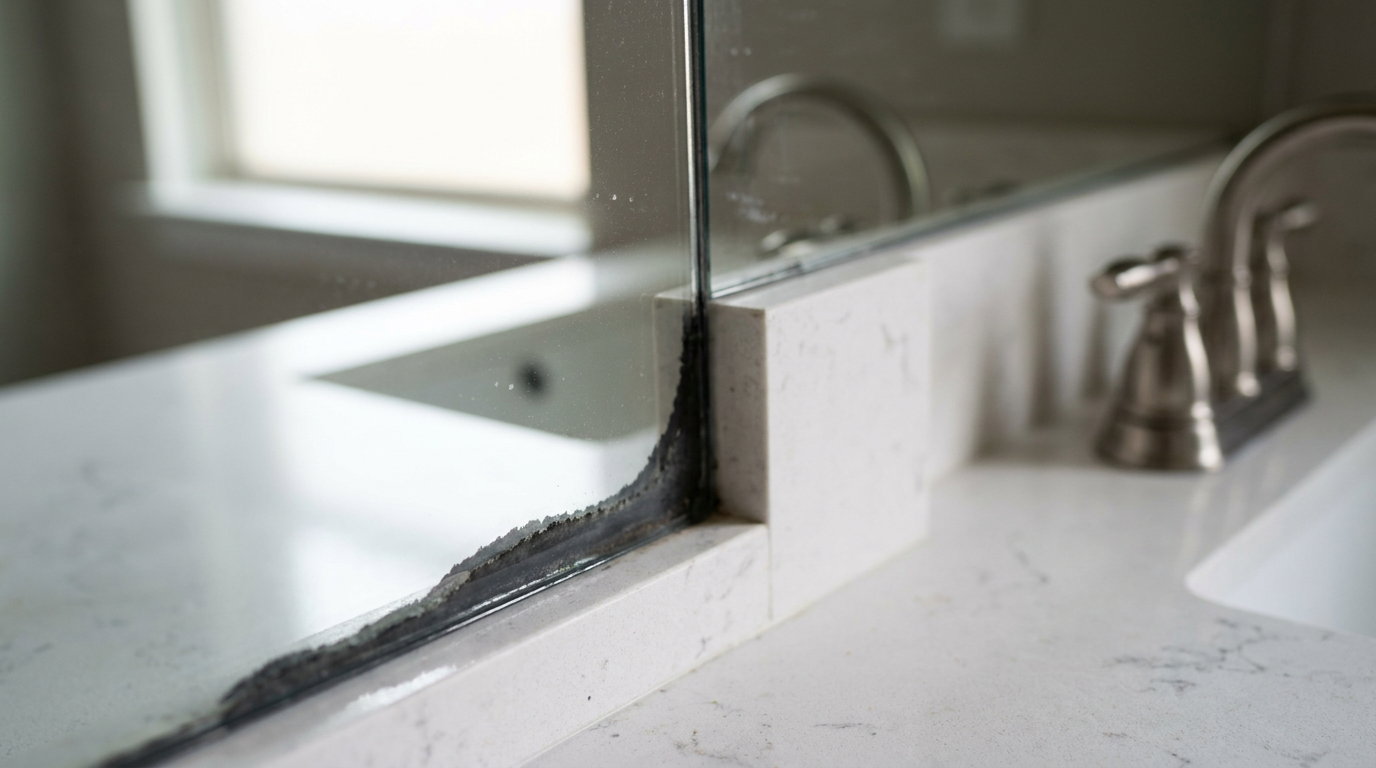
- If your bathroom mirror’s got peeling edges, black creeping stains, or cloudy patches behind the glass, the protective silvering on the back has given up to moisture oxidation — that’s desilvering.
- Walk into just about any house that’s ten or twenty years old and you’ll spot it: dark, jagged shadows chewing inward from the bottom edge of the bathroom mirror.
- To fix this the right way, you need to know how mirror glass hangs on drywall and why it fails in wet rooms.
- Here’s the exact process to either build a custom, moisture-resistant perimeter frame right over the black rot, or completely unseat and replace a damaged mastic-glued plate mirror.
General remodeling · Renovation planning
| Project category | General remodeling |
|---|---|
| Problem type | Renovation planning |
| Trade required | General contracting |
| Urgency | Planned project |
| Safety risk | Low safety risk |
| DIY suitability | Pro recommended |
| Cost category | Major investment |
| Typical timeline | Design and permitting often 2–4 months before work starts |
| Contractor type | General contractor |
Repair option
Phase the work and fix the building envelope first.
Replacement option
Full renovation with permits, design, and a general contractor.
Common causes
- Space no longer fits how the household lives
- Resale preparation
- Deferred maintenance stacking up
Relevant tools:project cost estimatorcompare quoteshome improvement material prices
Published October 26, 2026Last updated October 26, 2026
Tools & materials you'll need
Affiliate links- AmazonCellular PVC trim or architectural molding4 lengths · Moisture-proof composite, not wood or MDF
- AmazonNeutral-cure mirror mastic or silicone1 tube · Must be non-acidic / solvent-free
- AmazonHeavy-duty double-sided mounting tape1 roll · Polyurethane foam exterior rated
- AmazonHeavy-duty packing tape1 roll · To secure glass face before removal
- AmazonAluminum French cleat mounting bracket1 pack · Rated for 50+ lbs
As an Amazon Associate FixlyGuide earns from qualifying purchases — at no extra cost to you. Prices and availability are accurate as of publication and subject to change.
Quick Answer
If your bathroom mirror’s got peeling edges, black creeping stains, or cloudy patches behind the glass, the protective silvering on the back has given up to moisture oxidation — that’s desilvering. You’re not realistically re-silvering glass in a home shop. No dice. But you can kill the eyesore in an afternoon: wrap the perimeter with moisture-resistant pre-finished PVC molding, stick mirrored beveled border strips right over the creeping edges, or pull the builder-grade plate and swap in a clean modern unit hung on heavy-duty French cleats.
The Problem
Walk into just about any house that’s ten or twenty years old and you’ll spot it: dark, jagged shadows chewing inward from the bottom edge of the bathroom mirror. Looks like mildew at first glance, but no amount of scrubbing with glass cleaner or white vinegar is gonna touch it. In fact, if you go after it hard with commercial cleaners, you’ll usually make it spread faster.
That black rot is desilvering.
Standard mirrors get made by laying down a microscopic coat of pure silver (or aluminum) on the back of float glass, then sealing it with a copper layer and two protective coats of industrial paint. Once bathroom humidity, aggressive ammonia cleaners, or trapped puddles along the vanity break through that backing, water gets to the raw metals. The silver oxidizes into black silver sulfide. After that, it creeps inward like rust on an unprotected truck rocker panel. Ugly stuff.
And yeah, it wrecks the whole room. You can spend thousands on a slick vanity, matte black hardware, and fresh paint, but an oxidized, blotchy mirror drags everything right back to 1994. Luckily, you don’t need a custom glass shop or a four-figure budget to fix it. You’ve got two trade-proven moves: hide the perimeter with a better-looking frame, or pull the plate down and hang a brand-new focal piece.
How It Works
To fix this the right way, you need to know how mirror glass hangs on drywall and why it fails in wet rooms. Builder-grade sheet mirrors — often 36x48 inches or larger — usually get mounted one of two ways. They either sit in bottom plastic J-channels screwed into wall studs, or they’re glued flat to the drywall paper with thick, disc-shaped blobs of black mirror mastic.
Mirror mastic is a special solvent-free neoprene or asphalt adhesive made not to eat the backing paint. Regular construction adhesives like liquid nails have petroleum solvents in them, and those solvents chew right through mirror paint. That’s how you get the exact black spots you were trying to avoid.
When steam keeps condensing on the mirror face, gravity pulls water downward. If the mirror sits dead on the vanity backsplash with no 1/8-inch expansion gap, capillary action wicks water under the bottom edge. Then the water sits trapped in the channel or against the backing edge. Ammonia fumes from common aerosol glass cleaners make it worse fast — ammonia strips the protective copper barrier right off the silver backing. I pulled a bathroom mirror in Frisco last month that had exactly this kind of edge creep, and the homeowner swore the “extra strong” cleaner was helping. It wasn’t. It was feeding the problem.
To fix it without shattering 40 pounds of tempered or annealed glass across your porcelain fixtures, you’ve got to either seal off the exposed raw edge under a ventilated frame assembly or break the structural bond of that mastic using mechanical leverage and heat.
Step-by-Step Fix
Here’s the exact process to either build a custom, moisture-resistant perimeter frame right over the black rot, or completely unseat and replace a damaged mastic-glued plate mirror.
Option A: The Surface Frame-Over Fix (Zero Demo)
-
Clean and seal the oxidized perimeter — Scrape off any dried caulk or dirt from the mirror edge with a plastic razor blade, then wipe the whole perimeter dry with 91% isopropyl alcohol. Run a clean bead of neutral-cure silicone or clear edge-sealing lacquer along the bottom raw edge of the glass where the backing’s exposed to stop more moisture from sneaking in.
- Tools: Plastic scraper, lint-free microfiber, 91% isopropyl alcohol, neutral-cure clear silicone.
- Safety: Wear light nitrile gloves so your hand oils don’t smear the glass.
-
Measure and account for glass clips — Measure the outside dimensions of your mirror to within 1/16 of an inch with a steel tape measure. Check whether your mirror uses plastic mounting clips on the top and sides; if it does, note how far they stick out (standard clips project roughly 1/4 to 3/8 inch).
- If clips are present: You’ll need to rout a shallow recess channel into the back of your frame molding so it sits flush against the glass, or swap the clips for low-profile countersunk metal brackets.
-
Cut moisture-proof PVC trim — Use pre-finished architectural cellular PVC casing. Skip raw wood or MDF; those swell up and warp inside two years from shower steam. Cut four border pieces on a miter saw set to exact 45-degree angles, measuring from the long outside edge.
- Tools: 10-inch or 12-inch miter saw, composite trim blade.
- Tip: Dry-fit all four pieces on the bathroom floor against your tape marks before you put any adhesive on them.
-
Apply specialized double-sided foam tape and silicone — Flip your PVC trim face down on a clean drop cloth. Run a strip of heavy-duty exterior polyurethane double-sided tape along the outer rear lip, leaving a 1/2-inch gap along the inner margin for a bead of neutral-cure mirror mastic or neutral silicone.
- Critical: Don’t use standard silicone with acetic acid in it — the vinegar smell — because it’ll wreck the mirror backing along the joint.
- Tape role: The tape grabs the molding instantly while the structural adhesive cures over 24 hours.
-
Set the frame pieces square — Press the bottom frame piece in first, using the vanity or splash as your baseline. Check it with a 24-inch torpedo level. Bring in the vertical side legs, then the top piece, and lock the 45-degree corners tight.
- Tip: Put painter’s tape across each corner miter joint under tension so the seams stay put while the adhesive cures.
Option B: Complete Removal and Modern Replacement
-
Cross-hatch the glass surface with heavy tape — If you’re tearing out the old plate, run wide, heavy-duty packing tape or duct tape across the whole face of the mirror in an overlapping diagonal grid. If the glass cracks while you’re removing it, the tape keeps the big, sharp shards together instead of showering down into your sink.
- Safety: Thick leather work gloves, wrap-around ANSI safety goggles, long sleeves, and closed-toe boots aren’t optional here.
-
Heat the mirror face to soften old mastic — Fire up an electric heat gun on medium setting (roughly 250°F to 350°F) and move it evenly across the lower third of the mirror, where mastic spots usually sit. Don’t park the heat gun in one spot for more than 4 seconds, or thermal shock can snap the glass.
- Goal: Warm the adhesive through the glass so the mastic lets go of its rubbery grip.
-
Saw through mastic using braided wire or a drywall knife — Slide a length of braided 20-gauge picture wire, high-test braided fishing line, or a flexible long-blade drywall taping knife behind the top corners of the glass. Use a steady, two-handed downward sawing motion behind the plate to slice through the adhesive pucks.
- If using wire: Wrap the ends around short dowel handles so you don’t cut your hands through your gloves.
- Helper note: Have an assistant brace the face of the glass with flat hands or glass suction cups so the sheet can’t suddenly peel away and fall forward.
-
Pry gently using wooden shims — Once the top mastic bonds are sliced, slip wide wooden shims or plastic pry wedges behind the mirror near the top edge. Tap them downward gently. Don’t lever a metal pry bar against the glass edge — it’ll crack the sheet in a heartbeat.
- Pro tip: Wedge thin cardboard or plywood scrap against the drywall to spread the pry pressure and keep from punching holes in the wallboard.
-
Lift the plate clear and scrape the wall — Once the mastic bonds release, have your helper help you lift the plate up out of any bottom J-channel. Carry the mirror on edge — never flat, because flat carry encourages bending and snapping — and set it aside on thick moving blankets. Scrape the leftover black mastic globs off the drywall with a 4-inch stiff putty knife.
- Drywall repair: Skim coat torn drywall paper with joint compound, let it dry, sand smooth with 120-grit paper, and seal with a moisture-resistant primer.
-
Install heavy-duty French cleats for your new mirror — Find the studs behind the vanity with a magnetic or electronic stud finder. Fasten an aluminum French cleat bracket directly into at least two studs using 2-1/2 inch cabinet screws. Secure the matching bracket to the back of your new framed designer mirror.
- Tools: Stud finder, 4-foot level, cordless drill, #8 drywall/cabinet screws.
- Load rating: A standard 18-inch aluminum French cleat easily holds 75 to 100 lbs — more than triple the weight of most modern 30x40 framed mirrors.
-
Hang, level, and seal the bottom installation — Set the new mirror onto the wall cleat and verify with your level that it sits dead square. Make sure there’s a minimum 1/2-inch clearance gap between the bottom frame rail and the countertop backsplash so water can’t wick upward later.
Common Causes
Why do mirrors fail like this in the first place? It comes down to four basic mechanisms:
- Aggressive Ammonia Cleaners: Blue aerosol or pump window cleaners with ammonia in them dissolve the protective paint and copper coats on mirror edges. Over time, the ammonia migrates between the glass and backing, causing rapid black oxidation.
- Wicking Backsplash Water: When a builder mirror gets dropped flush against a granite or laminate vanity splash without an air gap, splash water from handwashing gets sucked beneath the bottom edge by capillary draw. The edge stays wet forever.
- Inadequate Bathroom Exhaust Ventilation: In high-humidity climates — especially across the South where summer heat meets interior air conditioning — showers that run without a fan rated at least 1 CFM per square foot saturate the room. Water condenses across cold mirror surfaces and runs downward every day.
- Incorrect Adhesives Used During Install: Previous DIYers or careless contractors sometimes mount mirrors with standard construction adhesive or acidic acid-cure silicone. The solvent eats right into the silver layer, leaving black, round blotches dead in the middle of the mirror instead of just at the edges.
Common Mistakes
Here are the mistakes that turn a simple Saturday job into a broken sink or cracked drywall:
- Using real wood or cheap MDF for the frame: Raw pine or primed MDF baseboards soak up bathroom steam like a sponge within eighteen months. The miters split, paint bubbles, and the back harbors mold. Always use cellular PVC, high-density polystyrene, or water-sealed aluminum.
- Prying directly against the glass with a crowbar: If you put a steel flat bar straight against the edge of a plate mirror, you’ll create point-load fractures and send the glass into hundreds of dangerous fragments. Spread the pressure with wide wood blocks and slice the mastic bonds instead of ripping at them.
- Using solvent-based construction adhesives: Grabbing a tube of standard subfloor glue or standard Liquid Nails to glue your frame or remount a mirror will ruin the silver backing within weeks. Look strictly for "Mirror Mastic" or "Neutral Cure Silicone" (100% silicone that doesn’t smell of vinegar).
- Leaving zero clearance at the bottom of the new frame: Jamming your new frame directly down onto the faucet deck invites standing water right back into the seam. Keep an intentional 1/8-inch to 1/4-inch space, or seal that bottom seam with a continuous micro-bead of translucent silicone.
- Carrying plate mirrors flat: Annealed plate mirrors have plenty of tensile strength when they’re standing vertical, but almost none when you carry them horizontal. A 36x60 sheet carried flat can snap under its own flexing weight. Always transport mirrors upright with two people.
Cost & Time Breakdown
| Task | DIY Cost | Pro Cost | Time |
|---|---|---|---|
| PVC Frame Over Existing Mirror | $45–$85 | $250–$450 | 2–3 hours |
| Beveled Mirrored Border Strips | $35–$60 | $200–$350 | 1–2 hours |
| Complete Mirror Demo & Cleat Install | $80–$250 | $350–$750 | 3–4 hours |
| Drywall Patching & Mastic Prep | $20–$40 | $150–$300 | 1.5 hours (plus dry time) |
| Replacement Framed Designer Mirror | $70–$300 | $250–$600 | 1 hour |
Tips & Prevention
- Switch to ammonia-free cleaners permanently: Clean your bathroom mirrors with warm water and a drop of dish soap, or mix a 50/50 water-and-rubbing-alcohol spray. Don’t spray cleaner straight onto the glass; spray your microfiber rag first so liquid never pools at the bottom edge.
- Seal raw mirror edges before installation: If you ever buy a replacement raw-edge mirror, paint all outer edges with clear fingernail polish or dedicated mirror edge sealant (like CRL Mirror Edge Sealant) before hanging it.
- Keep your exhaust fan running longer: Run your bathroom exhaust fan during every shower and keep it running for a full 20 minutes after to clear moisture out of the room. A digital countdown timer switch makes that automatic.
- Inspect the bottom seal every 6 months: Take a flashlight and check the lower perimeter seal where the mirror meets the backsplash. If you spot cracked caulk or peeling edges, strip and reseal the gap right away before water wicks behind the silver backing.
- Leave a breathing gap behind wall-hung frames: When you hang framed replacement mirrors, stick small clear silicone bumper pads on the bottom rear corners of the frame. Those little pads create a 1/8-inch air gap that keeps stagnant moisture from getting trapped against drywall.
When to Call a Professional
Most mirror framing and replacement jobs are straightforward for any patient homeowner. That said, you should call an experienced glazing contractor or handyperson in a few specific situations.
If your builder mirror runs floor-to-ceiling, sits right behind light fixtures or plumbing valves that can’t be safely unmounted, or exceeds 4 feet by 6 feet (24+ square feet), the glass is too heavy and too flexible for safe DIY removal. A piece that size easily weighs over 60 pounds, and if it drops, it’ll shatter plumbing fixtures, crack floor tile, or cut somebody bad.
If the mirror was installed right over unpainted drywall with commercial-grade structural epoxy, pulling it off will tear huge sections of drywall core paper and may force entire panels to be cut back to the studs. When you’re not sure about the adhesive or you’re dealing with oversized glass, let a two-person professional glass crew handle the pull and haul-away.
Should you do this yourself?
Answer five quick questions before you start. Safety outranks savings every time.
Your experience with work like this
How high do you have to work?
Does the job involve any of these?
Will it need a permit?
Specialty tools
Free and instant. Educational guidance only — not a quote, inspection, or professional diagnosis.
What should this project cost?
Enter your project details for a realistic cost range before you call anyone.
Mid-range remodels commonly $12,000–$22,000; small repairs often under $600.
- Regional adjustment
- National average
- Labor share (typical)
- ~$5,603
- Quotes to collect
- 3 written estimates
Educational estimate based on national averages — not a binding quote. Always confirm with written local estimates.
Get the print-ready PDF of this guide
A clean, ad-free, printable version you can keep on your phone or pin to the workshop wall. Free with a FixlyGuide account.
- Print-optimized layout
- Tools, materials & every step included
- Saved to your account
Recommended for DIYers & woodworkers
Sponsored
The Top 20 Tools for Workshops of Any Budget
No stationary machines or power tools required — plus 3 fundamental tools that can't be bought at any price.
Get the free guide
Ted's Woodworking — The #1 Woodworking Resource
Detailed instructions, dimensioned drawings, materials & cutting lists, and 3D schematics for every skill level.
See the plansSponsored: links above are affiliate links. FixlyGuide may earn a commission on qualifying purchases — at no extra cost to you.
Frequently asked questions
Why is my bathroom mirror turning black along the bottom edges?},{answer:+
Desilvering happens when moisture, humidity, and harsh household chemicals break through the protective paint backing on the mirror, oxidizing the thin silver or aluminum layer beneath into dark silver sulfide.
Discussion
Loading comments…