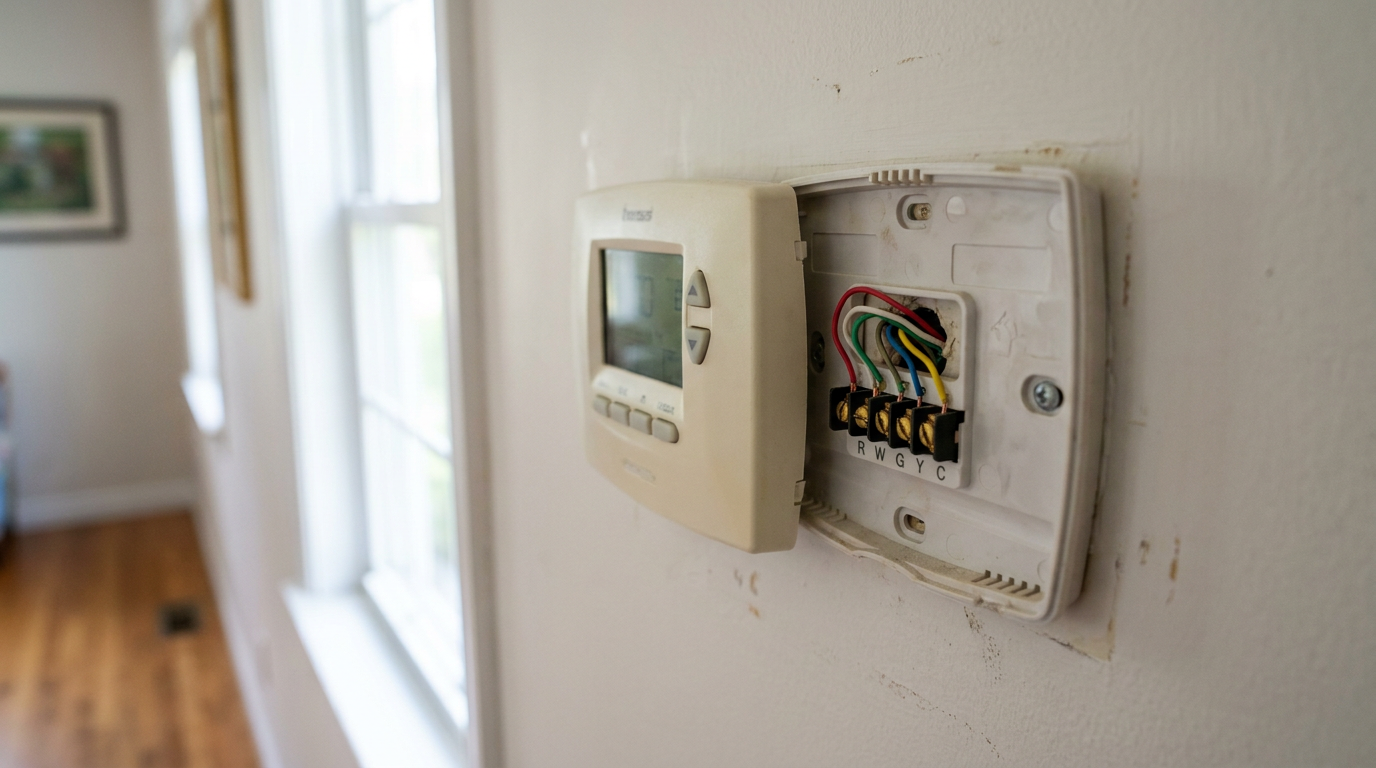
- Pop the faceplate straight off the subbase.
- Pull the batteries and look for white corrosion on the terminals; a pencil eraser usually cleans that junk off.
- Put in fresh, high-drain alkaline batteries. Skip the bargain zinc-carbon stuff.
HVAC · High energy usage
| Project category | HVAC |
|---|---|
| Problem type | High energy usage |
| Trade required | HVAC |
| Urgency | Planned project |
| Safety risk | Low safety risk |
| DIY suitability | DIY for experienced homeowners |
| Cost category | High cost |
| Typical timeline | Assessment within weeks; replacement planned off-season |
| Contractor type | Licensed HVAC technician |
Repair option
Duct sealing, insulation, and a tune-up before touching the equipment.
Replacement option
High-efficiency replacement sized by a load calculation, not a rule of thumb.
Common causes
- Aging, low-efficiency equipment
- Leaking ducts losing conditioned air
- Insufficient attic insulation
- Oversized system short-cycling
Relevant tools:project cost estimatorrepair or replace
Published November 2, 2026Last updated November 2, 2026
Tools & materials you'll need
Affiliate links- AmazonAA or AAA Alkaline Batteries2 · High-drain fresh pair for faceplate
- AmazonReplacement 3-Amp and 5-Amp Blade Fuses2 · Automotive style ATO/ATC fuses for furnace board
- AmazonSmall Wire Nut1 · For jumping control wires during manual testing
- AmazonDistilled White Vinegar1 qt · To dissolve algae plugs in PVC condensate pipe
As an Amazon Associate FixlyGuide earns from qualifying purchases — at no extra cost to you. Prices and availability are accurate as of publication and subject to change.
Quick Answer
If your thermostat clicks but your heating or cooling won’t start, I’m usually looking at one of a few things: weak low-voltage relays, dead backup batteries, a tripped float switch, or a blown 3-amp or 5-amp blade fuse on the furnace control board. If you hear the relay click in the thermostat housing and neither the indoor blower nor the outdoor condenser comes on, the thermostat is doing its job. The 24-volt control power isn’t making it downstream, or it’s getting knocked out along the way.
The Problem
There aren’t many home sounds more aggravating than a little dry plastic snap from the hallway wall and then nothing. You set the thermostat to 70°F on a brutal 95°F afternoon. You wait for the click. It comes right on time. Then… dead quiet. No attic blower. No condenser hum outside. Just the house getting hotter by the minute.
Sometimes it doesn’t stop at one click. It’ll click, pause three seconds, click again, then keep doing that like it’s got a bad habit. You might see the display flash, dim for a second with every click, or reboot back to the factory screen. That’s a headache.
That click means an internal relay moved to close a low-voltage circuit. So yes, the thermostat got your message. But if the HVAC gear downstream stays asleep—or the relay keeps chattering—the electrical handshake between the wall and the equipment has gone sideways. I’ve pulled a water heater in Frisco last month that had exactly this kind of maddening “almost working” problem, and it turned out the issue wasn’t the appliance at all. Same deal here sometimes. You’ve got to figure out whether the trouble is inside the thermostat, in the 18-gauge control wiring, or buried in one of the safety interlocks before you start throwing parts at it.
How It Works
Your thermostat doesn’t directly run the air conditioner or furnace. It’s just a little traffic cop for low-voltage power, usually 24 to 28 VAC. That power comes from a small transformer inside the air handler or furnace cabinet, and that transformer steps down the home’s 120-volt or 240-volt line power.
That 24-volt power runs up the blue or red wire and lands on the R terminal, or Rc for cooling and Rh for heating, on the thermostat backplate. Inside the thermostat, sensors and a microprocessor keep an eye on the room temperature. When you call for cooling, a tiny relay flips over. That’s the click you hear. It’s an electromagnetic coil pulling an armature shut and bridging the R terminal to the Y terminal for the compressor and the G terminal for the indoor fan.
[120V / 240V Line Power]
          │
          ▼
 [Furnace Transformer] ─── (24 VAC Output)
          │
     [Door Switch]
          │
   [Float Switch / Pan]
          │
          ▼
   (R Wire / 24 VAC)
          │
          ▼
[Thermostat Relay Closes] ── Click!
     │              │
     ▼              ▼
 (Y: Cool)      (G: Fan)
     │              │
     ▼              ▼
[Contactors / Relays Energize Equipment]
If the transformer sags below 19 VAC, that relay can’t stay pulled in. It’ll open, try again, and chatter. No dice. And if an upstream condensate safety switch has tripped because the 3/4-inch PVC drain line is packed with algae slime, the 24-volt circuit gets interrupted before it can do anything useful. The thermostat can click all day long, but there won’t be enough current left to energize the contactor in the condenser or the blower relay on the furnace board.
Step-by-Step Fix
Before you yank the thermostat off the wall, get a digital multimeter and an insulated precision screwdriver. We’re dealing with low voltage here, but that doesn’t mean sloppy work is fine.
-
Rule out short-cycle delays — A lot of modern digital and smart thermostats build in a 5-minute compressor protection delay. If the power blinked or you kept changing the setpoint back and forth, the relay may click once, but the thermostat will hold off the actual cooling call for 300 seconds so the compressor doesn’t take a locked-rotor hit. Leave it alone for 6 to 8 minutes and don’t poke any buttons.
- Watch for a flashing "Cool On" or an hourglass icon; a solid icon means the delay’s over.
- If the system starts after 5 minutes, everything’s working like it should.
-
Replace the thermostat backup batteries — Even with a Common (C) wire, a lot of Honeywell, Emerson, and plain-jane builder thermostats still use two AA or AAA alkaline batteries to pull the relay shut. Once battery voltage drops below 1.2 volts per cell, there’s still enough left to light the screen, but not enough to latch the relay coil. That’s where you get the click and then a reboot.
- Pop the faceplate straight off the subbase.
- Pull the batteries and look for white corrosion on the terminals; a pencil eraser usually cleans that junk off.
- Put in fresh, high-drain alkaline batteries. Skip the bargain zinc-carbon stuff.
-
Inspect the primary condensate drain pan and float switch — Air conditioners pull a shocking amount of moisture out of the air every day. If the indoor coil’s 3/4-inch PVC drain line clogs with slime, the water backs up into the pan. That lifts a magnetic float switch tied right into the R terminal wire, and just like that, the control voltage gets cut off to keep water from wrecking the drywall below.
- Find the indoor air handler, usually up in the attic, crawlspace, or a utility closet.
- Check the secondary pan and the primary PVC line for a little T-pipe float switch.
- If there’s standing water in the pan, clear the line with a wet/dry vac or a drain gun before the thermostat can call for cooling again.
-
Verify the furnace or air handler cabinet door switch — The blower access panel has a spring-loaded push-button safety switch. If that panel’s off by even 1/8 of an inch, the switch pops out and shuts off all 120-volt power feeding the transformer.
- Push the furnace blower door in firmly.
- Make sure the thumbscrews or clips are tight and the panel’s sitting square in the track.
- Listen for a blower whir or check for an LED diagnostic light through the sight glass to make sure power came back.
-
Examine the 3-amp or 5-amp low-voltage blade fuse — If an old contactor coil shorted or a wire rubbed through against the sheet metal, it’ll pop the automotive-style blade fuse on the furnace control board. Then your thermostat might still click on battery power all day long, but the board is dead.
- Shut off power at the furnace breaker.
- Pull the blower door and find the main circuit board.
- Look for a purple (3-amp) or amber (5-amp) spade fuse plugged into the board.
- Pull it and hold it up to the light; if the thin strip inside is broken or blackened, replace it with the same one.
- Never swap in a higher-amperage fuse like a 10-amp or 15-amp as a quick fix—you’ll fry a $400 control board.
-
Check voltage across R and C with a digital multimeter — Set the meter to AC Volts (VAC) on the 200V scale and see whether the thermostat is actually getting decent electrical pressure.
- Carefully pull the thermostat body off the wall to expose the terminals.
- Put the red probe on the R (or Rc) screw and the black probe on the C (Common) screw.
- A healthy transformer should read between 24 and 28 VAC; if you get 0 VAC, work backward to the float switch, door switch, or dead transformer.
- If you’re seeing 12 to 18 VAC, the transformer’s weak under load or the wire run has too much resistance.
-
Perform a manual jumper test to isolate the thermostat — You can tell in about ten seconds whether the thermostat relay is bad or whether the HVAC system is the real problem by bypassing the thermostat.
- Turn off the HVAC breakers at the main panel.
- Loosen the screws and remove the R (power), G (fan), and Y (compressor) wires from the thermostat base.
- Twist the bare copper ends of R, G, and Y together with a small wire nut.
- Turn the breakers back on.
- If the outdoor condenser and indoor blower fire up right away, your wiring and equipment are fine—your thermostat relays are toast and the unit needs replacement.
- If nothing happens, the problem is downstream in the air handler, the wiring harness, or the outdoor contactor.
-
Inspect the subbase wire pins for corrosion and seating — Smart thermostats like Nest, Ecobee, or Honeywell Home use tiny spring clips or header pins on the terminal block. If those connection points are loose, dirty, or oxidized, current won’t pass cleanly through the relay contacts.
- Strip the 18-gauge solid copper wire back about 3/8 of an inch.
- Make sure there isn’t any stray insulation trapped in the clamp.
- Give each wire a gentle tug to confirm the terminal grabbed the copper tight.
- Check the multi-pin connector on the back of the faceplate for bent or shoved-in pins.
-
Replace the thermostat if internal relays have pitted — Low-voltage relays use small silver-alloy contact pads that open and close thousands of times. After 7 to 10 years, electrical arcing starts leaving carbon buildup and pits on those contacts.
- Once that pitting gets bad, the magnet can still click shut, but the carbon stops the circuit from making solid contact.
- If the manual jump test in Step 7 worked, pull the bad thermostat, label the wires with masking tape, and install a newer programmable or smart thermostat that fits your system.
Common Causes
- Depleted Faceplate Batteries: The relay coil takes way more punch than the LCD screen. Weak batteries can keep the display alive just fine, but once the system asks for heat or AC, the relay tries to pull in, drags the voltage down, and the whole thing resets.
- Tripped Condensate Overflow Switch: High-efficiency air handlers make gallons of condensate every day. If dust, mold, or scale clogs the drain, the float switch rises and opens the 24-volt R circuit. The thermostat clicks, but no electricity gets to the outdoor unit.
- Blown Low-Voltage Blade Fuse on Control Board: A surge or a dead short in the outdoor 18/2 control wire—often chewed by rodents or nicked by string trimmers—blows the 3A or 5A fuse inside the blower cabinet.
- Failing 24-Volt Transformer: Old step-down transformers can short internally. They may show 24 VAC with no load, but once the thermostat relay clicks and asks for 0.5 to 1.0 amps to pull in the outdoor contactor, the voltage collapses to 8 or 10 VAC and drops out.
- Burned Contactor Coil Outdoors: The thermostat’s only job is to send 24 VAC to the condenser contactor, that high-voltage switch. If the contactor coil burns out or gets jammed with ants—a real nuisance all over the South and Texas—the thermostat still clicks inside, but the 240-volt compressor circuit never pulls in.
Common Mistakes
- Swapping out the thermostat before checking the attic pan: Homeowners will spend $150 to $250 on a new smart thermostat and still get the same clicking nonsense. Check the drain line and condensate safety switch first before blaming the wall unit.
- Ignoring the furnace blower door switch: Pull the air handler door off and you kill power through the safety switch. If you test at the thermostat with that door sitting on the attic floor, you’ll read 0 volts everywhere and think the transformer died when the interlock’s just open.
- Upsizing the control board fuse to stop it from blowing: If a 3-amp fuse keeps popping, stuffing a 10-amp or 20-amp automotive fuse in there to “keep it running” throws away the safety margin. That’ll burn traces off your $300-$600 integrated furnace control board or cook the transformer windings in short order.
- Mixing up wire colors instead of terminal labels: Don’t assume red is R, yellow is Y, or green is G just because that’s how it looks. Previous DIY work and some builders cross those colors all the time. Photograph the terminal letters (R, C, Y, W, G, O/B) and match wire to letter, not wire to color.
- Stripping wire ends with dull pliers: If you nick the solid copper core of an 18-gauge thermostat wire, you’ve made a weak spot. Push the thermostat back on the wall and that wire can snap inside the insulation, which leaves you chasing an invisible break that looks fine from the outside.
Cost & Time Breakdown
| Task | DIY Cost | Pro Cost | Time |
|---|---|---|---|
| Replace AAA/AA Thermostat Batteries | $4–$8 | $85–$150 (diagnostic fee) | 5 minutes |
| Clear Clogged Condensate Drain Line | $10–$25 (vinegar/vac fitting) | $150–$250 | 30–45 minutes |
| Replace Blown 3A/5A Control Board Fuse | $3–$6 (multi-pack) | $120–$180 | 15–20 minutes |
| Replace 24V HVAC Transformer | $20–$45 | $200–$350 | 45–60 minutes |
| Replace Failed Thermostat Unit | $35–$250 | $250–$450 | 30–60 minutes |
| Replace Burned Outdoor AC Contactor | $15–$35 | $175–$300 | 30–45 minutes |
Tips & Prevention
- Clear your condensate line every 90 days: Pour one cup of standard distilled white 5% household vinegar into the primary condensate drain access tee every three months during cooling season. That helps keep bacterial slime and algae from building those jelly plugs that trip the safety switch.
- Replace thermostat batteries on New Year's Day: Don’t wait for the low-battery warning or for the relay chatter to start. Swap in fresh lithium or high-grade alkaline cells every 12 months as part of your yearly home tune-up.
- Inspect the outdoor contactor for pests in spring: Shut off the 240V condenser disconnect, pop the side panel, and look at the contactor points. Fire ants and earwigs love electrical fields, and their crushed bodies can keep the contacts from making solid touch.
- Seal the wall opening behind the baseplate: Air leaking through an open wall cavity can fool the thermostat sensor and cause short cycling that wears out the relay way before it should. Pack a little plumber’s putty or foam insulation around the wire hole.
When to Call a Professional
Low-voltage troubleshooting is fair game for a handy homeowner, but high-voltage equipment is another story. If your jumper test shows the thermostat is fine, then the failure has moved to the 120-volt blower motor circuit, the high-voltage run capacitor, or the 240-volt outdoor compressor circuit.
Call a licensed HVAC pro right away if you smell scorched plastic or ozone near the air handler cabinet, if the 3-amp low-voltage fuse blows again the second you install a new one, or if the outdoor compressor hums hard for two seconds and trips the main 30-amp to 50-amp breaker. Working in high-voltage disconnects or messing with failing motor capacitors that can hold a lethal charge after the power’s off takes the right tools and the right license.
Related Articles
Keep troubleshooting with these hand-picked guides from FixlyGuide:
- Thermostat Won't Turn Off? 5 Causes and How to Shut It Down — Thermostat won't turn off your heat or AC? Follow this trade-tested isolation guide to diagnose stuck contactors, shorted low-voltage wires…
- AC Not Turning On? 9 Things to Check Before You Call a Pro — Your air conditioner won't turn on, and it's getting hot inside. Here are the 9 most common reasons—and the simple checks you can do yourse…
- Heat Pump Won't Switch to AC? 6 Causes & What to Check First — If your heat pump is stuck in heating mode and won't switch over to air conditioning, it's often a simple fix like a thermostat setting, a…
- Thermostat Won't Connect to Wi-Fi? 9 Reasons and What to Check First — A smart thermostat that can't connect to Wi-Fi is just a thermostat. Here are the 9 most common reasons yours keeps dropping offline and th…
- The Furnace That Won't Start: 3 Hidden Reasons Your Heat Quit — When your furnace won't kick on, it's often more than just the thermostat. Discover the overlooked culprits that stop your heat dead in its…
- Dishwasher Won't Fill With Water? 5 Causes and the Step-by-Step Fix — Dishwasher running dry? Learn how to diagnose a stuck float switch, unclog a water inlet valve, and test solenoid continuity with step-by-s…
What should this project cost?
Enter your project details for a realistic cost range before you call anyone.
Service calls and common repairs run $150–$900; full system replacement typically $6,000–$12,000.
- Regional adjustment
- National average
- Labor share (typical)
- ~$1,935
- Quotes to collect
- 3 written estimates
Educational estimate based on national averages — not a binding quote. Always confirm with written local estimates.
Fixly Project Decision Box
- DIY difficulty
- Advanced
- Estimated time
- Homeowner checks 20–30 minutes
- Cost level
- Moderate
Main tools / materials
- Clean air filter
- Garden hose for condenser coils
- Shop vac for the condensate line
When to stop and call a pro
- Burning smell, smoke, or a tripping breaker
- Refrigerant lines iced over or hissing
- Any work inside the sealed refrigerant circuit (EPA-licensed only)
- Gas smell near a furnace — leave and call the utility
Need professional help?
Find an HVAC Pro Near YouGet the print-ready PDF of this guide
A clean, ad-free, printable version you can keep on your phone or pin to the workshop wall. Free with a FixlyGuide account.
- Print-optimized layout
- Tools, materials & every step included
- Saved to your account
Frequently asked questions
What is the clicking sound inside my thermostat?},{answer:+
The sound is an electromechanical relay physically closing its internal contact points. The thermostat senses the room temperature has crossed your setpoint and activates an electromagnet to connect the 24-volt power source to your heating or cooling control wires.
Discussion
Loading comments…