- The Quiet Threat: How Hidden Flashing Damage Invites Disaster After a Storm — After a storm, visible roof damage is obvious, but often the real trouble hides in damaged flashing, silently inviting water intrusion and…
- The Urgent Truth About Missing Roof Shingles (And Your 3-Step Fix) — High winds can rip shingles off your roof, exposing your home to immediate water damage – here’s how to assess, temporary patch, and plan p…
- Missing Shingles? The Real Trouble Is Under Your Roof — After a storm, missing shingles seem like a simple fix. But the high winds that tore them off likely broke the seals on surrounding shingle…
- The $50 Storm Damage Secret Your Insurance Adjuster Won't Tell You — High winds snatched your shingles? Don't panic. I'll show you how to quickly and safely assess the damage and make a temporary repair to pr…
- The 1 Mistake Homeowners Make When Sealing a Deck (And How to Fix It) — Discover the crucial, often-missed step in deck sealing that prevents premature wear and water damage, ensuring your wood deck lasts for ye…
Plumbing · Leak
| Project category | Plumbing |
|---|---|
| Problem type | Leak |
| Trade required | Plumbing |
| Urgency | Emergency — act now |
| Safety risk | High safety risk |
| DIY suitability | DIY for experienced homeowners |
| Cost category | Low cost |
| Typical timeline | Shut water off now; repair usually same or next day |
| Contractor type | Licensed plumber |
Repair option
Isolate at the shutoff, replace the failed component, and dry the cavity fully.
Replacement option
Repipe the run or the branch when corrosion is widespread.
Common causes
- Failed supply line or shutoff valve
- Worn washers, cartridges, or P-trap connections
- Pinhole corrosion in older copper
Relevant tools:emergency checklistdiy or hire a pro
Published October 25, 2026Last updated October 25, 2026
Tools & materials you'll need
Affiliate links- AmazonFlat roofing pry bar (cat's paw or wonder bar)1 · For breaking seals and pulling fasteners without damaging shingle faces
- AmazonStraight claw framing hammer1 · For pulling and setting roofing nails flat
- AmazonUtility knife with hook blades1 · Hook blades cut asphalt cleanly without gouging the deck
- AmazonStandard caulking gun1 · For precise placement of cement dabs
- AmazonLumber crayon or carpenter's chalk1 stick · To mark compromised shingles during visual inspection
As an Amazon Associate FixlyGuide earns from qualifying purchases — at no extra cost to you. Prices and availability are accurate as of publication and subject to change.
Quick Answer
If high winds creased or peeled your roof shingles without blowing them completely off, water will wick underneath the torn asphalt matrix during the next downpour. You need to break the failed factory sealant bead, slide out the broken nails with a flat pry bar, swap in a color-matched replacement shingle, and nail it 1 inch above the exposure line. Seal each replacement tab with three quarter-sized dabs of SBS-modified roofing cement to prevent future wind uplift.
The Problem
Walk your yard after a 60 mph gust front rips across North Texas. You look up expecting gaping holes. Instead, every shingle appears to be sitting neatly in place.
Don't breathe a sigh of relief just yet.
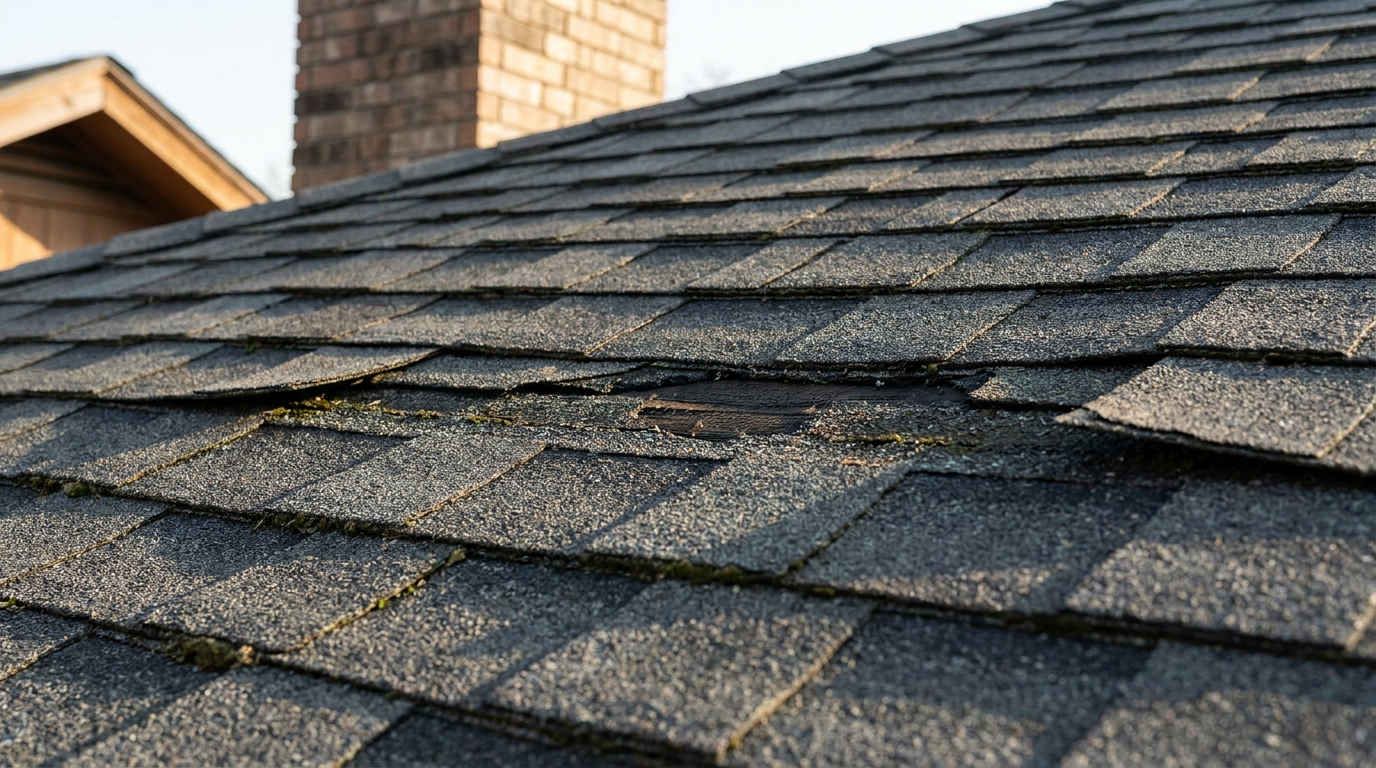
Wind damage rarely announces itself with clean, missing sections across the whole deck. More often, high-velocity uplift catches the bottom edge of an architectural or 3-tab shingle, bends it upward like a hinge, snaps the internal fiberglass matting, and drops it right back down. From the curb, it looks fine. Up close, there is a dark, horizontal bruise running straight across the tab where the protective mineral granules scrubbed away.
That crease means the shingle has lost its structural integrity. The asphalt substrate is fractured, the adhesive seal underneath is ripped apart, and the shingle is now acting like a loose flap. Water hits that crease, slips under the fractured mat, bypasses the synthetic underlayment at the nail penetrations, and rots your 7/16-inch OSB decking before you ever spot a ceiling stain.
How It Works
Your roof functions as a layered, overlapping watershed system governed by gravity and surface adhesion. Each asphalt shingle features three distinct zones: the lower exposed tab, a factory-applied thermo-plastic sealant strip (often called the tar line), and the upper nailing zone. When installed, roofers drive four to six 1-1/4-inch galvanized ring-shank nails through the nailing strip, directly piercing the upper portion of the course below it.
After installation, normal sun exposure heats the roof surface between 130°F and 160°F. This radiant heat activates the thermo-plastic sealant strip, bonding the bottom edge of the top shingle securely to the face of the shingle beneath it. This bond creates a unified wind membrane rated for 60 mph to 130 mph winds, depending on the shingle class.
During severe storms, wind creates negative pressure (uplift) as it crests the roof ridge and eaves. If uplift exceeds the bond strength of that thermal adhesive line, the seal snaps. The shingle tab flutters upward. Because the top edge remains held down by nails, the flexible fiberglass mat bends along an unnatural fulcrum point about an inch below the nail line.
Once that fiberglass core snaps, it can never heal itself. Surface tension pulls rainwater horizontally along the crack. Capillary action draws that trapped moisture straight toward the old nail holes underneath. Without a continuous seal and intact fiberglass, your roof deck is exposed to slow, hidden rot.
Step-by-Step Fix
Tackling wind-creased shingles requires patience and a gentle touch. Aggressive prying will tear surrounding tabs, turning a five-minute fix into a half-slope replacement.
-
Wait for Mild Weather — Plan this repair when the ambient outdoor temperature is between 65°F and 80°F. If you climb onto the roof when it's colder than 55°F, aged shingles become brittle and snap like saltine crackers. If it's blazing past 90°F in July, the asphalt softens into chewing gum, and your work boots will grind the protective granules right off the adjacent tabs.
- Safety Check: Never walk a pitch steeper than 6/12 without roof jacks, safety ropes, and a secured harness.
- If It's Too Cold: Use a heat gun on its lowest setting held 12 inches away to gently soften stubborn tabs before lifting.
-
Locate and Mark Every Compromised Tab — Walk the affected slope slowly, scanning for faint horizontal lines across the middle of the shingle tabs. Gently slide your gloved fingers under the bottom edge of suspect shingles; if they lift easily without resistance, the thermal seal has failed. Circle the affected shingles lightly with a piece of carpenter's chalk so you don't lose your place while juggling tools.
- Tool: White or yellow lumber crayon/carpenter's chalk.
-
Break the Adjacent Sealant Beads — Slide a smooth, flat roofing pry bar (a "cat's paw" or standard flat bar) gently beneath the creased shingle to separate it from the course below. Next, slide the bar under the shingle above the damaged piece. That overlapping shingle has nails driven straight through the upper flange of your target shingle, so its seal must be broken as well.
- Pro Technique: Keep the bar flat against the roof surface. Prying upward at a sharp angle will punch a hole through the shingle above.
-
Expose and Loosen the First Fastener Row — Lift the tab of the damaged shingle just high enough to spot the nail heads—aim for no more than a 45-degree angle. Slide the notched claw of your flat pry bar against the shank of the nail, center it, and pry against the bar's heel.
- Troubleshooting: If the nail head sinks into the asphalt, don't gouge the shingle. Drive the pry bar under the nail head and give the bar handle a sharp tap with the palm of your hand.
-
Pull the Two-Course Fasteners — This is where most homeowners mess up: remember that the shingle above your damaged piece drives its nails directly through the top margin of the broken shingle. Lift the tab two courses up, locate the four nails securing that layer, and pry them loose as well.
- Crucial Step: If you don't remove this second set of nails, your creased shingle remains pinned in place and will rip if yanked.
-
Extract the Damaged Shingle — With all eight fasteners pulled (four in the damaged shingle, four in the course directly above), slide the broken shingle straight down the slope. Inspect the black felt or synthetic underlayment underneath.
- Inspection Note: If you spot a tear in the underlayment, cut a 6-inch strip of self-adhering modified bitumen flashing tape and smooth it over the tear before installing new shingles.
-
Dry-Fit the Replacement Shingle — Measure the cut length of your replacement shingle against the gap. Slide the new shingle upward into position until its top edge sits flush against the bottom edge of the shingle two courses above it. Ensure the bottom exposure lines up evenly with the neighboring shingles on that run.
- Tool: Standard utility knife with a curved hook blade for clean cuts without tearing the backing mat.
-
Nail the Replacement Shingle in Place — Lift the tab directly above the new piece. Position your 1-1/4-inch electro-galvanized roofing nails along the manufacturer's nailing strip, roughly 1 inch above the cut-outs/exposure line. Drive four nails per shingle for standard slopes, or six nails if you live in high-wind zones.
- Nailing Tip: Drive the nails perfectly flush with the shingle surface. Under-driven nails puncture the tab above them; over-driven nails blow through the fiberglass and provide zero hold against the next windstorm.
-
Fasten the Upper Course — Re-nail the course directly above the new shingle that you loosened in Step 5. Drive the nails through fresh, undamaged asphalt—about 1/2 inch to the left or right of the old nail holes.
- Old Hole Treatment: Smear a nickel-sized dab of roofing cement directly over the empty, unsealed nail holes in the deck to stop water leaks.
-
Re-Seal Every Lifted Tab with Flashing Cement — The factory thermal seal on the old adjacent shingles is dead and will not re-adhere on its own. Use a caulking gun loaded with SBS-modified flashing cement to apply three to four quarter-sized dabs beneath each lifted shingle tab.
- Safety Limit: Do not apply continuous beads across the bottom edge. Continuous caulk traps condensation inside the shingle, rotting the deck from the inside out. Dabs allow moisture to escape freely.
-
Bed the Tabs and Clean Up — Press each shingle tab down firmly with your gloved hand to compress the roofing cement dabs. The adhesive should spread to roughly the size of a silver dollar without squeezing out of the bottom edge. Collect all pulled nails in a magnetic tray so they don't slide into gutters or blow into your lawn mower's path.
Common Causes
Wind damage isn't always caused by tornado-level weather. A modest wind can wreck shingles if other factors compromise their strength:
- Thermal Cycling and Aging: Prolonged summer heat bakes the volatile oils out of the asphalt. Once shingles dry out, their pliability drops, making them brittle. A routine 45 mph gust that a 5-year-old roof shrugs off will snap the tabs on a 15-year-old roof.
- Improper High-Nailing During Installation: Roofing crews moving too fast often nail 2 to 3 inches above the designated nailing strip. When fasteners miss the lower double-layer asphalt line, wind leverage on the exposed tab doubles, easily snapping the shingle along the nail boundary.
- Cold-Weather Installation Failures: Roofs installed during late fall or winter often fail to seal because temperatures never reach the 130°F roof-deck threshold needed to melt the adhesive strip. Dust and leaves blow under the unsealed tabs, permanently contaminating the glue.
- Rafter Sag and Structural Shifting: When rafter ties slip or decking sags slightly between trusses, the roof surface changes pitch. This creates localized tension pockets that pucker shingle edges, giving sudden crosswinds an easy handhold to catch and bend the tab upward.
Common Mistakes
- Face-Nailing Exposed Tabs — Driving a nail directly through the exposed colored surface of a shingle to hold down a fluttering corner is a massive blunder. That exposed steel head rusts, shrinks in freezing weather, and turns into an active leak within 18 months. Always nail under overlapping tabs.
- Slapping Down Mastic Like Peanut Butter — Smearing trowels of black asphalt plastic cement under a shingle might feel secure, but heavy solvent-based roof mastic dissolves asphalt binders over time. Use small, quarter-sized dabs of elastomeric roofing adhesive instead of slathering the entire shingle.
- Reusing Old Bent Nails — When pulling a nail, throwing it back into the deck to save a trip down the ladder is a recipe for failure. Bent or wallowed-out nail shanks strip the grip inside OSB decking. Always drive fresh, galvanized ring-shank nails into solid wood.
- Lifting Old Shingles Past 60 Degrees — Bending an intact, aging shingle upward at a sharp 90-degree angle to get your hammer underneath will crease that shingle, too. Work your pry bar and hammer underneath low and flat to protect adjacent tabs.
- Ignoring the Granule Loss Line — Some homeowners assume that if a wind-creased shingle lays back down flat, it doesn't need replacing. If you see a dark horizontal line where granules have flaked off, the inner fiberglass is broken. It will leak eventually; replace it now.
Cost & Time Breakdown
| Task | DIY Cost | Pro Cost | Time |
|---|---|---|---|
| Inspect and Chalk-Mark Creased Tabs | $5 (Chalk) | $150–$250 (Roof Inspection) | 30–45 mins |
| Single Shingle Replacement (1–3 tabs) | $35–$50 (Bundle + Nails) | $250–$400 (Minimum Service Fee) | 45–60 mins |
| Multi-Shingle Section Repair (Up to 10) | $60–$90 (Materials) | $450–$750 | 2–3 hours |
| Re-Sealing Lifted Wind-Torn Tabs (1 Slope) | $15 (1 Tube SBS Cement) | $200–$350 | 1–2 hours |
| Deck Penetration Patch (Underlayment) | $25 (Flashing Tape) | Included in Pro Repair | 15–20 mins |
Tips & Prevention
- Check the Roof Every Spring and Fall: Walk across the street with a pair of 10x binoculars. Look across your roof slopes during early morning or late afternoon when low-angle sunlight casts sharp shadows under lifted or creased shingle tabs.
- Keep Overhanging Branches 6 Feet Back: Tree branches whipping against shingle surfaces in high winds break the thermo-plastic bond and scour away protective granules long before wind uplift tears the tabs.
- Look at the Drip Edge Flashing: High wind usually lifts the perimeter first. Check the metal drip edge along your eaves and rakes; if it's bent upward, wind found a pathway underneath your starter shingles.
- Monitor Attic Decking After High Winds: Take a high-lumen flashlight into the attic during heavy rain following a wind event. Look for damp decking seams or rusted nail shanks dripping between the rafters before water ever stains your drywall ceilings.
When to Call a Professional
Swapping out three or four creased shingles on a low-slope garage roof is well within intermediate DIY range. However, wind damage is rarely isolated. If you step onto the roof and count more than 10 to 15 creased shingles across multiple courses, spot-fixing tabs won't solve the issue—the integrity of that entire roof slope's wind envelope is gone.
Stop and call a licensed, insured roofing contractor immediately if you find widespread creasing spanning multiple slopes, if your roof pitch exceeds 6/12 (a 26.5-degree angle), or if the underlying OSB decking feels spongy and yields under your boots.
Spongy decking means moisture has already rotted the wood beneath the underlayment, requiring structural deck replacement that goes far beyond simple shingle swapping. Furthermore, widespread creasing typically qualifies for full-slope insurance replacement under windstorm provisions; DIY repairs on dozens of shingles can complicate your claim if an adjuster suspects improper fastening.
Related Articles
Keep troubleshooting with these hand-picked guides from FixlyGuide:
- The Quiet Threat: How Hidden Flashing Damage Invites Disaster After a Storm — After a storm, visible roof damage is obvious, but often the real trouble hides in damaged flashing, silently inviting water intrusion and…
- The Urgent Truth About Missing Roof Shingles (And Your 3-Step Fix) — High winds can rip shingles off your roof, exposing your home to immediate water damage – here’s how to assess, temporary patch, and plan p…
- Missing Shingles? The Real Trouble Is Under Your Roof — After a storm, missing shingles seem like a simple fix. But the high winds that tore them off likely broke the seals on surrounding shingle…
- The $50 Storm Damage Secret Your Insurance Adjuster Won't Tell You — High winds snatched your shingles? Don't panic. I'll show you how to quickly and safely assess the damage and make a temporary repair to pr…
- The #1 Mistake Homeowners Make When Sealing a Deck (And How to Fix It) — Discover the crucial, often-missed step in deck sealing that prevents premature wear and water damage, ensuring your wood deck lasts for ye…
- The Secret Hairball Fix Plumbers Don't Want You to Know — Tired of standing in ankle-deep water? Most shower clogs are a gnarly mix of hair and soap scum, and you can clear them yourself without ha…
Repair or replace your roof?
Plug in four numbers and see which choice holds up financially.
Free and instant. Educational guidance only — not a quote, inspection, or professional diagnosis.
Estimate your own project cost
National averages are a starting point. Enter your details for a range that fits your house.
Roof replacement cost
- Per square (installed)$604 – $866
Add $500–$2,500 if decking is rotten and needs replacement. Storm damage may be covered by insurance.
Educational estimate only — always confirm with written local bids.
What should this project cost?
Enter your project details for a realistic cost range before you call anyone.
Spot repairs commonly run $400–$1,800; full replacement typically $9,000–$18,000 for an average home.
- Regional adjustment
- National average
- Labor share (typical)
- ~$2,948
- Quotes to collect
- 3 written estimates
Educational estimate based on national averages — not a binding quote. Always confirm with written local estimates.
Fixly Project Decision Box
- DIY difficulty
- Professional Recommended
- Estimated time
- Inspection 1–2 hours · repairs 1–3 days
- Cost level
- High
Main tools / materials
- Binoculars for a ground-level look
- Flashlight for attic checks
- Moisture meter
- Roofing cement (temporary patch only)
When to stop and call a pro
- Active leak near lights, fans, or any wiring
- Sagging, bulging, or water-filled ceiling
- Steep, wet, or two-story roof — do not climb it
- Storm or hail damage you plan to claim on insurance
Need professional help?
Free roof assessment first — no phone calls until you ask for them.
Get Local Roofing HelpDecide what your roof needs
Two minutes of questions turns "something is wrong up there" into a clear next step.
- Repair or replace your roof?Answer 10 questions about age, leaks, and damage to get a clear next step.Open
- Compare contractor quotesScore up to four bids on price, warranty, licensing, and timeline.Open
- Get local estimatesSend one request and compare written estimates from vetted pros.Open
Free, no signup required. Estimates are educational guidance, not a quote or an inspection.
Get the print-ready PDF of this guide
A clean, ad-free, printable version you can keep on your phone or pin to the workshop wall. Free with a FixlyGuide account.
- Print-optimized layout
- Tools, materials & every step included
- Saved to your account
Frequently asked questions
What causes a horizontal crease across a roof shingle?+
Wind uplift catches unsealed tabs and bends them upward. This action creates a stress fracture across the fiberglass matting, dislodging the granules along a crisp horizontal line. Even if the tab falls back down flat, that structural fold never heals and allows water to wick beneath the course.
Can a creased shingle cause an active roof leak if it isn't missing?+
Yes. Once the internal fiberglass mat fractures, surface tension pulls rainwater straight into the crease. From there, moisture wicks horizontally until it hits the nail penetrations in the underlying course, causing slow, hidden rot across the plywood or OSB deck.
Can I just glue a creased shingle back down with roofing tar?+
No. Roofing cement or mastic will temporarily glue the flap down, but it will not repair the snapped fiberglass reinforcement inside the shingle. Temperature changes and routine wind gusts will break the adhesive, allowing leaks to resume within a few months.
How many nails hold down a single wind-damaged shingle?+
Most architectural shingles use four nails per strip on standard slopes, driven across the nailing zone. However, because each shingle overlaps the one beneath it, pulling a single damaged shingle requires removing eight nails in total: four from the damaged piece and four from the course above it.
How do I find an exact color match for an older damaged shingle?+
Look for bundle lot tags or manufacturer stamps on the underside of leftover shingles in your garage or attic. If you have no spare shingles, cut off a clean 2-inch square piece from a damaged tab and bring it to a local building supply distributor to match thickness, grain, and color blend.
Does homeowners insurance cover creased shingles if they didn't blow off?+
Not always. In many jurisdictions, building codes and insurance policies feature matching clauses. If wind creases widespread shingles across a single slope and the manufacturer no longer makes that exact shingle color or size, insurance may cover replacement of the entire affected slope or roof.
What is the best temperature outside for replacing roof shingles?+
The sweet spot is between 60°F and 80°F. If the temperature is below 50°F, neighboring shingles become brittle and will snap while you pry them up. If it's hotter than 85°F, walking on the roof can gouge the softened asphalt and strip off protective granules.
What kind of glue should I use to re-seal loosened shingle tabs?+
Use an SBS-modified asphalt flashing cement applied in quarter-sized dabs. Never spread cement continuously across the entire tab bottom; leaving gaps allows internal condensation to drain freely down the roof slope rather than pooling against nail shanks.
Discussion
Loading comments…