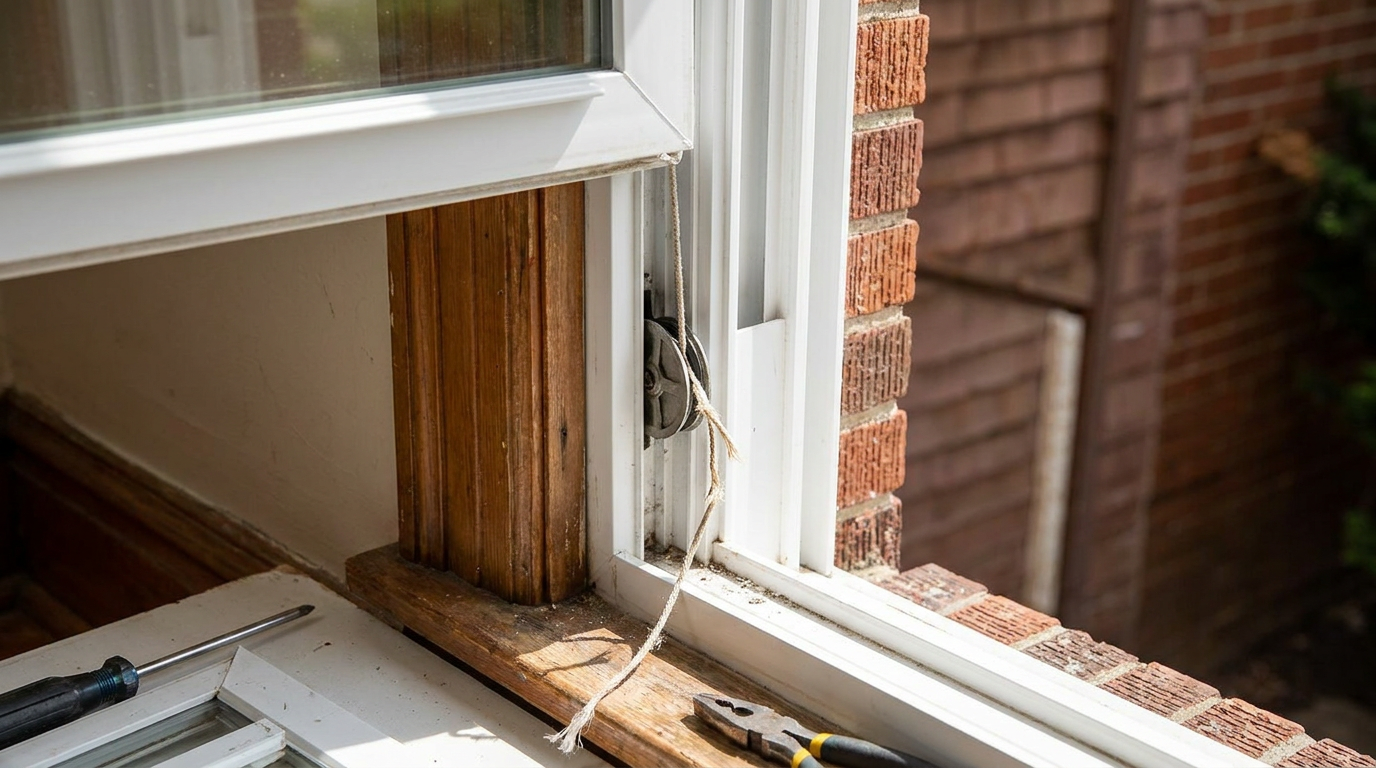
- This is the key step. Take a close look at what’s in the track.
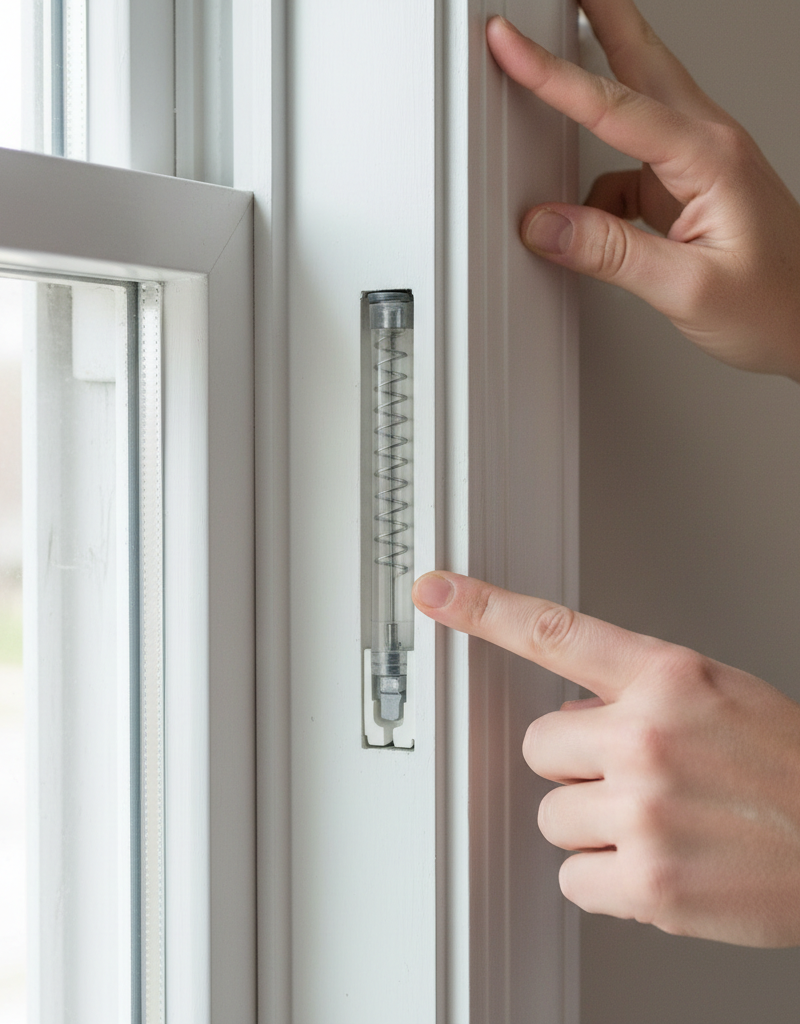
- Spiral Balance: You’ll see a thin metal tube, about 1/2-inch in diameter, with a spiral rod inside. The bottom of that rod connects to the balance shoe.
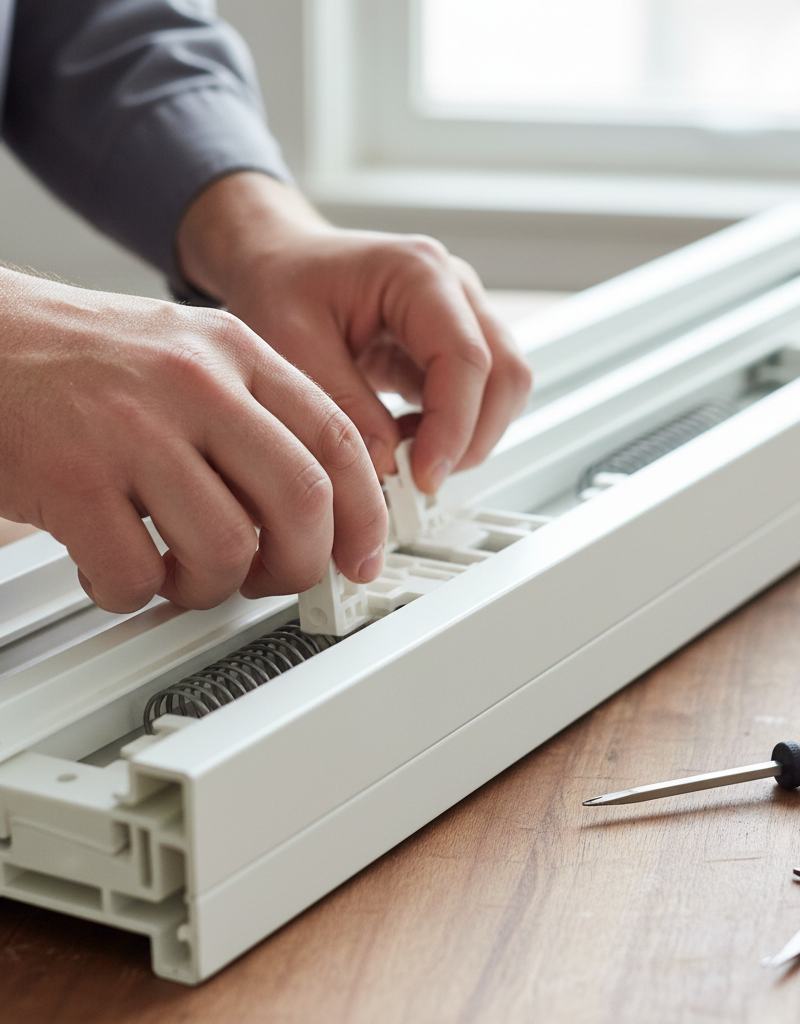
- Channel Balance: You’ll see a wider rectangular metal channel, usually 1/2 to 9/16-inch wide. The cord-and-pulley setup is hidden inside. You’ll see a hook or clip on the end that connects to the shoe.
- Cord-and-Weight: You’ll only see a thick cord or chain running up into the top of the frame. The weights are hidden in a pocket behind the wood trim.
General remodeling · Renovation planning
| Project category | General remodeling |
|---|---|
| Problem type | Renovation planning |
| Trade required | General contracting |
| Urgency | Planned project |
| Safety risk | Low safety risk |
| DIY suitability | Pro recommended |
| Cost category | Major investment |
| Typical timeline | Design and permitting often 2–4 months before work starts |
| Contractor type | General contractor |
Repair option
Phase the work and fix the building envelope first.
Replacement option
Full renovation with permits, design, and a general contractor.
Common causes
- Space no longer fits how the household lives
- Resale preparation
- Deferred maintenance stacking up
Relevant tools:project cost estimatorcompare quoteshome improvement material prices
Published October 3, 2026Last updated October 3, 2026
Tools & materials you'll need
Affiliate linksAs an Amazon Associate FixlyGuide earns from qualifying purchases — at no extra cost to you. Prices and availability are accurate as of publication and subject to change.
Quick Answer
If your window won’t stay up, nine times out of ten you’re looking at a bad or disconnected “window balance.” That’s the hidden mechanism in the frame that counterweights the sash — the moving part of the window. The fix usually means pulling the sash, figuring out which of the three main balance systems you’ve got (spiral, channel, or cord-and-pulley), and then re-tensioning, re-attaching, or swapping out the balance. It’s a job most homeowners can knock out in about an hour with basic tools.
The Problem
You pop the window open for a little air, let go, and—BAM!—it comes right back down. Or maybe it drifts shut slow as molasses over a few minutes. Either way, a window that won’t stay open is more than a nuisance; it’s a safety issue, especially if you’ve got kids or pets running around. A book under the sash or a stick jammed in there is just a band-aid, not a fix. Something in the window that’s supposed to hold the sash up is failing, and if you ignore it, it’s only gonna get worse.
How It Works
So how does a window stay put? Not magic. Just physics and a little hardware. Inside the vertical tracks of your window frame — those are called jambs — lives a window balance system. Its whole job is to offset the weight of the sash, which is the heavy moving part with the glass in it.
Think of it like the counterweight on an elevator, only scaled down for a window. When you lift the sash, the balance gives you an equal and opposite pull, so the thing feels almost weightless in your hand. That’s what lets it sit wherever you leave it. A modern double-hung sash can weigh anywhere from 15 to 40 pounds, so yeah, it’s doing real work.
There are three main types you’ll run into:
- Spiral Balances: These look like a metal tube with a spiral rod inside. The rod hooks to a spring. When you pull the window down, the spring winds up and stores energy. When you push it up, that energy helps lift the sash. You’ll often see these in older vinyl windows.
- Channel (or Block-and-Tackle) Balances: This is the one I see most in modern double-hung and single-hung windows. It’s a self-contained metal channel with pulleys and a cord under spring tension inside it. Smooth, solid, and a lot less fussy than spiral balances.
- Cord-and-Weight Balances: You’ll find these in older wood homes, usually pre-1960s. It’s the old-school setup. A sash cord runs over a pulley at the top of the frame and hooks to a heavy cast-iron weight hidden in a pocket in the wall. Simple. Tough. Lasts forever — until the cord gives up after 80+ years.
When a window starts falling, one of those parts has broken, come loose, or lost its tension. Plain and simple.
Step-by-Step Fix
Ready to get after it? The process isn’t complicated, but it does take a little patience. First thing is getting the sash out, then you can see what you’re actually dealing with.
1. Clear Your Workspace & Tilt the Sash In
- Pull any curtains, blinds, and screens out of the way. You want full access to the frame. Toss a towel or blanket on the floor so you don’t nick up the sash when you set it down.
2. Release the Lower Sash
- Unlock the window and raise the lower sash about 3 to 4 inches from the bottom. On the top edge of the sash, you’ll see two tilt latches. Slide both of them inward toward the center and carefully tilt the top of the sash toward you, into the room, until it’s horizontal.
- Safety: That sash is heavier than it looks. Keep a good grip on it. Don’t let it flop.
3. Remove the Lower Sash
- Once the sash is tilted to 90 degrees, lift one side straight up. The pivot pin at the bottom will pop out of the “shoe” in the track. Then lift the other side free. It should come out without much drama. Set it aside on the towel you laid down.
- If it doesn’t lift out: Some windows are built a little different. You may have to give one side a firm tap upward to pop the pivot out of the shoe.
4. Inspect the Balance System
- Now look inside the vertical tracks where the sash used to sit. That’s where the balance lives. Is a cord snapped? Is a metal channel bent or disconnected from the shoe — the piece that holds the pivot pin? Is a spiral rod hanging loose? Usually the problem jumps out once you can actually see it.
5. Identify Your Balance Type
- This is the key step. Take a close look at what’s in the track.
- Spiral Balance: You’ll see a thin metal tube, about 1/2-inch in diameter, with a spiral rod inside. The bottom of that rod connects to the balance shoe.
- Channel Balance: You’ll see a wider rectangular metal channel, usually 1/2 to 9/16-inch wide. The cord-and-pulley setup is hidden inside. You’ll see a hook or clip on the end that connects to the shoe.
- Cord-and-Weight: You’ll only see a thick cord or chain running up into the top of the frame. The weights are hidden in a pocket behind the wood trim.
6. For a Broken Channel Balance (Most Common)
- The shoe — that plastic piece the sash pivots in — may have popped loose from the balance. If that’s the case, use a flathead screwdriver to lift it up a few inches, then press the metal hook from the balance back into the slot on the shoe. You should hear it click. Be careful here. That shoe is under spring tension, and it’ll want to race up the track.
- If the balance itself is shot — say the cord snapped — you need a new one. Use your screwdriver to pop the old channel out of the track. Most of the time it’s held in with friction or a single screw at the top.
7. Ordering the Right Replacement Balance
- Don’t just grab any balance off the shelf. It has to match the old one exactly. On the metal channel, you’ll find a stamped code, like “28 3” or “28C”. That code tells you the channel length, 28 inches, and the spring weight calibration, 3 or C. Snap a clear photo of it. You can order the exact replacement from online specialty hardware suppliers for about $15-$25.
8. For a Spiral Balance That Needs Tensioning
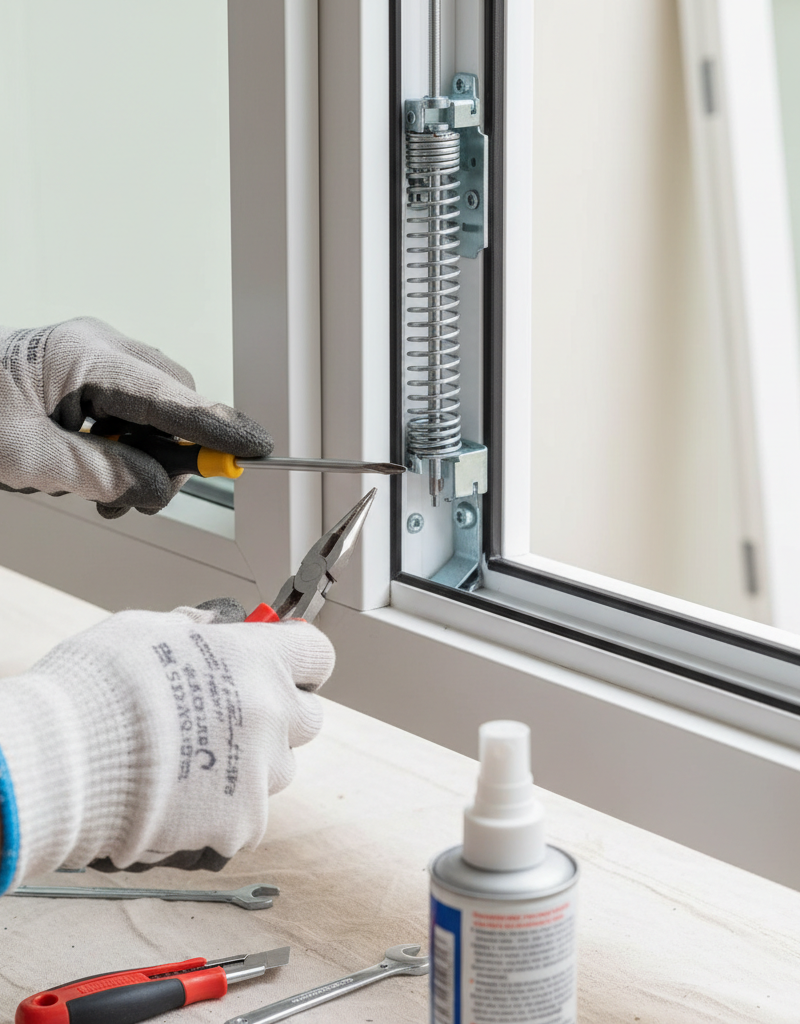
- If the spiral rod is still intact but loose, it’s lost its tension. Disconnect it from the shoe. You’ll need a special spiral balance tensioning tool — it runs about $8. Hook the tool onto the tip of the spiral rod. Turn it clockwise to wind the spring; it should get firm pretty quick. For a standard window, you’ll usually turn it about 10-15 times. Re-hook the rod into the shoe and make sure the notch on the rod locks in.
- Safety: Don’t kid yourself about the stored energy. If the tool slips, it can spin hard and fast. Wear safety glasses and gloves.
9. For a Broken Sash Cord (Old Wood Windows)
- This one takes more elbow grease. You’ll need to carefully pry off the wood trim around the frame to get into the weight pocket. Pull the old broken cord off both the sash and the weight. Feed a new sash cord — buy one rated for window weights — over the top pulley and down into the pocket. Tie it securely to the weight, then cut it to length and fasten it to the side of the sash. You want the weight just off the bottom of the pocket when the window is fully closed.
10. Reinstall the Sash
- Once the balance is repaired or replaced, just work backward. Hold the sash horizontal and guide the pivot pin on one side into the balance shoe. Then lower the other side and pop its pin into the other shoe. Tilt the sash back up until the tilt-latches click into the frame. Test it. It ought to glide smooth and stay wherever you leave it.
Common Causes
Why did the balance fail in the first place? Usually it’s one of these.
- Age and Wear: Springs lose tension after thousands of cycles. Cords fray. After 15-20 years, failure isn’t unusual. In North Texas, that brutal summer heat can also beat up plastic parts and make them brittle.
- Dirt and Debris: Grit, dust, and grime in the tracks make the balance work harder, which wears everything out faster. If the sash doesn’t slide smooth, it’s straining the whole setup.
- Improper Operation: Slamming a window up or down puts a big shock load on the balances. Same thing if the window was painted shut and you forced it open — no dice, something probably broke loose.
- Wrong Part Installed: If someone replaced a balance before and used the wrong weight rating, it was doomed. A balance built for a 20-pound sash won’t last long holding up a 35-pound one.
Common Mistakes
I’ve seen plenty of DIY window repairs go sideways. Steer clear of these:
- Guessing on the Replacement Part: Don’t just measure the balance and buy one that looks close enough. That stamped number is the whole game. Wrong spring weight means the window’ll still fall, or it’ll be a bear to close. You need the exact match.
- Only Replacing One Balance: Balances come in pairs. If one failed, the other one’s been doing overtime and is probably on borrowed time. Replace both on the sash at the same time. Same idea as brake pads — you do both sides.
- Forgetting to Tension a Spiral Balance: If you put in a new spiral balance and don’t wind it, it’s dead weight. The window’ll still slam shut. Tension is what gives it lift.
- Lubricating the Wrong Thing: Don’t spray WD-40 or grease into a block-and-tackle balance channel. It’ll grab dirt and gum up the works. The right move is to clean the vinyl tracks with a dry cloth or use a silicone spray lubricant. The balance itself is sealed up.
- Losing Control of the Shoe: That balance shoe is loaded with spring tension. If you pop it loose without holding onto it, it can rocket to the top of the frame with a loud thwack. Getting it back down can be a pain.
- Breaking the Tilt Latches: Those plastic tilt latches get brittle with age. Slide them gently. Don’t force them. If one snaps, they’re cheap and easy to replace, thankfully.
Cost & Time Breakdown
This is a pretty budget-friendly DIY fix. Parts are cheap, and the labor’s on you. Hiring a pro is an option too, but you’re mostly paying for their time and know-how.
| Task | DIY Cost | Pro Cost (Handyman/Window Tech) | Time |
|---|---|---|---|
| Replace Pair of Channel Balances | $30 – $50 (for two balances) | $150 – $225 | 1 hour |
| Re-tension Spiral Balances | $8 (for the tool) | $125 – $175 | 30-45 minutes |
| Replace Pair of Spiral Balances | $25 – $40 (for two) | $150 – $200 | 1 hour |
| Replace Broken Sash Cords | $10 – $15 (cord only) | $200 – $300 | 1.5 - 2.5 hours |
Tips & Prevention
Keep your windows working smooth a little longer with some routine upkeep.
- Clean the Tracks Annually: At least once a year, tilt the windows in and wipe down the vinyl jambs and tracks. Use a damp cloth to get rid of grit and dust. A clean track is a happy track.
- Lubricate Sparingly: After cleaning, spray a small amount of pure silicone lubricant onto a clean rag and wipe it onto the vertical tracks. Do not use oil-based lubricants like WD-40, which attract dirt.
- Operate Smoothly: Don’t slam the window open or shut. Smooth, controlled movement puts less stress on the balance hardware.
- Check the Weep Holes: At the bottom of your window frame on the outside, you’ll see small slots called weep holes. They let rainwater drain out. If they clog with debris, water can back up into the frame and potentially corrode the balance mechanisms. Keep them clear with a thin wire or a can of compressed air.
- Listen for Trouble: If a window starts scraping or groaning, it’s telling you something. That’s the time to dig in, not after it gives up completely. I pulled a water heater in Frisco last month that had exactly this kind of “ignore it until it dies” vibe — same story, different trade.
When to Call a Professional
Replacing a balance is a solid DIY project, but there are times to set the tools down and call a window repair specialist. If you pull the sash and find the vinyl or wood frame itself is cracked or broken where the balance mounts, that’s a bigger problem. A pro can sometimes repair the frame, or they may need to consolidate the parts.
If you’ve got a very large, heavy, or high-up window — like a second-story picture window — it’s often safer to let a pro handle it. Sashes can be awkward and heavy, and dropping one can mean broken glass or an injury. And if you’re dealing with an older house with original cord-and-weight systems and the access panels have been painted or plastered shut for decades, a pro’s usually the better bet. They’ll know how to open it up without tearing up half the wall.
Related Articles
Keep troubleshooting with these hand-picked guides from FixlyGuide:
- The 4 Hidden Reasons Your Window Won't Stay Up (And the Easy Fixes) — Before you blame a broken window, learn the common culprits behind window sashes that won't stay open and how to fix them yourself.
- The 3 Hidden Reasons Your Window Won't Stay Up (And the Easy Fixes) — Before you call a repairman, learn the three most common reasons your double-hung window won't stay open and how to fix them yourself.
- The 4-Minute Trick to Fix a Sagging Window (No More Prop-Sticks!) — Discover the simple, often-overlooked culprit behind a window that won't stay open and how to fix it in minutes with basic tools.
- The 5-Minute Trick to Fix a Window That Won't Stay Open (No Tools Needed!) — Discover the surprisingly simple reasons why your window keeps sliding shut and how to fix it in minutes, often without any tools.
- The Hidden Cause of Squeaky Hardwood Floors & The Real Fix — That persistent squeak from your hardwood floors isn't just an annoyance; it's a sign of movement. We'll uncover the hidden causes, from hu…
- Why Your Cabinet Doors Aren't Square (And How to Fix That Gap) — Frustrated by cabinet doors that won't close flush or hang crooked? I'll show you how to diagnose and fix those annoying gaps, hinges, and…
Should you do this yourself?
Answer five quick questions before you start. Safety outranks savings every time.
Your experience with work like this
How high do you have to work?
Does the job involve any of these?
Will it need a permit?
Specialty tools
Free and instant. Educational guidance only — not a quote, inspection, or professional diagnosis.
What should this project cost?
Enter your project details for a realistic cost range before you call anyone.
Cost depends heavily on which system turns out to be the source.
- Regional adjustment
- National average
- Labor share (typical)
- ~$1,620
- Quotes to collect
- 3 written estimates
Educational estimate based on national averages — not a binding quote. Always confirm with written local estimates.
Recommended for DIYers & woodworkers
Sponsored
The Top 20 Tools for Workshops of Any Budget
No stationary machines or power tools required — plus 3 fundamental tools that can't be bought at any price.
Get the free guide
Ted's Woodworking — The #1 Woodworking Resource
Detailed instructions, dimensioned drawings, materials & cutting lists, and 3D schematics for every skill level.
See the plansSponsored: links above are affiliate links. FixlyGuide may earn a commission on qualifying purchases — at no extra cost to you.
Discussion
Loading comments…