- UV Damage: Sunlight breaks down screen material over time. The mesh gets brittle, then it starts tearing like paper.
- Accidents & Impacts: A stray ball, a ladder leaned in the wrong spot, or someone pushing on the screen instead of the frame can rip it fast.
- Pets & Wildlife: Cats and dogs love to claw at screens, and birds or squirrels can damage them trying to get in or out.
- Age: Stuff wears out. Old screens get tiny holes that turn into bigger problems if you leave them alone.
General remodeling · Renovation planning
| Project category | General remodeling |
|---|---|
| Problem type | Renovation planning |
| Trade required | General contracting |
| Urgency | Planned project |
| Safety risk | Low safety risk |
| DIY suitability | Pro recommended |
| Cost category | Major investment |
| Typical timeline | Design and permitting often 2–4 months before work starts |
| Contractor type | General contractor |
Repair option
Phase the work and fix the building envelope first.
Replacement option
Full renovation with permits, design, and a general contractor.
Common causes
- Space no longer fits how the household lives
- Resale preparation
- Deferred maintenance stacking up
Relevant tools:project cost estimatorcompare quoteshome improvement material prices
Published October 15, 2026Last updated October 15, 2026
Tools & materials you'll need
Affiliate linksAs an Amazon Associate FixlyGuide earns from qualifying purchases — at no extra cost to you. Prices and availability are accurate as of publication and subject to change.
Quick Answer
Replacing a window screen is a pretty easy DIY job. You’ll pull the old mesh and rubber spline out of the frame, lay new screen over the opening, and use a screening tool to press fresh spline into the groove so the mesh stays put. Then you trim the extra mesh off with a utility knife and call it a day. Quick, cheap, and honestly, it makes a bigger difference than most folks expect.
The Problem
You’ve got a window screen that’s about done. Maybe a dog put a paw through it, a storm tossed debris into it, or the thing’s just old, dry, and falling apart on its own. Those tears aren’t just ugly. They’re basically an open door for mosquitoes, flies, and every other bug looking for a way inside. Once that screen’s ripped, it’s no longer doing its job, and now you’re stuck choosing between fresh air and a house full of pests. No thanks.
How It Works
A window screen is simple, which is why this repair isn’t a big deal. You’ve got three main parts: the rigid aluminum or fiberglass frame that fits the window opening, the mesh that keeps bugs out, and a vinyl or rubber cord called a "spline." That spline is the whole trick. It gets pressed into a channel, the "spline groove," around the inside edge of the frame, and it locks the mesh in place by sheer pressure. No screws. No glue. Just a tight fit. That’s why swapping the screen material is such a straightforward job—you’re basically removing the old spline and mesh, then putting in fresh material.
Step-by-Step Fix
1. Remove the Screen Frame
- Start by pulling the whole screen frame out of the window. Most newer screens are held in by spring clips on one side and slip into a channel on the other. You may have to push the screen toward the spring side to get enough wiggle room to pop it free. Older screens might use little tabs or levers you twist. Don’t muscle it; figure out how it releases first.
2. Prepare Your Workspace
- Set up on a flat surface with some room to breathe — garage floor, patio, big table, whatever you’ve got. Throw down a blanket or a piece of cardboard so you don’t scratch the frame. Then lay the screen frame down and get yourself organized.
3. Remove the Old Spline and Mesh
- Find the end of the spline. Usually there’s a little gap where the ends meet. Use a small flathead screwdriver or a pick to lift one end loose. Once it starts, you can usually pull the whole spline out in one piece. With that gone, the torn mesh lifts right off. Toss both.
4. Clean the Frame
- Before you put anything new in there, clean out the frame and the groove. A stiff brush works fine for dirt, spiderwebs, and gunk packed into the channel. I pulled a water heater in Frisco last month that had exactly this kind of dusty buildup in the access area — same idea here. Clean groove, smoother install. Simple as that.
5. Lay Down the New Mesh
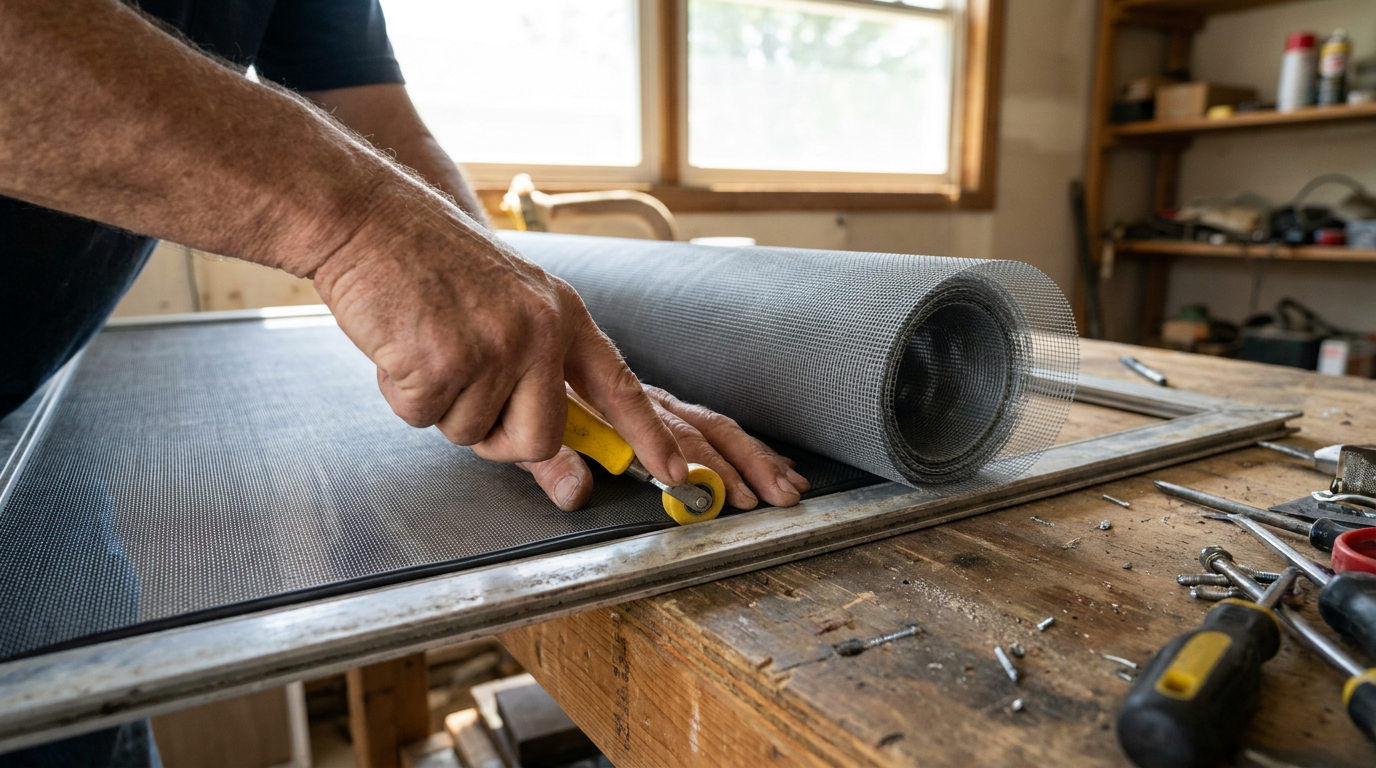
- Roll your new mesh out over the frame and make sure it overlaps by at least one inch on all four sides. You want extra material, not less. If the mesh has a curl from being rolled up, set it so the curve goes downward, like a rainbow. That helps keep it from bunching. A couple clamps can help hold one side while you get going.
6. Install the First Side of the Spline
- Grab your new spline — make sure it matches the frame, because 0.140-inch is a common size, but not the only one — and use the convex wheel on your screening tool to press the mesh lightly into the groove along one long side. That makes the crease and gets things seated. Don’t yank the mesh tight yet. Just get it lined up.
7. Seat the Spline
- Start at a corner and use the concave wheel on your screening tool to push the spline into the groove right over the mesh. Use steady pressure. You’ll feel it pop into place. Roll along the full first side, seating the spline and locking that edge down.
8. Install the Remaining Sides
- Move to the next short side. As you roll the spline in, keep gentle pressure on the mesh and pull it taut away from the side you just finished. You’re trying to get a flat surface, not bow the frame or create waves. Keep going on the third and fourth sides. On the last side, pull the mesh snug so there’s no slack left before you set the spline. You want that thing tight — drum-tight, if you can manage it.
9. Trim the Spline
- Once you get back to where you started, cut the spline with a utility knife and leave about 1/8 inch extra. Then use your screwdriver to tuck that little bit flush into the groove.
10. Trim the Excess Mesh
- This is the part that feels good. Using a sharp utility knife, trim the extra mesh off the outside of the spline. Keep the blade angled away from the new spline so you don’t nick it by mistake. Your screening tool or the frame edge gives you a clean guide. Go slow. Clean cut, clean job.
11. Reinstall the Screen
- The screen’s ready to go back in. Pop it into the window — spring side first — and enjoy the breeze without letting the bugs throw a party inside.
Common Causes
- UV Damage: Sunlight breaks down screen material over time. The mesh gets brittle, then it starts tearing like paper.
- Accidents & Impacts: A stray ball, a ladder leaned in the wrong spot, or someone pushing on the screen instead of the frame can rip it fast.
- Pets & Wildlife: Cats and dogs love to claw at screens, and birds or squirrels can damage them trying to get in or out.
- Age: Stuff wears out. Old screens get tiny holes that turn into bigger problems if you leave them alone.
Common Mistakes
- Using the Wrong Spline Size: Too thin and it won’t hold. Too thick and you’ll fight it the whole way, maybe even damage the frame. Pull a piece of the old spline and match it at the store.
- Over-stretching the Mesh: If you pull the mesh too tight, you can bow the frame inward and mess up the fit. Then the screen won’t go back in right. You want flat, not bent.
- Cutting the Mesh Too Short: Start with more mesh than you think you need. If you trim it too close before the spline’s set, you’re setting yourself up for a gap and a redo.
- Using a Dull Knife: A dull blade will snag the new mesh and leave you with a ragged edge. Fresh blade only. Don’t make extra work for yourself.
Cost & Time Breakdown
| Task | DIY Cost | Pro Cost | Time |
|---|---|---|---|
| Replace mesh in one screen | $15–$25 | $40–$75 | 30 minutes |
| Replace mesh in 3-5 screens | $30–$50 | $150–$300 | 1–2 hours |
| Replace with specialty mesh | $30–$50 per screen | $80–$150 per screen | 30 minutes |
| Build a new screen frame | $25–$40 | $75–$125 | 1 hour |
Tips & Prevention
- Buy a Kit: If this is your first go at it, an all-in-one repair kit makes life easier. You get the mesh, spline, and rolling tool without guessing what fits.
- Choose the Right Mesh: Standard fiberglass is cheap and common. Aluminum holds up better but can crease. "Pet screens" are thicker and stand up to claws. Solar screens can block up to 70% of the sun's heat.
- Clean Screens Annually: Wash them gently with soap and water every spring. It clears off grime that wears the material down and it’ll improve your view, too.
- Check the Spline Diameter: Before you buy anything, pull out a small piece of the old spline and measure it or bring it with you. Common sizes are 0.125", 0.140", and 0.160". That’s the detail that makes or breaks the job.
When to Call a Professional
Re-meshing is a solid DIY project, but if the screen frame is bent, warped, or broken, call a window or screen specialist. A damaged frame won’t seal right against the window, which means bugs get in and the screen’s a pain to install or remove.
Related Articles
Keep troubleshooting with these hand-picked guides from FixlyGuide:
- The Grimy Secret Why Your Window Sticks (And The 15-Minute Fix) — Don't let a stubborn window ruin your day; often, the culprit is simple dirt or dried paint that you can easily fix in under an hour.
- Window Won't Lock? 6 Reasons It's Misaligned—and How to Fix It — Can't get your window to lock? It's usually a simple alignment issue you can fix yourself in under 30 minutes with a few basic tools.
- Window Won't Stay Up? 3 Reasons Your Sash Falls (and the Real Fix) — Tired of a window sash that crashes down? We'll show you how to diagnose a broken window balance system—the hidden mechanism that holds the…
- Why Does My Trim Look Like a Snake Ate It? (The Hidden Culprit) — That wavy, crooked trim isn't just shoddy workmanship—it's often a sign of underlying issues. Learn what causes your trim to warp and how t…
- The Cupped Hardwood Secret: What Your Floor’s Really Telling You — Don't let cupped hardwood floors get you down. This guide tackles the real reasons your wood floor is warping and how to fix it like a pro.
- My Toaster Only Toasts One Side: The Hidden Thermostat Flaw — If your toaster only toasts one side, the cause is often an imbalanced internal thermostat or misaligned heating element, a specific flaw y…
Repair or replace this system?
Plug in four numbers and see which choice holds up financially.
Free and instant. Educational guidance only — not a quote, inspection, or professional diagnosis.
Questions to ask before you sign
Ask every contractor the same questions and the cheapest bid stops looking cheapest. Check them off as you go — your progress is saved on this device.
Free, no signup. Bring this to every walkthrough so you compare bids on the same terms.
What should this project cost?
Enter your project details for a realistic cost range before you call anyone.
Cost depends heavily on which system turns out to be the source.
- Regional adjustment
- National average
- Labor share (typical)
- ~$1,620
- Quotes to collect
- 3 written estimates
Educational estimate based on national averages — not a binding quote. Always confirm with written local estimates.
Repair or replace?
Run the age, cost ratio, and repair history through the calculator before you commit.
- Estimate this projectGet a cost range for your scope and ZIP before you call anyone.Open
- Get local estimatesSend one request and compare written estimates from vetted pros.Open
Free, no signup required. Estimates are educational guidance, not a quote or an inspection.
Recommended for DIYers & woodworkers
Sponsored
The Top 20 Tools for Workshops of Any Budget
No stationary machines or power tools required — plus 3 fundamental tools that can't be bought at any price.
Get the free guide
Ted's Woodworking — The #1 Woodworking Resource
Detailed instructions, dimensioned drawings, materials & cutting lists, and 3D schematics for every skill level.
See the plansSponsored: links above are affiliate links. FixlyGuide may earn a commission on qualifying purchases — at no extra cost to you.
Frequently asked questions
What tools do I need to replace a window screen?+
You'll need a utility knife, a flathead screwdriver, and a special screen rolling tool (spline roller). All of these are available at any hardware store, often sold in a convenient kit.
What's the difference between fiberglass and aluminum screen mesh?+
Fiberglass mesh is the most common and affordable choice. It's flexible and doesn't crease. Aluminum is more durable and offers better clarity, but it can dent or crease if you're not careful during installation.
How do I know what size spline to buy?+
The best way is to pull a small section of the old spline out of the frame and take it with you to the hardware store to match the diameter. If you can't, 0.140 inches is a very common size for standard aluminum frames.
Can I use a screwdriver instead of a spline roller tool?+
It's not recommended. A spline roller has wheels designed to perfectly seat the spline without tearing the mesh or slipping. Using a screwdriver is difficult, slow, and you risk ripping your new screen.
My screen frame seems bent. Can I still replace the mesh?+
You can, but the frame will likely not fit properly in the window, leaving gaps. If a frame is bent or warped, it's best to have a professional repair it or build a new one.
What is a 'pet screen'?+
Pet screen is a much thicker, heavy-duty mesh made from vinyl-coated polyester. It's 7 times stronger than standard fiberglass mesh and designed to resist damage from claws and paws.
My window screen doesn't have a spline. How do I fix it?+
Some older or cheaper screens use a different system, but the vast majority of modern window screens use a spline. If you genuinely don't have one, you may need to replace the entire screen unit, as they are often not designed to be repaired.
How tight should the new screen be?+
You want it to be taut, but not so tight that it bows or bends the frame. A good rule of thumb is that it should be flat and not sag, like a well-made tennis racket. Don't pull so hard that the frame starts to curve inward.
Discussion
Loading comments…