
Tools & materials you'll need
Affiliate linksAs an Amazon Associate FixlyGuide earns from qualifying purchases — at no extra cost to you. Prices and availability are accurate as of publication and subject to change.
Quick Answer
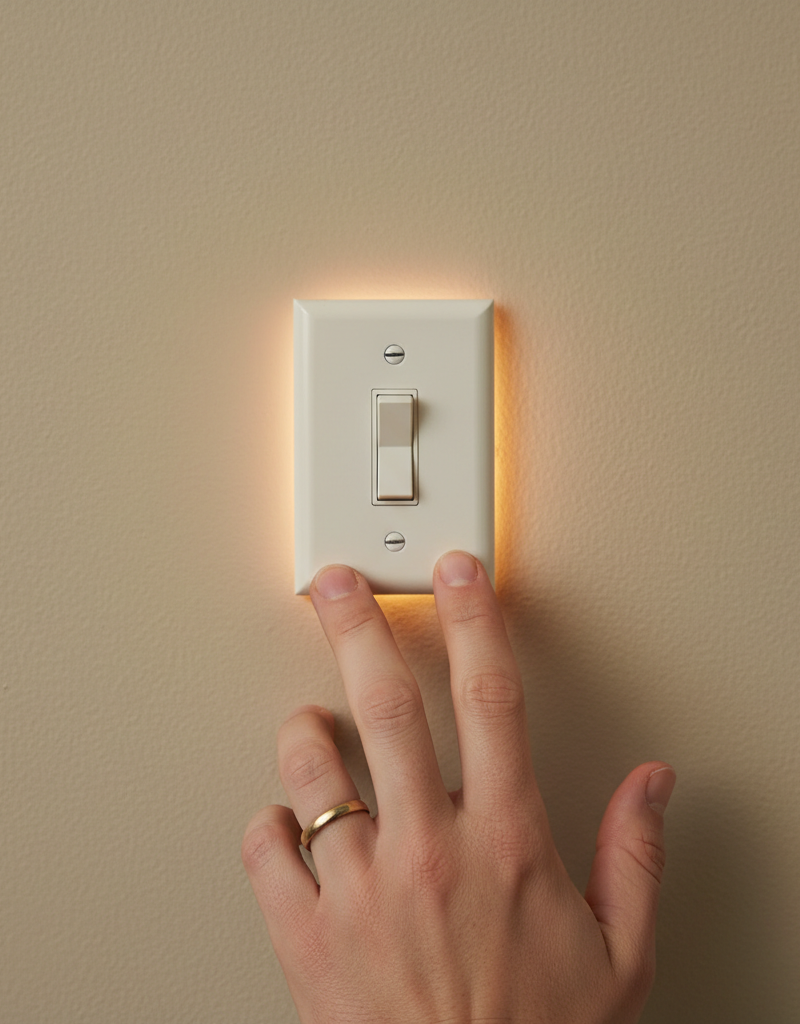
A light switch that is hot to the touch is a serious warning sign, typically caused by an overloaded circuit, loose wire connections, or a faulty switch. The heat indicates excessive electrical resistance, which can lead to melting components or even a fire. It is crucial to address a hot light switch immediately by turning off the power and investigating the cause.
The Problem
When you notice a light switch becoming warm or hot to the touch, it's more than just a minor inconvenience – it's a critical indicator of an underlying electrical issue that demands immediate attention. Electrical components, including light switches, are designed to operate within specific temperature ranges. Any significant heat buildup points to excessive electrical resistance, an inefficient conversion of electrical energy into thermal energy. This resistance can arise from several common culprits: an overloaded circuit, where too many demands are placed on a single switch; loose wire connections, which create poor contact points and generate heat as current struggles to flow; or a defective switch itself that is failing internally. Ignoring a hot light switch significantly raises the risk of melting insulation, charred wiring, short circuits, and potentially an electrical fire. Understanding these causes and knowing how to safely diagnose and rectify them is essential for maintaining a safe home electrical system.
How It Works
To understand why a light switch gets hot, it helps to grasp the basic principles of how a switch operates within a circuit. A light switch is fundamentally a simple mechanical device designed to make or break an electrical connection, thereby controlling the flow of current to a light fixture or other load. Inside a standard toggle or rocker switch, there are internal contacts that bridge two terminals when the switch is in the "on" position, allowing electricity to flow. When the switch is in the "off" position, these contacts separate, halting the flow of electricity.
Electricity, as it moves through a conductor (like a wire) or across a connection point (like the internal contacts of a switch or where a wire connects to a terminal), encounters some degree of resistance. This resistance is a natural property of materials and connections. When current flows through a resistor, some electrical energy is converted into heat energy. This is governed by Joule's Law (P = I²R), where P is power (heat generated), I is current, and R is resistance. Ordinarily, the resistance within a properly functioning switch and its connections is very low, so the heat generated is negligible and quickly dissipates, making the switch feel cool or only slightly warm.
However, if the resistance increases significantly, the heat generated can become substantial. This increased resistance can stem from several factors:
- Loose Connections: When a wire is not securely fastened to a screw terminal on the switch, the contact area between the wire and the terminal is reduced. This constricted path for the electricity creates high resistance at that specific point, leading to localized heating.
- Overloaded Circuit/Switch: If the total wattage of the lights or devices connected to a single switch exceeds the switch's stated amperage rating (e.g., a 15-amp switch handling a load designed for a 20-amp switch), too much current attempts to flow through the switch. Even if the switch itself has low internal resistance, the sheer volume of current will generate more heat, potentially overheating the switch.
- Faulty Internal Components: Over time, the internal contacts of a switch can degrade, corrode, or become pitted due to arcing (small electrical flashes when the switch is toggled). This degradation increases the internal resistance of the switch, causing it to heat up during operation.
- Incorrect Switch Type: Using a standard light switch for a specific load, such as incandescent lights, when it should be a dimmer switch or a specialty switch designed for heavier loads (like motor loads), can also lead to overheating due to incompatible electrical characteristics.
Understanding these mechanisms highlights why consistent heat from a light switch is never normal and always indicates a problem that requires resolution to prevent safety hazards.
Step-by-Step Fix
SAFETY NOTE: Always turn off the power at the circuit breaker BEFORE touching any wiring or opening an electrical box. Verify the power is off using a non-contact voltage tester.
1. Identify the Circuit Breaker — Confirm power is off.
- Locate your home's main electrical panel. It's usually in the basement, garage, or utility closet.
- Before opening the switch plate, turn off the circuit breaker that controls the hot light switch. Look for labels on your breaker box. If not labeled, you may need to flip breakers one by one until the corresponding light goes out. Consider labeling your breakers for future use.
- Crucial Safety Step: Use a non-contact voltage tester to confirm there's no power to the switch. Touch the tester to the face of the switch, and then to any exposed wires once the cover plate is removed. The tester should remain silent and dark.
2. Remove the Switch Plate — Access the wiring.
- With the power positively off and verified, use a screwdriver (flat-head or Phillips, depending on the screw type) to carefully remove the two screws holding the switch plate cover.
- Set the cover plate and screws aside in a safe place where they won't get lost. You'll need them for reassembly.
3. Inspect for Visible Damage — Look for warning signs.
- Gently pull the switch out from the electrical box, being careful not to tug excessively on the wires.
- Examine the switch body and the surrounding wires for any signs of damage: melted plastic, scorched insulation, discoloration (especially brown or black marks), or a burning smell. These are strong indicators of significant overheating.
- If you find significant melting or charring, do not proceed; call a licensed electrician immediately. This indicates a severe electrical fault.
4. Check Wire Connections — Secure loose wires.
- Look at all the wires connected to the screw terminals on the switch. There will typically be two or three wires: one or two "hot" wires (black or red) connected to the brass screws, and possibly a ground wire (bare copper or green) connected to a green screw.
- Ensure each wire is securely wrapped clockwise around its terminal screw and tightened down firmly. Wires should not be loose or able to be pulled off easily.
- If you find any loose connections, carefully tighten the screws until snug. Do not overtighten, as this can strip the screw or damage the wire.
- If wires are connected via "stab-in" ports (small holes on the back of the switch), these are notorious for creating loose connections over time. It's best practice to carefully pull these wires out and reconnect them to the screw terminals instead. If a wire won't easily come out, twist the switch slightly while pulling.
5. Check for Overloaded Circuit — Evaluate total wattage.
- Identify all the lights or devices controlled by this single switch. Add up the total wattage of all light bulbs connected. For example, six 60-watt bulbs equal 360 watts.
- Most standard light switches are rated for 15 amps, which translates to about 1800 watts on a 120-volt circuit (15A x 120V = 1800W). If your total connected wattage is approaching or exceeding this, the switch may be overloaded, especially if it's an older switch or there are other devices on the same circuit.
- Consider reducing the load by using lower-wattage LED bulbs or splitting the load onto a separate switch/circuit if feasible (this might require professional help).
6. Replace the Switch — If the switch is faulty.
- If connections are tight and the load is not excessive, the switch itself is likely faulty. You'll need a new switch with the same amperage rating (usually 15A for general lighting).
- Before disconnecting: Take a photo of the existing wiring configuration. This provides a visual reference for reconnecting the new switch.
- Carefully loosen the terminal screws and remove each wire from the old switch. Pay attention to which wire goes to which terminal.
- Connect the wires to the new switch in the exact same configuration. Twist bare copper wires clockwise and ensure they are snug under the terminal screws. Reconnect the ground wire if present.
- Gently push the new switch and wires back into the electrical box.
7. Reassemble and Test — Power up and monitor.
- Once the switch is securely mounted in the electrical box (using the screws provided with the switch or reusing the old ones if they are in good condition), replace the cover plate and tighten its screws.
- Return to your electrical panel and turn the circuit breaker back on.
- Test the light switch. Turn it on and off several times. Leave it on for a while and periodically check if it's still getting hot. If the problem persists, turn off the power immediately and contact a professional electrician.
Common Causes
- Loose Wire Connections: This is the most prevalent cause. Over time, vibrations or improper initial installation can cause wires connected to the switch terminals to loosen. A loose connection creates increased resistance, generating heat.
- Overloaded Switch/Circuit: The switch is trying to handle more current (due to high-wattage bulbs or too many connected fixtures) than its design rating allows, leading to overheating. This is especially common with older incandescent fixtures.
- Faulty or Worn-Out Switch: Internal components of the switch can degrade over time. The metal contacts inside can become pitted or corroded, increasing internal resistance and generating heat.
- Back-Stab Wiring: Many older and some newer switches have holes on the back for "back-stab" connections. While quick to install, these connections are less secure than screw terminals and are prone to loosening and overheating.
- Incorrect Switch Type: Using a standard switch for a dimmer application, a motor load, or a three-way circuit where a specific three-way switch is required can cause overheating due to incompatible electrical characteristics.
Common Mistakes
- Ignoring the Heat: The biggest mistake is to dismiss a hot switch as "normal." Any significant heat is a warning sign of an electrical problem that could escalate into a fire hazard.
- Not Disconnecting Power: Failing to turn off the circuit breaker and verify with a voltage tester before working on electrical components is extremely dangerous and can lead to electric shock or electrocution.
- Overtightening or Undertightening Wires: Overtightening can strip screws or damage wires, while undertightening leads to poor contact and heat generation. Wires should be snug, but not crushed.
- Using Back-Stab Connections: While convenient, these aren't as secure as screw terminals. Always use the screw terminals for a more reliable and safer connection, especially when replacing a switch.
- Not Considering the Load: Replacing a hot switch without assessing if the connected load (e.g., total wattage of light bulbs) is too high only addresses the symptom, not the root cause. The new switch will likely also overheat.
- Assuming All Switches Are Alike: Using a single-pole switch in a three-way application, or not replacing a dimmer with another dimmer, can cause operational issues and potential overheating.
Cost & Time Breakdown
| Task | DIY Cost | Pro Cost | Time |
|---|---|---|---|
| Inspect & Tighten Connections | $0 | $75–$150 | 20–30 minutes |
| Replace Standard Light Switch | $3–$10 | $100–$200 | 30–60 minutes |
| Replace Dimmer Switch | $15–$30 | $120–$250 | 45–90 minutes |
| Electrical Box Inspection | $0 | $150–$300+ | 1–2 hours |
| Circuit Load Analysis | $0 | $150–$300+ | 1–2 hours |
Tips & Prevention
- Regular Visual Inspection: Periodically check your light switches by touching them. If any feel consistently warm, investigate promptly.
- Use LED Bulbs: Replacing old incandescent bulbs with energy-efficient LED bulbs drastically reduces the load on your switches and circuits, thereby reducing heat generation.
- Proper Wire Installation: When installing or replacing switches, always ensure wires are securely wrapped clockwise around screw terminals and tightened properly. Avoid using back-stab connections.
- Match Switch to Load: Ensure the switch's amperage rating (usually 15A for standard lighting) is appropriate for the total wattage of the fixtures it controls. For heavier loads, consider a higher-rated switch or consult an electrician.
- Label Your Breaker Panel: A well-labeled electrical panel makes it quicker and safer to identify and turn off the correct circuit when troubleshooting.
- Don't Overload Circuits: Be mindful of how many high-wattage devices are connected to a single circuit. If lights dim or breakers trip often, it's a sign of overload.
When to Call a Professional
While inspecting and replacing a standard light switch is a common DIY task, a hot light switch can point to deeper, more complex electrical problems that require the expertise of a licensed electrician. You should immediately call a professional if you observe any signs of charred or melted wiring, smell burning plastic or a smoky odor, or if the circuit breaker for that switch frequently trips. If, after tightening connections and replacing the switch, the problem persists, or if multiple switches or outlets are heating up, it indicates a systemic issue with your home's wiring or an overloaded electrical panel that only a qualified electrician can safely diagnose and repair. Never attempt to troubleshoot beyond basic switch replacement if you are unsure or uncomfortable, especially if you see arc marks or damaged insulation, as this poses a significant fire and shock risk.
Related Articles
Keep troubleshooting with these hand-picked guides from FixlyGuide:
- Why is Your Light Switch Hot? (The Hidden Danger Most Homeowners Miss) — A hot light switch isn't just uncomfortable; it's a critical warning sign of electrical issues that should never be ignored due to fire ris…
- Why is Your Light Switch Hot? The 3 Hidden Overload Risks Explanations — A hot light switch isn't just uncomfortable; it signals potential electrical problems like overloading, loose wiring, or a failing switch.
- Why Your Outlet Died (Even If the Breaker's On) — Discover the hidden reasons an electrical outlet stops working, even when the circuit breaker appears to be on, and learn simple diagnostic…
- The Single Most Common Reason Half Your Outlet Dies (and How to Fix It in 15 Minutes) — Before you call an electrician for a half-dead outlet, check this common culprit that's often a simple DIY fix.
- The 7 Head-Scratching Reasons Your Outlet Died (Even With The Breaker On) — Discover the surprising reasons why an electrical outlet might stop working even when its circuit breaker is fully engaged, and how to safe…
- The Hidden Reason Your GFCI Trips (It's Not Always a Faulty Outlet) — A continuously tripping GFCI outlet is a critical safety warning, often indicating moisture, a faulty appliance, or a wiring problem that r…
Frequently asked questions
Is it normal for a light switch to be warm?+
No, a light switch should ideally feel cool or at ambient room temperature. If it is consistently warm or hot to the touch, it indicates an electrical issue such as loose wiring, an overloaded circuit, or a faulty switch, and should be investigated immediately.
What happens if a light switch gets too hot?+
If a light switch gets too hot, the excessive heat can melt the plastic insulation around the wires and the switch components, potentially leading to a short circuit, arcing, or even an electrical fire within the wall. It also increases the risk of electric shock.
Can a hot light switch cause a fire?+
Yes, absolutely. A hot light switch is a significant fire hazard. The heat generated by loose connections or an overloaded circuit can ignite combustible materials in the wall, such as insulation or wood framing, leading to a serious house fire.
How do I know if my light switch is faulty?+
Signs of a faulty light switch include physical damage (cracks, discoloration), intermittent operation, buzzing or popping sounds when operated, and most critically, becoming hot to the touch even when connections are secure and the load is appropriate. If you've ruled out loose wires and overload, the switch itself is likely the culprit.
Should I replace all my old light switches?+
While not always necessary to replace all old switches, it's a good practice if they show signs of wear, are constantly hot, or if you are upgrading your home's electrical system. Older switches (especially those with back-stab terminals) are more prone to developing issues than modern, higher-quality switches with screw terminals.

Discussion
Loading comments…