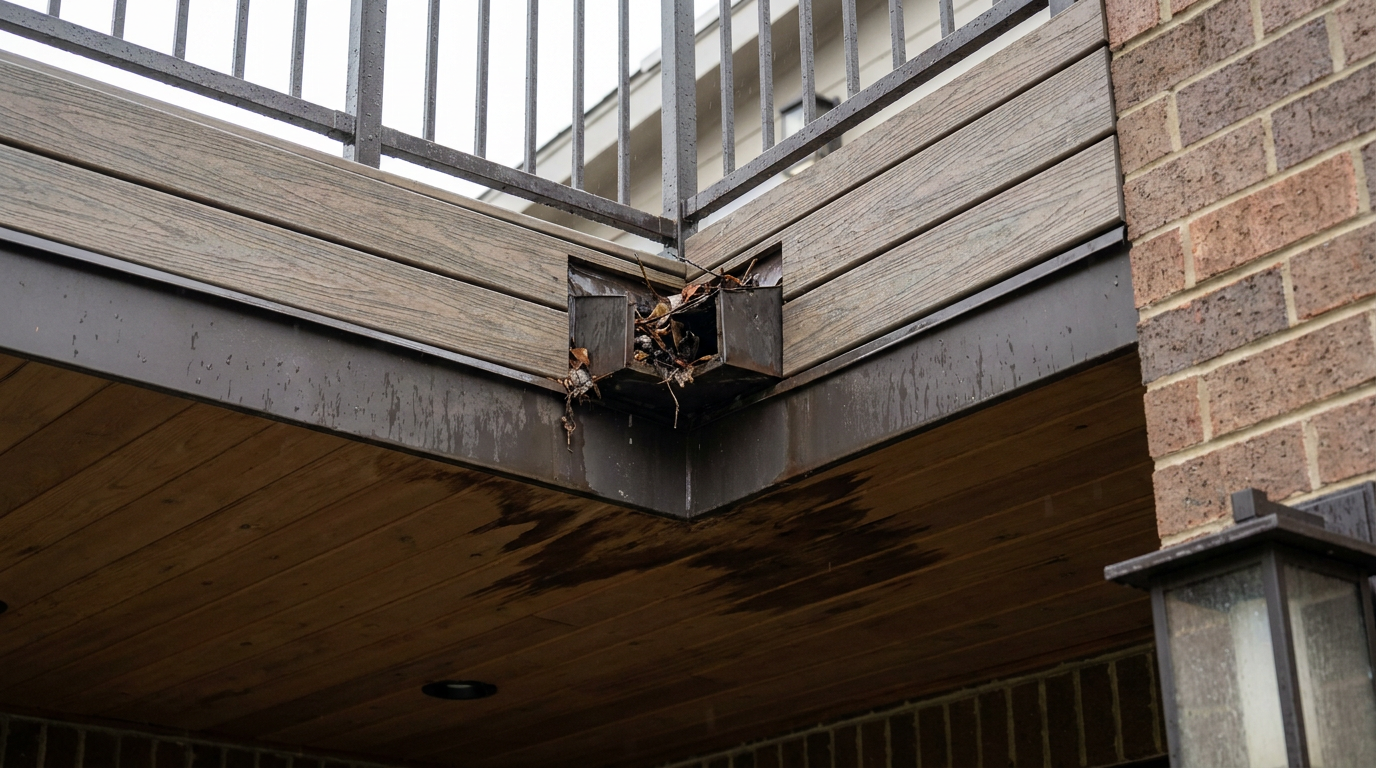
- Clogged Drains or Scuppers: This is the big one. Leaves, dirt, and debris pile up, water backs up, and it starts hunting for tiny openings.
- Failed Flashing: The seals where the deck meets the house wall take a beating from temperature swings. That sealant ages out and leaves a gap.
- Membrane Puncture: A dropped tool, a sharp chair leg, or even a screw from the original install can punch a hole in the membrane.
- Degraded Sealant: Caulk around railing posts, vents, and other penetrations doesn’t last forever. Usually you’re looking at 5-10 years, give or take. Once it cracks, water’s got an invite.
- Open Seams: The joints where membrane sheets are joined can fail from bad installation or plain old age.
Plumbing · Clog
| Project category | Plumbing |
|---|---|
| Problem type | Clog |
| Trade required | Plumbing |
| Urgency | Soon — within weeks |
| Safety risk | Low safety risk |
| DIY suitability | DIY friendly |
| Cost category | Low cost |
| Typical timeline | Same-day DIY attempt; pro visit within a day or two |
| Contractor type | Licensed plumber |
Repair option
Plunger, hand auger, or trap cleanout before chemicals.
Replacement option
Line replacement when clogs return in the same spot repeatedly.
Common causes
- Hair and soap buildup in the trap
- Grease cooling in the branch line
- Flushed wipes or foreign objects
Relevant tools:diy difficultydiy or hire a pro
Published October 14, 2026Last updated October 14, 2026
Tools & materials you'll need
Affiliate linksAs an Amazon Associate FixlyGuide earns from qualifying purchases — at no extra cost to you. Prices and availability are accurate as of publication and subject to change.
Quick Answer
If your roof deck is leaking into your house, the usual suspects are failed flashing around the perimeter, trouble with the scuppers or drains, or a busted waterproof membrane under the decking. First thing I’d do is clear every bit of debris off the deck surface and out of the drains. Sometimes that’s all it takes. If the leak’s still there, then you need a careful look at the flashing and membrane. You’re hunting for cracks, gaps, or tears anywhere water can sneak through. For a small membrane tear, a specialty sealant might buy you some time, but bigger problems usually mean bringing in a roofer who actually knows flat roofs.
The Problem
There aren’t many homeowner headaches worse than a leak you can’t pin down. When it’s coming from a roof deck, it feels like a double hit—the place you use for relaxing ends up threatening the structure under your feet. Then you spot that watermark on the ceiling below and your brain goes straight to the ugly stuff: rot, mold, and a repair bill that’ll make your eyes water. The tricky part? The leak isn’t always right above the stain. Water’s sneaky. It can run along joists and framing and show up a few feet away from where it got in. That’s what makes this kind of leak such a pain to track.
How It Works
A roof deck isn’t just a deck; it’s a flat roof you can walk on. That little detail changes everything. On a normal pitched roof, gravity does most of the work for you. On a flat roof, every layer has to be sealed right if you want to keep water out.
Most roof decks are built with a few layers. On top, you’ve got the decking you walk on—wood, composite, or pavers. That’s the wear layer. Under that, there’s often a sleepers system, basically a frame that lifts the decking so water can move. The real workhorse sits underneath all of it: the waterproof membrane. This is a continuous sheet of material, like TPO, PVC, or modified bitumen, sealed at the edges and around every penetration. That membrane is your first line of defense. It catches the water that gets through the deck boards and sends it toward drains or scuppers, which are the openings in the parapet wall that let water out.
When any part of that system fails—a tear in the membrane, a clogged drain, a bad flashing joint where the deck meets the house wall—water gets trapped. Then it finds a way inside. It always does.
Step-by-Step Fix
-
Clear the Deck - Start by clearing the whole deck surface. Pull off the furniture, planters, rugs, grills, the whole nine yards. You need a clean look at the surface. Sweep it well, too. Get rid of leaves, dirt, and whatever else has built up. I’ve seen a deck stop leaking just because a pile of junk was blocking water from getting to the drains.
-
Inspect and Clean Drains & Scuppers - Find every drain and scupper on the deck. Those are your water exits. Scoop out the gunk, leaves, and packed-in debris with a gloved hand or small trowel. If you’ve got scuppers, make sure the openings are wide open. For drains, you might have to lift a grate. Shine a flashlight down in there and see if there’s a deeper clog. If the downspout’s plugged, a plumber’s snake can save you some grief.
-
Perform a Controlled Water Test - Once the drains are clear, you can start narrowing down the leak. Grab a garden hose. Important: Don’t use a high-pressure nozzle. That can hurt the membrane. Start at the lowest part of the deck, close to the drains. Run water there for 15-20 minutes while somebody inside watches the stain or leak spot. Nothing? Move the hose a few feet and do it again. Keep working across the deck in a methodical way. Slow and steady wins here. No shortcuts.
-
Inspect the Flashing - Flashing is the metal or membrane material that seals the joint where the deck meets the house wall. It’s one of the most common places for water to get in. Look for rust, cracks, or sealant that’s pulled away from the wall. Pay extra attention to corners and seams. Press on the flashing gently. It should feel solid and locked in place. If it’s loose or you can see daylight in a gap, there’s a good chance you found the problem.
-
Lift Decking to Inspect the Membrane (If Possible) - This is where the job can get a little more involved. If your deck uses removable pavers or deck tiles, carefully lift a few in the area your water test pointed to. That’ll expose the waterproof membrane underneath. Look for punctures, tears, blisters, or open seams. A puncture can be tiny—something as small as a dropped screw—so don’t rush it. If the decking is screwed down, you may need to pull a section apart to get eyes on the membrane. Just don’t create a new problem while you’re chasing the old one.
-
Check All Penetrations - Any place where something comes through the deck is a possible leak point. Railing posts, vents, electrical conduit, you name it. Check the sealant around each one. Is it cracked, peeling, or missing altogether? That sealant lives a rough life out there in the sun and weather, and it breaks down over time. I pulled a water heater in Frisco last month that had exactly this kind of issue—tiny failure, big mess. Same story with roof decks all the time.
-
Evaluate Seams in the Membrane - If you can see the membrane, follow the seams. Those are the spots where the roofing material was welded or glued together. Over time, those seams can lift or split apart. Look for anything that seems loose or where the bond’s given up. An open seam is basically a water highway straight into your house.
-
Make a Temporary Repair (If Safe) - If you find a small, obvious puncture, less than 1/4 inch, in a TPO or EPDM membrane, you can make a temporary patch. Clean the area with denatured alcohol and let it dry all the way. Then apply a small bead of a compatible, high-quality elastomeric or polyurethane sealant made for roofing. That’s not a forever fix. It’s just enough to slow the water down while you line up a proper repair.
Common Causes
- Clogged Drains or Scuppers: This is the big one. Leaves, dirt, and debris pile up, water backs up, and it starts hunting for tiny openings.
- Failed Flashing: The seals where the deck meets the house wall take a beating from temperature swings. That sealant ages out and leaves a gap.
- Membrane Puncture: A dropped tool, a sharp chair leg, or even a screw from the original install can punch a hole in the membrane.
- Degraded Sealant: Caulk around railing posts, vents, and other penetrations doesn’t last forever. Usually you’re looking at 5-10 years, give or take. Once it cracks, water’s got an invite.
- Open Seams: The joints where membrane sheets are joined can fail from bad installation or plain old age.
- Ice Damming: In colder climates, snow melts and refreezes at the deck edge. Then the ice dam pushes water back under the decking and into whatever opening it can find.
Common Mistakes
- Ignoring a Small Leak: “It only leaks when it rains hard.” Yeah, and that tiny leak still turns into rot and mold if you sit on it. Don’t.
- Using the Wrong Sealant: Grabbing whatever silicone’s on the shelf at the hardware store is a rookie move. Roofing membranes need sealants that actually play nice with them. Wrong product, wrong result.
- Power Washing the Deck: Looks like a good cleaning trick, sure. But a high-pressure washer can slice or puncture the membrane under the deck boards. Then you’ve got a much bigger mess.
- Screwing New Things to the Deck: Putting in a satellite dish, handrail, or decorative feature? Every new screw is a leak point unless it’s sealed perfectly.
- Assuming the Leak Is at the Stain: Water travels. The ceiling stain might be 10 feet away from the real leak. That’s why you need a slow, methodical water test.
Cost & Time Breakdown
| Task | DIY Cost | Pro Cost | Time |
|---|---|---|---|
| Cleaning Drains & Gutters | $0 | $150–$300 | 30 minutes |
| Resealing Flashing & Penetrations | $20–$50 (sealant) | $300–$750 | 2-4 hours |
| Patching a Small Membrane Puncture | $30–$60 (patch kit) | $400–$900 | 1-2 hours |
| Full Membrane Replacement | Not a DIY job | $15–$30 per sq. ft. | 3-5 days |
| Finding the Leak Source | Your time | $200–$500 (leak detection service) | 2-8 hours |
Tips & Prevention
- Clean your deck surface and drains at least twice a year—spring and fall are the usual slots. If you’ve got trees hanging over it, bump that up to quarterly.
- Inspect the sealant around all flashing and penetrations annually. Pick a dry spring day and look for cracking, pulling away, or spots that just look tired.
- Keep heavy, sharp objects off the deck surface. If you’ve got metal furniture, put rubber or felt pads on the feet.
- Never shovel snow off a roof deck with a metal shovel. That sharp edge can cut the membrane in a heartbeat. Use a plastic shovel or a stiff broom instead.
- After any work is done on or near the deck, like HVAC or siding, do a full inspection. Tools get dropped. Debris gets left behind. It happens.
When to Call a Professional
If you’ve cleared the drains and the leak keeps coming back, or if your water test points to a general area but you still can’t find the exact source, it’s time to call a pro. A roofer who specializes in flat roofs has the tools and the experience to find leaks the eye just won’t catch. I’d definitely bring one in if you think the leak is coming from a seam, if you see multiple blisters or big cracks in the membrane, or if this has been going on for a while. A botched roof deck repair can turn into widespread structural damage in a hurry, and that’s no joke.
Related Articles
Keep troubleshooting with these hand-picked guides from FixlyGuide:
- The Unseen Danger After a Storm: What to Do About a Sagging Roof Deck — A sagging roof deck after a storm isn't just an eyesore; it's a serious structural problem that demands immediate attention to prevent coll…
- Missing Shingles? The Real Trouble Is Under Your Roof — After a storm, missing shingles seem like a simple fix. But the high winds that tore them off likely broke the seals on surrounding shingle…
- The #1 Gutter Mistake That Causes Overflow (It's Not Clogs!) — Discover the often-overlooked culprit behind overflowing gutters during heavy rain and learn the surprising, easy fix most homeowners miss.
- The #1 Gutter Mistake That Causes Overflow (And How to Fix It in 20 Minutes) — Overflowing gutters during heavy rain are usually caused by a readily fixable clog, often due to a common cleaning mistake.
- The Quiet Threat: How Hidden Flashing Damage Invites Disaster After a Storm — After a storm, visible roof damage is obvious, but often the real trouble hides in damaged flashing, silently inviting water intrusion and…
- Thermostat Won't Go Below 70 Degrees? 9 Causes and the Fix — Struggling to get your home cooler? If your thermostat won't go below 70°F, we'll walk through the nine most common reasons and the steps t…
Get deck & patio quotes from local pros
Tell us about your project and we'll match you with vetted contractors in your area. Free, no obligation, and we never sell your info.
Should you do this yourself?
Answer five quick questions before you start. Safety outranks savings every time.
Your experience with work like this
How high do you have to work?
Does the job involve any of these?
Will it need a permit?
Specialty tools
Free and instant. Educational guidance only — not a quote, inspection, or professional diagnosis.
Questions to ask before you sign
Ask every contractor the same questions and the cheapest bid stops looking cheapest. Check them off as you go — your progress is saved on this device.
Free, no signup. Bring this to every walkthrough so you compare bids on the same terms.
What should this project cost?
Enter your project details for a realistic cost range before you call anyone.
Spot repairs commonly run $400–$1,800; full replacement typically $9,000–$18,000 for an average home.
- Regional adjustment
- National average
- Labor share (typical)
- ~$2,948
- Quotes to collect
- 3 written estimates
Educational estimate based on national averages — not a binding quote. Always confirm with written local estimates.
Fixly Project Decision Box
- DIY difficulty
- Professional Recommended
- Estimated time
- Inspection 1–2 hours · repairs 1–3 days
- Cost level
- High
Main tools / materials
- Binoculars for a ground-level look
- Flashlight for attic checks
- Moisture meter
- Roofing cement (temporary patch only)
When to stop and call a pro
- Active leak near lights, fans, or any wiring
- Sagging, bulging, or water-filled ceiling
- Steep, wet, or two-story roof — do not climb it
- Storm or hail damage you plan to claim on insurance
Need professional help?
Free roof assessment first — no phone calls until you ask for them.
Get Local Roofing HelpGet help with your roof now
Stay off the roof. These free tools help you protect the house and reach the right professional fast.
- Emergency repair checklistThe first steps that limit damage before a pro arrives.Open
- Repair or replace your roof?Answer 10 questions about age, leaks, and damage to get a clear next step.Open
- Get local estimatesSend one request and compare written estimates from vetted pros.Open
Free, no signup required. Estimates are educational guidance, not a quote or an inspection.
Get the print-ready PDF of this guide
A clean, ad-free, printable version you can keep on your phone or pin to the workshop wall. Free with a FixlyGuide account.
- Print-optimized layout
- Tools, materials & every step included
- Saved to your account
Frequently asked questions
Why is my roof deck holding water?+
If your roof deck is holding water, it almost always means your drains or scuppers are clogged. Leaves, dirt, and other debris can easily block these outlets, preventing water from escaping. A less common but more serious cause is structural settling, where the deck has lost its original slope toward the drains.
How often should a roof deck be inspected?+
You should personally inspect your roof deck twice a year, in the spring and fall, by cleaning the drains and checking for obvious issues. It's also wise to have a professional flat-roofing contractor inspect it every 3-5 years to catch potential problems with the membrane, seams, and flashing before they turn into major leaks.
Can I use Flex Seal on my leaking roof deck?+
Using products like Flex Seal is not recommended for a permanent repair on a roof deck membrane. These are temporary fixes at best and can make a proper professional repair more difficult and expensive later. They often don't bond correctly with professional-grade roofing materials like TPO or PVC.
What is the lifespan of a roof deck membrane?+
The lifespan of a roof deck's waterproof membrane depends on the material, quality of installation, and climate. Generally, a modern TPO or PVC membrane can last 15-25 years, while a modified bitumen or EPDM roof might last 20-30 years with proper maintenance.
Is it normal to see water between deck boards?+
Yes, it's completely normal and necessary to see water go down between the gaps in your deck boards. The walkable surface is not the waterproof layer. The water is supposed to drain through to the waterproof membrane below, which then directs it to the drains.
How much does it cost to replace a roof deck membrane?+
Replacing a roof deck membrane is a major job. As of 2023, you can expect to pay between $15 and $30 per square foot. The cost varies widely based on the material chosen, the complexity of the job (e.g., number of penetrations), and the cost to remove and reinstall the decking on top.
Can I walk on my roof deck membrane?+
You should avoid walking directly on the waterproof membrane whenever possible. It's not designed for foot traffic, and the oils from your shoes and grit on your soles can degrade it over time. Always use designated protective walk pads or have your decking installed over it.
What's the difference between a scupper and a drain?+
A drain is an opening in the flat surface of the deck that connects to a pipe (downspout) to carry water away. A scupper is an opening in the parapet or side wall of the roof deck that allows water to drain off the side. Scuppers are often used as a primary drainage method or as an overflow backup for the main drains.



Discussion
Loading comments…