- The $10 Shower Fix Plumbers Don't Want You to Know — Stop that annoying drip! I'll show you how to fix a leaky shower faucet yourself, saving you money and preventing water waste.
- The 3 Tiny Screws That Keep Your Cabinet Doors From Closing — If your cabinet doors are crooked, sagging, or won't close, the problem isn't the wood—it's the three tiny, often-ignored adjustment screws…
- Why Your Cabinet Doors Aren't Square (And How to Fix That Gap) — Frustrated by cabinet doors that won't close flush or hang crooked? I'll show you how to diagnose and fix those annoying gaps, hinges, and…
- The 3 Hidden Drywall Mistakes That Make Floating Shelves Sag (And How to Fix Them) — Prevent disastrous sagging and ensure your floating shelves stay perfectly level by avoiding common drywall installation mistakes.
- The 3 Hidden Drywall Mistakes That Make Floating Shelves Sag (And How to Fix Them) — Prevent floating shelves from sagging in drywall by avoiding common installation mistakes like improper anchor selection and incorrect stud…
General remodeling · Renovation planning
| Project category | General remodeling |
|---|---|
| Problem type | Renovation planning |
| Trade required | General contracting |
| Urgency | Planned project |
| Safety risk | Low safety risk |
| DIY suitability | Pro recommended |
| Cost category | Major investment |
| Typical timeline | Design and permitting often 2–4 months before work starts |
| Contractor type | General contractor |
Repair option
Phase the work and fix the building envelope first.
Replacement option
Full renovation with permits, design, and a general contractor.
Common causes
- Space no longer fits how the household lives
- Resale preparation
- Deferred maintenance stacking up
Relevant tools:project cost estimatorcompare quoteshome improvement material prices
Published August 28, 2026Last updated August 28, 2026
Tools & materials you'll need
Affiliate links- AmazonSilicone Spray Lubricant1 can · Dry lubricant, avoid oil-based
- AmazonWood Glue1 small bottle · For stripped screw holes or reinforcing bottoms
- AmazonWooden Toothpicks or Golf Tees1 small pack · For stripped screw holes
- AmazonReplacement Drawer Glides1 pair · Only if existing glides are broken
- AmazonSmall Finishing Nails or ScrewsSmall box · 1/2 to 3/4 inch, for drawer bottom reinforcement
- AmazonShop Towels or RagsA few
As an Amazon Associate FixlyGuide earns from qualifying purchases — at no extra cost to you. Prices and availability are accurate as of publication and subject to change.
Quick Answer
That kitchen drawer that sticks, sags, or grinds every time you open it isn’t just being fussy. Nine times out of ten, it’s loose hardware or worn-out glides. The good news is you can usually get it back in shape in less than an hour with basic tools. A few turns of a screwdriver, maybe a cheap replacement part, and you’re back in business. No need to start pricing new cabinets yet—let’s get that old thing sliding like it ought to.
The Problem
You know the move: you pull open a kitchen drawer and it drops, scrapes, or won’t slide all the way out or back in. Maybe it hangs up halfway, or you’ve got to lift it just to get it moving. That’s not just annoying; it can chew up the drawer box and beat the contents inside to death. After a while, all that yanking and forcing loosens joints, chips wood, and can even bend the glides beyond saving. I pulled a water heater in Frisco last month and the homeowner pointed me at a kitchen drawer that took two hands and a whole lot of stubbornness just to open—same kind of mess. Usually, it starts small. A loose screw. A crumb. A little worn spot. But if you ignore it, it only gets uglier.
How It Works
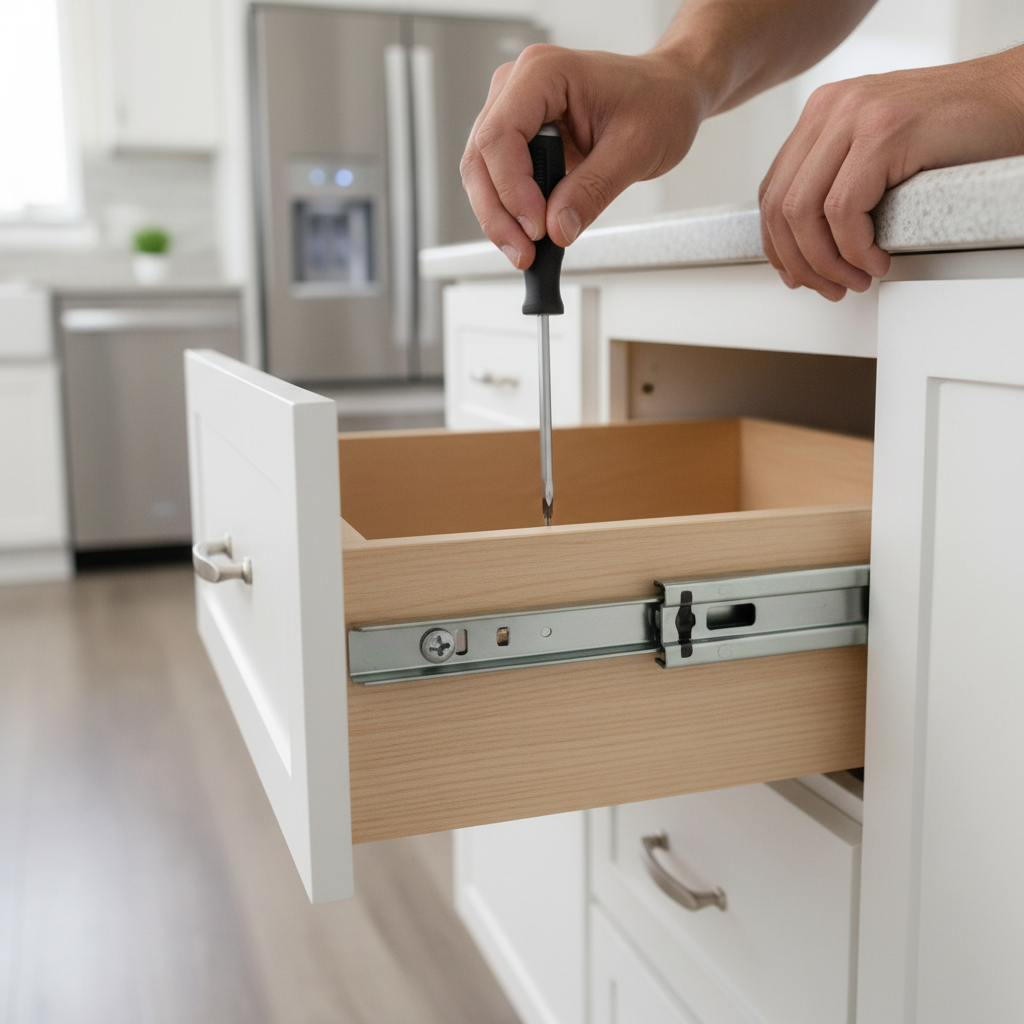
Kitchen drawers are pretty simple machines, but every part’s got to do its job if you want that smooth slide. Most modern drawers use side-mounted metal glides. There are two main pieces: a "cabinet member" that screws to the inside of the cabinet frame and a "drawer member" that attaches to the side of the drawer box. Inside, you’ve got small ball bearings or nylon rollers doing the actual sliding. They’re built to carry the weight of the drawer and whatever’s stuffed in it, and they spread that load out so nothing drags hard on one spot. Older setups might use a center-mount slide or plain wooden runners. When those parts get loose, wear out, or fall out of alignment, that’s when you get the sag, the bind, and the ugly grinding noise. The weight in the drawer puts stress on the glides, and if the screws back out or the glide gets damaged, the drawer drops, rubs, and fights you every inch of the way. Think of it like a train on a bent track—no dice.
Step-by-Step Fix
Before you start, clear yourself a good workspace and get some light on the job. Safety first, even for a dumb little drawer repair. You don’t want a pinched finger or a stripped screw turning into a bigger headache. Pull the drawer all the way out and empty it before you start messing with the hardware. And if you’re not sure what you’re looking at, stop and check twice. Better that than making a bad problem worse. I’ve watched plenty of folks muscle a screw that was cross-threaded, and then you’re drilling metal out, which is a whole lot less fun than it sounds.
-
Empty the Drawer – Clear out everything inside.
- Take out the utensils, pots, pantry stuff, whatever’s in there. The lighter the drawer, the easier the job, and you won’t have things falling out while you’re working. Set everything somewhere safe so it doesn’t end up scattered across the kitchen floor. This is also your chance to clean out crumbs, grease, and whatever else has been hiding in there. I’ve found pet hair, paper clips, and enough random change in drawers to make a kid happy for a week.
-
Inspect the Glides – Look for obvious damage or misalignment.
- With the drawer empty, pull it out as far as it’ll go, then gently lift it off the glides if the style allows it. Most modern glides have a little tab or lever that releases them. Check both sides: the drawer-mounted pieces and the cabinet-mounted pieces. Are they bent? Any broken plastic? Missing ball bearings? Look for anything stuck in the track—food bits, a broken toothpick, a toy part, you name it. Sometimes one tiny dropped object is the whole problem. Make a mental note of what’s wrong.
-
Tighten All Screws – The most common culprit.
-
Grab your Phillips head screwdriver and go screw by screw, tightening every fastener holding the drawer glides to the drawer box and cabinet frame. Don’t crank them down like you’re setting wheel lugs—just snug them up. Pay close attention to the screws at the back of the cabinet glides. Those get overlooked a lot, and they loosen over time because the drawer keeps tugging on them. I once worked a place in Maplewood where the homeowner was sure the cabinets were falling apart, but it turned out to be just two loose screws on a bottom drawer. Five minutes later, she was grinning ear to ear.
-
If a screw spins freely: The hole is stripped. You’ll need a slightly longer or wider screw (check your hardware store for "cabinet screws" or "glide screws") or the toothpick-and-wood-glue trick. Dip a few wooden toothpicks in wood glue, push them into the stripped hole, snap them off flush, and let the glue dry for about 30 minutes. Then put the original screw back in. That gives the screw something solid to bite into.
-
-
Lubricate the Glides – Smooth things out.
- If the glides look decent and the screws are tight but the drawer still feels rough, a little lubricant can make a big difference. Use a dry lubricant like silicone spray or paraffin wax. Skip WD-40; it can pull in dust and grime and make the whole thing worse down the road. Put on a light, even coat right on the moving parts of the glides, both on the drawer and inside the cabinet. If you’re using wax, rub it along the tracks. Work the drawer in and out a few times so it spreads around. That usually knocks out the grinding noise too.
-
Check for Debris – A simple blockage can cause big headaches.
- Even after you empty the drawer, little crumbs or stray objects can still get wedged deep in the glide or tucked under the drawer. Grab a flashlight and look into every corner you can reach. A vacuum with a narrow attachment can pull out the hidden junk. If something’s stuck stubborn, needle-nose pliers or even a bent paper clip can help fish it out. Don’t laugh—a single grain of rice in the wrong spot can mess up a glide.
-
Reinforce the Drawer Bottom – If the bottom is bowing.
- If the drawer bottom feels weak or bows when it’s loaded, it’s not carrying the weight properly, and that puts extra strain on the glides. Pull the drawer all the way out and flip it over. If the bottom is just thin plywood or hardboard stapled into a groove, you can strengthen it. Run a bead of wood glue along the seams where the bottom meets the drawer sides. For extra strength, add small finishing nails or screws (1/2 to 3/4 inch) from the underside into the drawer sides, but don’t poke through into the inside of the drawer. Clamp it while the glue dries if you can—that’s how you get the best hold.
-
Replace Damaged Glides – When tightening isn’t enough.
Related Articles
Keep troubleshooting with these hand-picked guides from FixlyGuide:
- The $10 Shower Fix Plumbers Don't Want You to Know — Stop that annoying drip! I'll show you how to fix a leaky shower faucet yourself, saving you money and preventing water waste.
- The 3 Tiny Screws That Keep Your Cabinet Doors From Closing — If your cabinet doors are crooked, sagging, or won't close, the problem isn't the wood—it's the three tiny, often-ignored adjustment screws…
- Why Your Cabinet Doors Aren't Square (And How to Fix That Gap) — Frustrated by cabinet doors that won't close flush or hang crooked? I'll show you how to diagnose and fix those annoying gaps, hinges, and…
- The 3 Hidden Drywall Mistakes That Make Floating Shelves Sag (And How to Fix Them) — Prevent disastrous sagging and ensure your floating shelves stay perfectly level by avoiding common drywall installation mistakes.
- The 3 Hidden Drywall Mistakes That Make Floating Shelves Sag (And How to Fix Them) — Prevent floating shelves from sagging in drywall by avoiding common installation mistakes like improper anchor selection and incorrect stud…
- The $5 Single-Handle Faucet Fix Plumbers Don't Want You to Know — Stop that annoying drip! Most single-handle faucet leaks are caused by worn-out O-rings or seals, a repair homeowners can easily tackle in…
Should you do this yourself?
Answer five quick questions before you start. Safety outranks savings every time.
Your experience with work like this
How high do you have to work?
Does the job involve any of these?
Will it need a permit?
Specialty tools
Free and instant. Educational guidance only — not a quote, inspection, or professional diagnosis.
What should this project cost?
Enter your project details for a realistic cost range before you call anyone.
Cosmetic refreshes start near $5,000; full remodels commonly $25,000–$45,000.
- Regional adjustment
- National average
- Labor share (typical)
- ~$8,550
- Quotes to collect
- 3 written estimates
Educational estimate based on national averages — not a binding quote. Always confirm with written local estimates.
Fixly Project Decision Box
- DIY difficulty
- Moderate
- Estimated time
- 30 minutes – half a day
- Cost level
- Moderate
Main tools / materials
- Adjustable wrench
- Plunger or drain auger
- Bucket and towels
- Thread tape
When to stop and call a pro
- Water you cannot shut off at the fixture or main
- Sewage backing up into more than one fixture
- Water near electrical panels or outlets
- Gas water heater work beyond relighting a pilot
Need professional help?
Get a Licensed PlumberBefore you start
Check the difficulty, permits, and safety risk — then decide whether to call a pro.
- Estimate this projectGet a cost range for your scope and ZIP before you call anyone.Open
- Get local estimatesSend one request and compare written estimates from vetted pros.Open
Free, no signup required. Estimates are educational guidance, not a quote or an inspection.
Get the print-ready PDF of this guide
A clean, ad-free, printable version you can keep on your phone or pin to the workshop wall. Free with a FixlyGuide account.
- Print-optimized layout
- Tools, materials & every step included
- Saved to your account
Recommended for DIYers & woodworkers
Sponsored
The Top 20 Tools for Workshops of Any Budget
No stationary machines or power tools required — plus 3 fundamental tools that can't be bought at any price.
Get the free guide
Ted's Woodworking — The #1 Woodworking Resource
Detailed instructions, dimensioned drawings, materials & cutting lists, and 3D schematics for every skill level.
See the plansSponsored: links above are affiliate links. FixlyGuide may earn a commission on qualifying purchases — at no extra cost to you.
Frequently asked questions
Why do my kitchen drawers keep sagging?+
Sagging is usually caused by loose mounting screws on the drawer glides, especially those towards the back. Over time, weight and repeated use can cause these screws to back out, leading to the drawer dropping and sticking.
Can I replace just one drawer glide?+
Yes, you can often replace a single drawer glide if the other one is in good condition. However, it's generally best to replace both glides on a single drawer as a pair to ensure even wear and smooth operation. Mismatched glides can lead to uneven sliding.
What kind of lubricant should I use on drawer glides?+
For metal drawer glides, use a dry lubricant like silicone spray or paraffin wax. Avoid oil-based lubricants like WD-40, which can attract dust, dirt, and grime, potentially making the sticking problem worse over time.
How do I know what size replacement glides to buy?+
Measure the length of your existing drawer glides when fully extended and fully retracted. Most glides come in standard lengths (e.g., 14-inch, 16-inch, 18-inch). Take a damaged glide with you to the hardware store for the best match, ensuring the mounting holes align.
My drawer bottom is falling out. How can I fix it?+
If the drawer bottom is falling out, reinforce it with wood glue along the seams where it meets the drawer sides. For added durability, you can drive small finishing nails or screws (1/2-inch to 3/4-inch) from the underside into the drawer box frame.
Is it worth fixing old wooden drawer runners?+
Absolutely! For older cabinets with wooden runners, you can often restore smooth operation by cleaning the runners thoroughly and then rubbing them with paraffin wax or a dry bar of soap. This reduces friction and can significantly improve glide.
Can heavy items cause drawer sagging?+
Yes, consistently storing very heavy items can exacerbate sagging by putting excessive strain on the drawer glides and their mounting screws. It can also cause thinner drawer bottoms to bow, further contributing to the problem. Distribute heavy items or use a reinforced drawer.
When should I call a professional for a drawer problem?+
Call a pro if the cabinet frame itself is damaged, if multiple drawers are consistently failing, or if you're dealing with custom or highly intricate drawer systems that you're uncomfortable disassembling. They can assess structural issues or custom order specialized parts.
My drawer is stuck closed and won't open. What should I do?+
First, try gently wiggling and pulling the drawer. If it's still stuck, remove any adjacent drawers to see if you can identify an obstruction or a dislodged item from the sides. Avoid forcing it, as this can cause further damage to the glides or drawer box.


Discussion
Loading comments…