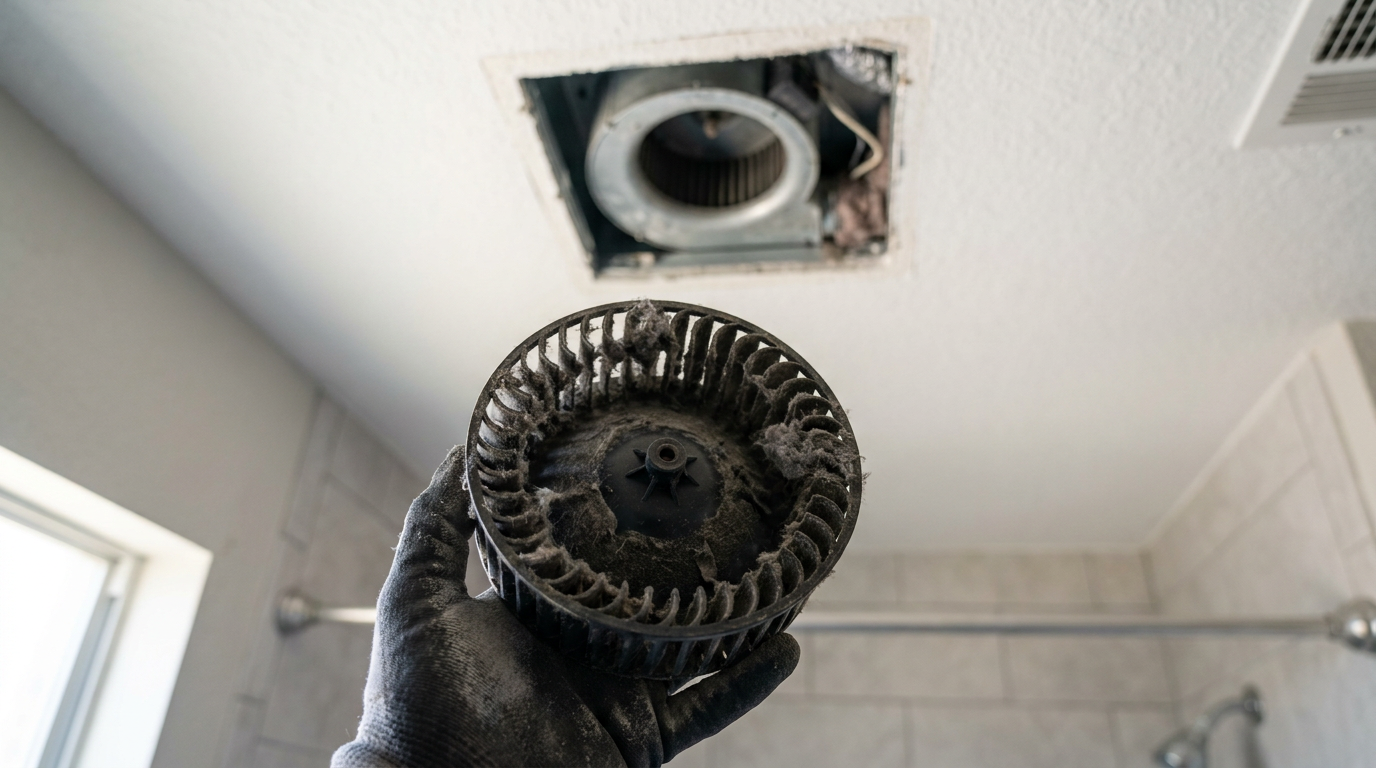
- Dust & Debris Buildup: The 1 culprit. Household dust, towel lint, and moisture turn into a heavy coating on the blower blades, and that throws the wheel out of balance.
- Worn Motor Bearings: After years of service, the bearings in the motor wear out. It starts as a low hum, then turns into a grinding noise. If cleaning doesn’t help, this is probably it.
- Loose Blower Wheel: The blower wheel can work loose on the motor shaft and start wobbling or scraping the housing, which makes a clattering or rattling sound.
- Loose Mounting Screws: Sometimes the screws holding the fan housing to the ceiling joists back out, and then the whole unit vibrates against the drywall.
- Duct Obstruction: A bird’s nest, leaves, or a disconnected duct section can choke off airflow, making the fan work harder and sound louder. You might hear a buffeting noise.
HVAC · High energy usage
| Project category | HVAC |
|---|---|
| Problem type | High energy usage |
| Trade required | HVAC |
| Urgency | Planned project |
| Safety risk | Low safety risk |
| DIY suitability | DIY for experienced homeowners |
| Cost category | High cost |
| Typical timeline | Assessment within weeks; replacement planned off-season |
| Contractor type | Licensed HVAC technician |
Repair option
Duct sealing, insulation, and a tune-up before touching the equipment.
Replacement option
High-efficiency replacement sized by a load calculation, not a rule of thumb.
Common causes
- Aging, low-efficiency equipment
- Leaking ducts losing conditioned air
- Insufficient attic insulation
- Oversized system short-cycling
Relevant tools:project cost estimatorrepair or replace
Published October 11, 2026Last updated October 11, 2026
Tools & materials you'll need
Affiliate links- AmazonReplacement fan motorif cleaning doesn't work
As an Amazon Associate FixlyGuide earns from qualifying purchases — at no extra cost to you. Prices and availability are accurate as of publication and subject to change.
Quick Answer
If your bathroom fan suddenly starts making a loud grinding, humming, or rattling noise, the usual suspect is a dirty blower wheel packed with dust and debris. Happens all the time. Over time, lint, dust, and humidity build up on the blades, throw the wheel out of balance, and that thing starts shaking itself silly. The fix is usually pretty simple: cut the power at the breaker, pull the fan cover, and clean the blower wheel and housing real good with a brush and vacuum.
The Problem
That rattling, grinding, or humming noise from your bathroom exhaust fan isn’t just a nuisance—it’s a warning. A loud fan usually means it’s not moving air like it should, and that can lead to peeling paint, mildew, and even mold on the ceiling and walls. Your bath fan’s whole job is to pull that moist air out of the room, and if it’s struggling, the humidity just hangs around. The noise is usually a symptom of a mechanical problem, like an unbalanced part or a motor that’s on its last legs, and it’s getting in the way of the fan doing its job. Ignore it long enough and the fan gets worse, and so does the moisture problem.
How It Works
A bathroom exhaust fan is a simple little machine, but it matters. Flip the switch and you send power to a small electric motor inside a metal housing above the ceiling. That motor spins the blower wheel—it looks like a hamster wheel or a small turbine. As it spins, it creates suction and pulls air from the bathroom into the housing. From there, the air gets pushed through a duct running through the attic or ceiling space and out of the house, usually through a roof vent or soffit. That’s what gets rid of steam, smells, and airborne junk, and it helps keep the bathroom from getting wrecked by constant humidity. The noise you’re hearing is almost always coming from one of the moving parts in that setup: the motor or the blower wheel it drives.
Step-by-Step Fix
Here’s how I’d track down and fix that racket coming from your ceiling. You should be able to knock this out in less than an hour.
1. Kill the Power
- Before you touch a thing, shut off the power to the bathroom fan at your main breaker panel. Flip the switch, then try the fan to make sure it’s dead. Don’t skip this. You’ll be working right next to wiring, and there’s no reason to get lit up over a noisy fan.
2. Remove the Grille (Fan Cover)
- Most fan covers hang on with two spring-loaded metal clips. Grab the edges of the plastic grille and pull down gently about 2-3 inches. You’ll feel the tension right away. Pinch the metal clips together on each side and work them out of the slots in the housing. Then the grille comes free. Some older units use a center screw or knob instead—just back it out.
3. Unplug the Motor
- Look up inside the housing. You should see the motor and blower wheel assembly, usually called the "motor plate." There’ll be a small plug connecting the motor to the house wiring. Unplug it. Now the fan assembly is electrically disconnected. Nice and safe.
4. Remove the Motor Plate Assembly
- Find the one or two screws holding the metal plate the motor is mounted to. Use a screwdriver or nut driver to pull those out. Once they’re out, the whole assembly—motor plate, motor, and blower wheel—should tilt down and come right out of the housing. Hold onto it; it can surprise you with a little weight.
5. Inspect and Clean the Blower Wheel
- This is where most noise problems start. The blower wheel is probably caked with dust and lint. Use a stiff brush—an old toothbrush works just fine—and a vacuum with a brush attachment to scrub the blades clean. Get into every little slot. That gunk throws the wheel out of balance, and once it starts wobbling, it gets loud fast. Clean wheel, quiet fan. Simple as that.
6. Check the Blower Wheel's Position
- Make sure the blower wheel hasn’t slipped on the motor shaft. It should be centered and not rubbing the motor mount or the housing. If it looks crooked, you can usually loosen a tiny set screw on the hub, slide it back where it belongs, and snug it down. You want a small gap, maybe 1/8-inch, so it doesn’t scrape.
7. Clean the Housing
- With the motor assembly out, vacuum the inside of the fan housing up in the ceiling. You’d be shocked how much dust piles up in there. I pulled a bathroom fan in Frisco last month that was so packed with lint it looked like someone stuffed a dryer filter in the ceiling. Cleaning the housing helps airflow and keeps loose junk from getting pulled back into the fan.
8. Reassemble and Test
- Put the motor plate assembly back in and tighten the screws you removed earlier. Plug the motor’s cord back in. Before you reinstall the grille, go turn the breaker back on and test the fan. It should be a lot quieter. If it is, you’ve got it handled. Reinstall the grille by squeezing the spring clips and guiding them back into their slots.
- If it still hums loudly or won’t spin: The motor itself is probably failing. You’ll need to replace the motor/blower wheel assembly. Take the old one to a hardware store to find a match, or look for a model number on the motor plate to order a replacement online. It’s a pretty straightforward swap.
Common Causes
So why did the fan get so noisy in the first place? Usually one of these.
- Dust & Debris Buildup: The #1 culprit. Household dust, towel lint, and moisture turn into a heavy coating on the blower blades, and that throws the wheel out of balance.
- Worn Motor Bearings: After years of service, the bearings in the motor wear out. It starts as a low hum, then turns into a grinding noise. If cleaning doesn’t help, this is probably it.
- Loose Blower Wheel: The blower wheel can work loose on the motor shaft and start wobbling or scraping the housing, which makes a clattering or rattling sound.
- Loose Mounting Screws: Sometimes the screws holding the fan housing to the ceiling joists back out, and then the whole unit vibrates against the drywall.
- Duct Obstruction: A bird’s nest, leaves, or a disconnected duct section can choke off airflow, making the fan work harder and sound louder. You might hear a buffeting noise.
- Failing Motor: Sometimes the motor just quits. If you hear a loud electrical hum and the blades won’t spin, or they creep along very slowly, the motor’s probably toast.
Common Mistakes
A lot of DIYers trip over the same stuff. Don’t be one of them.
- Forgetting to Kill the Power: You can get a nasty shock that way. Always turn off the breaker before you start. It takes ten seconds and keeps you out of trouble.
- Just Cleaning the Grille: Wiping the cover does nothing for the noise. The problem’s usually inside with the moving parts—you’ve got to pull the grille to get to it.
- Using Liquid Cleaners or Lubricants: Don’t spray WD-40 or any other lubricant into the motor. These fans use sealed bearings that don’t need oil, and sprays can mess up the windings or just collect more dust. Stick with a dry brush and a vacuum.
- Replacing the Whole Fan: Don’t assume the entire fan has to come out of the ceiling. In 90% of cases, you can fix the noise by cleaning or replacing the motor/blower wheel assembly for under $50. Way easier.
- Ignoring the Ductwork: While you’re in there, check the duct connection. Is it tight? If it’s loose, humid air spills into the attic, and that can turn into moisture damage and mold over time.
Cost & Time Breakdown
| Task | DIY Cost | Pro Cost | Time |
|---|---|---|---|
| Clean Blower Wheel & Housing | $0 | $125–$200 | 20–30 minutes |
| Replace Motor/Blower Wheel | $25–$75 (parts) | $150–$250 | 30–45 minutes |
| Replace Entire Fan Unit | $50–$200 (parts) | $300–$550 | 2–4 hours |
| Inspect & Repair Ductwork | $5–$15 (tape) | $200–$400 | 1–2 hours |
Tips & Prevention
- Clean it Annually: Best way to keep the noise down is to keep the gunk out. Once a year, pop the cover off and give the blower wheel and housing a quick vacuum. Takes 10 minutes, tops.
- Run it Longer: Leave the fan on for at least 15-20 minutes after every shower. That helps pull the moisture out for real, which keeps mold down and helps the fan stay cleaner.
- Look for High CFM Ratings: When it’s time for a replacement, don’t just grab the cheapest fan on the shelf. Look for a model with a higher CFM (Cubic Feet per Minute) rating. A properly sized fan won’t have to strain, and that usually means a longer, quieter life. A decent rule of thumb is at least 1 CFM per square foot of bathroom area.
- Check the Soffit/Roof Vent: Once a year, check the outside vent. Make sure the flap isn’t stuck shut and that it’s clear of leaves, nests, or anything else blocking airflow.
When to Call a Professional
Cleaning and motor replacement are pretty DIY-friendly, but there are times to bring in an electrician. If you’re not comfortable working around electricity, or if you pull the motor plate and see scorching, melting, or frayed wires, stop right there and call a pro. Same goes if the job turns into replacing the whole fan housing, because that means attic work, new wiring, and maybe cutting drywall. That’s often a job best left to somebody who does it every day so it gets done safely and up to code.
Related Articles
Keep troubleshooting with these hand-picked guides from FixlyGuide:
- Thermostat Reading Wrong Temperature? 9 Reasons and How to Recalibrate — Your thermostat says it's 75°F, but it feels like 80°F. Here are the most common causes for a thermostat reading the wrong temperature and…
- The Secret Reason Your Furnace Turns On and Off So Much (It's Not What You Think) — Short cycling strains your furnace and wastes energy. Learn the most common surprising causes and how to fix them to restore efficient heat…
- AC Not Turning On? 9 Things to Check Before You Call a Pro — Your air conditioner won't turn on, and it's getting hot inside. Here are the 9 most common reasons—and the simple checks you can do yourse…
- Thermostat Won't Connect to Wi-Fi? 9 Reasons and What to Check First — A smart thermostat that can't connect to Wi-Fi is just a thermostat. Here are the 9 most common reasons yours keeps dropping offline and th…
- The Mystery of the Vanishing Air: Why Your HVAC Stops Blowing After 10 Minutes — Discover the hidden culprits behind your HVAC system stopping short after just 10 minutes of operation and learn how to fix them yourself.
- Your Refrigerator's Loud Hum? The Fix Most People Miss — A constant, loud refrigerator hum is more than annoying—it's a warning sign. Before you call a pro, discover the #1 most overlooked cause a…
Should you do this yourself?
Answer five quick questions before you start. Safety outranks savings every time.
Your experience with work like this
How high do you have to work?
Does the job involve any of these?
Will it need a permit?
Specialty tools
Free and instant. Educational guidance only — not a quote, inspection, or professional diagnosis.
What should this project cost?
Enter your project details for a realistic cost range before you call anyone.
Service calls and common repairs run $150–$900; full system replacement typically $6,000–$12,000.
- Regional adjustment
- National average
- Labor share (typical)
- ~$1,935
- Quotes to collect
- 3 written estimates
Educational estimate based on national averages — not a binding quote. Always confirm with written local estimates.
Before you start
Check the difficulty, permits, and safety risk — then decide whether to call a pro.
- Estimate this projectGet a cost range for your scope and ZIP before you call anyone.Open
- Get local estimatesSend one request and compare written estimates from vetted pros.Open
Free, no signup required. Estimates are educational guidance, not a quote or an inspection.
Frequently asked questions
Why is my bathroom fan suddenly so loud?+
The most common reason for a sudden loud noise is a buildup of dust and lint on the fan's blower wheel. This unbalances the wheel, causing it to wobble and create a rattling or grinding sound as it spins. It's a sign the fan needs a thorough cleaning.
Can I just spray WD-40 in my noisy bathroom fan?+
No, you should never spray WD-40 or any other lubricant into the fan motor. Bathroom fan motors use sealed bearings that don't need lubrication. The spray can damage the electrical windings and will attract more dust, making the problem worse.
Is a loud bathroom fan dangerous?+
While the noise itself isn't dangerous, it indicates the fan isn't working efficiently. This can lead to mold and mildew from trapped moisture. In rare cases, a failing, overheating motor could be a fire risk, so it's a problem you shouldn't ignore.
How do I know if the fan motor is bad?+
After a thorough cleaning, if the fan still makes a loud grinding noise or hums without spinning, the motor bearings are likely worn out. At this point, the motor itself is failing and needs to be replaced.
Why does my bathroom fan rattle when it's windy?+
This is usually caused by the exterior duct damper. The wind outside is blowing back down the vent duct and causing the damper flap on the fan housing or at the wall/roof cap to chatter. Ensure your exterior vent cap has a functioning damper to prevent this.
How much does it cost to fix a noisy bathroom fan?+
If it just needs cleaning, it's free to do it yourself. If the motor needs to be replaced, the part typically costs between $25 and $75. Hiring a pro for a cleaning or motor swap usually runs $125 to $250.
Can I just replace the motor instead of the whole fan?+
Yes, absolutely. In most cases, you can buy a replacement motor and blower wheel assembly that fits your existing fan housing. This is much cheaper and easier than removing the entire unit, which involves drywall and attic work.
How often should I clean my bathroom fan?+
A good rule of thumb is to clean your bathroom fan once a year. This preventative maintenance takes only about 10-15 minutes and is the best way to keep it running quietly and efficiently, preventing the heavy buildup that causes noise issues.


Discussion
Loading comments…