- Reverse Lapping — Nailing the flashing over the outside of the building paper instead of sliding it underneath. Water running down the housewrap drops straight behind the vertical metal leg and keeps going right against raw sheathing.
- Zero Drip Edge — Using flat L-shaped flashing with no bottom kick-out bend. Surface tension drags water back under the horizontal leg through capillary action, soaking the exact joint the metal was supposed to protect.
- Caulk-Only "Waterproofing" — Depending on a bead of silicone caulk along the top of the ledger instead of bent metal. Sunlight dries it out, it shrinks and splits within 12 months, and then you’ve got a trough that sends water backward.
Roofing · Flashing failure
| Project category | Roofing |
|---|---|
| Problem type | Flashing failure |
| Trade required | Roofing |
| Urgency | Soon — within weeks |
| Safety risk | Moderate safety risk |
| DIY suitability | Pro recommended |
| Cost category | Low cost |
| Typical timeline | Usually a half-day repair |
| Contractor type | Licensed roofing contractor |
Repair option
Replace the boot or step flashing and re-weave shingles around it.
Replacement option
Address during a full replacement when several details have failed at once.
Common causes
- Cracked pipe boots — the single most common roof leak source
- Rusted step flashing at walls and chimneys
- Sealant used as a substitute for proper metal
Relevant tools:project cost estimatordiy or hire a pro
Published November 9, 2026Last updated November 9, 2026
Tools & materials you'll need
Affiliate links- AmazonSelf-adhering butyl flashing tape1 roll · 6-inch or 9-inch width, 20+ mils thick
- AmazonCorrosion-resistant metal Z-flashing2-3 sticks (10 ft) · G185 galvanized or copper, sized to ledger
- AmazonExterior polyurethane sealant2 tubes · Flexible, UV-resistant exterior grade
- AmazonHot-dipped galvanized roofing nails1 box · 1-1/4 inch length
- AmazonExterior-grade deck screws1 box · #10, 3-inch ceramic-coated or stainless
As an Amazon Associate FixlyGuide earns from qualifying purchases — at no extra cost to you. Prices and availability are accurate as of publication and subject to change.
Quick Answer
If water pools between your deck and the house or drips through your basement ceiling, your deck ledger board flashing is either missing, corroded, or installed wrong. I’ve seen all three. The fix isn’t fancy, but it’s fussy: pry up the first two rows of deck boards, slide an L-shaped or Z-shaped corrosion-resistant metal flashing behind the house’s exterior water-resistive barrier, and let it drape cleanly over the ledger’s top edge. Skip that, and rain gets a free pass to rot the structural band joist. That thing’s toast if it goes far enough.
The Problem
A deck ledger board is that thick horizontal framing timber—usually a pressure-treated 2x8 or 2x10—bolted flat to your house so it can carry roughly half the deck’s weight. Since it sits tight to the wall, any rain running down the siding hits a dead-end ledge.
Without a continuous shed path, water doesn’t just wash away; it hangs around. Capillary action pulls trapped moisture behind the ledger and into the rim joist, wall sheathing, and sill plate. You almost never see the damage starting because it’s hiding in that dark little gap sandwiched between pressure-treated pine and your home’s framing.
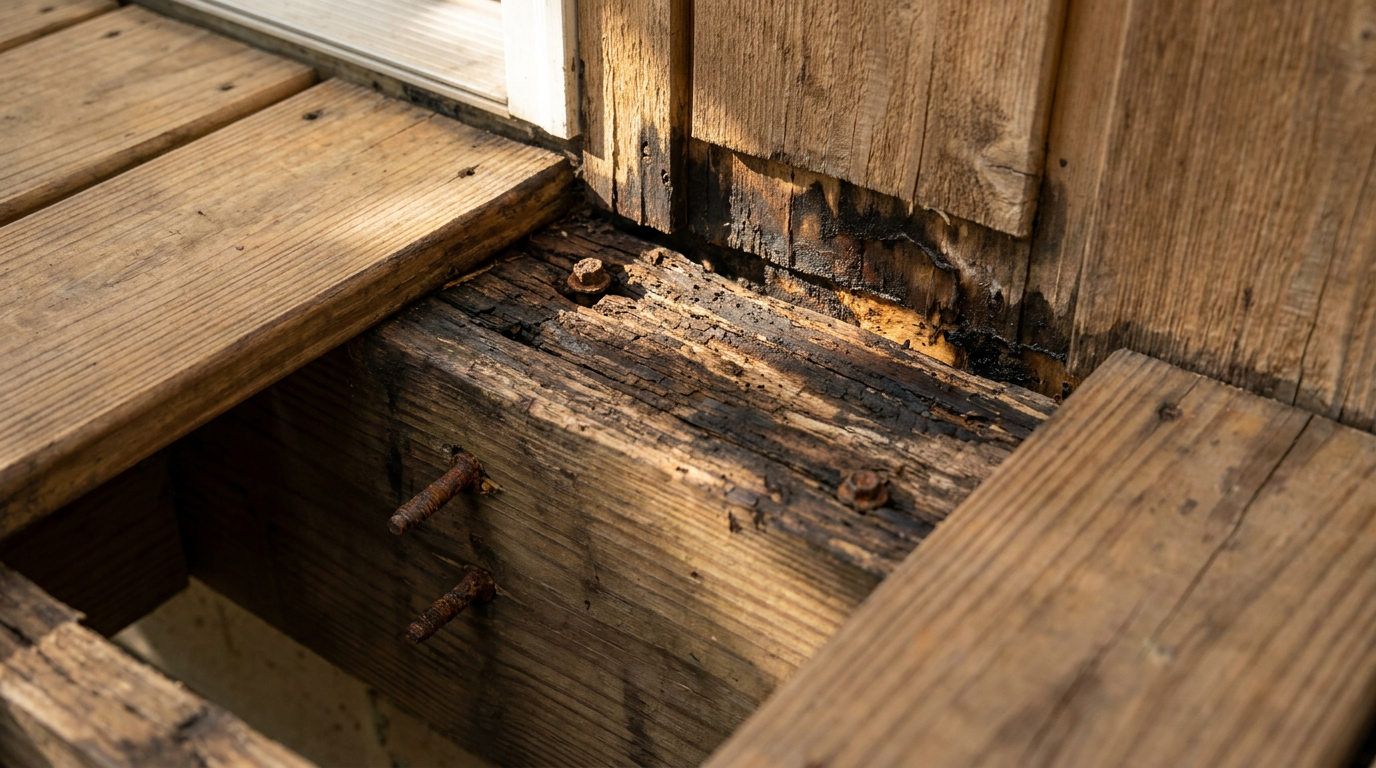
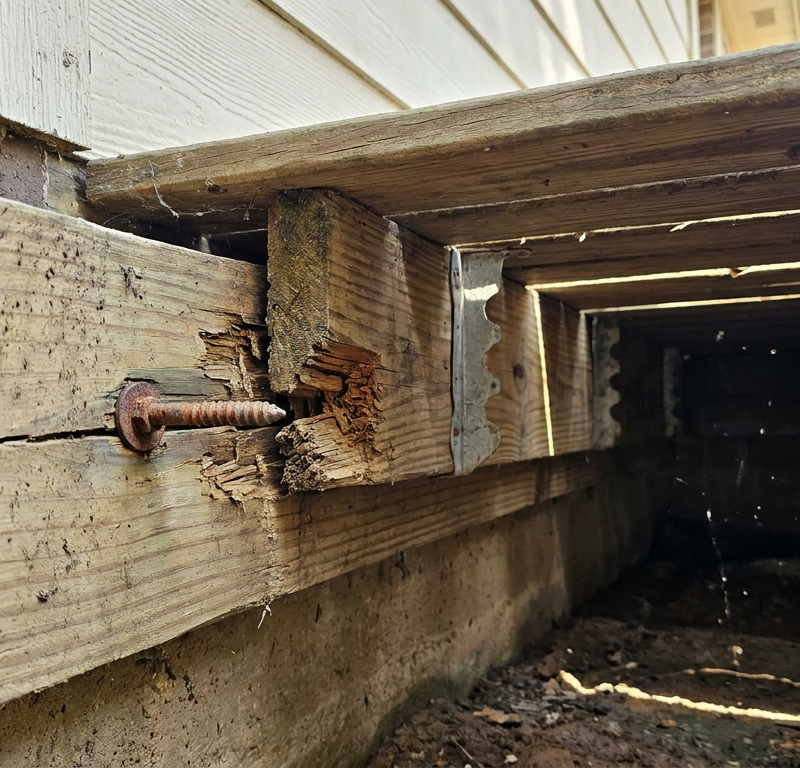
By the time you notice soft floorboards inside, mildew on the basement ceiling, or a spongy deck surface near the door, the structure holding up your deck may feel like wet cardboard. And if standard steel nails or unrated screws are reacting with pressure-treated chemicals in a damp spot, they’ll corrode out from under you. No dice. Then the ledger’s hanging on by friction and hope.
How It Works
Deck attachment is pretty simple physics: gravity pulls down, and the house framing pushes back up. The ledger spreads thousands of pounds of dead load (the deck framing itself) and live load (people, furniture, snow) into the rim joist with 1/2-inch structural lag screws or through-bolts spaced every 12 to 16 inches.
Waterproofing that joint comes down to gravity-assisted shingling—every upper layer has to lap over the lower layer so water never finds an upward-facing seam.
[ Exterior Siding ]
       │
[ Housewrap / WRB (overlaps vertical flashing leg by 2"-4") ]
       │
[ Flashing Vertical Leg (minimum 4" up behind WRB) ]
       │
[ Z-Flashing 90° Bend ]───────┐
                              │ [ Flashing Drip Edge (overhangs 1/4"-1/2") ]
[ Deck Ledger Board (2x8/10) ]│
       │                      ▼
       │               [ First Deck Board ]
[ House Rim Joist ]
Rain hits the siding, runs down the housewrap, gets carried over the top vertical leg of the flashing, moves across the horizontal bend, kicks out past the 1/4-inch drip edge, and drops to the ground where it belongs. If somebody tucks the flashing under the housewrap or leaves out the membrane behind the wood, water skips the metal barrier and heads straight behind the ledger. That’s a bad day waiting to happen.
Step-by-Step Fix
Fixing busted or missing ledger flashing means opening up the structural seam down to bare wood. Pick a clear Saturday morning, and make sure the forecast stays dry for at least 48 hours.
-
Inspect and Clear the Work Area — Pull everything away from the house wall within 6 feet: patio furniture, grills, planters, the whole pile. Sweep out pine needles, grit, and moss packed between the siding and the first deck board so you’re not fighting garbage while you work.
- Safety: Wear cut-resistant work gloves and safety glasses; rusted screws and siding edges can be nasty.
- If the deck boards are swollen tight to the siding, score the seam first with a sharp utility knife so you’re not prying blind.
-
Remove the First Two Rows of Decking — Back out the screws holding the board nearest the house and the one right beside it. Two boards give you about 11 inches of working room, which is enough to inspect joists and get at the ledger face without cussing the whole time.
- Tools: Cordless impact driver with the right bit—usually #2 square or T20/T25 star drive.
- If screw heads are stripped or snap off, slip a flat pry bar under the board near the joist and ease it up, with a scrap block under the bar so you don’t wreck the neighboring boards.
-
Carefully Remove the Lower Siding Course — You need 4 to 6 inches of vertical access above the ledger board. Vinyl? Use a zip tool to unlock the bottom row. Wood lap or fiber cement? Gently pry out the fasteners on the lowest course and pull the planks off intact if you can.
- Tools: Siding zipper tool for vinyl, or a stiff putty knife and mini pry bar for wood/fiber cement.
- If you’re dealing with brick or stone veneer above the ledger, the flashing has to tuck into a cut mortar joint backed by polyurethane sealant instead of sneaking behind siding.
-
Probe the Rim Joist and Ledger for Wood Rot — Grab a flat-head screwdriver or awl and probe the top edge of the ledger, the structural bolts, and the exposed sheathing. The wood ought to fight back. If the screwdriver sinks more than 1/4 inch with hand pressure, stop right there.
- If you find heavy rot, flashing alone won’t save it—the rim joist needs to be structurally sistered or replaced from inside the basement or crawlspace before you go any further.
-
Clean and Prep the Ledger Top — Scrape off old caulk, dirt, and wasp nests with a 2-inch stiff scraper blade. Sand stubborn residue with 60-grit paper so the ledger top and house sheathing sit dead flat.
- Vacuum every loose bit out of the pocket between the ledger and wall with a wet/dry vac and a crevice nozzle.
-
Apply Self-Adhering Waterproof Membrane — Cut a strip of heavy-duty, self-adhering butyl flashing tape, minimum 20 mils thick and 6 to 9 inches wide. Center the crease on the seam where the ledger meets the house, pressing it 3 inches up the sheathing and folding it across the top of the ledger.
- Tools: Hand roller or wooden block to burnish the membrane hard; butyl needs firm pressure to bond.
- Don’t use standard asphalt-based flashing tape if it touches vinyl or flexible PVC, because the petroleum solvents can mess with the material.
-
Cut and Measure the Metal Z-Flashing — Measure the ledger run and cut corrosion-resistant Z-flashing, either heavy-gauge copper or minimum 0.019-inch G185 galvanized/coated aluminum. The horizontal leg needs to match the ledger thickness plus any joist-hanger bracket projections—usually 1-5/8 to 2 inches—with a 1/2-inch downward drip edge bent outward at roughly 15 degrees.
- Tools: Aviation snips, left- and right-cut pairs for clean edges.
- Overlap adjoining metal flashing lengths by at least 4 inches, and run a double bead of structural polyurethane sealant between the seam.
-
Tuck Flashing Under the Housewrap — Slice the existing building paper or housewrap horizontally 4 inches above the ledger if it isn’t already loose. Slide the vertical leg of the metal flashing straight up behind the building paper so water running down the paper lands on the metal every time.
- Don’t fasten flashing through the horizontal deck-facing surface; nail only through the top 1 inch of the vertical leg using 1-1/4-inch hot-dipped galvanized roofing nails.
- Tape the cut seam of the housewrap over the flashing with approved housewrap tape, like Tyvek tape, so you get a tight, water-shedding transition.
-
Install End Caps and Corner Diverters — At the left and right ends of the ledger board, fold the flashing down or tuck in a kick-out flashing diverter. That pushes runoff away from the siding joint and into the gutter or out into open air instead of letting it sneak behind the corner boards.
- Bed all corner overlaps into a continuous bead of high-performance elastomeric sealant.
-
Reinstall Siding and Deck Boards — Snap the lower siding course back into the track, or renail wood planks with stainless trim nails and pre-drill to keep from splitting them. Put the two deck boards back, and leave a 1/4-inch expansion gap between the inner board and the siding so air can move and water can drain.
- Fasten boards with new #9 or #10 3-inch exterior-grade coated or 305/316 stainless steel screws. Don’t reuse stripped or bent screws. They’re junk.
Common Causes
Missing, rotten, or botched ledger flashing usually doesn’t come from one thing. It’s a mix of sloppy work and the wrong materials:
- Siding Trapped Behind Ledger — Lazy builders sometimes bolt the ledger right over lap siding, vinyl, or stucco instead of cutting it away and fastening to the rim joist. That leaves hollow pockets where water collects and keeps the flashing from sitting flat.
- Galvanic Corrosion — When unpainted aluminum flashing touches modern pressure-treated wood treated with copper azole (CA) or alkaline copper quaternary (ACQ), you get a battery-like chemical reaction. The copper can chew pinholes through aluminum in as little as 2 to 3 years, and then the flashing’s basically a sieve.
- Reverse Lapping — Nailing the flashing over the outside of the building paper instead of sliding it underneath. Water running down the housewrap drops straight behind the vertical metal leg and keeps going right against raw sheathing.
- Zero Drip Edge — Using flat L-shaped flashing with no bottom kick-out bend. Surface tension drags water back under the horizontal leg through capillary action, soaking the exact joint the metal was supposed to protect.
- Caulk-Only "Waterproofing" — Depending on a bead of silicone caulk along the top of the ledger instead of bent metal. Sunlight dries it out, it shrinks and splits within 12 months, and then you’ve got a trough that sends water backward.
Common Mistakes
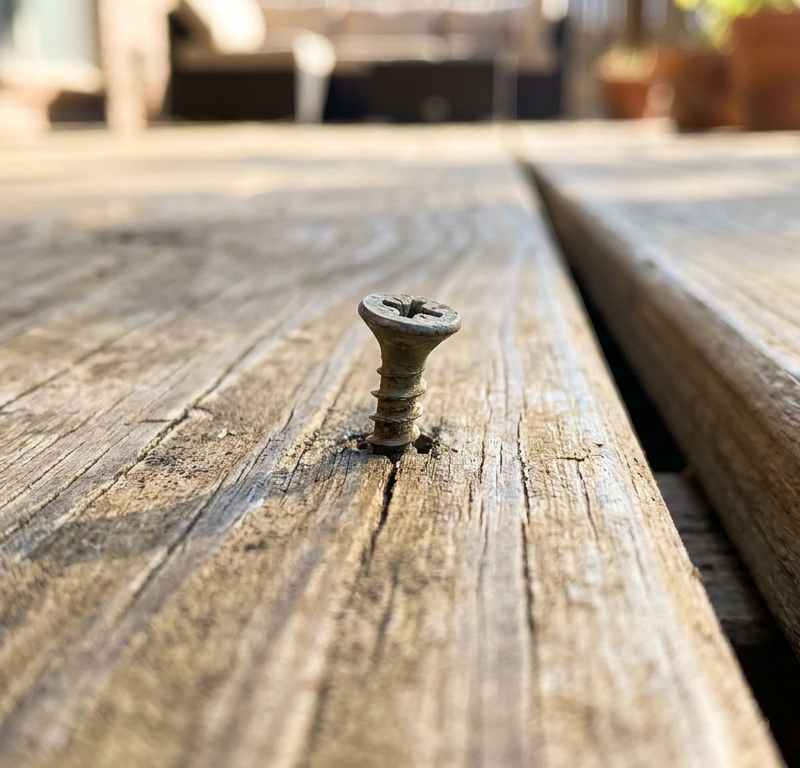
- Reusing corroded fasteners when putting boards back down. If you reinstall old rusty fasteners or grab interior drywall screws, they’ll snap under the movement of wet lumber. Use ceramic-coated or 304/316 stainless-steel fasteners rated for ACQ lumber.
- Omitting the self-adhering membrane under the metal. Metal flashing can sweat or leak at overlaps. Skipping the peel-and-stick butyl layer takes away your second line of defense against rot.
- Face-nailing through the horizontal leg of the flashing. Every nail hole in the horizontal metal gives gravity-fed water a straight shot into the top edge of the ledger. Fasten only through the upper vertical flange behind the siding.
- Crushing the flashing drip edge tight against the ledger. If you hammer the drip edge flush to the wood, surface tension lets water cling to the metal and wick right into the ledger face. Keep that edge bent outward at least 15 degrees.
- Butting the deck boards hard against the siding. Shoving the inner deck plank tight against the house traps damp dirt, pine needles, and leaves. Leave a minimum 1/4-inch to 3/8-inch clean air gap for drainage.
Cost & Time Breakdown
| Task | DIY Cost | Pro Cost | Time |
|---|---|---|---|
| Flashing Replacement & Membrane (12-16 ft ledger) | $65–$120 | $600–$1,100 | 3–5 hours |
| Partial Siding Removal & Re-hang | $15–$35 | $250–$450 | 1–2 hours |
| Fastener Replacement (structural screws/deck screws) | $30–$50 | $150–$250 | 1 hour |
| Full Ledger Detach & Re-hang (no rim rot) | $120–$200 | $1,200–$2,200 | 6–8 hours |
| Rim Joist Structural Sistering (minor rot repair) | $90–$180 | $1,500–$3,500 | 4–6 hours |
Tips & Prevention
- Conduct a seasonal flashlight check. Every spring and fall, crawl under your deck with a bright flashlight and scan the ledger. Look for dark, wet staining on the rim joist or white mineral blooms that point to active seepage.
- Clear leaf litter twice a year. Use an old putty knife or a dedicated deck-groove brush to scrape out leaves, needles, and soil trapped in the gap between the house and the first deck board before winter freezes.
- Check bolt tension annually. Crawl underneath or peek between joists with a wrench and make sure the structural 1/2-inch lag screws or ledger bolts haven’t rusted or pulled out from seasonal movement in the lumber.
- Monitor basement band joists. If you’ve got an unfinished basement or crawlspace under the deck, look at the inside face of the exterior wall after a heavy wind-driven rain. Any dampness or rust marks around bolt threads means the exterior seal has failed.
- Verify flashing metals. Make sure any exposed metal flashing is copper, vinyl, or factory-coated G185 galvanized steel. If you spot bare mill-finish aluminum touching treated wood, plan a retrofit before the corrosion punches through.
When to Call a Professional
Fixing top-edge flashing is something an intermediate homeowner can handle, but structural rot isn’t. If your awl sinks more than 1/4-inch deep into the house’s structural band joist, the wood can’t safely carry your deck’s shear load anymore. Stop. Right there. At that point, the deck needs temporary structural shoring towers under it to carry the weight while the ledger is disconnected, the rotten framing is cut out, and new rim joists are engineered back in.
Call a licensed general contractor or structural engineer too if you see ledger separation—meaning a visible gap between the ledger board and the house wall—or if the deck sags noticeably along the foundation line. A failing ledger connection is one of the main causes of sudden, catastrophic deck collapses in the United States. Don’t gamble with framing that’s showing fungal decay, heavy insect damage, or missing anchors. Protect yourself and bring in a pro when the house framing’s integrity is in question.
Related Articles
Keep troubleshooting with these hand-picked guides from FixlyGuide:
- The #1 Mistake Homeowners Make When Sealing a Deck (And How to Fix It) — Discover the crucial, often-missed step in deck sealing that prevents premature wear and water damage, ensuring your wood deck lasts for ye…
- Deck Wobbles When Walking? 10 Causes of Sway and the Step-by-Step Fix — Stop dangerous deck sway before structural failure occurs. Diagnose loose ledger connections, rotten posts, and install code-approved brace…
- Roof Deck Leaking Into House? 7 Causes and the Fix for Each — A roof deck leaking into your house is a serious problem. We’ll walk through the 7 most common causes, from failed flashing to clogged drai…
- Missing Shingles? The Real Trouble Is Under Your Roof — After a storm, missing shingles seem like a simple fix. But the high winds that tore them off likely broke the seals on surrounding shingle…
- Your Roof is Leaking. Now What? — A leaking roof after a storm is a homeowner's nightmare. Learn how to safely install a temporary roof tarp to prevent further water damage…
- The Secret Culprit Behind Your Leaky Refrigerator (It’s Not Always the Water Line) — Discover the most common, often overlooked, reasons your refrigerator is leaking water and how to fix them with simple DIY steps.
Get deck & patio quotes from local pros
Tell us about your project and we'll match you with vetted contractors in your area. Free, no obligation, and we never sell your info.
Should you do this yourself?
Answer five quick questions before you start. Safety outranks savings every time.
Your experience with work like this
How high do you have to work?
Does the job involve any of these?
Will it need a permit?
Specialty tools
Free and instant. Educational guidance only — not a quote, inspection, or professional diagnosis.
Questions to ask before you sign
Ask every contractor the same questions and the cheapest bid stops looking cheapest. Check them off as you go — your progress is saved on this device.
Free, no signup. Bring this to every walkthrough so you compare bids on the same terms.
What should this project cost?
Enter your project details for a realistic cost range before you call anyone.
Spot repairs commonly run $400–$1,800; full replacement typically $9,000–$18,000 for an average home.
- Regional adjustment
- National average
- Labor share (typical)
- ~$2,948
- Quotes to collect
- 3 written estimates
Educational estimate based on national averages — not a binding quote. Always confirm with written local estimates.
Fixly Project Decision Box
- DIY difficulty
- Professional Recommended
- Estimated time
- Inspection 1–2 hours · repairs 1–3 days
- Cost level
- High
Main tools / materials
- Binoculars for a ground-level look
- Flashlight for attic checks
- Moisture meter
- Roofing cement (temporary patch only)
When to stop and call a pro
- Active leak near lights, fans, or any wiring
- Sagging, bulging, or water-filled ceiling
- Steep, wet, or two-story roof — do not climb it
- Storm or hail damage you plan to claim on insurance
Need professional help?
Free roof assessment first — no phone calls until you ask for them.
Get Local Roofing HelpGet help with your roof now
Stay off the roof. These free tools help you protect the house and reach the right professional fast.
- Emergency repair checklistThe first steps that limit damage before a pro arrives.Open
- Repair or replace your roof?Answer 10 questions about age, leaks, and damage to get a clear next step.Open
- Get local estimatesSend one request and compare written estimates from vetted pros.Open
Free, no signup required. Estimates are educational guidance, not a quote or an inspection.
Get the print-ready PDF of this guide
A clean, ad-free, printable version you can keep on your phone or pin to the workshop wall. Free with a FixlyGuide account.
- Print-optimized layout
- Tools, materials & every step included
- Saved to your account
Frequently asked questions
What is the difference between L-flashing and Z-flashing for a deck ledger?},{answer:+
Z-flashing is preferred because its preformed shape slips behind the siding, extends over the top horizontal edge of the ledger, and bends down with an outward drip edge. L-flashing only covers the vertical corner and lacks the bottom kick-out that sheds surface tension water away from the wood face.
Discussion
Loading comments…