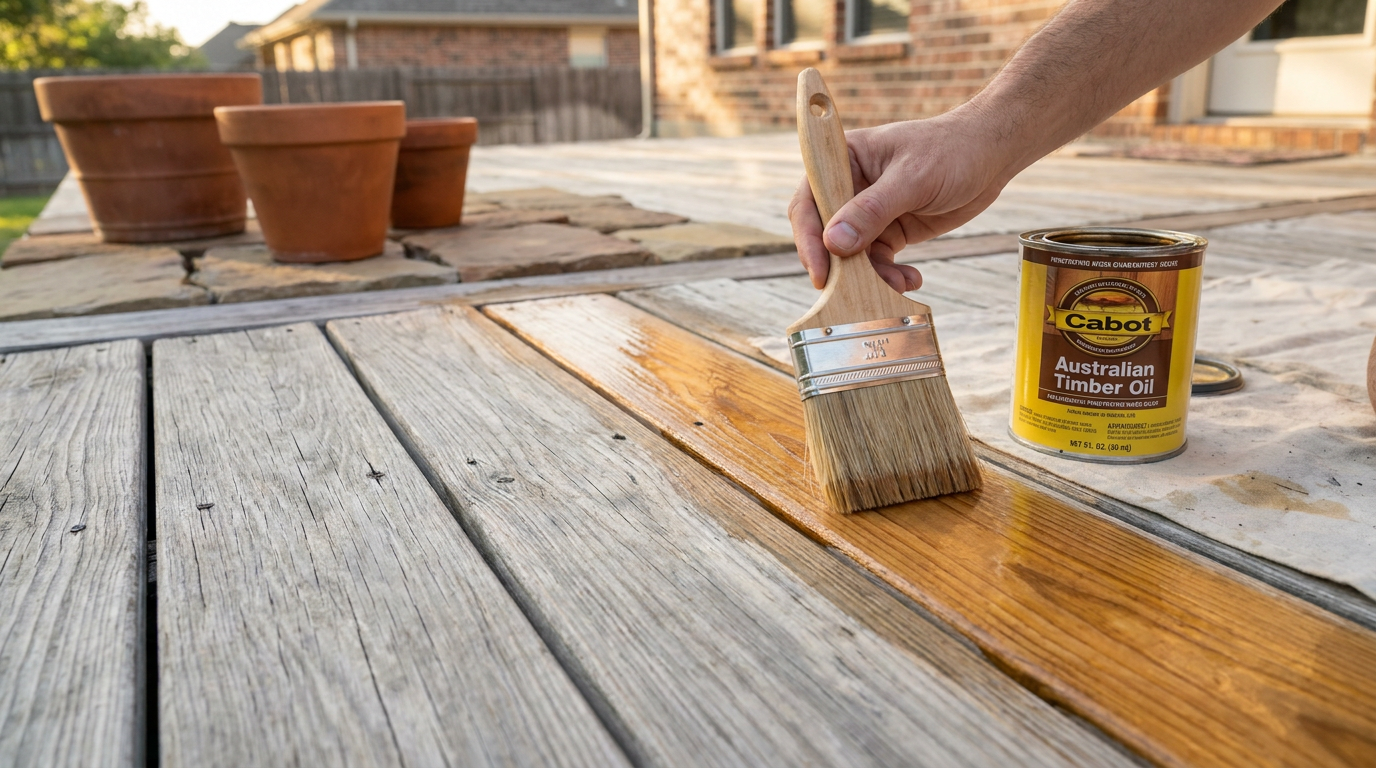
- Wipe off unabsorbed excess and let cure — Give penetrating oils 15 to 20 minutes to soak deep into the wood grain. If shiny puddles are still sitting on top after 20 minutes, wipe them dry with clean lint-free cotton rags.
- Critical safety warning: Spread oil-soaked rags flat on an outdoor concrete driveway so they can dry completely, or dunk them in a water-filled metal bucket before disposal; bunched oil rags build heat and can catch fire on their own.
- Leave the deck alone for a full 24 hours before light foot traffic, and wait 48 to 72 hours before sliding heavy furniture back into place.
Landscaping · Deck or fence project
| Project category | Landscaping |
|---|---|
| Problem type | Deck or fence project |
| Trade required | Landscaping |
| Urgency | Planned project |
| Safety risk | Moderate safety risk |
| DIY suitability | DIY for experienced homeowners |
| Cost category | High cost |
| Typical timeline | Most builds 3–10 days depending on size |
| Contractor type | Landscaping contractor |
Repair option
Replace failed boards, posts, and hardware; reseal the surface.
Replacement option
Rebuild when framing or the ledger connection is unsafe.
Common causes
- Rot at posts and ledger
- Storm damage
- Adding outdoor living space
Relevant tools:home improvement material pricesproject cost estimator
Published November 10, 2026Last updated November 10, 2026
Tools & materials you'll need
Affiliate links- AmazonPin-style wood moisture meterTo verify lumber moisture is under 15%
- AmazonGarden pump sprayer2-gallon
- AmazonStiff-bristle synthetic deck scrub brushWith extension pole
- AmazonRandom orbital sander & 80-grit sanding discs1 pack
- Amazon3/8-inch nap roller and frame9-inch
- Amazon4-inch natural bristle stain brush
As an Amazon Associate FixlyGuide earns from qualifying purchases — at no extra cost to you. Prices and availability are accurate as of publication and subject to change.
Quick Answer
To reseal a wood deck, I’d start by checking the boards for rot, then I’d clean the whole thing with an oxygenated deck cleaner, let the timber dry down to under 15% internal moisture, knock off the loose gray fibers with 80-grit abrasive paper, and back-brush a penetrating oil or acrylic sealer in steady runs along each board’s length. You want a 48-hour clear weather window and ambient temperatures between 50°F and 90°F. No shortcuts. That’s how you get it done right.
The Problem
Deck sealer doesn’t last forever. Sun, foot traffic, rain, and winter ice beat it up hard. I’ve pulled more than a few decks apart where the finish looked okay from ten feet away, but up close it was all dried out and checked. First, UV rays chew through the wood’s natural lignin, so boards gray out, crack, and splinter. Then the protective film or oil barrier wears thin until bare wood starts soaking up rainwater like a sponge.
Once moisture gets trapped inside untreated lumber, fungal decay—dry rot—starts working from the inside out. Fasteners loosen, joists soften, and boards warp or cup. Catch it early, before the wood fibers go mushy, and resealing brings back that water-shedding layer, freshens the color, and can stretch your deck’s life by 15 to 20 years. Skip it, and you’re staring at a tear-out that’ll run into the thousands.
How It Works
Deck sealers protect exterior lumber in two basic ways: penetrating oils or film-forming acrylic coatings. Penetrating sealers, usually oil- or alkyd-based, soak 1/16 to 1/8 of an inch deep into open wood pores and leave behind hydrophobic resins and paraffin waxes that push water away while still letting vapor escape from inside. Film-forming sealers, mostly water-based acrylics, dry on the surface and leave a flexible plastic shell that helps block UV damage and everyday abrasion.
       PENETRATING SEALER                      FILM-FORMING SEALER
  [ Raindrops Bead Up & Roll ]              [ Rain Repelled by Membrane ]
          ▼     ▼                                   ▼     ▼
  ═══════════════════════════               ═══════════════════════════  ◄ Solid Surface Film
  |  :  .  :  .  :  .  :  . |  ◄ Pores      |                         |
  | .  :  .  :  .  :  .  :  |    Saturated  |   Dry Wood Pores        |
  |  :  .  :  .  :  .  :  . |    with Oils  |                         |
  ───────────────────────────               ───────────────────────────
      Sub-Surface Protection                     Surface Shield Only
Wood is hygroscopic. It breathes. It swells in humid months and shrinks when dry North Texas or midwestern winds start howling through. Once a deck’s internal moisture climbs past 19%, fungal spores can wake up and feed on the cellulose. For a sealer to cure and bond, the wood’s cell structure has to be empty enough to take the chemistry. Put fresh sealer over damp wood, gray fuzzy fibers, or old peeling layers, and you trap water inside. Then the coating blisters and bubbles in a hurry. No dice.
Step-by-Step Fix
Follow this complete workflow to restore your deck’s waterproof envelope safely and efficiently.
-
Check the weather and board dryness — Make sure you’ve got at least 48 to 72 hours of rain-free weather with temps between 50°F and 85°F. Don’t hit the deck in direct midday summer sun; the carrier solvents flash off too fast and leave you with a gummy, uncured mess.
- Safety: Stay off damp framing where a slip could turn into a fall from height.
- Tool check: Grab a pin-style moisture meter from the hardware store; push the prongs 1/8 inch into three different boards in shaded spots. If you’re over 15% moisture content, hold off.
-
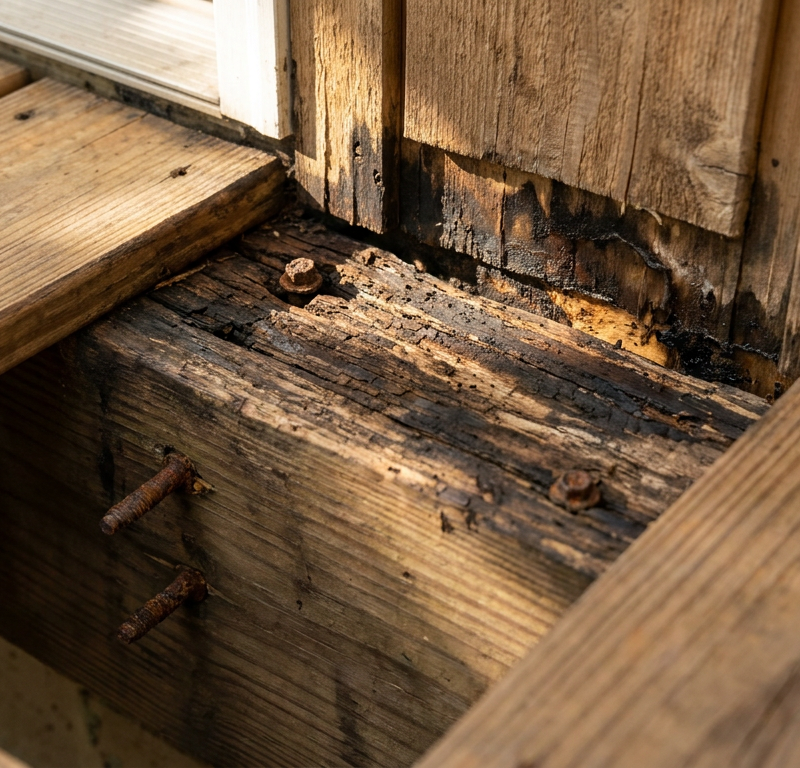
Inspect the framing and reset fasteners — Walk the whole deck, square foot by square foot, and look for spongy spots, structural rot, or popped nails. Any soft area around post bases or rim joists has to be fixed before you put any cosmetic coating on top.
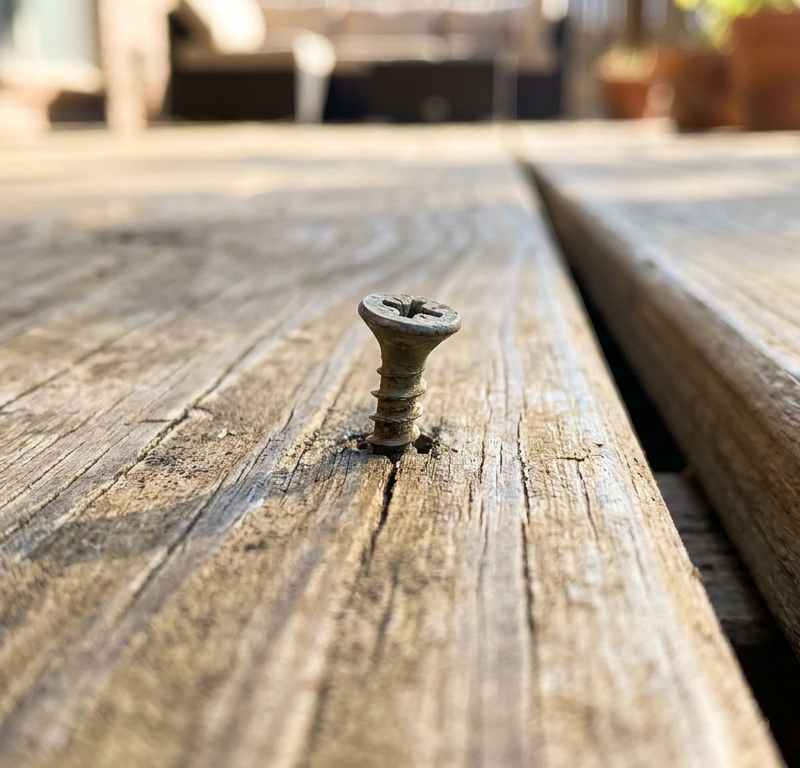
- Drive raised ring-shank nails back down flush with a hammer and nail set, or swap popped screws for #8 2-1/2-inch structural composite/wood deck screws.
- If a board gives like a damp sponge when you press it with a flat-head screwdriver, that thing’s toast and needs replacing.
-
Clear the deck and protect adjoining areas — Get all the furniture, planters, and grill gear off the deck. Cover nearby siding, brickwork, HVAC units, and shrubs with heavy-duty poly sheeting or canvas drop cloths.
- Mist the grass and plants around the deck with fresh water from a garden hose before and after applying chemicals so any overspray gets diluted.
-
Apply an oxygenated deck cleaner — Mix sodium percarbonate (oxygen-based deck cleaner) with warm water in a clean pump sprayer per the package ratio (usually 6 to 8 ounces per gallon). Saturate the boards evenly and let the solution foam up and break down dirt, mold, and oxidized graying for 15 to 20 minutes.
- Safety: Wear nitrile gloves, safety goggles, and slip-resistant rubber boots while you’re working with deck chemicals.
- Important rule: Don’t let the cleaner dry on the wood; give it a light mist of fresh water if it starts drying out too fast.
-
Scrub and rinse the deck surface — Work a stiff synthetic-bristle deck brush on an extension pole along the grain of each board to lift embedded grime and dead wood pulp. Once you’ve scrubbed it, rinse the boards thoroughly with a garden hose and a high-pressure brass nozzle.
- Pressure washer alternative: If you use a pressure washer, fit a 40-degree wide-fan tip (white nozzle) and keep the pressure dial under 1,200 PSI for softwoods like cedar or pine. Hold the tip 10-to-12 inches from the surface so you don’t gouge it or cause “furring.”
-
Neutralize with a wood brightener — Wet the cleaned boards with an oxalic acid wood brightener applied through a pump sprayer. Oxygen cleaners leave wood in a high-pH alkaline state that darkens the boards and blocks oil penetration; oxalic acid brings the timber back to its natural pH and restores the original amber tone within 5 to 10 minutes.
- Rinse it well with plain water until the runoff comes off clear and there’s no slick chemical film left behind.
-
Allow 48 hours of complete dry time — Let the cleaned deck dry in the open air for 48 straight hours under dry conditions. Don’t rush this step. Sealing wood with trapped moisture is the number one reason deck finishes fail.
- Check your moisture meter again on several boards. If any test spot is still above 15%, wait another 24 hours before you crack open the sealer can.
-
Sand raised grain and rough edges — Scrubbing and wetting the timber lifts the micro-grain fibers and leaves you with a fuzzy, splintery surface. Run an orbital sander or pole sander with 80-grit abrasive paper over the flat faces to knock down the loose burrs.
- Don’t sand finer than 80-grit on deck boards; 120-grit and higher shuts the pores down and blocks sealer penetration.
- Vacuum or blow off all sanding dust with an electric leaf blower or shop vac before you open the stain.
-
Cut in edges, railings, and tight joints — Stir the sealer well with a wooden paddle from the bottom of the can so the settled pigments and resins get mixed back in (don’t shake it, or you’ll whip foam into it). Use a 2-1/2-inch or 3-inch natural-bristle stain brush to coat railings, balusters, corners, and vertical board edges where big rollers can’t reach.
- Keep a cotton rag handy to catch and blend drips running down vertical spindles right away.
-
Apply the sealer using the back-brush method — Pour the sealer into a 5-gallon bucket fitted with a roller screen. Use a 3/8-inch nap roller or a dedicated pad applicator on an extension pole to lay the sealer down, working two to three boards across their full length from house to outer edge without stopping.
- Right behind that, follow with a 4-inch or 5-inch wide staining brush and work the wet sealer down into the grain, end cuts, and board gaps.
- Keep a wet edge the whole time; don’t stop halfway down a board, or you’ll leave a lap mark that won’t disappear later.
-
Wipe off unabsorbed excess and let cure — Give penetrating oils 15 to 20 minutes to soak deep into the wood grain. If shiny puddles are still sitting on top after 20 minutes, wipe them dry with clean lint-free cotton rags.
- Critical safety warning: Spread oil-soaked rags flat on an outdoor concrete driveway so they can dry completely, or dunk them in a water-filled metal bucket before disposal; bunched oil rags build heat and can catch fire on their own.
- Leave the deck alone for a full 24 hours before light foot traffic, and wait 48 to 72 hours before sliding heavy furniture back into place.
+---------------------------------------------------------------------------------+
|                       DECK RESEALING WORKFLOW CHECKLIST                         |
|                                                                                 |
| [1] Check Forecast & Meter   ->  Must be 48-72h dry window & <15% moisture      |
| [2] Framing Inspection       ->  Reset popped screws, test for soft rot spots   |
| [3] Clean with Percarbonate  ->  Dwell 15 min, scrub with stiff synthetic brush |
| [4] Oxalic Acid Brightener   ->  Restores pH balance and original wood color    |
| [5] 48-Hour Deep Dry Out     ->  Do not shortcut; meter must confirm dryness    |
| [6] 80-Grit Grain Sanding    ->  Removes wood fuzz, opens pores for penetration  |
| [7] Cut In Spindles/Edges    ->  Use 2.5" natural/synthetic brush for detail     |
| [8] Roll & Back-Brush Boards ->  Work 2-3 boards full length to avoid lap marks |
| [9] Safe Rag Disposal        ->  Submerge oily rags in water; allow 48h cure    |
+---------------------------------------------------------------------------------+
Common Causes
Wood decks lose their protective seal because of a few different environmental and mechanical beatdowns:
- UV Degradation: Direct sun breaks down the lignin holding the wood cells together, turning the timber gray and causing microscopic surface cracks that ruin the sealer bond.
- Standing Water and Poor Drainage: Decks with no slope or board gaps narrower than 1/8 inch trap water between the boards and joist tops, soaking the wood until the coating lifts.
- High-Alkaline or Harsh Cleaning: Scrubbing with household chlorine bleach (sodium hypochlorite) bleaches the color, eats at the metal fasteners, and destroys lignin, leaving a crumbly surface sealers can’t grab onto.
- Winter Ice Melt & Snow Salt: Rock salt and chemical deicers pull moisture into the wood cells while salt crystals expand inside the grain, which flake off the finish.
- Heavy Mechanical Abrasion: Heavy foot traffic, dog claws, and dragging patio furniture can chew through thin topical coatings in a single season.
Common Mistakes
Watch out for these common DIY blunders on a deck reseal job:
- Applying Sealer to Wet Lumber: A lot of homeowners wash the deck on Saturday morning and figure Sunday afternoon is good enough. Even if the top feels dry, the deep wood core often still holds 20% to 25% moisture. Seal damp wood and you trap rot spores inside, then the coating turns milky and starts flaking within weeks. Wait a full 48 rain-free hours and check it with a moisture meter.
- Using Chlorine Bleach Instead of Oxygen Cleaner: Household bleach leaves boards a harsh, fake pale gray, wrecks the wood cellular structure, and corrodes deck screws. Stick with oxygenated cleaner (sodium percarbonate) and an oxalic acid brightener if you want to clean without beating up the timber.
- Sandpaper Grit is Too Fine: Using 120, 150, or 220-grit sandpaper makes the surface too slick and shuts the pores down. Keep sanding grit between 60 and 80; penetrating oils need open, porous grain to soak into.
- Over-Applying the Product: Smearing on heavy coats of penetrating sealer doesn’t buy you extra protection. The excess oil can’t soak in, so it sits on top, stays tacky, grabs pollen and dirt, and ruins the finish. Apply only what the wood can drink up, and wipe puddles after 15 minutes.
- Letting Rags Pile Up in a Corner: Oil-soaked deck-stain rags oxidize fast and make serious heat through an exothermic chemical reaction. Piled in a bucket, trash can, or garage corner, they can ignite on their own. Spread them flat on open concrete to dry, or soak them in a metal bucket filled with water.
Cost & Time Breakdown
| Task / Item | DIY Cost | Pro Cost | Time Required |
|---|---|---|---|
| Inspection & Board Prep (fasteners, spot repairs) | $15–$35 | $150–$300 | 1–2 hours |
| Chemical Cleaning & Brightening (cleaner, brightener, sprayer) | $45–$80 | $250–$450 | 2–3 hours |
| Dry Out Period | $0 | $0 | 48 hours (passive) |
| Surface Sanding (80-grit discs, orbital sander) | $20–$50 | $200–$400 | 2–4 hours |
| Deck Sealer & Applicators (oil sealer, brushes, rollers) | $80–$180 | $400–$900 | 3–5 hours |
| Total Project | $160–$345 | $1,000–$2,050 | 8–14 active hours |
Tips & Prevention
- Perform the Water Drop Test Twice a Year: Splash a tablespoon of tap water onto high-traffic deck boards. If the water beads into tight droplets, your seal is holding. If it sinks into the grain within 60 seconds and darkens the board, schedule a reseal before seasonal rains show up.
- Maintain 3/16-Inch Gaps Between Boards: Clear tree needles, leaves, and dirt packed between deck boards with an old putty knife. Clogged gaps choke off airflow and trap moisture against the framing.
- Shovel Snow Along the Grain: When you’re clearing winter snow, use a plastic-blade shovel and push parallel to the direction of the boards. Metal blades gouge wood and slice right through the sealer film.
- Sweep Organic Debris Weekly: Wet leaves bleed tannins that stain the boards, and leaf mulch holds the wood damp for weeks. A quick sweep once a week keeps fungal growth from getting a foothold.
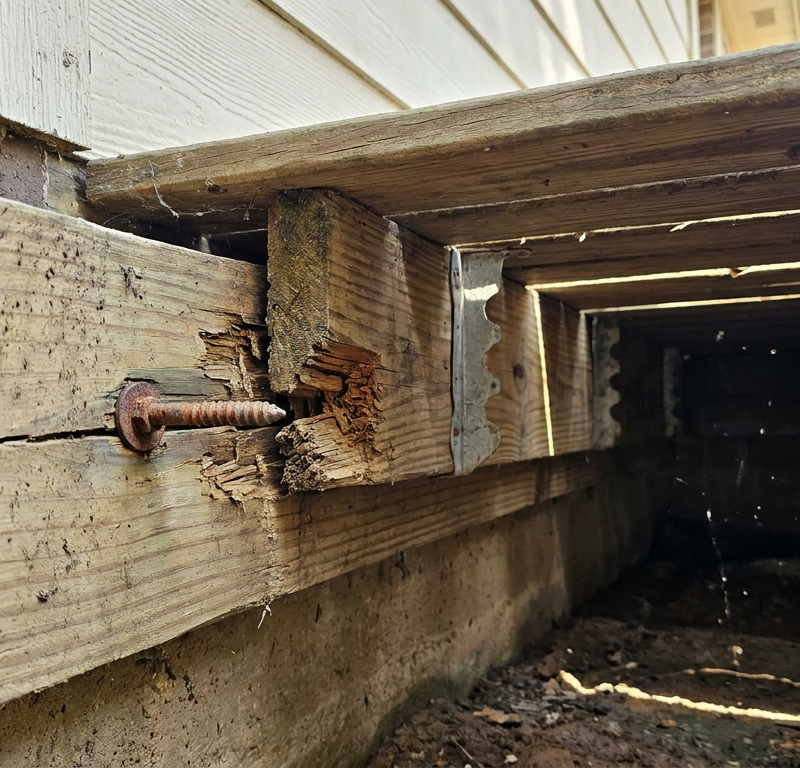
- Inspect Ledger Flashing Annually: Check beneath the siding where the deck ties into the foundation wall. Make sure the aluminum or copper Z-flashing is intact and keeping rain out of the house framing.
When to Call a Professional
Resealing surface boards is a pretty straightforward DIY weekend job, but structural damage calls for an experienced deck builder or licensed carpenter.
If your deck has noticeable spring or bounce underfoot, or if the main support posts have softened near the soil line, stop and call a pro. Take a look at the ledger board where the deck bolts to your house: if that wood is soft, or if fasteners have pulled away, the whole structure is at risk of ledger failure and collapse. I pulled a water heater in Frisco last month that had exactly this kind of hidden moisture problem nearby, and the owner had no idea until the framing started giving way. Same story here—sometimes the ugly stuff is buried.
If the previous homeowner slapped on a thick, failing solid acrylic paint that’s peeled all over the railings and steps, hand sanding and stripping can chew up 40+ hours of brutal labor. Commercial contractors bring high-output floor maintainers, heavy dust-extraction tools, and commercial-grade chemical strippers that handle big restorations safely without tearing up the wood.
Frequently Asked Questions
How often should a wood deck be resealed?
Most exterior wood decks need resealing every 1 to 3 years, depending on sun exposure, foot traffic, and the finish you used. Clear sealers repel water but don’t offer sun protection, so they usually need reapplication every 12 months. Semi-transparent penetrating oil stains typically last 2 to 3 years, while solid acrylic deck coatings can hang on for 3 to 5 years before they start peeling.
Can I apply a new coat of sealer directly over an old coat?
You can only put new sealer over an old coat if you’re using the same chemical family—like an oil-over-oil penetrating finish—and the old layer has worn down enough for the new liquid to penetrate. If the old coating is peeling, flaking, or it’s an incompatible solid film, putting new sealer on top will make it blister and peel away within months. Clean, sand, and test porosity before coating.
Why is my deck still sticky days after applying sealer?
Sticky deck surfaces usually mean too much penetrating sealer went on, or the wood was still wet and couldn’t soak the oil in. Penetrating sealers are made to sink into the wood, not build a film on top. If excess puddles don’t get wiped off within 15 to 20 minutes of application, the surface can stay tacky. You can often clean that gummy residue with a stiff bristle brush soaked in mineral spirits.
Can I use a pressure washer instead of sanding the deck?
A pressure washer will clean out a lot of dirt, but it can’t replace sanding. High-pressure water raises the grain and leaves burrs, or “fuzzing,” which turns into a rough, splintery surface after it dries. Once the wood dries out completely after pressure washing, a quick pass with 80-grit sandpaper knocks those loose fibers down and opens the grain so it drinks up the sealer evenly.
What is the ideal temperature range for sealing a deck?
The sweet spot for deck sealing is between 50°F and 85°F with moderate relative humidity. Below 50°F, curing slows down and solvent evaporation crawls, leaving the finish gummy and easy to ding with dust. Above 85°F or out in blazing direct sun, the solvents flash dry before the resins can soak in, which leads to lap marks and lousy adhesion.
What happens if it rains shortly after applying deck sealer?
If heavy rain hits within 12 to 24 hours of application, water can pit the finish, wash out uncured resins, or leave milky white spots across the boards. Oil-based finishes are a little more forgiving after 12 hours, but water-based acrylics can wash right off if the rain catches them before they’ve cured. If rain ruins the wet sealer, let the deck dry for 48 hours, check for spotting, lightly scuff with sandpaper, and put on a thin coat again.
Should I use an oil-based or water-based deck sealer?
Oil-based sealers soak deeper into the timber, go on easier without lap marks, and don’t peel—they just fade over time, which makes future recoating easier. Water-based acrylic sealers hold color better against UV fading and clean up with soap and water, but they form a film that can crack and peel later, so recoating usually means more aggressive sanding.
Do I need to seal the underside of my deck boards?
Sealing the underside of existing, fully installed deck boards is usually unnecessary and almost impossible if clearance is tight. But if you’re installing brand new lumber or replacing deck boards, sealing all four sides—including the cut ends—before fastening them down gives you balanced moisture resistance. That helps keep boards from cupping or warping as ground moisture rises underneath.
Related Articles
Keep troubleshooting with these hand-picked guides from FixlyGuide:
- The #1 Mistake Homeowners Make When Sealing a Deck (And How to Fix It) — Discover the crucial, often-missed step in deck sealing that prevents premature wear and water damage, ensuring your wood deck lasts for ye…
- Deck Screws Pulling Out? 5 Causes and the Step-by-Step Fix — Stop tripping on loose deck screws. Here is why fasteners pop out of deck boards, how to test for joist rot, and the step-by-step fix to an…
- Is Your Gutter Sagging After Every Storm? The Hidden Flaw Most Homeowners Miss — Discover the overlooked reason your gutters sag after every storm and learn the lasting fix that most homeowners miss.
- The #1 Deck Sealing Mistake Most Homeowners Make (And How to Fix It) — Discover the most common deck sealing error and a step-by-step guide to resealing your wood deck for lasting protection against the element…
- The 3 Hidden Mistakes That Make Your Deck Sealer Fail (And How to Fix Them) — Resealing your wood deck protects it from weather and extends its life. Learn how to avoid common mistakes for a long-lasting finish and vi…
- Driveway Expansion Joint Cracking? 11 Steps to Reseal It for Good — Stop weeds, water erosion, and winter frost heave by replacing failed concrete expansion joints with commercial-grade polyurethane and clos…
Get deck & patio quotes from local pros
Tell us about your project and we'll match you with vetted contractors in your area. Free, no obligation, and we never sell your info.
Should you do this yourself?
Answer five quick questions before you start. Safety outranks savings every time.
Your experience with work like this
How high do you have to work?
Does the job involve any of these?
Will it need a permit?
Specialty tools
Free and instant. Educational guidance only — not a quote, inspection, or professional diagnosis.
What should this project cost?
Enter your project details for a realistic cost range before you call anyone.
Spot repairs commonly run $400–$1,800; full replacement typically $9,000–$18,000 for an average home.
- Regional adjustment
- National average
- Labor share (typical)
- ~$2,948
- Quotes to collect
- 3 written estimates
Educational estimate based on national averages — not a binding quote. Always confirm with written local estimates.
Decide what your roof needs
Two minutes of questions turns "something is wrong up there" into a clear next step.
- Repair or replace your roof?Answer 10 questions about age, leaks, and damage to get a clear next step.Open
- Compare contractor quotesScore up to four bids on price, warranty, licensing, and timeline.Open
- Get local estimatesSend one request and compare written estimates from vetted pros.Open
Free, no signup required. Estimates are educational guidance, not a quote or an inspection.
Get the print-ready PDF of this guide
A clean, ad-free, printable version you can keep on your phone or pin to the workshop wall. Free with a FixlyGuide account.
- Print-optimized layout
- Tools, materials & every step included
- Saved to your account
Frequently asked questions
How often should a wood deck be resealed?+
Most exterior wood decks need resealing every 1 to 3 years depending on local sun exposure, foot traffic, and the type of finish used. Clear sealers provide water repelling without sun protection and generally require reapplication every 12 months. Semi-transparent penetrating oil stains typically hold up for 2 to 3 years, while solid acrylic deck coatings can last 3 to 5 years before peeling.
Can I apply a new coat of sealer directly over an old coat?+
You can only apply new sealer over an old coat if you're using the same chemical family (like an oil-over-oil penetrating finish) and the old layer has worn away enough for new liquid to penetrate. If the old coating is peeling, flaking, or an incompatible solid film, applying new sealer on top will cause it to blister and peel away within months. Clean, sand, and test porosity before coating.
Why is my deck still sticky days after applying sealer?+
Sticky deck surfaces happen when too much penetrating sealer was applied or when wet timber prevented the oil from soaking into the wood pores. Penetrating sealers are formulated to soak in, not build an exterior film. If excess puddles aren't wiped off within 15 to 20 minutes of application, the surface remains tacky. You can often clean the gummy residue using a stiff bristle brush soaked in mineral spirits.
Can I use a pressure washer instead of sanding the deck?+
A pressure washer cleans deep dirt, but it cannot replace sanding. High-pressure water raises the wood grain and leaves raised burrs ("fuzzing"), which creates a rough, splintery surface when dry. Once the wood dries thoroughly after pressure washing, a quick pass with 80-grit sandpaper knocks down those loose fibers and opens the grain to drink up the sealer evenly.
What is the ideal temperature range for sealing a deck?+
The best temperature window for deck sealing is between 50°F and 85°F with moderate relative humidity. Sealing below 50°F slows curing and solvent evaporation, leaving the finish gummy and vulnerable to dust. Applying sealer in temperatures above 85°F or under direct blazing sunlight causes solvents to flash dry before the resins soak into the pores, leading to lap marks and poor adhesion.
What happens if it rains shortly after applying deck sealer?+
If heavy rain hits within 12 to 24 hours of application, water drops can pit the finish, wash out uncured resins, or leave milky white spots across the boards. Oil-based finishes are somewhat more forgiving after 12 hours, but water-based acrylics can wash right off if struck by rain before curing. If rain ruins your wet sealer, let the deck dry for 48 hours, inspect for spotting, lightly scuff with sandpaper, and reapply a thin coat.
Should I use an oil-based or water-based deck sealer?+
Oil-based sealers penetrate deeper into timber, are easier to apply without lap marks, and don't peel—they simply fade over time, making future recoating much easier. Water-based (acrylic) sealers offer superior color retention against UV fading and clean up easily with soap and water, but they form a film that can eventually crack and peel, requiring aggressive sanding before recoats.
Do I need to seal the underside of my deck boards?+
Sealing the underside of existing, fully installed deck boards is usually unnecessary and nearly impossible if clearance is low. However, if you are installing brand new lumber or replacing deck boards, sealing all four sides (including the cut ends) before fastening them down provides balanced moisture resistance. This helps prevent boards from cupping or warping as ground moisture rises underneath.
Discussion
Loading comments…