
Tools & materials you'll need
Affiliate links- AmazonEmpty tuna cans or catch cups5-10
As an Amazon Associate FixlyGuide earns from qualifying purchases — at no extra cost to you. Prices and availability are accurate as of publication and subject to change.
How it works
Your irrigation system is a coordinated network designed to deliver water efficiently. It begins at the irrigation controller, or timer, which acts as the brain. This device sends a low-voltage (typically 24-volt AC) electrical signal to a specific zone valve at a scheduled time. Each zone has a dedicated valve, usually housed in a green rectangular box flush with the ground.
This electrical signal energizes a solenoid on the valve, which is a small electromagnet. The energized solenoid lifts a plunger, allowing a small amount of water to pass from the inlet side to the top of a flexible rubber diaphragm inside the valve body. This action releases the water pressure holding the diaphragm down, causing the main water pressure from your home's supply line to lift the diaphragm and open the valve fully.
Once the valve is open, pressurized water flows from the main irrigation line into a series of smaller lateral pipes that serve that specific zone. This pressure travels through the pipes to the sprinkler heads. For pop-up style heads (both spray and rotor types), the water pressure pushes against the base of a riser assembly, forcing it to extend upward from its protective casing in the ground. Water then flows up through the riser and out through the nozzle. The nozzle itself is the most critical component for shaping the water. A spray head nozzle creates a fixed, fan-like pattern, while a rotor head uses internal, water-powered gears to turn a turret, emitting a single stream of water across a defined arc. Adjustments made to the head are manipulating either the nozzle's orifice, the rotation of the turret, or the physical orientation of the entire sprinkler body.
Step-by-Step Fix
1. Gather Your Tools — Before heading out, collect a sturdy flathead screwdriver, needle-nose pliers, a small trowel or hori-hori knife for digging, and a few marking flags. If you have rotor-style sprinklers, you will also need the brand-specific adjustment tool (e.g., a Hunter key or Rain Bird screwdriver tool), which is a plastic and metal hybrid designed for their specific adjustment sockets.
- Pro Tip: Having a bucket of clean water and a cloth is useful for rinsing off dirt-caked components. An old toothbrush is excellent for gently scrubbing clogged nozzle screens.
2. Identify Head Type and Zone — Visually inspect the sprinkler head you need to adjust. A spray head has a round top, often with a small central screw, and emits a fan-shaped spray. A rotor head is typically larger, with a turret that rotates and a rubber cap covering multiple adjustment sockets. To identify the zone, go to your irrigation controller and find the function to manually run a single station or zone; cycle through them one by one until the problem head pops up.
3. Run the Zone Manually — With the correct zone identified, activate it from the controller so the sprinkler head is operating. Working with the water on is the only way to see the results of your adjustments in real time. Do not attempt to adjust blind, as you will have to repeat your work.
4. Clear and Clean the Head — Grass, thatch, and soil often build up around sprinkler heads, impeding their pop-up action and blocking the spray. Use your trowel to carefully excavate around the head, creating a clear space of about 2-3 inches. Wipe down the riser and nozzle area. If the spray is weak or erratic, the filter may be clogged.
- If Clogged: Turn off the zone. For most spray heads, you can unscrew the entire nozzle assembly from the top of the pop-up riser. At the bottom of the nozzle, you will find a small, cylindrical filter screen. Pull it out with needle-nose pliers and rinse it thoroughly before reinstalling.
5. Set the Fixed Left Edge (Rotor Heads Only) — Every rotor head has a fixed and an adjustable side to its arc. The fixed side is almost always the left stop (the point where it stops turning counter-clockwise). Before adjusting the arc length, you must aim this fixed stop correctly. With the zone off, pull the riser up by hand and hold it. Grip the turret portion of the rotor and turn it all the way to the right until it stops, then all the way to the left until it hits its hard stop. This left edge is your starting point. Now, while holding the riser stem, rotate the entire sprinkler body in the ground until this fixed left edge points precisely where you want the pattern to begin (e.g., the edge of a driveway or garden bed).
6. Adjust the Arc (Rotation) — For a rotor head, insert the plastic end of your brand-specific key into the arc adjustment socket (often marked with "+" and "-" or arc symbols). While the head is rotating, turn the key toward the "+" to increase the arc (widen the watering pattern) or toward the "-" to decrease it. This adjustment changes the position of the right stop relative to the fixed left one. For an adjustable spray head, firmly grasp the pop-up stem with one hand and twist the ratcheting collar or nozzle itself with the other to increase or decrease the pattern.
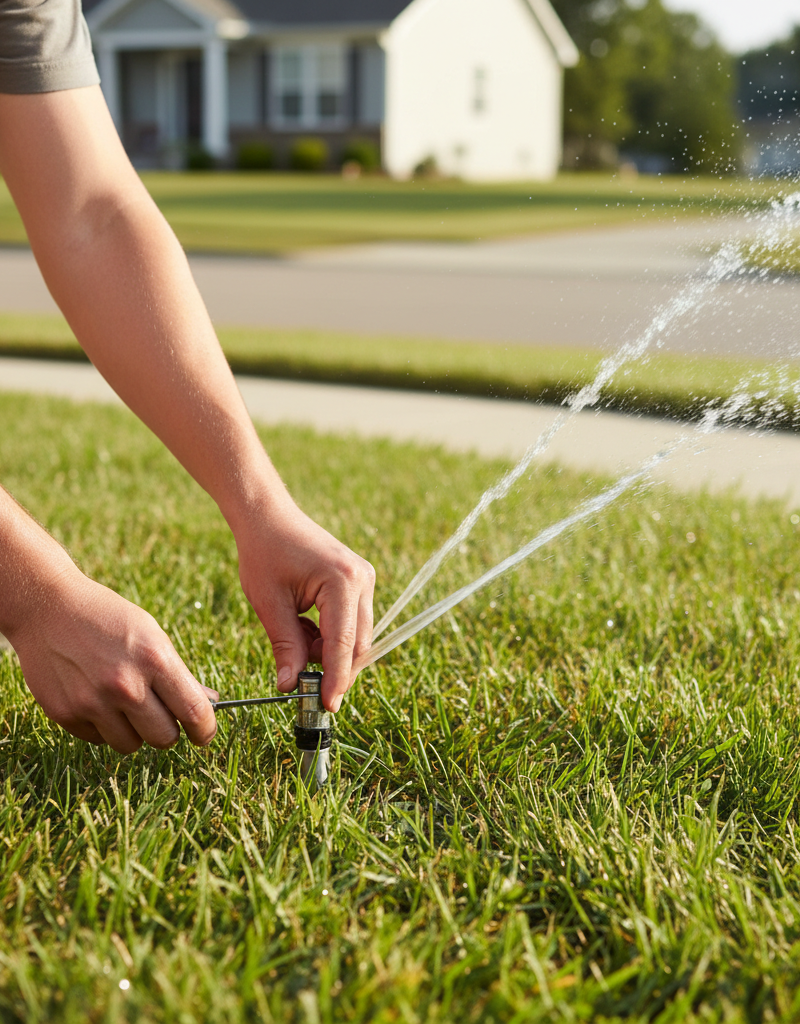
7. Adjust the Radius (Throw Distance) — This controls how far the water stream travels. For both rotor and spray heads, locate the radius adjustment screw, which is often a small metal screw on top of the nozzle that sits in the path of the water stream. Turn the screw clockwise with a flathead screwdriver to drive it down, which interrupts the stream and shortens the distance. Turn it counter-clockwise to raise it and increase the distance.
- Warning: Do not reduce the radius with this screw by more than 25% of the head’s rated distance. Overtightening will cause severe misting and water "atomization," which leads to evaporation and poor coverage. If a major reduction is needed, you must replace the nozzle with a lower-trajectory or shorter-radius model.
8. Check Head-to-Head Coverage — The goal of an efficient system is "head-to-head coverage," meaning the water from one sprinkler should just reach the base of the next. Stand back and observe the entire zone running. Look for dry spots (triangular or crescent-shaped brown patches in the lawn) that indicate the radii or arcs are set too short. Adjust accordingly so that patterns overlap sufficiently.
9. Confirm Pop-Up Height and Level — The top of the sprinkler head should sit perfectly flush with the soil level. If it's too low, grass will block the spray. If it's too high, it becomes a tripping hazard and is easily damaged by lawnmowers. The head should also be perfectly vertical (plumb) to the ground. If it is tilted, the spray pattern will be distorted.
- To Fix: If a head is too low or tilted, you must dig it up. Turn off the water, dig a one-foot square around the head, and unscrew it from the pipe fitting below. Add a short "cut-off riser" extension or a flexible "swing joint" assembly to raise it to the proper height and allow for easy leveling. Backfill the dirt firmly around the head to hold it in place.
10. Observe for Low-Head Drainage — After the zone shuts off, watch the lowest sprinkler head on the slope. If it continues to leak or gush water for more than a minute, you have low-head drainage. This wastes a significant amount of water as the pipes empty themselves after every cycle. To fix this, you need to replace that sprinkler head with a model that has an integrated check valve (e.g., Rain Bird 1804-SAM or Hunter Pro-Spray PRS40 with a drain check valve installed). These valves hold water in the pipes, preventing drainage.
Common mistakes
-
Forcing Rotor Adjustments. Attempting to adjust a rotor’s arc by hand while it's running or using pliers to twist the turret can strip the delicate internal plastic gears. Instead, always use the manufacturer-provided tool in the designated adjustment socket. If you must set the left stop, do so with the system off by pulling up the riser and turning the turret gently by hand.
-
Drastically Reducing Radius with the Screw. Cranking down the radius adjustment screw to shorten the throw distance by 50% or more is a common error. This doesn't reduce water flow; it just obstructs the stream, causing heavy misting and fogging near the head. This fine mist evaporates quickly and is easily blown away by wind, wasting water. The correct solution for a major radius reduction is to purchase and install a nozzle designed for that shorter distance.
-
Confusing Body Alignment with Arc Adjustment. If a sprinkler is watering a 90° corner but is aimed 45° into the street, homeowners often try to fix it by reducing the arc. This creates a weak, compressed pattern. The correct fix is to rotate the entire sprinkler body in the ground so the fixed edge of the arc aligns with one side of the landscape, then adjust the arc to cover the desired area.
-
Ignoring Clogged Filter Screens. A weak or sputtering spray is often misdiagnosed as a pressure problem or a poorly adjusted head. Before making any adjustments, always check the small filter screen located at the base of the nozzle assembly. This screen is the first line of defense against grit and debris from the water line and is frequently the source of poor performance. Unscrew the nozzle, pull the screen out with pliers, rinse it, and reinstall.
-
Mismatching Nozzles in a Zone. All sprinkler heads within a single zone should have matched precipitation rates (MPR). It's a mistake to mix standard spray nozzles with high-efficiency rotary nozzles or different brands of rotor heads in the same zone. They apply water at vastly different rates, which guarantees that one part of your lawn will be overwatered while another remains dry. When replacing a nozzle, use one from the same family as the others in that zone.
Cost & time breakdown
The cost and time for sprinkler adjustments can vary depending on whether you're performing a simple tweak or a more involved replacement. Most adjustments are well within a DIYer's capability with minimal expense.
| Task | DIY Cost | Pro Cost | Time per Head |
|---|---|---|---|
| Simple Arc/Radius Adjustment | $0–$5 | $85–$150 (min. fee) | 5–10 minutes |
| Nozzle Cleaning or Replacement | $2–$8 per nozzle | $90–$160 | 10 minutes |
| Full Head Replacement | $5–$25 per head | $125–$200 | 20–30 minutes |
| Raising/Leveling a Sunken Head | $3–$10 per head | $100–$175 | 30–45 minutes |
| Installing a Check Valve Head | $15–$30 per head | $150–$225 | 25–35 minutes |
| Full System Audit & Adjustment | $0–$20 | $150–$350 | 1–3 hours (total) |
When to call a pro
While most sprinkler head adjustments are straightforward, certain symptoms indicate a deeper problem that requires professional expertise. Call an irrigation specialist if you encounter any of the following:
One or more entire zones fail to turn on. This typically points to a faulty zone valve, a bad solenoid, or a break in the low-voltage wiring between the controller and the valve box. Troubleshooting this involves using a multimeter to test for electrical continuity and resistance, and may require excavating the valve box and replacing valve components, which can be complex for a novice.
One zone consistently has very low pressure across all heads. If all sprinklers in a single zone are sputtering, misting, or have a weak spray, this is not an individual head issue. It likely signals a leak or break in the underground lateral pipe for that zone, or a valve that is not opening completely. A professional can use listening devices and pressure gauges to locate the underground leak without destroying your entire lawn.
You have consistently squishy, wet areas in the yard or an unusually high water bill. These are classic signs of a persistent leak, either in the main irrigation line (which is always under pressure) or a valve that is stuck partially open. Locating and repairing these leaks requires experience and specialized tools.
The irrigation controller is malfunctioning, shows error messages, or behaves erratically. If the controller itself is the problem, a professional can diagnose whether it's a programming issue, a failed internal component, or a power supply problem, and can properly install and wire a replacement.
Prevention & maintenance
Proactive maintenance is the best way to ensure your sprinkler system runs efficiently and to avoid costly repairs. Incorporate these practices into your regular yard care routine.
-
Perform a Spring Start-Up. Before you rely on the system for the season, manually run each zone one by one. Walk the lawn and watch every single head. Check for risers that don't pop up, heads that are broken or leaking, nozzles that are clogged, and patterns that are spraying sidewalks or fences. This initial check allows you to fix problems before they waste water or damage your landscape.
-
Clean Nozzles and Filters Annually. At least once a year, turn off the system and systematically remove each spray-head nozzle. Pull out the small filter screen beneath it and rinse away any sediment or debris. For rotors, check the nozzle opening for any lodged pebbles or grit. This simple cleaning prevents clogs that cause poor patterns and distribution uniformity.
-
Mark Heads Before Lawn Maintenance. Place small landscape flags next to each sprinkler head before you mow or use a power aerator. This small step is the single most effective way to prevent costly damage from mower wheels and aerator tines, which can crack casings, break risers, or knock heads out of alignment.
-
Winterize in Freezing Climates. If your region experiences freezing temperatures, you must winterize your irrigation system. This involves shutting off the main water supply to the system and using a high-volume air compressor to blow all residual water out of the pipes, valves, and heads. Water left in the system will freeze, expand, and crack components, leading to expensive repairs in the spring. While DIY kits exist, this is a job often best left to a professional to ensure it’s done thoroughly and safely.
-
Observe Periodically. Don't just "set it and forget it." At least once a month during the peak watering season, watch a full cycle. Look for changes in performance. A new geyser indicates a broken head. A dry spot that wasn't there before means a head has become clogged or knocked out of alignment. Catching these issues early saves water and protects your lawn.
Related Articles
Keep troubleshooting with these hand-picked guides from FixlyGuide:
- The #1 Reason Your Sprinkler Misses the Lawn (and How to Fix It in 5 Minutes) — Adjusting your sprinkler's spray pattern and distance is crucial for efficient watering, preventing wasted water, and ensuring a healthy la…
- The #1 Mistake Homeowners Make Adjusting Sprinklers (and How to Fix It in 5 Minutes) — Even advanced sprinkler heads can go rogue, wasting water and harming your lawn. Learn to quickly diagnose and adjust their spray patterns.
- How Often to Water Your Lawn in Summer: A Homeowner's Guide — Watering your lawn correctly in summer is crucial for its health and appearance, preventing common issues like browning and shallow root gr…
- The 3 Hidden Reasons Your Sprinkler Head Won't Pop Up (And How to Fix Them) — Frustrated by a sprinkler head that won't rise? Discover the top three culprits behind this common irrigation issue and how to resolve them…
- The #1 Mistake Turning Your Green Lawn Brown After Watering — Watering your lawn should make it greener, but brown spots appearing afterward can signal common issues like overwatering, fungal disease,…
- The #1 Mistake Wrecking Your Dishwasher's Cleaning Power (It's Not Soap!) — Your dishwasher isn't cleaning dishes because of a common, overlooked issue with its spray arms, leading to poor water distribution.
Frequently asked questions
How do I make my sprinkler spray further?+
To make most sprinkler heads spray further, locate the radius adjustment screw (often a flathead screw on top of the head) and turn it counter-clockwise. This reduces the amount of water deflected, allowing the stream to reach further.
Why is my sprinkler not spraying a full circle?+
If your sprinkler isn't spraying a full circle, its arc adjustment is likely set incorrectly. For rotor heads, use a flathead screwdriver or sprinkler key to increase the arc setting towards the '+' indicator. For some spray heads, you can manually twist the nozzle to expand the spray pattern.
Can you adjust the height of a pop-up sprinkler?+
Generally, you cannot adjust the pop-up height of a sprinkler head. The height is determined by the specific model and is designed to clear the surrounding grass. If a sprinkler isn't popping up fully, it might be due to low water pressure, debris in the head, or a damaged riser, which may require repair or replacement.
How do I know if my sprinklers are adjusted correctly?+
A good way to tell if your sprinklers are adjusted correctly is to perform a 'catch can test.' Place several empty tuna cans or similar containers uniformly across your lawn within a sprinkler zone. Run the system for a set time (e.g., 15 minutes), then measure the amount of water in each can. Similar water levels indicate good, even coverage.


Discussion
Loading comments…