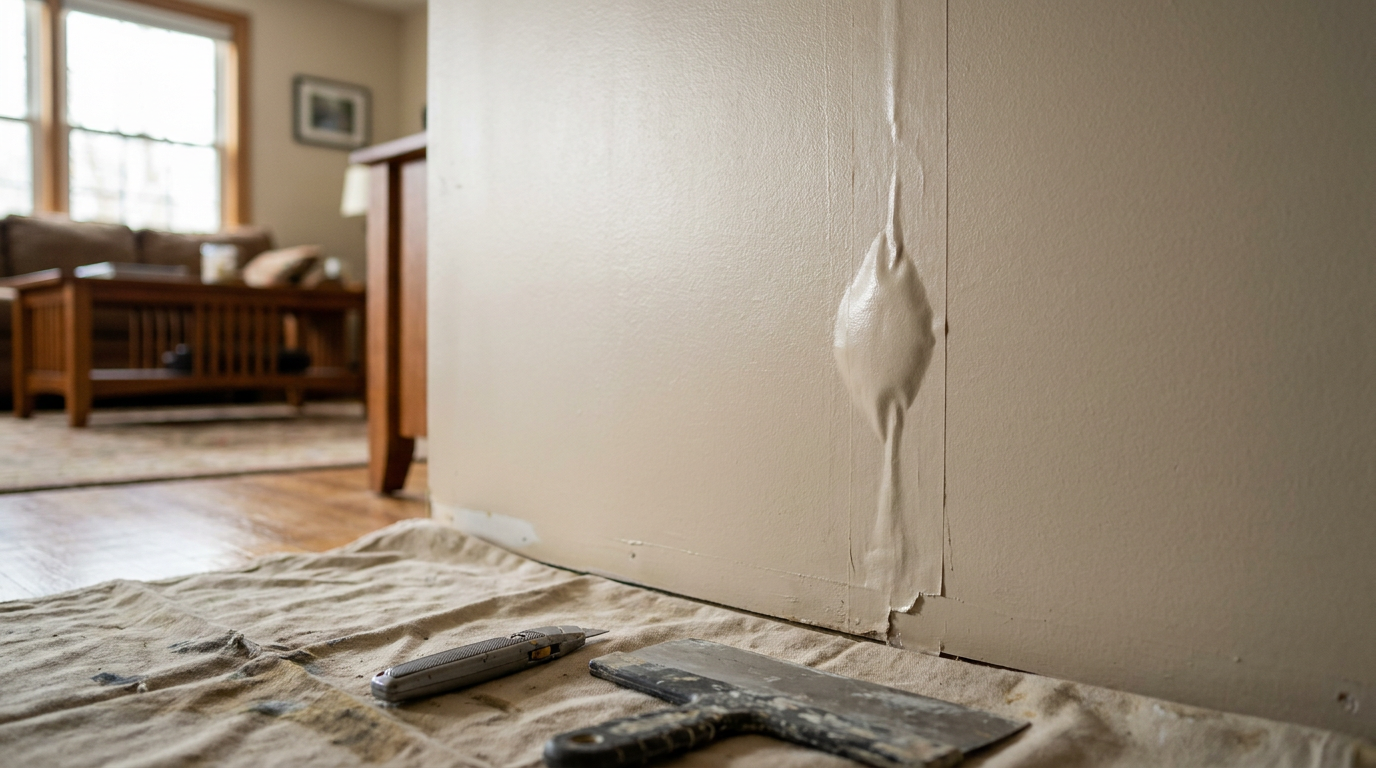
- Seal exposed gypsum core — Look over the scraped area; if your blade exposed raw, brown paper or raw white gypsum plaster, brush a thin coat of shellac-based or oil-based primer directly onto the bare patches and let it dry for 30 minutes.
- Why this matters: Raw gypsum core will drink the water right out of your new compound like a sponge, and that can make the fresh repair blister or shrink before it’s cured.
- Skip rule: If the drywall surface still has an intact layer of dried compound and undamaged face paper, you can skip this step.
General remodeling · Renovation planning
| Project category | General remodeling |
|---|---|
| Problem type | Renovation planning |
| Trade required | General contracting |
| Urgency | Planned project |
| Safety risk | Low safety risk |
| DIY suitability | Pro recommended |
| Cost category | Major investment |
| Typical timeline | Design and permitting often 2–4 months before work starts |
| Contractor type | General contractor |
Repair option
Phase the work and fix the building envelope first.
Replacement option
Full renovation with permits, design, and a general contractor.
Common causes
- Space no longer fits how the household lives
- Resale preparation
- Deferred maintenance stacking up
Relevant tools:project cost estimatorcompare quoteshome improvement material prices
Published November 22, 2026Last updated November 22, 2026
Tools & materials you'll need
Affiliate links- AmazonSetting-type joint compound (Easy Sand 20)1 bag · Powder formula for zero shrinkage
- AmazonPaper drywall tape or fiberglass mesh tape1 roll
- AmazonPremixed lightweight joint compound1 small tub · Blue lid for final skim coats
- AmazonShellac-based or oil-based primer1 quart or spray can · To seal torn drywall core paper
- AmazonPVA drywall primer-sealer1 quart · Prevents paint flashing
As an Amazon Associate FixlyGuide earns from qualifying purchases — at no extra cost to you. Prices and availability are accurate as of publication and subject to change.
Quick Answer
To fix bubbling drywall tape, I’d slice open the blister with a sharp utility knife, pull away every bit of unbonded paper, and scrape down the dried compound until I hit firm board. Then wipe off the gypsum dust, put on a thin bed of setting-type joint compound (hot mud), bed a strip of self-adhesive fiberglass mesh or paper tape into the recess, and feather it out in two thin skim coats with a 10-inch or 12-inch taping knife before sanding.
The Problem
There aren’t many things that wreck a smooth paint job faster than a long, spongy blister running across your living room wall or ceiling. You roll on a fresh coat of satin or eggshell latex paint, step back feeling pretty good about it, and then—there it is—a raised air pocket popping out along a drywall seam. Push on it with your thumb, and it flexes inward like crisp cardboard over an empty void.
I’ve seen it on fresh DIY joints, and I’ve seen it on rooms that were finished a decade ago. Paint brings liquid water into the drywall paper. If the tape underneath never fully bonded to the gypsum core, that moisture makes the dry paper swell, buckle, and break loose from the wall.
Leaving a bubble alone won’t fix a thing. Smearing spackle over the blister just gives you an ugly raised hump that catches every bit of light in the room. Worse yet, if you ignore it, the delamination keeps spreading every time humidity spikes inside or somebody rolls on another coat of paint. If you want that seam flat and invisible, you’ve gotta cut the dead tape out and reset the joint the right way.
How It Works
Drywall finishing depends on building one continuous composite out of two gypsum panels, a bonding bed of joint compound, and reinforcement tape. Standard drywall tape is made from cross-fibered kraft paper. On its own, dry paper tape has zero adhesive. It depends completely on the wet mud behind it to soak into the fibers, lock into the paper face of the drywall board, and cure into one solid layer.
When you install paper tape, you need an even "bed coat" of compound—typically 1/16-inch thick—press the tape into that wet mud with a taping knife, and wipe the strip down firmly. The knife pressure pushes compound through the tape’s tiny pores while squeezing out extra mud and trapped air pockets.
Bubbles happen because of one plain mechanical failure: starvation. If the mud dries too fast before the tape gets embedded, or if the finisher presses too hard and squeezes every last drop of mud from behind the paper, the tape ends up sitting dry against dry drywall. It may look okay at first because the top coats hide the void. But there’s no bond underneath. As soon as humidity changes, the framing settles, or wet paint hits the surface, the dry paper lets go and an air pocket pushes outward.
Step-by-Step Fix
Follow these steps to get rid of bubbles and blend your drywall seam flush with the surrounding wall.
-
Slit and assess the bubble — Grab a fresh utility knife blade and slice straight down the center of the blister from end to end. Press lightly with your fingers around the cut to see how far the paper has detached from the gypsum core underneath.
- Tool check: Use a brand-new razor blade; a dull one will drag, chew up the paper face, and leave ragged edges that are a pain to hide.
- What to watch for: If the loose tape runs more than 18 inches down the seam, plan on replacing that whole segment instead of trying to save little bits.
-
Carve out all unbonded tape — Cut a clean "V" or rectangular border around the blistered section and peel the dry tape off the wall until you hit paper that’s tight to the drywall. Slice cleanly through the tape at both ends of your cut instead of ripping it loose.
- Safety note: Keep your razor blade flat against the wall so you don't gouge deep into the gypsum core below.
- Branch point: If the tape keeps peeling with almost no resistance, stop pulling; cut across the tape with your knife to isolate the repair zone, or you’ll peel it all the way to the corner.
-
Scrape down the dried compound ridges — Run a stiff 6-inch taping knife firmly over the exposed void at a 45-degree angle to scrape away old, brittle joint compound and loose paper fuzz. You’re trying to make a shallow, even depression where the new tape and mud can sit a little below the finished wall plane.
- Pro tip: If you’ve got high, crusty mud around the edge, sand it lightly with 120-grit sandpaper until the transitions taper smoothly into the surrounding surface.
-
Seal exposed gypsum core — Look over the scraped area; if your blade exposed raw, brown paper or raw white gypsum plaster, brush a thin coat of shellac-based or oil-based primer directly onto the bare patches and let it dry for 30 minutes.
- Why this matters: Raw gypsum core will drink the water right out of your new compound like a sponge, and that can make the fresh repair blister or shrink before it’s cured.
- Skip rule: If the drywall surface still has an intact layer of dried compound and undamaged face paper, you can skip this step.
-
Wipe down and remove all dust — Vacuum the excavated seam with a brush attachment, then follow it with a damp microfiber cloth to get every trace of gypsum dust. Joint compound won’t stick to chalky powder; it’ll roll up like loose dough if the surface isn’t clean.
-
Mix a batch of setting-type compound — Dump 2 cups of 20-minute setting compound (often sold as "hot mud" or Easy Sand 20) into a mud pan, add clean room-temperature water (about 65°F to 72°F), and mix it with your 6-inch knife until it looks like smooth, thick mayonnaise.
- Why hot mud?: Standard premixed bucket mud shrinks by roughly 20% to 30% as its water evaporates, which causes dimples. Setting compound hardens through a chemical reaction with virtually zero shrinkage and a lot better bonding strength.
- Warning: Only mix what you can spread in 10 minutes. Once hot mud starts stiffening, toss it—don’t add more water to re-temper it.
-
Bed new tape into the recess — Spread a smooth 1/16-inch layer of compound into the shallow void, cut a piece of paper drywall tape to bridge the gap (overlapping sound tape by 1/2 inch at each end), and lay it straight into the wet mud. Hold your 6-inch knife at a 30-degree angle and wipe down the tape firmly from the center out toward both ends.
- Alternative material: If you prefer fiberglass mesh tape, stick the self-adhesive mesh directly to the dry wall first, then pack your setting compound straight through the open grid with your knife.
- Check your pressure: You want enough pressure to squeeze out extra mud, but leave a thin, even film behind the paper. If the tape wrinkles or dry paper shows through, pull it off, re-mud, and reset it.
-
Apply the first fill coat — Right after embedding the tape, apply a second thin layer of compound over the top of the paper, feathering the edges 2 inches beyond the seam with your 6-inch knife. Let the 20-minute setting compound harden fully (wait about 45 to 60 minutes until it turns chalky white and cool to the touch).
-
Apply the wide feather coat — Switch to a 10-inch or 12-inch flexible taping knife and premixed all-purpose or lightweight joint compound (green or blue lid). Spread a thin skim coat centered over the patch, extending the mud 4 to 6 inches past your previous perimeter.
- Knife technique: Push firm pressure on the outer edge of the blade to taper the mud flush to the wall, while keeping lighter pressure on the inner edge over the tape.
- Drying time: Let this coat dry for at least 12 to 24 hours depending on indoor humidity.
-
Final skim coat for imperfections — Check the patch with a bright work light held flat against the wall (cross-lighting) so you can spot ridges, pinholes, or dips. Apply one whisper-thin final coat across the whole repair using your 12-inch knife, feathering the border out to roughly 8 to 10 inches wide. Let it dry overnight.
-
Sand flush without scuffing face paper — Wrap 150-grit or 220-grit drywall sanding screen around a flat sanding block and sand the repair using broad, circular strokes.
- Caution: Sand only the perimeter edges until you can’t feel the transition with your eyes closed. Don’t scrub the center over the tape too hard, or you’ll fray the paper fibers (a defect painters call "fuzzing").
- Prime and match the wall texture — Wipe away all sanding dust, apply a high-quality PVA drywall primer-sealer over the entire patched area, let it dry for 2 hours, and then roll on two finish coats of your matching wall paint.
- Texture note: If your walls have an orange peel or knockdown texture, spray a can of water-based aerosol wall texture onto a piece of cardboard first to dial in the nozzle pattern before misting the repair area.
Common Causes
Knowing why your seam failed keeps you from making the exact same mistake on the next drywall project:
- Starved bed coat (too little mud): The finisher pressed down too aggressively with the knife during the taping pass. Squeezing out all the compound leaves paper tape sitting against dry drywall with nothing to hold it in place.
- Pre-dried joint compound: If you lay down a bed of mud on a hot summer afternoon and wait 5 minutes before placing the tape, the drywall sucks the moisture out of the compound. The mud skins over, and the paper never absorbs the binder.
- Trapped air pockets: Wiping tape erratically from the outside edges inward pushes air bubbles into the center of the strip where they stay trapped under the paper.
- Excess moisture during repainting: When homeowners repaint using thick rollers soaked in low-cost latex paint, water soaks through the thin topcoat of joint compound. The unbonded paper absorbs the moisture, swells by up to 2% in surface dimension, and buckles outward.
- Using setting compound without enough water: Mixing hot mud too dry keeps the crystalline matrix from bonding to the tape fibers, creating a weak, chalky layer that delaminates under light stress.
Common Mistakes
- Injecting glue with a syringe: YouTube videos love to show folks cutting a tiny slit and pumping wood glue or liquid nails behind a bubble. Don’t do it. The paper has already stretched and deformed; pumping glue behind it makes a hard, rubbery bump you can’t sand flat, so you end up gouging it out later anyway.
- Mudding directly over the blistered paper: Spreading joint compound over a bubble without cutting the loose paper out just seals in the air pocket. The wet compound saturates the paper, makes the blister swell even bigger, and leaves a huge raised hump on your wall.
- Ripping tape without a clean boundary cut: Yanking loose tape with your bare hands will tear the sound paper tape right out from under good compound several feet down the wall. Always score across the tape with a sharp utility knife to isolate the repair zone before peeling.
- Using premixed bucket mud for the deep fill: Premixed compound dries by evaporation. Filling a deep hollow behind sliced tape with bucket mud causes severe cracking and cratering as it dries over 24 hours. Always use setting compound (hot mud) for the base and tape bedding.
- Skipping the primer before painting: Joint compound has an open, porous structure. If you roll wall paint directly over unprimed patch compound, the mud drinks the paint binder unevenly. That leaves a dull, visible spot known as "flashing" that stands out under daylight even if the wall is mechanically flat.
Cost & Time Breakdown
| Task | DIY Cost | Pro Cost | Time |
|---|---|---|---|
| Cut out loose blistered tape & prep void | $0 (existing utility knife) | $75–$125 | 15–20 minutes |
| Seal bare drywall core (shellac/oil primer) | $8–$14 | Included in pro minimum | 10 minutes (+30 min dry) |
| Bed new tape with setting compound (hot mud) | $12–$18 (compound + tape) | $100–$150 | 25–35 minutes |
| Apply 2 wide feather skim coats | $10–$15 (premixed mud) | $125–$200 | 30 minutes active (24 hr dry) |
| Sand, wipe, PVA prime, and paint patch | $15–$25 (primer + sandpaper) | $100–$175 | 45 minutes active |
| Total Project Estimate | $45–$72 | $250–$450 (trade minimum) | 2–3 hours active / 2 days total |
Tips & Prevention
- Pre-dampen paper tape on hot, dry days: If you’re working in dry summer heat (like a 95°F Texas garage or a house with the heater cranked), run your paper tape through a bucket of clean water and squeeze off the extra before you embed it in the mud. That keeps the tape from sucking critical moisture out of your bed coat.
- Switch to fiberglass mesh with setting compound: If paper tape gives you trouble, self-adhesive fiberglass mesh tape gets rid of air pockets because mud flows right through the open screen. Just make sure you bed it with chemical-setting compound (Easy Sand), never standard bucket mud, since bucket mud doesn’t have the tensile strength to keep mesh joints from hairline cracking.
- Use the right mud for each coat: Use all-purpose compound (green lid) or setting powder for your tape coat because they’ve got strong vinyl adhesives. Save lightweight finishing compound (blue lid) strictly for your final two skim coats because it sands like soft chalk but doesn’t have the glue needed to hold tape.
- Check tape adhesion immediately: After embedding tape along a seam, shine a light down the wall at an angle. If you see dry, dull spots showing through the paper, lift that section with your knife, butter more mud underneath, and smooth it back down before it skins over.
- Watch for structural shifts: Inspect the wall framing if blisters keep coming back in the exact same spot. A drywall screw that missed the stud or popped through the gypsum core will let the board move, and that keeps shearing the tape free from the joint.
When to Call a Professional
Fixing a 6-inch or 12-inch bubble is a standard DIY weekend repair that takes patience more than heavy tools. But sometimes peeling tape is pointing at a much deeper structural or moisture problem, and that calls for a licensed general contractor or a pro drywall specialist.
If drywall tape is buckling along an entire 12-foot ceiling seam—especially under an upstairs bathroom, roof valley, or HVAC condensate line—stop cutting and check for active water leaks. Water running down ceiling joists dissolves joint compound binders, turns mud back into soft slurry, and makes whole runs of tape detach under structural load. I pulled a water heater in Frisco last month that had exactly this leak, and the ceiling below it looked fine until you tapped it—then the whole seam went soft like wet cardboard.
You should also bring in a pro if your home is showing recurring tape blisters along with diagonal stair-step cracks across doorways, jammed window sashes, or sagging drywall panels. In North Texas and other places with volatile clay soils, serious foundation movement puts huge shear pressure on drywall framing. Re-taping a moving wall is just wasting your time; a structural engineer or foundation contractor needs to stabilize the framing before any cosmetic seam repair will hold. And if you’re dealing with multi-story vaulted ceilings that need staging or tall scaffolding, that’s best left to experienced finishing crews with dustless vacuum sanders.
Related Articles
Keep troubleshooting with these hand-picked guides from FixlyGuide:
- Paint Wrinkling on Your Walls? 6 Causes and the Exact Fix — Stop peeling and scraping wet paint. Learn why paint wrinkles, how to sand down the ridges, and the exact steps to recoat for a smooth, fla…
- Why Is My New Paint Cracking? 9 Causes of 'Alligatoring' and How to Fix It — Seeing fine, alligator-skin cracks in your new paint? It's a common problem called 'alligatoring'—here are the nine most likely causes and…
- Shelf Tilting Forward? 5 Common Causes and the Permanent Leveling Fix — Fix sloped wall shelves for good. Learn how to diagnose bracket lever-action, swap failing drywall plugs for structural screws or snap togg…
- Why Your Fresh Paint Looks Blotchy & Uneven (It’s Not Just Your Technique) — Discover the surprising culprits behind blotchy, uneven paint finishes and learn the contractor-approved steps to achieve a smooth, profess…
- Wire Shelving Pulling Out of Drywall? 5 Causes and the Permanent Fix — Fix falling wire shelving pulling out of drywall permanently using heavy-duty toggle bolts or a solid wood cleat anchored into framing stud…
- Dishwasher Not Cleaning Dishes Properly? 5 Common Causes and How to Fix It — Is your dishwasher leaving grit, grease, or cloudy film on your dishes? Learn the step-by-step diagnostic sequence to clean filters, unclog…
Should you do this yourself?
Answer five quick questions before you start. Safety outranks savings every time.
Your experience with work like this
How high do you have to work?
Does the job involve any of these?
Will it need a permit?
Specialty tools
Free and instant. Educational guidance only — not a quote, inspection, or professional diagnosis.
Estimate your own project cost
National averages are a starting point. Enter your details for a range that fits your house.
Interior paint estimator
- Paint$96
- Supplies (tape, rollers, drop cloth)$35
- Estimated total (DIY)$131
Hiring a pro? Add roughly $1.50–$4.00/sq ft for labor depending on prep work and trim detail.
Educational estimate only — always confirm with written local bids.
What should this project cost?
Enter your project details for a realistic cost range before you call anyone.
Cost depends heavily on which system turns out to be the source.
- Regional adjustment
- National average
- Labor share (typical)
- ~$1,620
- Quotes to collect
- 3 written estimates
Educational estimate based on national averages — not a binding quote. Always confirm with written local estimates.
Get the print-ready PDF of this guide
A clean, ad-free, printable version you can keep on your phone or pin to the workshop wall. Free with a FixlyGuide account.
- Print-optimized layout
- Tools, materials & every step included
- Saved to your account
Recommended for DIYers & woodworkers
Sponsored
The Top 20 Tools for Workshops of Any Budget
No stationary machines or power tools required — plus 3 fundamental tools that can't be bought at any price.
Get the free guide
Ted's Woodworking — The #1 Woodworking Resource
Detailed instructions, dimensioned drawings, materials & cutting lists, and 3D schematics for every skill level.
See the plansSponsored: links above are affiliate links. FixlyGuide may earn a commission on qualifying purchases — at no extra cost to you.
Frequently asked questions
Can I just fill the cutout with spackle instead of new tape?+
No, spackling compound lacks the structural binding power and vinyl adhesives required to tape drywall seams. Spackle also shrinks significantly in deep repairs. Always use joint compound—specifically setting-type hot mud for the tape bed and all-purpose or lightweight compound for the feather coats.
Can I just sand down a drywall bubble until it is flat?+
No. Once drywall paper separates from the wall and absorbs room humidity or wet paint, it stretches out of shape. Smoothing mud over the top traps the air pocket underneath; as the mud dries, the paper will swell and lift, leaving you with an even larger and more fragile blister.
Is mesh drywall tape better than paper tape for avoiding bubbles?+
Yes, but only if you use chemical-setting joint compound (hot mud like Easy Sand) for the base coat. Self-adhesive mesh tape has an open grid that prevents air bubbles, but standard premixed bucket mud allows mesh tape to flex and crack over time. Setting mud cures hard and locks the mesh tight to the wall.
Why did my drywall tape only start bubbling after I painted?+
Yes. Liquid paint introduces water into the drywall surface. If your tape had dry spots underneath from poor initial installation, that moisture penetrates the thin compound, causing the dry paper fibers to expand, soften, and lift away from the gypsum board.
Can I use glue and a syringe to stick bubbling tape back down?+
Injecting wood glue or drywall adhesive with a syringe sounds quick, but it almost never works. Because the blistered paper tape has already stretched, gluing it down leaves wrinkles and uneven ridges that cannot be sanded smooth without shredding the paper. Cutting out the bad section and re-taping takes the same amount of time and delivers a genuinely flat repair.
What is the difference between a drywall bubble and water damage?+
Drywall bubbles are caused by dry, unbonded tape pulling away from the wall core due to mud starvation or paint moisture. Popcorn ceiling blisters or water stains are caused by external liquid leaks dissolving the gypsum binders. If your bubble is brown, wet, or squishy, you have a plumbing or roof leak rather than a simple taping defect.
How long do I need to wait between mud coats on a tape repair?+
Setting-type compound hardens chemically in 20 to 45 minutes, allowing you to apply your next coat almost immediately. Premixed bucket compound dries via water evaporation, which takes 12 to 24 hours per coat and shrinks substantially. Using hot mud for the first bed coat speeds up the repair and prevents shrinkage cracks.
How do I stop my drywall repair from showing through the paint (flashing)?+
Flashing occurs when the porous, repaired joint compound absorbs more paint binder than the surrounding sealed wall, creating a dull or uneven sheen. To stop it, apply a dedicated PVA drywall primer-sealer over the sanded patch before painting, and roll two coats of finish paint across the entire wall section rather than just dabbing the patch.
Discussion
Loading comments…