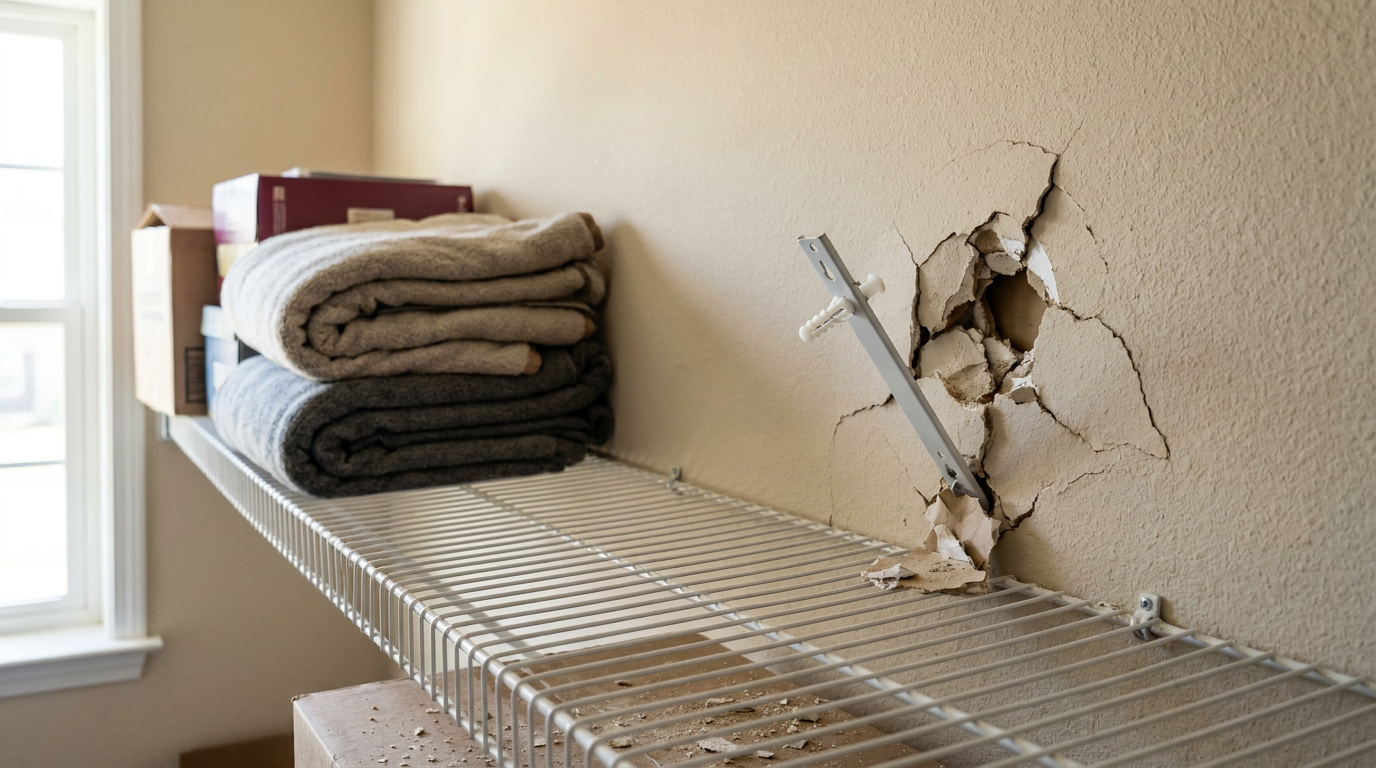
- Extract the failed drywall anchors cleanly — Pry out all damaged plastic drive-pins, wall clips, and bent nails from the wall with needle-nose pliers or a pry bar.
- Slip a putty knife behind your pry bar so you don’t crush or crease the drywall paper around it.
- If an anchor’s spinning loose in the hole, thread a standard 2-inch drywall screw two turns into its center hole, then grab the screw head with pliers and pull the anchor sleeve straight out.
General remodeling · Renovation planning
| Project category | General remodeling |
|---|---|
| Problem type | Renovation planning |
| Trade required | General contracting |
| Urgency | Planned project |
| Safety risk | Low safety risk |
| DIY suitability | Pro recommended |
| Cost category | Major investment |
| Typical timeline | Design and permitting often 2–4 months before work starts |
| Contractor type | General contractor |
Repair option
Phase the work and fix the building envelope first.
Replacement option
Full renovation with permits, design, and a general contractor.
Common causes
- Space no longer fits how the household lives
- Resale preparation
- Deferred maintenance stacking up
Relevant tools:project cost estimatorcompare quoteshome improvement material prices
Published November 8, 2026Last updated November 8, 2026
Tools & materials you'll need
Affiliate links- Amazon3/16-inch or 1/4-inch spring-wing toggle bolts1 box (10 pack) · Get toggle bolts with machine screws included
- Amazon1x4 select pine board1 board (matching shelf length) · Optional, for heavy-duty cleat installation
- Amazon2-1/2 inch coarse-thread wood screws1 small box · For securing cleat into wall studs
- AmazonReplacement wire shelf wall clips1 pack (6–10 clips) · Heavy-duty universal type
- AmazonSetting-type joint compound (hot mud)1 small bag · 20-minute cure time for rapid blowout patching
As an Amazon Associate FixlyGuide earns from qualifying purchases — at no extra cost to you. Prices and availability are accurate as of publication and subject to change.
Quick Answer
If wire shelving’s pulling out of the drywall, unload that rack right now and take the busted shelf section down. Toss the failed plastic push-pins or hollow drywall anchors, then put in structural metal toggle bolts — minimum 3/16-inch or 1/4-inch diameter — through the existing holes and into the drywall cavity. If you want this thing to stay put for good, screw a horizontal 1x4 pine cleat into two wall studs with 2-1/2-inch wood screws and mount the wire shelf clips straight to the wood. That’s the real fix. No drama.
The Problem
You walk into the master closet or laundry room and the whole wire shelving setup’s leaning downhill at a 30-degree angle. Clothes are on the floor, and the top support track or back clips have ripped jagged, dime-sized craters clean out of the gypsum board.
Here’s the ugly truth from tract-home work: builders love vinyl-coated wire shelving because it’s cheap as dirt and goes in fast. But they barely ever anchor it to real framing. Instead, installers drill straight into 1/2-inch drywall and bang in plastic expansion drive-pins with integral nail collars. Those plastic anchors are leaning on nothing but friction against soft, crushed-up gypsum dust.
Once you load it with winter coats, heavy laundry detergent jugs, or stacked bath towels, you’re easily past 60 to 80 pounds of dead load. Then the day-to-day stuff kicks in — pulling hangers across the rod, yanking a basket off the shelf, all of it — and that creates outward rotational torque. That constant levering works the plastic plug back and forth until the soft drywall core turns into loose chalk. Then the anchor pops, the top rail pulls forward, and gravity takes over. End of story.
I pulled a water heater in Frisco last month and saw a closet shelf fail in almost the exact same way — same cheap plastic anchors, same torn-out holes, same pile of clothes on the floor. Builders keep saving pennies. Homeowners keep paying for it.
How It Works
Wire shelving depends on a mechanical cantilever balance to stay level. The back edge of the wire deck sits in wall clips or hooks that hold the rear wire tight against the sheetrock. Diagonal support braces run from the front rail down to the wall at a 45-degree angle, or vertical standards hang from a horizontal top track.
Set 40 pounds of weight on the front edge of a 12-inch deep shelf, and that shelf starts acting like a class-one lever. The diagonal brace or wall clip becomes the fulcrum. That downward weight on the front rail turns into an outward pulling force — tensile stress — at the upper wall fasteners. In plain English, every pound on the outer edge creates almost two pounds of direct pullout tension on the drywall anchor at the top rail.
Drywall just stinks at that job. While 1/2-inch standard drywall can theoretically resist 10 to 15 pounds of direct pullout before ripping out around a cheap plastic anchor, high-humidity spaces like utility rooms or primary bathrooms soften that gypsum core a bunch. Over time, repeated movement beats up the paper facer of the sheetrock. If you want serious holding power, the fastener has to spread tension over several square inches behind the wall with a spring-loaded metal wing (toggle bolt), or skip the sheetrock entirely and bite into a nominal 2x4 Douglas fir stud with coarse-thread wood screws.
Step-by-Step Fix
Follow this repair sequence to patch the drywall blowout and lock your wire shelving permanently into the wall framing.
-
Strip and detach the damaged shelf section — Clear every item off the collapsed shelving and the adjacent spans so you can work without the rest of it shifting on you. Unhook the wire decking from the diagonal wall struts by pulling the front wire free of the retaining clips, then lift the back edge out of the wall anchors.
- Set the wire decks, hanging rods, and diagonal struts in another room so you’ve got space to move.
- If the neighboring spans are still connected with plastic joining clips, pry them apart gently with a flathead instead of snapping them.
-
Extract the failed drywall anchors cleanly — Pry out all damaged plastic drive-pins, wall clips, and bent nails from the wall with needle-nose pliers or a pry bar.
- Slip a putty knife behind your pry bar so you don’t crush or crease the drywall paper around it.
- If an anchor’s spinning loose in the hole, thread a standard 2-inch drywall screw two turns into its center hole, then grab the screw head with pliers and pull the anchor sleeve straight out.
-
Assess and prepare the damaged anchor holes — Check the sheetrock around every torn-out mounting hole and see whether the paper facing is blown outward or shredded.
- Cut away loose hanging paper flaps or busted gypsum chunks around the damaged holes with a sharp utility knife.
- If you’re putting toggle anchors back in the same spots, make sure the torn hole doesn’t exceed 3/4 inch; if it’s larger than an inch across, move your mounting points horizontally by at least 2 inches.
-
Locate and mark every wall stud along the shelf run — Run a magnetic or electronic deep-scan stud finder horizontally across the shelf line to find the exact centers of your 2x4 framing.
- Wood studs are usually 16 inches on center, though you’ll still run into 24 inches in older or non-load-bearing walls.
- Confirm stud centers by driving a 1-1/2-inch finishing nail or poking a thin awl into the drywall where the trim or shelf track will sit; once you hit pine framing, you’ll feel solid resistance.
-
Choose your anchor strategy (Wood Cleat vs. Heavy Toggle) — Decide whether you’re anchoring into raw drywall with heavy-duty toggles or mounting a permanent solid wood support cleat.
- If you’ve got heavy storage needs — over 50 pounds of clothes or supplies — go with the 1x4 wood cleat method. It turns a flimsy drywall-anchored rack into a rock-solid setup that’ll hold over 200 pounds.
- If you want a faster fix without changing shelf height, use 3/16-inch spring-wing toggle bolts with metal wire-shelf mounting clips.
-
Patch and repair torn drywall (if using shifted mounting points) — Fill blown-out drywall craters with setting-type joint compound (hot mud) if you’re moving clips or putting a cleat over the damage.
- Mix a small batch of 20-minute setting compound with water in a mud pan until it’s about peanut butter thick.
- Pack the mud hard into the blowouts, embed a small patch of fiberglass mesh tape over holes bigger than 1/2 inch, and scrape it flat with a 6-inch taping knife.
- Let it cure for 30 minutes, wipe it with a damp sponge, and add a light topcoat of standard premixed joint compound if the repair’s going to show in open closet space.
-
Cut and pre-drill a solid 1x4 mounting cleat (Cleat Method) — Measure the exact length of your wire shelf run and cut a clean 1x4 select pine board to fit the wall space with a miter box or circular saw.
- Hold the cleat against the wall, line up its top edge exactly where the back wire of your shelf needs to sit — use a 4-foot torpedo level — and mark your stud lines across the face of the wood.
- Pre-drill pairs of 1/8-inch pilot holes through the board at each stud location so the pine doesn’t split near the edges.
- Countersink the pilot holes a bit so the screw heads sit flush with the lumber surface.
-
Secure the cleat to the wall studs — Mount the 1x4 cleat straight into the wall framing with 2-1/2-inch coarse-thread #8 wood screws driven firmly into each stud.
- Drive two screws per stud location — one near the top edge of the 1x4 and one near the bottom edge.
- Check the board with your level as you tighten the first two screws so the whole cleat stays true.
- If this doesn't work: If an older house has crooked framing and you miss a stud, back the screw out, angle your drill 15 degrees toward the center of the framing pocket, and drive another screw until you hit solid wood.
-
Install heavy-duty toggle bolts (Alternative Drywall Method) — If you skip the wood cleat and reinstall clips straight into drywall, toss the manufacturer’s plastic pins and grab 3/16-inch steel spring toggle bolts.
- Slide the steel machine screw through the hole of a heavy-duty wire shelf clip first, then thread the spring-loaded toggle wings onto the screw threads with the wing points facing the screw head.
- Push the folded metal wings all the way through the drywall blowout hole until you hear them snap open inside the wall cavity.
- Pull outward on the screw head to seat the open wings tight against the back of the drywall, then tighten the screw with a drill or screwdriver until the clip’s locked dead still against the wall face.
-
Re-anchor the diagonal front support struts — Replace the flimsy push-pin anchors on the bottom of the diagonal struts with 1/4-inch flip toggles or find a stud for direct screw mounting.
- Diagonal braces carry most of the shelf’s downward load; that’s why wire shelving drops in the first place when people rely on drywall anchors alone.
- Drill a 1/2-inch hole at the strut base, insert a strap toggle or metal toggle bolt through the strut mounting eyelet, and crank it down tight.
- If a strut lands near a stud line, skip the toggle and drive a 2-inch cabinet screw with an integral washer straight into the wood.
-
Snap the wire shelf back into position and test the load — Seat the rear horizontal rod of the wire shelf securely into the freshly anchored back wall clips or the top rail of the pine cleat.
- Press the front edge of the wire deck into the top retaining clips of the diagonal wall struts until you hear an audible click.
- Check each clip to make sure the shelf wire’s fully trapped behind the retaining tab and can’t jump forward.
- Grab the front wire rail with both hands and pull down firmly with roughly 30 to 40 pounds of body force; the shelf should stay dead rigid with zero flex or wall pullout.
Common Causes
- Builder-grade friction drive-pins — Low-cost install crews use hammer-in plastic pins with zero mechanical spread behind the wall. They hold by wedging against chalky gypsum, and that’s it.
- Overloading beyond the 10 lb/foot drywall limit — An average linear foot of wire shelving anchored only to drywall can handle 10 to 15 pounds safely. A 6-foot shelf loaded with heavy winter parkas can shoot past 100 pounds in no time.
- Rotational torque from hanging clothes — Every time you slide plastic or wooden hangers along the bottom rail, the downward and outward lever forces pull directly against the top fasteners.
- Drywall softened by high humidity — Bathrooms, laundry spaces, and uninsulated garage walls see relative humidity swings above 65%, which softens standard 1/2-inch gypsum board and chews up its fastener grip.
- Missing diagonal struts — Builders often space diagonal wall supports 48 to 60 inches apart to save parts, even though manufacturer specs call for a support brace every 36 inches maximum.
Common Mistakes
- Reusing the blown-out hole with a slightly bigger plastic anchor. Homeowners do this all the time. They jam a larger plastic conical anchor into a stripped hole. That soft gypsum’s already pulverized; a bigger plastic plug will pull right out the moment you hang your first pair of jeans.
- Driving drywall screws straight into sheetrock without anchors. Drywall screws are made to bind drywall to wood studs, not hang loads from drywall by itself. Put one into hollow sheetrock and it strips out at fewer than 5 pounds of tensile pull.
- Mounting diagonal struts at the wrong angle. Support struts are supposed to sit at a 45-degree angle. Too steep or too shallow, and they don’t transfer the shelf’s vertical load into the wall studs, so the back clips end up carrying everything.
- Over-torquing toggle bolts with an impact driver. If you hammer on a 3/16-inch toggle bolt with an 18-volt impact driver, the steel wings can crush through the soft paper backside of the sheetrock and wreck your hold before you even load the shelf.
- Ignoring the spacing between wall brackets. Leave spans longer than 36 inches between support braces and wire decks start sagging in the middle, which pulls the nearest wall anchors sideways and pries them loose.
Cost & Time Breakdown
| Task | DIY Cost | Pro Cost | Time |
|---|---|---|---|
| Replace plastic anchors with 3/16" toggle bolts | $8–$15 | $120–$180 | 30–45 mins |
| Install 1x4 pine support cleat into studs | $18–$30 | $175–$250 | 1–1.5 hours |
| Patch blown-out drywall holes with setting mud | $12–$20 | $150–$225 | 45 mins (plus dry time) |
| Complete closet wall rebuild (cleat + added struts) | $35–$60 | $250–$400 | 2–3 hours |
Tips & Prevention
- Ditch plastic drive pins permanently. Keep a box of 3/16-inch and 1/4-inch metal toggle bolts — like Snaptoggle or standard spring wings — in your toolbox and toss the plastic anchors that come bundled in retail shelf kits.
- Add an extra diagonal strut. If your shelf run goes past 4 feet, put in another support strut dead center. Cutting the span between supports from 36 inches to 24 inches doubles the load capacity of the wire deck.
- Inspect your top clips every spring. Shine a flashlight behind your closet shelves once a year. If you spot fine white gypsum powder under a clip on the baseboard, the anchor’s moving and needs to be replaced before it drops.
- Distribute dense items over stud locations. Put heavy items — like liquid detergent bottles, cast iron pans, or toolboxes — directly above the diagonal wall struts instead of in the middle of an unsupported wire span.
- Use closet pole brackets that tie into the struts. If your wire shelf has an integrated hang rod, make sure the rod support hooks lock physically into the diagonal strut arm instead of hanging only from the light horizontal wires.
When to Call a Professional
Most wire shelf collapses are quick weekend repairs that only need basic hand tools and good fasteners. But call a licensed handyman or finish carpenter if the collapse tore down big sections of drywall and exposed electrical wiring, junction boxes, or plumbing supply lines. If the shelf pulled free from masonry, lath-and-plaster, or a structural firewall shared with an adjoining townhouse or condo, you’ll need specialized hammer drills and masonry anchoring systems. And if you want to swap out builder-grade wire shelves for a custom wood closet system with built-in drawers, vertical towers, and crown molding, bringing in a trim carpenter will save you days of frustration and give you a setup that’ll last.
Related Articles
Keep troubleshooting with these hand-picked guides from FixlyGuide:
- That 'Stud-Only' Belief? A Myth for Heavy Shelves — Tired of shelves ripping out of your drywall? The common advice to 'only use studs' is incomplete. Discover the modern anchoring techniques…
- That Falling Closet Rod? It’s The Tiny Anchor You’re Using. — Your closet rod keeps collapsing because the standard plastic anchors can't grip drywall; the fix is to anchor it properly to a wall stud o…
- Wood Glue Not Drying? 7 Reasons Your Project Is Still Tacky (And How to Fix It) — Wondering why your wood glue is still wet hours or even days later? It's usually due to temperature, wood type, or clamp pressure—here are…
- Framing Nail Gun Sinking Nails Too Deep? 6 Causes of Overdriven Nails (And the Right Depth) — Frustrated by your nail gun driving nails too deep and damaging your wood? Learn the six common causes, from air pressure to worn-out parts…
- Adjustable Shelves Keep Falling? Fix the Pin Holes, Not Just the Pins — If your adjustable shelves keep collapsing, the problem is rarely the pins themselves—it's that the pin holes have worn out, become oversiz…
- Deck Screws Pulling Out? 5 Causes and the Step-by-Step Fix — Stop tripping on loose deck screws. Here is why fasteners pop out of deck boards, how to test for joist rot, and the step-by-step fix to an…
Should you do this yourself?
Answer five quick questions before you start. Safety outranks savings every time.
Your experience with work like this
How high do you have to work?
Does the job involve any of these?
Will it need a permit?
Specialty tools
Free and instant. Educational guidance only — not a quote, inspection, or professional diagnosis.
What should this project cost?
Enter your project details for a realistic cost range before you call anyone.
Outlet and switch work usually $150–$400; panel upgrades commonly $1,800–$4,200.
- Regional adjustment
- National average
- Labor share (typical)
- ~$709
- Quotes to collect
- 3 written estimates
Educational estimate based on national averages — not a binding quote. Always confirm with written local estimates.
Get the print-ready PDF of this guide
A clean, ad-free, printable version you can keep on your phone or pin to the workshop wall. Free with a FixlyGuide account.
- Print-optimized layout
- Tools, materials & every step included
- Saved to your account
Recommended for DIYers & woodworkers
Sponsored
The Top 20 Tools for Workshops of Any Budget
No stationary machines or power tools required — plus 3 fundamental tools that can't be bought at any price.
Get the free guide
Ted's Woodworking — The #1 Woodworking Resource
Detailed instructions, dimensioned drawings, materials & cutting lists, and 3D schematics for every skill level.
See the plansSponsored: links above are affiliate links. FixlyGuide may earn a commission on qualifying purchases — at no extra cost to you.
Frequently asked questions
Can I put a larger plastic anchor into the same hole?+
No. Once an anchor rips out of drywall, the internal gypsum core is crushed into loose powder. Threading a slightly larger plastic plug into that damaged hole creates a false sense of security; it will pull out again under moderate load. You must either use a toggle bolt that spans across the back of the undamaged drywall or patch the hole and shift the anchor location.
How much weight can wire shelving in drywall actually hold?+
Standard 1/2-inch drywall secured only with builder plastic push-pins holds roughly 10 to 15 pounds per linear foot safely. If you upgrade to 3/16-inch steel toggle bolts, capacity jumps to roughly 30 to 40 pounds per foot. Mounting your shelf to a solid 1x4 wood cleat screwed into 2x4 framing studs easily raises that capacity to over 75 to 100 pounds per foot.
Why are toggle bolts better than expansion anchors for wire shelves?+
Standard plastic expansion anchors fail constantly because they rely solely on outward friction inside brittle sheetrock. Under the rotational downward torque created by hanging clothes, that friction fails rapidly. Toggle bolts use spring-loaded metal wings that open behind the wall, clamping the drywall between the front clip and the wide steel wing to distribute the pullout force over several square inches.
Can I use a 1x4 wood cleat instead of patching the drywall?+
Yes. A 1x4 select pine board screwed across wall studs provides a continuous, rock-solid wood backer for your entire shelf run. You can then drive standard 3/4-inch wood screws anywhere along the cleat to lock in your shelf clips without worrying about where the studs fall, eliminating drywall anchor failures forever.
How far apart should wire shelf diagonal support brackets be?+
For light linen storage, diagonal struts can be spaced up to 36 inches apart. For clothes closets or pantries holding heavy canned goods, install a diagonal strut every 24 inches. Adding one additional strut in the middle of a sagging run drastically reduces stress on the back wall clips.
Do I need to drill new holes to install toggle bolts?+
Yes, but toggle bolts require larger holes—typically 3/8-inch or 1/2-inch—for the folded spring wings to pass through the sheetrock. The ripped-out hole left by a failed plastic plug is often already the perfect size for a toggle bolt wing to slide right in, saving you the step of drilling a new hole.
How do I know what size replacement diagonal strut to buy?+
Measure the depth of your shelf deck (usually 12 or 16 inches). The diagonal strut must match that depth rating so it meets the wall at a 45-degree angle. Mounting the wrong size strut forces the shelf out of level and multiplies pullout force against the wall anchors.
How can I tell if my wire shelf is about to pull out of the wall?+
Look for telltale warning signs: the front edge dips downward, the back wall clips have visible gaps between the plastic flange and the paint, or you notice white drywall dust sifting down onto the floor beneath the shelf brackets. If the shelf bounces noticeably when you place an item on it, the fasteners have already started to yield.

Discussion
Loading comments…