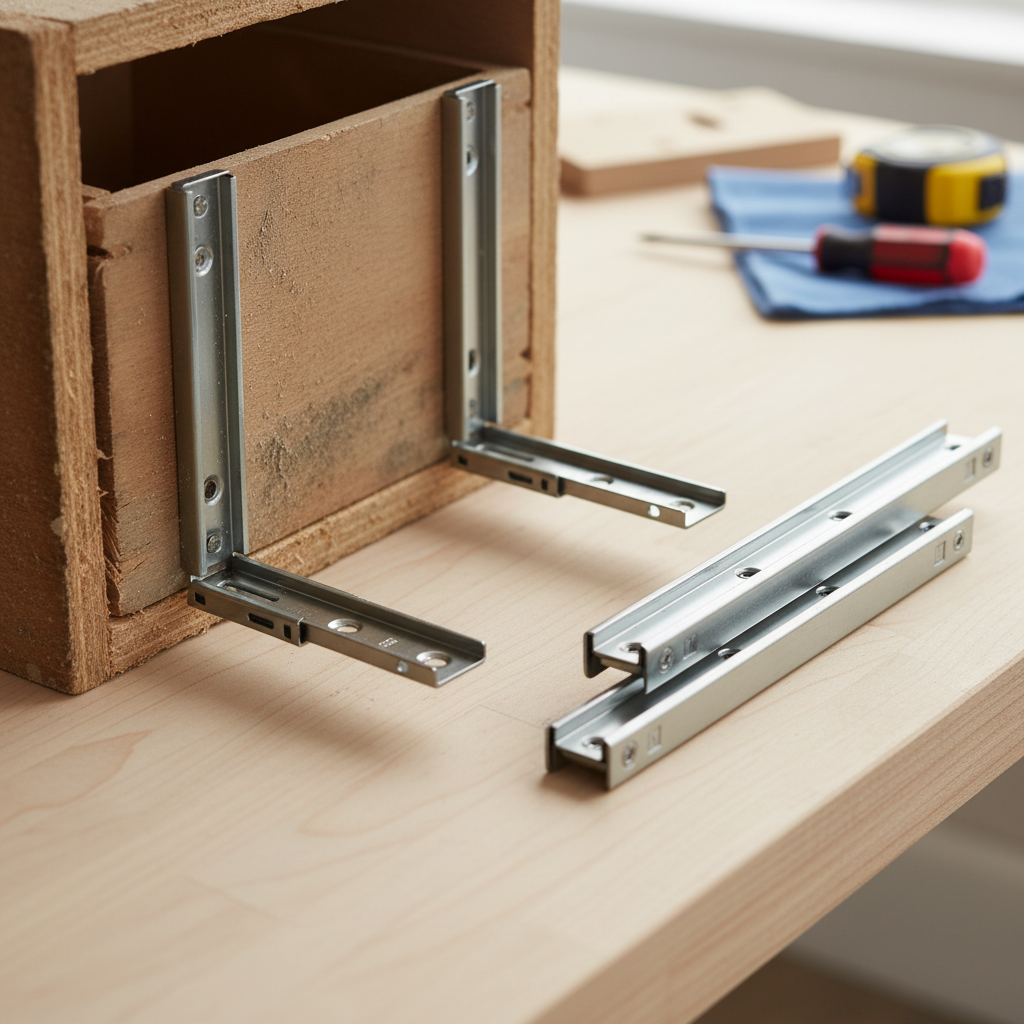
- Remove the Old Slides — Careful not to strip screws
- Tools: Screwdriver (Phillips or square drive)
- Keep the old slides nearby, especially if you had trouble identifying them. They're your best template for where the new ones need to land.
General remodeling · Renovation planning
| Project category | General remodeling |
|---|---|
| Problem type | Renovation planning |
| Trade required | General contracting |
| Urgency | Planned project |
| Safety risk | Low safety risk |
| DIY suitability | Pro recommended |
| Cost category | Major investment |
| Typical timeline | Design and permitting often 2–4 months before work starts |
| Contractor type | General contractor |
Repair option
Phase the work and fix the building envelope first.
Replacement option
Full renovation with permits, design, and a general contractor.
Common causes
- Space no longer fits how the household lives
- Resale preparation
- Deferred maintenance stacking up
Relevant tools:project cost estimatorcompare quoteshome improvement material prices
Published September 2, 2026Last updated September 2, 2026
Tools & materials you'll need
Affiliate links- AmazonNew drawer slidesMatching type and length of existing, or upgraded; buy as a pair
- AmazonMild household cleanerOptional, for degreasing
- AmazonDry silicone lubricant sprayOptional, for ball-bearing slides only, NOT WD-40
- AmazonWood shims or paint stir sticksOptional, for minor alignment adjustments in older cabinets
As an Amazon Associate FixlyGuide earns from qualifying purchases — at no extra cost to you. Prices and availability are accurate as of publication and subject to change.
Quick Answer
Listen, when a pull-out shelf or drawer starts sticking, binding, or just grinding its way open and closed, most folks think the whole thing's shot. But more often than not, it's just a couple of dollars' worth of worn-out plastic rollers or ball bearings inside the drawer slide mechanism that are causing all the fuss. Swap those slides out, and you'll be gliding smooth again — I've seen it hundreds of times.
The Problem
You know the drill: you go to pull out that shelf in the pantry for the canned goods, or that bottom drawer in the kitchen for the pots and pans, and it catches. It might groan, it might scrape, or it might just flat-out refuse to budge without a fight. That's aggravating, plain and simple. And it only snowballs. What started as a little nuisance turns into a full-on wrestling match every time you need something from the back of the cabinet.
This isn't just inconvenience, either. A binding drawer or shelf puts real stress on the cabinet box itself, the drawer face, and even the handles. I pulled a water heater in Frisco last month that had a drawer next to it with a slide so mangled the screws were halfway out of the wood — same kind of damage, different job. And it isn't just kitchen cabinets; bathroom vanities, office desks, dresser drawers — they all use similar slide mechanisms and can get beat up the same way. Most homeowners just live with it or start pricing out a whole new cabinet or piece of furniture, which is a massive waste of money and time when the fix is often this simple.
How It Works
Alright, let's talk about these unsung heroes: drawer slides. They're pretty clever if you ask me, letting heavy loads glide with almost no effort. Most modern pull-out shelves and drawers use one of two main types of slides: roller slides (also called epoxy-coated or European slides) or ball-bearing slides.
Roller slides are the simpler, usually cheaper option. They've got two main parts: a cabinet member that mounts to the cabinet interior and a drawer member that mounts to the drawer box. Each member has a nylon or plastic roller. When you open the drawer, those rollers ride along each other and let the drawer extend. The weight of the drawer and its contents is carried by those rollers. Over time, the plastic can flatten, crack, or break apart, which gives you friction instead of a smooth glide. The epoxy coating can wear off too, and then you're left with rough metal rubbing metal. No dice.
Ball-bearing slides are a step up for smoothness and load capacity. They're usually metal and have one or more rows of tiny ball bearings — think miniature bearings from a skateboard wheel — tucked inside channels. As you open the drawer, those ball bearings roll and cut down friction between the cabinet and drawer members. These often come in two-part or three-part extensions, with the three-part version giving you 'full extension' — meaning the drawer comes all the way out so you can reach the very back. The downside? If dirt, grime, or corrosion gets into those ball-bearing races, or if the tiny ball bearings themselves get deformed or lost, you'll get that grinding, sticking feeling. Sometimes the grease that was supposed to keep them slick dries out or gets nasty.
Both types are built for a specific weight. Roller slides might handle 30-50 pounds, while heavy-duty ball-bearing slides can manage 100 pounds or more. If you keep loading a drawer past what it was meant to carry, you're basically asking those slides to fail early. Figuring out which style you’ve got is step one to fixing it right.
Step-by-Step Fix
Alright, let's get those drawers gliding like new again. This isn't rocket science, but a little attention to detail goes a long way.
-
Assess the Damage and Type of Slide — Before you order parts
- Tools: Flashlight, screwdriver (Phillips or square drive, depending on your screws)
- Pull the drawer out as far as it'll go. Shine that flashlight into the mechanism. Are the plastic rollers on a roller slide flattened, cracked, or missing? Or are you dealing with a ball-bearing slide that feels gritty or has obvious damage? That tells you what you're up against.
- Most ball-bearing slides have a small lever or tab you press (usually blue or black plastic) that lets the drawer member separate from the cabinet member. Roller slides usually just lift up a bit at the front and then pull free. Get that drawer out so you can actually see both sides of the slide.
-
Measure and Match Your Slides — Crucial for a perfect fit
- Tools: Tape measure
- With the drawer removed, measure the length of the cabinet-side slide when it's fully retracted. This matters. Drawer slides come in standard lengths, usually in 2-inch increments (e.g., 14, 16, 18, 20, 22, 24 inches). Don't guess. Also note the width and height of the slide. Ball-bearing slides are generally 1/2 inch wide, designed to fit in a 1/2-inch gap between the drawer box and the cabinet side.
- Take photos of your existing slides from a few angles. When you head to the hardware store or start shopping online, those pictures and measurements will save you a headache. Match the type (roller vs. ball-bearing) and the length exactly. If you're upgrading from roller to ball-bearing, make sure the new slides will fit the existing gap and screw holes, or be ready to drill new ones.
-
Remove the Old Slides — Careful not to strip screws
- Tools: Screwdriver (Phillips or square drive)
- Find every screw holding the old slides to both the cabinet interior and the drawer box. There might be 4-6 screws per slide. Use the right screwdriver tip and keep steady pressure on it so you don't tear up the screw heads. If a screw's stuck, a little penetrating oil can help, but don't get it on unfinished wood if you can avoid it.
- Keep the old slides nearby, especially if you had trouble identifying them. They're your best template for where the new ones need to land.
-
Clean Up the Mounting Areas — A clean slate for new hardware
- Tools: Shop vacuum, damp cloth, mild cleaner (optional)
- Once the old slides are off, you'll probably find dust, grime, and maybe some old dried-up grease or food crumbs. Vacuum up the loose junk first. Then wipe the mounting surfaces on both the cabinet and the drawer box with a damp cloth. A little mild detergent can help cut through grease. Make sure everything's bone dry before you move on.
-
Install the New Cabinet Members — Precision here pays off
- Tools: New slides, screwdriver, drill (optional, for pilot holes)
- Grab the cabinet member of the new slide. Line it up with the existing screw holes in the cabinet. If you can, use the same holes. If the old holes are stripped, you might need to shift the slide a little or use slightly larger screws (check manufacturer recommendations) or wood filler to plug the old holes before redrilling new pilot holes.
- Drill pilot holes if you're making new holes or if the wood is hard — about 1/16th inch smaller than the screw shank. Don't crank the screws down too hard; snug is enough. Make sure the slide's level. I usually check with a small level, but half the time matching the old screw lines gets you there just fine.
-
Install the New Drawer Members — Same process, different location
- Tools: New slides, screwdriver, drill (optional, for pilot holes)
- Now attach the matching drawer member to the side of the drawer box. Again, line it up with the old screw holes if they're still in good shape. If they're stripped, move over a hair or fill and redrill. The big thing here is keeping both drawer members parallel and at the same height on each side. If they're off, you'll get sticking even with brand-new slides.
- I've had to chase a crooked drawer more than once, and it's never the slide's fault alone — it's usually a little offset that nobody caught at first.
-
Re-insert the Drawer — The moment of truth
- Tools: None
- Carefully slide the drawer back into the cabinet. For ball-bearing slides, you'll usually need to line up the drawer member with the cabinet member and push it in until it clicks into place. For roller slides, just guide the rollers onto their tracks. Push it in and pull it back out a few times. Does it glide smoothly? Quiet, too? Good — you're in business.
-
Adjust for Perfect Alignment (If Needed) — Fine-tuning
- Tools: Screwdriver, shims (optional)
- If the drawer still sticks a little, or if the drawer front isn't perfectly flush with the cabinet, you may need to make small adjustments. Some slides have elongated screw holes that allow for minor vertical or horizontal tweaking. You might also find that one side sits a fraction of an inch lower or higher. In older cabinets, I've had to use thin shims — paint stir sticks cut down work great — behind the cabinet slide to get everything lined up right.
Common Causes
- Worn-out rollers/bearings: This is the big one. Plastic rollers flatten, crack, or break. Ball bearings get gritty, lose lubrication, or deform. It's just wear and tear from friction and weight.
- Overloading: Too much weight in a drawer built for less will quickly deform rollers, bend metal, or crush ball bearings. Think 50 pounds of canned goods in a drawer rated for 30. That thing's toast eventually.
- Dirt and debris: Kitchen slides are famous for collecting crumbs, spilled flour, or dried-up food. That gunk works right into the mechanism and grinds away like sandpaper.
- Lack of lubrication (ball-bearing slides): The factory grease on ball-bearing slides can dry out over the years, which cuts down performance and ramps up friction.
- Loose or missing screws: If the slides aren't firmly fastened to both the cabinet and the drawer, they can sag or twist and cause misalignment and binding.
- Bent or damaged metal components: A hard hit, repeated overloading, or a bad install can bend the metal channels of the slide and leave you with a permanent obstruction.
Common Mistakes
- Using WD-40: Folks reach for the nearest spray, and that's usually WD-40. Sure, it'll displace water, but it's not a long-term lubricant for drawer slides. It flashes off fast, can pull in more dust, and can make the whole mess worse over time. Use a silicone spray or dry lubricant, or just replace the worn parts.
- Not measuring accurately: Guessing the slide length is a recipe for trouble. A slide that's too short won't extend fully or support weight right. A slide that's too long won't fit at all. Measure twice, buy once.
- Ignoring a single sticking point: If one side of a drawer's hanging up, it isn't always the slide itself. Check for something physically blocking the drawer — a cleaning bottle, a pot handle, or even a loose item that's dropped into the gap. Always look for an obstruction before you assume the slides are done.
- Overtightening screws: Torque those screws down too hard, and you'll strip them, crack the wood, or deform the slide mechanism, which causes more problems than it solves.
- Mismatched slide types: Mixing a roller slide on one side with a ball-bearing slide on the other, or using different brands/models on the same drawer, is a sure way to make it bind. Replace both slides with an identical pair.
- Forgetting to clean: Putting new slides over old grime is like painting over rust. It might look okay for a minute, but the problem'll come right back.
Cost & Time Breakdown
| Task | DIY Cost | Pro Cost | Time |
|---|---|---|---|
| Diagnose problem & measure | $0 | $50–$100 | 10–20 minutes |
| Purchase new slides | $10–$40 | $10–$40 | 30 minutes (shop) |
| Remove old slides | $0 | $25–$50 | 15–30 minutes |
| Clean mounting areas | $0 | $15–$30 | 10 minutes |
| Install new slides | $0 | $50–$100 | 30–60 minutes |
| Test & adjust | $0 | $15–$30 | 5–10 minutes |
| TOTAL | $10–$40 | $165–$350+ | 1–2 hours |
Tips & Prevention
- Don't overload: This is the easiest way to kill your slides. Know the weight rating and stick to it. If you've got heavy pots, pans, or a pile of canned goods, spend the money on heavy-duty slides (100lb+ rated) from the start.
- Regular cleaning: Once or twice a year, pull your drawers out all the way and vacuum any visible crumbs or debris from the slide tracks. For ball-bearing slides, a quick spray with a dry silicone lubricant (like one from CRC or Permatex) can help them last longer, but avoid oil-based lubricants or WD-40.
- Check screws annually: Over time, screws can loosen from constant motion. A quick check and snugging them back down with a screwdriver can prevent sagging and misalignment before it gets ugly.
- Proper installation matters: If you're building or installing new shelves, take the time to make sure the slides are level and parallel. A tiny misalignment during installation creates friction that wears slides out faster.
- Consider upgrades: If you're always replacing cheap roller slides, it might be worth upgrading to better quality ball-bearing slides. They run smoother, carry more weight, and usually last longer.
When to Call a Professional
Look, I'm all for DIY, but there are times when it makes sense to call in a pro. If you've got custom-built cabinetry where the slides are integrated into the cabinet box in a non-standard way, or if the cabinet itself is damaged (like warped wood or a structural issue keeping the slide from installing right), you might be better off calling a cabinet maker or a handyman. Also, if you've got European-style concealed slides — the ones that hide under the drawer box — they can be trickier to adjust and replace. If you pull the drawer and can't figure out the release levers, or if you just don't have the time or patience to deal with precise measurements and screw holes, that's when you bring in someone with the right tools and know-how. Don't fight it if it feels like you're about to break something else.
Related Articles
Keep troubleshooting with these hand-picked guides from FixlyGuide:
- The Hidden Culprit Behind Your Fuzzy Table Saw Cuts (It's Not Just the Blade!) — Fuzzy table saw cuts and tearout are frustrating, but often the problem isn't just your blade; hidden factors like feed rate, blade height,…
- Why Your Freestanding Shelf Wobbles Like a Drunk Sailor (and the 5-Minute Fix) — Don't let a shaky shelf ruin your organization or your peace of mind. I'll show you how to stabilize that wobbly unit in minutes, no matter…
- That New Grout Is Already Cracking? Here’s the Hidden Cause — Cracked grout weeks after a renovation is often a sign of a deeper issue with your subfloor or tile installation, not just a problem with t…
- The Giant Drywall Hole: 3 Hidden Mistakes That Make Fixing It Worse — Don’t just spackle over that huge drywall hole; learn the right way to repair it and avoid common mistakes that lead to an even bigger head…
- The $10 Shower Fix Plumbers Don't Want You to Know — Stop that annoying drip! I'll show you how to fix a leaky shower faucet yourself, saving you money and preventing water waste.
- Why Your Kitchen Sink Drain Stinks (Even After You've Cleaned It) — Don't just mask that foul odor from your kitchen sink; get rid of the gunk causing it with this pro-level cleaning method.
Should you do this yourself?
Answer five quick questions before you start. Safety outranks savings every time.
Your experience with work like this
How high do you have to work?
Does the job involve any of these?
Will it need a permit?
Specialty tools
Free and instant. Educational guidance only — not a quote, inspection, or professional diagnosis.
What should this project cost?
Enter your project details for a realistic cost range before you call anyone.
Cosmetic refreshes start near $5,000; full remodels commonly $25,000–$45,000.
- Regional adjustment
- National average
- Labor share (typical)
- ~$8,550
- Quotes to collect
- 3 written estimates
Educational estimate based on national averages — not a binding quote. Always confirm with written local estimates.
Before you start
Check the difficulty, permits, and safety risk — then decide whether to call a pro.
- Estimate this projectGet a cost range for your scope and ZIP before you call anyone.Open
- Get local estimatesSend one request and compare written estimates from vetted pros.Open
Free, no signup required. Estimates are educational guidance, not a quote or an inspection.
Get the print-ready PDF of this guide
A clean, ad-free, printable version you can keep on your phone or pin to the workshop wall. Free with a FixlyGuide account.
- Print-optimized layout
- Tools, materials & every step included
- Saved to your account
Recommended for DIYers & woodworkers
Sponsored
The Top 20 Tools for Workshops of Any Budget
No stationary machines or power tools required — plus 3 fundamental tools that can't be bought at any price.
Get the free guide
Ted's Woodworking — The #1 Woodworking Resource
Detailed instructions, dimensioned drawings, materials & cutting lists, and 3D schematics for every skill level.
See the plansSponsored: links above are affiliate links. FixlyGuide may earn a commission on qualifying purchases — at no extra cost to you.
Frequently asked questions
Why do my kitchen drawers get sticky?+
Kitchen drawers often get sticky due to worn-out plastic rollers or ball bearings in the slide mechanism, compounded by accumulated dirt, crumbs, and dried food particles. Overloading the drawer with heavy items can also accelerate wear and tear, causing the slides to bind or deform.
Can I lubricate sticky drawer slides?+
For ball-bearing slides, a dry silicone spray lubricant can help, but avoid oil-based products like WD-40, which can attract dust and grime. For roller slides, lubrication is rarely effective; replacement of the worn plastic rollers is usually the only lasting solution. Always clean the tracks thoroughly before applying any lubricant.
How do I know what size drawer slides to buy?+
To get the correct size, remove your old drawer slides and measure the length of the cabinet-mounted portion when fully retracted. Drawer slides come in standard lengths, usually in 2-inch increments. Also, note if they are roller or ball-bearing type and their width to ensure compatibility.
Is it hard to replace drawer slides?+
Replacing drawer slides is a moderate DIY task. The main challenges are accurately measuring for new slides, removing old screws, and aligning the new slides perfectly level and parallel. With the right tools and careful attention to instructions, most homeowners can complete the job in an hour or two.
What's the difference between roller and ball-bearing slides?+
Roller (or epoxy-coated) slides use plastic rollers for movement and are typically less expensive and have lower weight capacities. Ball-bearing slides use tiny metal ball bearings for smoother operation, higher weight capacities, and often full extension, allowing complete access to the drawer's contents.
My drawer is sticking, but the slides look fine. What else could it be?+
If your slides appear intact, check for obstructions within the cabinet or the drawer itself. Sometimes, an item in the drawer (like a pot handle) can catch on the cabinet frame, or debris can fall into the slide mechanism. Also, ensure all mounting screws are tight, as loose screws can cause misalignment.
Can I upgrade my existing roller slides to ball-bearing slides?+
Yes, you can often upgrade from roller to ball-bearing slides. You'll need to ensure the new ball-bearing slides fit the existing cabinet opening and drawer box dimensions, especially the 1/2-inch clearance typically required for ball-bearing slides. You may need to drill new screw holes for proper installation.
How much weight can typical drawer slides hold?+
Standard roller slides usually hold between 30-50 pounds. Standard ball-bearing slides often support 50-100 pounds. Heavy-duty ball-bearing slides are available for capacities of 100 pounds or more, ideal for tool chests or large pantry drawers. Always check the weight rating of the slides you purchase.

Discussion
Loading comments…