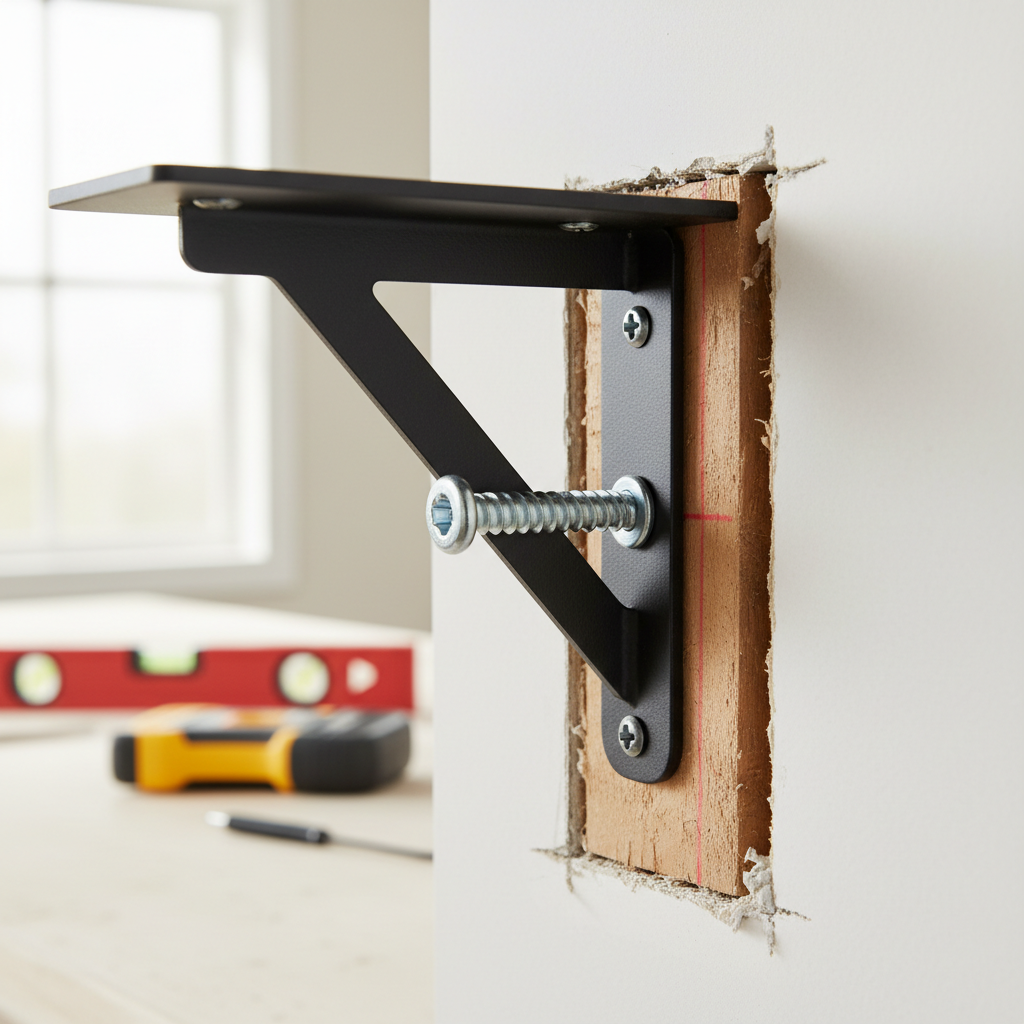
- Inadequate Anchors: Basic plastic drywall anchors over 10-15 lbs per anchor are a bad bet. Fine for light frames. Not for shelves.
- Missing Studs: If the brackets aren’t fastened into wall studs, shelf failure is just waiting around the corner. Drywall can’t carry real load on its own.
- Poor Pilot Holes: Wrong drill bit size, and the screw won’t bite right. Too small, and you split the stud. Too big, and the whole connection gets sloppy.
- Uneven Loading: Stacking everything in one spot — especially near the front edge — puts a ton of strain on the brackets and fasteners.
- Lack of Shelf-to-Bracket Fastening: If the board isn’t secured to the brackets, it can slide off or tip even when the brackets themselves are holding fine.
General remodeling · Renovation planning
| Project category | General remodeling |
|---|---|
| Problem type | Renovation planning |
| Trade required | General contracting |
| Urgency | Planned project |
| Safety risk | Low safety risk |
| DIY suitability | Pro recommended |
| Cost category | Major investment |
| Typical timeline | Design and permitting often 2–4 months before work starts |
| Contractor type | General contractor |
Repair option
Phase the work and fix the building envelope first.
Replacement option
Full renovation with permits, design, and a general contractor.
Common causes
- Space no longer fits how the household lives
- Resale preparation
- Deferred maintenance stacking up
Relevant tools:project cost estimatorcompare quoteshome improvement material prices
Published September 27, 2026Last updated September 27, 2026
Tools & materials you'll need
Affiliate linksAs an Amazon Associate FixlyGuide earns from qualifying purchases — at no extra cost to you. Prices and availability are accurate as of publication and subject to change.
Quick Answer
Listen, when a shelf comes crashing down, it’s rarely the shelf itself that’s the problem — especially if the box said “heavy-duty.” Nine times out of ten, I’ve got two usual suspects: somebody put way more weight on it than they thought, or the thing never got fastened to the wall right in the first place. Drywall alone won’t carry real weight, and those little plastic anchors? No dice. You’ve got to match the fastener to the wall and respect the limits of the material, or that shelf is coming down sooner or later.
The Problem
There’s nothing quite like the sound of a loaded shelf giving up. It’s a nasty crash, and then you’re standing there staring at broken stuff, spilled liquids, maybe a busted wall or scuffed floor. I’ve seen garage shelves buckle, laundry room shelves rip out of drywall, pantry shelves dump canned goods all over the place. You buy something sold as “heavy-duty,” you follow the directions, you load it up, and then CRASH. Now you’re wondering if the maker lied, or if the install just wasn’t right.
Truth is, that “heavy-duty” label can fool people. A lot of the time, it’s talking about the material in the shelf, not the whole setup once it’s hanging on your wall. The weak point is usually the connection to the wall, or plain old too much weight packed on top. I’ve been sorting out this kind of mess for 25 years, and it’s the same story over and over.
How It Works
Alright, let’s keep the physics simple — nobody needs a lecture here. Once you load a shelf, that weight pushes straight down, sure, but it also tries to peel the brackets away from the wall and shove the fasteners downward. The farther that weight sits from the wall — say, books stacked at the front edge — the more leverage you create. More leverage means more stress on the anchors. That’s how shelves get beat up.
Most wall-mounted shelving depends on two things working together: the shelf material’s strength and the fasteners’ grip on the wall. For real weight, you want studs. Studs are usually 2x4s or 2x6s, and they’re built to carry load. Your screws or lag bolts go right into that solid wood, and that gives you the best pull-out strength and shear resistance you’re gonna get.
If you can’t hit a stud, then you’re leaning on drywall. Drywall — gypsum board, basically compressed plaster sandwiched between paper — is fine for finishing a wall, but it’s lousy at holding weight by itself. Any fastener in drywall needs an anchor to spread the load or expand behind the wall so it can grip. Think about trying to hang something heavy on a single sheet of paper. It’s not happening. You need backup. That’s what the anchor does. Even then, the better drywall anchors still have limits, often in the range of 50-75 lbs per anchor under ideal conditions, and that’s often a lot less than what a “heavy-duty” shelf makes people expect.
Step-by-Step Fix
Before you get rolling, clear the space out. If the shelf already came down, clean up the mess and look at the wall damage first. You might be patching holes before you even think about putting it back up.
1. Remove Everything — Clear the decks, old-timer. Unload the shelf completely, and if the brackets are still hanging on for dear life, take the board and hardware off carefully. You want a clean slate. Don’t try to beef up a shelf that’s still loaded — that’s just asking for a busted knuckle or worse.
2. Find Those Studs — This is where your real support comes from. Grab a decent stud finder and locate the wall studs. Mark the centers with a pencil. Most studs are 16 or 24 inches apart. If the shelf is long, try to catch at least two studs, three if you can. If your stud finder has a deep scan, use it. Older houses can throw you curveballs with lath and plaster, and a magnetic stud finder — the kind that finds nails — can work better there.
3. Choose the Right Fasteners — No wimpy screws here. For heavy loads, you must use lag screws or stout wood screws long enough to bite at least 1.5 inches into the middle of a stud. With 3/4-inch thick shelving brackets, you’ll usually want screws that are at least 2.5 to 3 inches long. I can’t count how many times I’ve seen folks use screws that barely catch, then act surprised when the shelf pulls loose later. If you absolutely can’t hit a stud for all mounting points, use heavy-duty toggle bolts or expanding metal anchors (like Toggler Snaptoggles) rated for at least 75-100 lbs each where there’s no stud. Don’t mess around with plastic anchors for anything you’re calling “heavy-duty” — they’re fine for a light frame, not your garage tools or a pantry loadout.
4. Mark and Level — Measure twice, drill once, always. Hold a bracket on the wall where you want it, lined up with a stud mark. Use a level so it’s dead straight. Mark the holes through the bracket. Then measure from the ceiling or floor to the top edge of that first bracket, and transfer that exact same height to the next bracket location. Check level across all the bracket spots again before you drill anything. Saves headaches. Every time.
5. Pre-drill Pilot Holes — Prevent splitting and make life easier. Use a drill bit just a bit smaller than the shank — that’s the non-threaded part — of the screw, and pre-drill through the drywall and into the studs. If you’re using toggle bolts or expanding anchors, follow the manufacturer’s drill size exactly — it’ll be bigger. Pre-drilling into studs keeps the wood from splitting and helps the screws go in straight and solid. If you’re mounting into concrete or brick, you’ll need a hammer drill, masonry bits, and the right anchors for that wall. No shortcuts there.
6. Mount the Brackets — Tighten 'em down, but don't strip 'em. Set the brackets on the wall and drive the screws firmly into the pilot holes in the studs. If you’re using toggle bolts, feed them through the bracket and the wall, then follow the installation steps so they expand properly behind the drywall. Each bracket should sit snug against the wall, no wobble, no play. Don’t crank down so hard that you strip the heads or chew up the drywall.
7. Install the Shelf Board — Secure it, don't just rest it. Set the shelf board on the mounted brackets. On most heavy-duty systems, the shelf needs to be fastened to the brackets with small screws from underneath or through the pre-made holes. That keeps the board from sliding off or tipping forward when somebody bumps it or loads one side heavier than the other. I can’t tell you how many shelves I’ve seen bounce right off the brackets because nobody secured the board. Last month I was in Northridge, and a guy had stacked paint cans on a shelf, never fastened the board down, and the whole thing slid forward and dumped the works. What a cleanup.
8. Test the Load — Start small, then go big. Before you pile on the heavy stuff, push down on it with your hands — easy at first, then a little firmer. Watch for movement or creaking. Then start with lighter items and work your way up. Keep an eye on how the shelf reacts. If you see sagging, hear stress, or feel any shifting, stop right there. Better to catch a weak point now than after it’s fully loaded and tearing out of the wall.
Common Causes
- Underestimating Weight: Folks don’t always realize how heavy everyday stuff gets. A box of books can run 30-40 pounds easy. Canned goods? Even worse. That “heavy-duty” sticker might mean 100 pounds distributed evenly over 4 feet, not 300 pounds piled on one spot.
- Inadequate Anchors: Basic plastic drywall anchors over 10-15 lbs per anchor are a bad bet. Fine for light frames. Not for shelves.
- Missing Studs: If the brackets aren’t fastened into wall studs, shelf failure is just waiting around the corner. Drywall can’t carry real load on its own.
- Poor Pilot Holes: Wrong drill bit size, and the screw won’t bite right. Too small, and you split the stud. Too big, and the whole connection gets sloppy.
- Uneven Loading: Stacking everything in one spot — especially near the front edge — puts a ton of strain on the brackets and fasteners.
- Lack of Shelf-to-Bracket Fastening: If the board isn’t secured to the brackets, it can slide off or tip even when the brackets themselves are holding fine.
- Water Damage/Rot: In laundry rooms, basements, and other damp spots, moisture can weaken the shelf material or the studs behind it over time.
Common Mistakes
- Trusting "Heavy-Duty" Without Question: That’s marketing. Always check the real weight rating, and remember it usually assumes ideal conditions. Your wall setup might knock that number down fast.
- Skipping the Stud Finder: Tapping the wall and guessing is a rookie move. Get a decent stud finder. It’ll save you grief.
- Using Too Few Brackets: Long shelves need more support points. Don’t try to stretch 6 feet with two brackets and call it a day. You’re asking for sag, maybe a full collapse. Every 24-32 inches is a solid rule of thumb.
- Assuming Drywall is Strong Enough: It isn’t. I’ve seen people try to hang kitchen cabinets with drywall anchors alone. Never ends pretty. For anything heavier than a small picture, hit studs or use proper heavy-duty drywall anchors made for real loads.
- Ignoring the Shelf's Material: Particle board is cheap, sure, but it sags over time, especially under weight. Solid wood or plywood holds up better. If you’re using particle board, you’ll need more brackets.
- Over-Drilling Pilot Holes: Too large, and the screw threads have nothing to grab. Too small, and you can split the stud or snap the screw head.
Cost & Time Breakdown
When a shelf collapses, the costs can pile up. Here
Related Articles
Keep troubleshooting with these hand-picked guides from FixlyGuide:
- That Annoying Sawhorse Wobble: The Simple Fix Your Shop Needs — Don't let a wobbly sawhorse ruin your cuts or—worse—cause an accident. I'll walk you through the real reasons your sawhorses are unstable a…
- The $10 Secret to Never Fixing a Stripped Screw Hole in Your Shelves Again — I'll show you how a common, cheap material can permanently fix stripped screw holes in shelves and furniture, saving you from wobbly repair…
- Why Your Paint Just Won't Cover (and How to Stop the Struggle) — Struggling with paint that just won't cover the old color, even after multiple coats? I'll show you why it happens and how to fix it for go…
- The Grimy Secret Under Your Bathroom Sink: Why Your Faucet Is Slow — A slow-flowing bathroom faucet is often more than just an annoyance; it's a clear sign of mineral buildup or internal damage that's surpris…
- Why Your New IKEA Shelf is Already Wobbly (It's Not the Instructions) — Even flat-pack furniture like IKEA shelves can become wobbly soon after assembly if common mistakes are made; learn how to identify the cau…
- The Dirty Truth About Your HVAC Filter (And When to Change It) — Don't just guess when to swap out your HVAC filter; I'll show you the real factors that tell you when it's time to change it for cleaner ai…
What should this project cost?
Enter your project details for a realistic cost range before you call anyone.
Cost depends heavily on which system turns out to be the source.
- Regional adjustment
- National average
- Labor share (typical)
- ~$1,620
- Quotes to collect
- 3 written estimates
Educational estimate based on national averages — not a binding quote. Always confirm with written local estimates.
Recommended for DIYers & woodworkers
Sponsored
The Top 20 Tools for Workshops of Any Budget
No stationary machines or power tools required — plus 3 fundamental tools that can't be bought at any price.
Get the free guide
Ted's Woodworking — The #1 Woodworking Resource
Detailed instructions, dimensioned drawings, materials & cutting lists, and 3D schematics for every skill level.
See the plansSponsored: links above are affiliate links. FixlyGuide may earn a commission on qualifying purchases — at no extra cost to you.
Frequently asked questions
How much weight can a heavy-duty shelf hold?+
The weight capacity varies wildly by manufacturer, material, and installation method. Always check the product specifications, but understand that listed capacities assume optimal installation into wall studs. A typical heavy-duty shelf might hold 100-200 lbs per linear foot when properly installed into studs.
What kind of screws should I use for heavy shelves?+
For maximum strength, use lag screws or substantial wood screws that are at least 2.5 to 3 inches long, ensuring at least 1.5 inches of penetration into the center of a wall stud. Phillips head or Torx drive screws are generally better than flathead for torque.
Can I install heavy-duty shelves into drywall without studs?+
Only if you use very specific, heavy-duty drywall anchors designed for high loads, like toggle bolts (e.g., Toggler Snaptoggles) or expanding metal anchors. Even then, your capacity will be significantly lower than if you hit studs. Avoid plastic anchors for anything heavy.
How far apart should shelf brackets be for heavy loads?+
For heavy loads, I recommend spacing brackets no more than 24-32 inches apart, ideally hitting a stud with every bracket if possible. For very long or very heavily loaded shelves, aim for even closer spacing to distribute the weight better.
What's the best way to find wall studs?+
A good electronic stud finder is your best friend. Move it slowly across the wall. For older homes with lath and plaster, a strong rare-earth magnet can often locate the nails holding the lath to the studs, which is a reliable method.
My shelf is sagging in the middle, what does that mean?+
Sagging usually indicates either an overloaded shelf that's exceeding its material strength or insufficient support brackets. You might need to add more brackets, use a thicker, stronger shelf material, or reduce the weight you're storing on it.
Should I glue the shelf to the brackets?+
No, generally not. While securing the shelf board to the brackets with small screws is crucial to prevent it from shifting or tipping, glue isn't typically necessary and makes future adjustments or removal difficult. Screws provide adequate hold.
What if my wall isn't drywall or studs, like concrete or brick?+
For concrete or brick, you'll need a hammer drill and specialized masonry drill bits. Then, use concrete anchors like sleeve anchors or wedge anchors, or tapcon screws, which are designed to bite directly into masonry. Always match the anchor to the material and load.
Discussion
Loading comments…