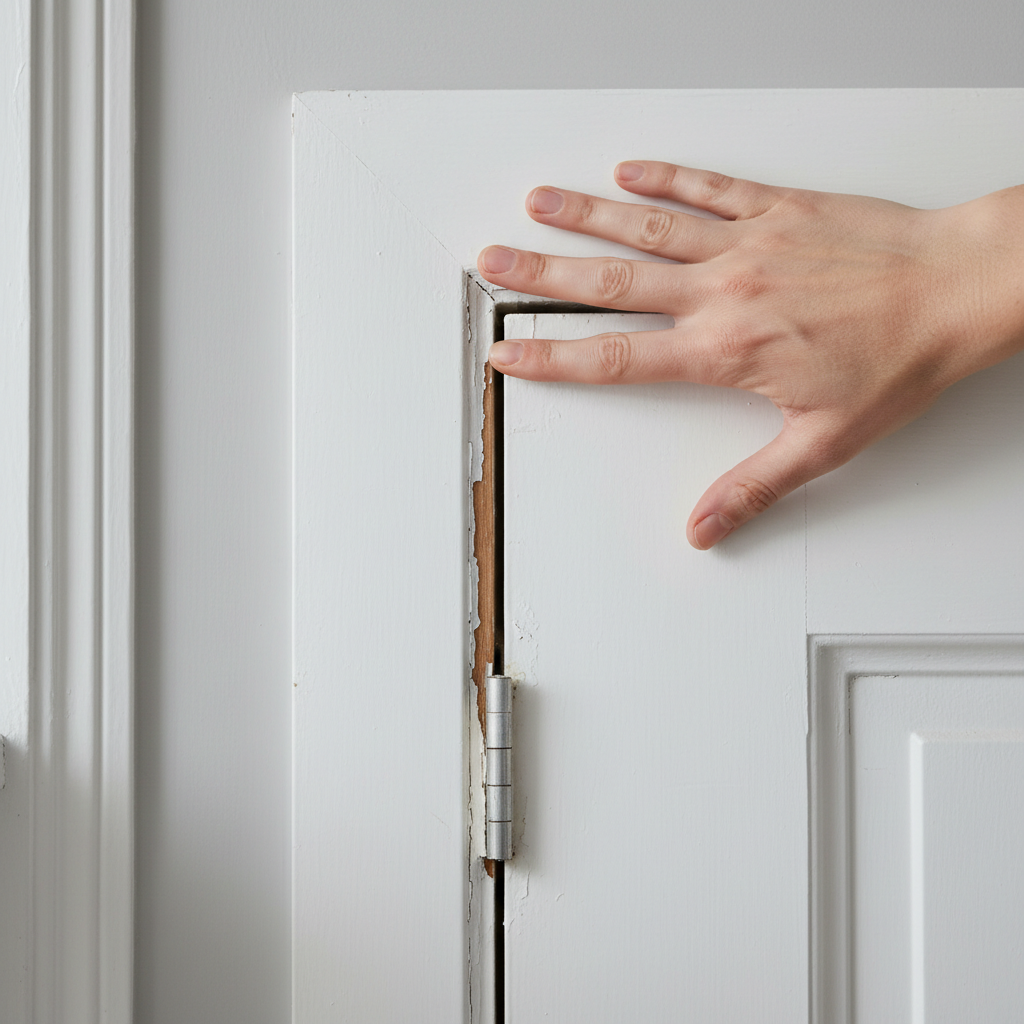
- Loose Door Frame: This is the big one. Screws tying the jamb to the rough framing (or the hinges to the jamb) work loose over time, and then the frame starts flexing and beating up the trim.
- Forceful Door Operation: Slamming doors puts a serious hit on the frame and casing. Kids, pets, strong wind — they all help speed the damage along.
- Seasonal Movement: Wood expands and contracts with humidity and temperature. That constant tug-of-war can pull apart miter joints or split the trim along the grain.
- Improper Installation: If the trim wasn’t nailed well to both the jamb and the wall framing, or the miters weren’t tight, it’s going to split easier.
- Undersized Fasteners: Nails that are too short or too skinny won’t hold the trim the way they should, especially on heavier solid core doors.
General remodeling · Renovation planning
| Project category | General remodeling |
|---|---|
| Problem type | Renovation planning |
| Trade required | General contracting |
| Urgency | Planned project |
| Safety risk | Low safety risk |
| DIY suitability | Pro recommended |
| Cost category | Major investment |
| Typical timeline | Design and permitting often 2–4 months before work starts |
| Contractor type | General contractor |
Repair option
Phase the work and fix the building envelope first.
Replacement option
Full renovation with permits, design, and a general contractor.
Common causes
- Space no longer fits how the household lives
- Resale preparation
- Deferred maintenance stacking up
Relevant tools:project cost estimatorcompare quoteshome improvement material prices
Published September 18, 2026Last updated September 18, 2026
Tools & materials you'll need
Affiliate linksAs an Amazon Associate FixlyGuide earns from qualifying purchases — at no extra cost to you. Prices and availability are accurate as of publication and subject to change.
Quick Answer
When you see your door trim splitting, especially vertically or near the hinges and strike plate, it usually isn’t just age creeping in. More often than not, it’s telling you the door frame’s moving around on you. Could be loose screws. Could be a door that gets slammed all day long. Could just be normal wood movement with the seasons. Either way, you’ll need to stabilize the frame first, then fix the split trim the right way.
The Problem
I’ve seen plenty of homes where somebody tried to caulk or paint over a split door casing, and sure enough, the crack came right back a few months later. Happens all the time. Because they’re patching the surface and ignoring the actual problem. Your door trim isn’t cracking for sport; it’s reacting to movement in the frame. And a door frame carries a heavy slab of wood that gets opened and shut dozens of times a day. That’s a lot of wear. Over time, or with a sloppy install, that stress shows up as cracks and splits in the trim, especially along the casing around the opening.
How It Works
Here’s what’s going on behind that split trim. A standard door frame has three main pieces: two vertical jambs and a horizontal head jamb. Those get fastened to the rough framing in your wall with nails or screws. Then the trim, or casing, gets nailed to the door jamb and the wall framing. Its job is to cover the gap between the jamb and the rough opening and make everything look finished.
Now, if a door gets slammed over and over, or if the hinge screws in the jamb or rough framing are loose, the whole frame can flex just a hair. Tiny movement, but it adds up. That little flex puts shear stress right where trim is weakest — usually the mitered corners or any grain line that was already under tension. Wood’s got its own little routine, too. It expands and contracts with humidity and temperature. Summer rolls in, the wood swells. Winter hits, it dries out and shrinks. That constant back-and-forth can pull joints apart or start splits, especially if the trim was installed too tight or the lumber wasn’t acclimated before install.
And if you’ve got a solid core door, you’re dealing with a lot of weight. A 32-inch wide solid core door can easily weigh 80-100 pounds. I pulled a water heater in Frisco last month that had exactly this kind of hinge-side stress nearby in the same hall — door was chewing up the casing because the top hinge screws were barely hanging on. Heavy door, weak fasteners, no dice.
Step-by-Step Fix
Alright, let’s get this fixed for good. Don’t rush it. A little patience now saves you from doing the same repair twice.
-
Inspect the Door & Frame – Identify the root cause
- Open and close the door a few times. Does it sag? Does it rub anywhere? Listen for squeaks or groans. Check if the door latch lines up perfectly with the strike plate. Any misalignment suggests the frame has shifted. Look closely at the split trim: is it near a hinge? The strike plate? A corner?
- Safety: Wear safety glasses, especially when dealing with older wood or potential splinters.
-
Tighten Loose Screws – Stabilize the frame
- Start with the hinges. Use a Philips head screwdriver (not a drill on high torque, you'll strip it!) to gently tighten all the screws on the door-side and frame-side of each hinge. If a screw just spins, it's stripped. Replace it with a longer, fatter screw (3-inch deck screws work great) that can bite into the rough framing behind the jamb. Do the same for the strike plate screws. Sometimes, a 3-inch screw in the top hinge (drilled through the jamb into the king stud) can pull a slightly sagging door frame back into square. I’ve used that trick in all kinds of houses, and it saves a lot of grief.
- Tools: Philips head screwdriver, 3-inch wood screws (#8 or #9).
-
Clean Out the Split – Prepare for repair
- Use a utility knife or a small scraper to carefully remove any old caulk, paint, or debris from inside the split. You want clean, bare wood for the glue to stick to. Don’t pry it open more than you have to, but make sure you can get glue deep inside.
- Tools: Utility knife, small scraper.
-
Apply Wood Glue – Bond the wood back together
- Generously apply a high-quality wood glue, like Titebond III, into the split. You can use a small syringe for fine cracks or a putty knife to work it in. Make sure the glue gets in as deep as possible. Wipe away any squeeze-out right away with a damp rag.
- Materials: Wood glue (e.g., Titebond III).
-
Clamp or Tape the Split – Hold it while it dries
- For wider splits, use small C-clamps or spring clamps with wood blocks to protect the trim, squeezing the split shut. If clamps aren't an option or for smaller cracks, painter's tape wrapped tightly around the trim can give you enough pressure. Leave it clamped for at least 4-6 hours, ideally overnight.
- Tools: Small C-clamps or spring clamps, wood blocks, painter's tape.
-
Fill Remaining Gaps – Smooth it out
- Once the glue is fully dry, take off the clamps or tape. You might still have a few little gaps or rough spots. Use a good quality wood filler — I like a two-part epoxy filler for bigger voids, but a pre-mixed spackle works for hairline cracks. Apply it with a putty knife and overfill just a bit. Let it dry completely — this might take 30-60 minutes depending on thickness.
- Materials: Wood filler or two-part epoxy filler.
-
Sand Smooth – Blend it in
- Once the filler is bone dry, sand the patched area flush with the surrounding trim. Start with 120-grit sandpaper to knock down the extra material, then finish with 180 or 220-grit for a smoother surface. Don’t go at it too hard; you don’t want to sand in a low spot.
- Tools: Sanding block, 120-grit and 220-grit sandpaper.
-
Prime and Paint – Finish strong
- Wipe down the trim to get rid of all the sanding dust. Apply a good quality primer over the repaired area — that helps the paint soak in evenly and stick right. Once the primer’s dry, paint the trim with at least two coats, using the same paint type and color as the existing trim. Feather the new paint into the old so it doesn’t jump out at you. Let each coat dry fully, usually 2-4 hours, before recoating.
- Materials: Primer, trim paint, paintbrush.
Common Causes
- Loose Door Frame: This is the big one. Screws tying the jamb to the rough framing (or the hinges to the jamb) work loose over time, and then the frame starts flexing and beating up the trim.
- Forceful Door Operation: Slamming doors puts a serious hit on the frame and casing. Kids, pets, strong wind — they all help speed the damage along.
- Seasonal Movement: Wood expands and contracts with humidity and temperature. That constant tug-of-war can pull apart miter joints or split the trim along the grain.
- Improper Installation: If the trim wasn’t nailed well to both the jamb and the wall framing, or the miters weren’t tight, it’s going to split easier.
- Undersized Fasteners: Nails that are too short or too skinny won’t hold the trim the way they should, especially on heavier solid core doors.
Common Mistakes
- Just Caulking Over It: That’s a band-aid on a broken bone. The movement underneath will break the caulk bond, and the split shows back up. You’ve gotta fix the frame first.
- Not Cleaning the Split: Old paint, caulk, or debris inside the crack keeps the glue or filler from bonding right, and that weakens the repair.
- Using the Wrong Filler: Caulk isn’t structural. Use a proper wood filler or epoxy for deep cracks if you want the repair to last. Caulk is for final, flexible gaps, not structural splits.
- Skipping the Sanding: A rough patch will stick out like a sore thumb, even under a couple coats of paint. Take the time to smooth it out.
- Over-tightening Screws: When you’re fixing loose hinges or jambs, cranking too hard can strip the wood and make things worse. Tighten until snug, not until it feels like it’s about to split.
- Not Priming Repaired Areas: Fresh filler or bare wood takes paint different than old painted trim, so you’ll get flashing or an uneven sheen if you skip primer. Don’t do that to yourself.
Cost & Time Breakdown
Here
Related Articles
Keep troubleshooting with these hand-picked guides from FixlyGuide:
- Why Does My Trim Look Like a Snake Ate It? (The Hidden Culprit) — That wavy, crooked trim isn't just shoddy workmanship—it's often a sign of underlying issues. Learn what causes your trim to warp and how t…
- That Annoying Water Stain on Your Ceiling? What Your Roof Isn't Telling You — Don't just paint over that ugly ceiling water stain! This guide helps you pinpoint the real leak source, from roof issues to plumbing probl…
- The Secret Reason Your Interior Door Sticks (It's Not Always Humidity) — A sticking interior door is a common household nuisance, often attributed to humidity, but frequently caused by easily fixable issues like…
- That Ceiling Stain Isn't a Leak: 5 Hidden Causes — A mysterious ceiling stain can be alarming, especially when there's no active leak. The real culprits are often hidden issues like attic co…
- That ONE Reason Your Closet Door Keeps Derailing — Stop just putting your sliding closet door back on the track. We reveal the hidden—and surprisingly simple—hardware issue that causes 90% o…
- The Sneaky Reason Your Extension Cord Keeps Tripping the Breaker — Don't just reset that breaker again! Discover why your extension cord keeps tripping your circuit and how to fix it right.
Should you do this yourself?
Answer five quick questions before you start. Safety outranks savings every time.
Your experience with work like this
How high do you have to work?
Does the job involve any of these?
Will it need a permit?
Specialty tools
Free and instant. Educational guidance only — not a quote, inspection, or professional diagnosis.
What should this project cost?
Enter your project details for a realistic cost range before you call anyone.
Cost depends heavily on which system turns out to be the source.
- Regional adjustment
- National average
- Labor share (typical)
- ~$1,620
- Quotes to collect
- 3 written estimates
Educational estimate based on national averages — not a binding quote. Always confirm with written local estimates.
Fixly Project Decision Box
- DIY difficulty
- Professional Recommended
- Estimated time
- Monitoring over 60–90 days · engineer visit 1–2 hours
- Cost level
- Major Project
Main tools / materials
- Crack monitor or pencil marks with dates
- Tape measure
- Marble or level for floor slope
When to stop and call a pro
- A crack wider than 1/4 inch or growing month over month
- Doors and windows that suddenly stick or will not latch
- Stair-step cracks in brick or block
- Separation between walls and ceilings or floors
Need professional help?
Get a Foundation EvaluationGet the print-ready PDF of this guide
A clean, ad-free, printable version you can keep on your phone or pin to the workshop wall. Free with a FixlyGuide account.
- Print-optimized layout
- Tools, materials & every step included
- Saved to your account
Recommended for DIYers & woodworkers
Sponsored
The Top 20 Tools for Workshops of Any Budget
No stationary machines or power tools required — plus 3 fundamental tools that can't be bought at any price.
Get the free guide
Ted's Woodworking — The #1 Woodworking Resource
Detailed instructions, dimensioned drawings, materials & cutting lists, and 3D schematics for every skill level.
See the plansSponsored: links above are affiliate links. FixlyGuide may earn a commission on qualifying purchases — at no extra cost to you.
Frequently asked questions
Why does my door trim keep splitting after I patch it?+
It keeps splitting because you're likely not addressing the root cause. The door frame itself is probably moving due to loose screws or excessive force. You need to stabilize the frame before repairing the trim.
Can I just use wood filler for the split trim?+
For very small, hairline cracks, wood filler might work if the underlying cause of movement is resolved. However, for significant splits, you should use wood glue first to bond the wood, then use filler for any remaining imperfections.
How do I know if my door frame is loose?+
Look for gaps between the jamb and the wall, or check if the door sags or rubs when you open and close it. You can also try tightening hinge screws; if they just spin, the frame is likely loose.
What kind of screws should I use for loose hinges?+
Use longer, sturdier wood screws, typically 3-inch #8 or #9 Phillips head screws. These will bite into the rough framing behind the door jamb, providing much better stability than the shorter screws often installed originally.
Is it okay to use caulk instead of wood glue for splits?+
No, caulk is not a structural adhesive. It's flexible and meant for sealing small gaps. For actual splits in wood trim, you need a strong wood glue to bond the separated pieces back together.
How long should I clamp the trim after gluing?+
For best results, leave the trim clamped for at least 4-6 hours, but ideally overnight (12-24 hours). This allows the wood glue to fully cure and create a strong bond.
My trim split at the mitered corner. Is the fix different?+
Not significantly. The principle is the same: stabilize the frame first, then clean out the joint, apply wood glue, clamp, fill, sand, and paint. Miter splits are often a sign of seasonal movement.
When should I call a professional for splitting door trim?+
If the splitting is extensive, affecting multiple areas, or if the door frame itself is severely warped or out of plumb, it might be best to call a professional carpenter. Also, if you suspect foundation issues causing significant wall movement, a structural engineer or general contractor should be consulted.

Discussion
Loading comments…