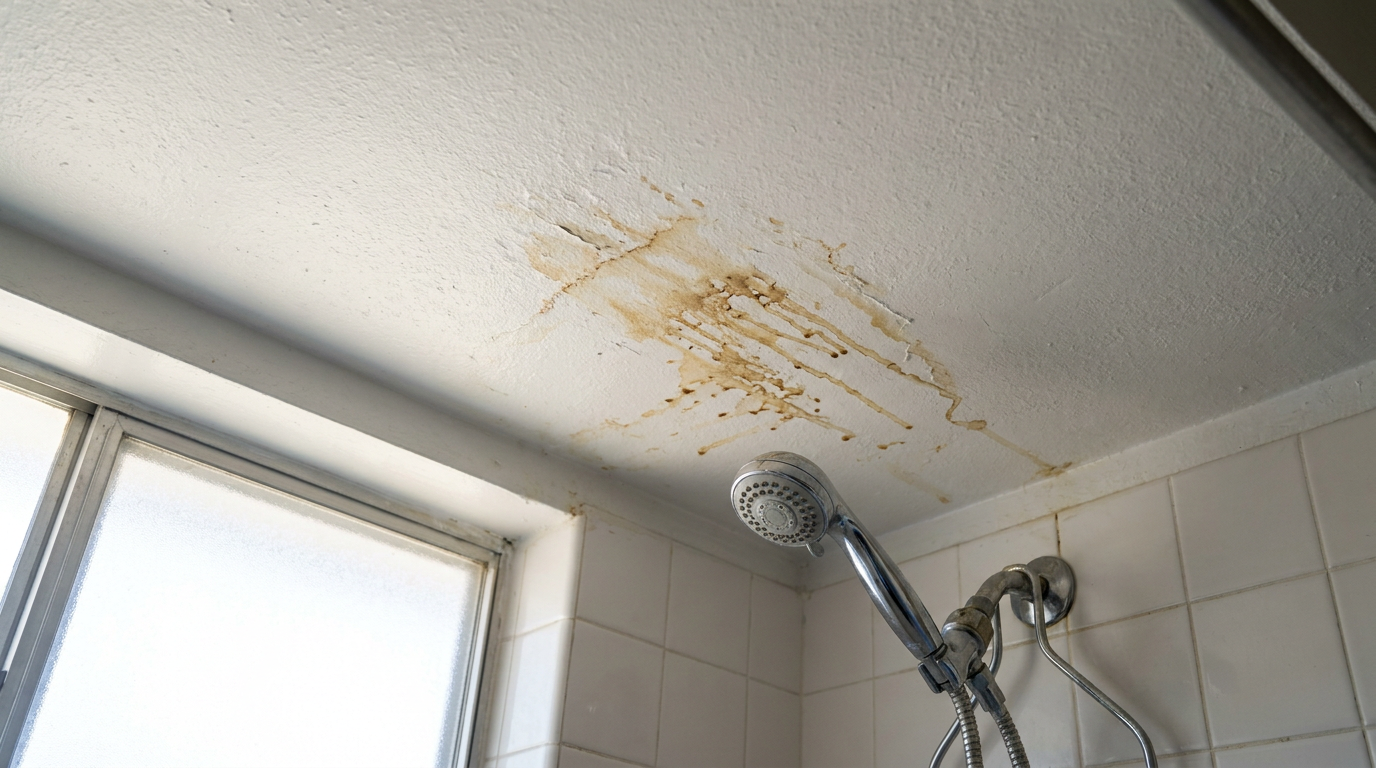
- Safety First & Prep the Room
- Tools: Drop cloths, painter's tape, safety glasses.
- Shut off the bathroom exhaust fan and any ceiling light fixtures you’re working around. Spread drop cloths over the floor, vanity, and toilet. Tape off trim, fans, and light fixtures so you don’t make a bigger mess than you started with.
General remodeling · Renovation planning
| Project category | General remodeling |
|---|---|
| Problem type | Renovation planning |
| Trade required | General contracting |
| Urgency | Planned project |
| Safety risk | Low safety risk |
| DIY suitability | Pro recommended |
| Cost category | Major investment |
| Typical timeline | Design and permitting often 2–4 months before work starts |
| Contractor type | General contractor |
Repair option
Phase the work and fix the building envelope first.
Replacement option
Full renovation with permits, design, and a general contractor.
Common causes
- Space no longer fits how the household lives
- Resale preparation
- Deferred maintenance stacking up
Relevant tools:project cost estimatorcompare quoteshome improvement material prices
Published October 18, 2026Last updated October 18, 2026
Tools & materials you'll need
Affiliate linksAs an Amazon Associate FixlyGuide earns from qualifying purchases — at no extra cost to you. Prices and availability are accurate as of publication and subject to change.
Quick Answer
Those stubborn brown or rusty-looking spots on your bathroom ceiling are usually from a thing called surfactant leaching. Sounds fancy, but it’s pretty simple. Moisture from your shower condenses on the painted surface and pulls water-soluble ingredients right out of the paint. Once the water evaporates, it leaves behind a sticky brown residue. It looks like a leak. Most times, it isn’t. It’s usually just paint that cured in a steamy room before it had a fair shot.
The Problem
You walk into the bathroom one morning and there they are: brownish spots on the ceiling, sometimes shiny, sometimes a little sticky. They can look like rust stains, or like somebody flicked coffee up there. First thought? Roof leak. Fair enough. I’d think the same.
But if the spots are centered over the shower or tub and feel a little greasy or soapy, you’re probably looking at something else. I’ve seen this a bunch over the years, and it’s a common homeowner headache in bathrooms that get used hard. Good news is, it usually isn’t a big structural mess. It’s fixable. And if you catch it early, you can handle it yourself without tearing half the ceiling down.
How It Works
To make sense of what’s happening on your ceiling, you need a quick paint lesson. All latex, or water-based, paints have soap-like ingredients called surfactants. Those help keep the pigment and binder mixed together in the can, and they help the paint spread out smooth on the wall. Think of them as wetting agents. Nothing glamorous. Just part of the recipe.
Normally, as paint dries and cures over several weeks, those surfactants leave with the water. The trouble starts when a fresh coat gets hit with high humidity before it’s fully cured. In a bathroom, that’s almost a given. Hot showers throw off a pile of steam, and that steam condenses on the cold ceiling. That moisture reactivates the surfactants that haven’t escaped yet, pulling them out of the paint film and up to the surface. When the water dries, the surfactants stay behind as that brownish, waxy mess. That’s surfactant leaching.
I pulled a bathroom ceiling in Frisco last month that had exactly this kind of spotting above the shower. No leak. Just fresh paint, no ventilation, and a family that took long, hot showers twice a day. Same story, different house.
It’s especially common with darker paint colors, since they use more colorants that can interfere with curing. But don’t think lighter colors get a free pass. Any shade can do it.
Step-by-Step Fix
Fixing surfactant leaching takes two moves: clean the stains you’ve got, then keep them from coming back. If you stay on it, the whole job shouldn’t take more than a weekend, and most of that is just dry time. Paint always loves to make you wait.
-
Safety First & Prep the Room
- Tools: Drop cloths, painter's tape, safety glasses.
- Shut off the bathroom exhaust fan and any ceiling light fixtures you’re working around. Spread drop cloths over the floor, vanity, and toilet. Tape off trim, fans, and light fixtures so you don’t make a bigger mess than you started with.
-
Wash the Ceiling Thoroughly
- Tools: Bucket, warm water, mild detergent (like dish soap), sponges, clean towels.
- Mix warm water with a few drops of mild dish detergent. Don’t grab harsh chemical cleaners — they’re overkill and can make the finish worse. Wet a sponge, wring it out well, and gently wash the stained areas. You should see that brown residue start to break loose. Work small sections and rinse the sponge often.
-
Rinse and Dry
- Tools: A second bucket with clean water, new sponge, towels.
- You’ve got to get all the soap off. Go back over the whole ceiling with a clean sponge and fresh water. Pat it dry with clean towels. Then let it dry all the way. Point a box fan at the ceiling and let it run for at least 24 hours. No shower steam, no hot baths, no shortcuts.
-
Assess the Surface
- After 24 hours, take a good look. A lot of times, washing the stains off is all you need. If the paint underneath looks sound and the spots are gone, you may be done. If the leaching was heavy, you might still see water marks, discoloration, or peeling paint. If that’s the case, keep going.
-
Spot-Prime with a Stain-Blocking Primer
- Tools: Stain-blocking shellac-based primer (e.g., Zinsser B-I-N), paintbrush or small roller.
- Any leftover stains or water marks need to be sealed so they don’t bleed through the new paint. A shellac-based primer is the ticket. It dries fast and blocks just about anything. Brush on a thin coat right over the problem spots and feather the edges so you don’t end up with a hard line. Let it dry fully per the label — usually less than an hour.
-
Apply a Quality Topcoat
- Tools: High-quality acrylic-latex paint with a "kitchen & bath" or "high-humidity" formulation, roller with extension pole, paintbrush.
- Now repaint. Pick a bathroom-rated paint. Those formulas are made with fewer leachable surfactants and more mildewcides, which helps a lot. Use your brush to cut in the edges, then roll the main field. Keep your pattern steady so you don’t leave lap marks. Let that first coat dry for at least 4-6 hours.
-
Apply the Second Coat
- Roll on a second full coat of the bathroom paint. That gives you even coverage and the best shot at durability and moisture resistance. Don’t skip it. Half a job here just means you’ll be back on the ladder sooner than you want.
-
The Critical Curing Period
- This is the part that really matters for prevention. The new paint needs time to cure. For the next 30 days, do everything you can to keep humidity down. Run the exhaust fan during every shower and for a full 30 minutes afterward. Crack a window if you can. The goal is simple: keep condensation off the paint until it’s fully hard and all the chemistry has settled down.
Common Causes
- Poor Ventilation: An undersized, clogged, or missing bathroom exhaust fan is the #1 culprit. If steam can’t get out, it lands on the coldest surface — usually the ceiling.
- Paint Cured in High Humidity: Painting in a damp room or jumping into a steamy shower too soon after painting (within the first 2-3 weeks) is practically asking for surfactant leaching.
- Using the Wrong Paint: Standard wall paint just isn’t made for a bathroom’s moisture load. You need a dedicated "kitchen & bath" formula that stands up to humidity and mildew.
- Dark Paint Tints: Deeper colors need more universal colorants mixed into the base. Those can bump up the amount of leachable material in the paint.
- Actual Water Leak: Less common for this kind of spotting, sure. But don’t rule it out. If the spot grows, stays wet, or comes with sagging drywall, you’ve got a plumbing or roof leak that needs attention right now.
Common Mistakes
- Painting Over the Stains: Slapping new paint over brown spots without washing them first is a bad move. The surfactants are water-soluble, and the water in the fresh paint just wakes them back up and drags the stain through the new coat.
- Not Letting the Ceiling Dry: After washing, the surface needs to be bone-dry before you even think about primer or paint. Trap moisture under a new coat and you’re asking for peeling.
- Skipping Primer: If any water marks or stubborn stains are still there after cleaning, skipping a good stain-blocking primer means they’ll bleed through later. Then you’re doing the whole dance again in six months.
- Using the Wrong Primer: Don’t just grab any latex primer off the shelf. For water-soluble stains like this, you want a solvent-based primer like shellac or oil to lock it down for good.
- Not Improving Ventilation: Moisture is the whole game here. Clean it, repaint it, sure — but if you don’t fix the airflow, those spots will come right back.
Cost & Time Breakdown
| Task | DIY Cost | Pro Cost | Time |
|---|---|---|---|
| Wash & Monitor | $5–$15 (soap, sponges) | $150–$250 | 1-2 hours + drying |
| Prime & Repaint Ceiling | $50–$100 (primer, paint, roller) | $350–$600 | 4-6 hours + drying |
| Upgrade Exhaust Fan | $70–$200 (for a new fan unit) | $300–$750 (incl. electrical) | 2-3 hours |
| Full Ceiling Repair & Repaint | $100–$250 | $700–$1,500+ | 2-3 days |
Tips & Prevention
- Run Your Fan Religiously: The exhaust fan isn’t just for smells. Run it every time you shower and keep it on for 20-30 minutes afterward so the moist air gets pushed out.
- Check Your Fan's Power: A fan’s capacity is measured in cubic feet per minute (CFM). For most bathrooms, you want at least 80 CFM, or even 110 CFM if the space is bigger. Rule of thumb: 1 CFM per square foot of bathroom area.
- The Toilet Paper Test: Not sure your fan’s doing much? Hold a single square of toilet paper up to the grille while it’s running. If it sticks there, you’ve got decent suction. If it flutters or falls, the fan’s weak or the duct’s clogged.
- Wipe Down Walls: After a shower, hit the tile walls and glass door with a squeegee. That gets rid of a surprising amount of water before it turns into humidity.
- Choose the Right Sheen: When you repaint, go with satin, eggshell, or semi-gloss. Those harder, less porous finishes clean up easier and shrug off moisture better than flat paint.
When to Call a Professional
If the stained area feels soft, spongy, or saggy, or if the spots keep coming back fast as dark water marks even after the ceiling dries, stop and call a plumber or roofer. That’s not cosmetic paint trouble anymore. That’s an active leak from above, and you don’t want to mess around with it. Ignore it long enough and you can end up with real structural damage and mold, and nobody wants that mess on their hands.
Related Articles
Keep troubleshooting with these hand-picked guides from FixlyGuide:
- That Ceiling Stain Isn't a Leak: 5 Hidden Causes — A mysterious ceiling stain can be alarming, especially when there's no active leak. The real culprits are often hidden issues like attic co…
- Window Frame Cracked? 5 Causes and How to Fix Each Type — A cracked window frame isn't just ugly—it can lead to leaks, drafts, and even bigger structural problems if you don't fix it right.
- Why Your Hardwood Floors Have Gaps in Winter (And When to Worry) — Seeing gaps in your hardwood floors this winter? It's likely caused by low indoor humidity making the wood shrink. Learn what's normal, how…
- Keypad Lock Not Working? 10 Reasons It Won't Open—and the Fix — Is your electronic keypad deadbolt suddenly refusing to open? From dead batteries to a jammed bolt, here are the most common causes and wha…
- That ONE Reason Your Closet Door Keeps Derailing — Stop just putting your sliding closet door back on the track. We reveal the hidden—and surprisingly simple—hardware issue that causes 90% o…
- Toilet Keeps Clogging? 9 Common Causes and How to Fix Them for Good — A toilet that clogs every few days points to a bigger issue than a one-time blockage. We'll walk through the common causes, from simple clo…
Should you do this yourself?
Answer five quick questions before you start. Safety outranks savings every time.
Your experience with work like this
How high do you have to work?
Does the job involve any of these?
Will it need a permit?
Specialty tools
Free and instant. Educational guidance only — not a quote, inspection, or professional diagnosis.
Estimate your own project cost
National averages are a starting point. Enter your details for a range that fits your house.
Interior paint estimator
- Paint$96
- Supplies (tape, rollers, drop cloth)$35
- Estimated total (DIY)$131
Hiring a pro? Add roughly $1.50–$4.00/sq ft for labor depending on prep work and trim detail.
Educational estimate only — always confirm with written local bids.
What should this project cost?
Enter your project details for a realistic cost range before you call anyone.
Mid-range remodels commonly $12,000–$22,000; small repairs often under $600.
- Regional adjustment
- National average
- Labor share (typical)
- ~$5,603
- Quotes to collect
- 3 written estimates
Educational estimate based on national averages — not a binding quote. Always confirm with written local estimates.
Before you start
Check the difficulty, permits, and safety risk — then decide whether to call a pro.
Free, no signup required. Estimates are educational guidance, not a quote or an inspection.
Get the print-ready PDF of this guide
A clean, ad-free, printable version you can keep on your phone or pin to the workshop wall. Free with a FixlyGuide account.
- Print-optimized layout
- Tools, materials & every step included
- Saved to your account
Recommended for DIYers & woodworkers
Sponsored
The Top 20 Tools for Workshops of Any Budget
No stationary machines or power tools required — plus 3 fundamental tools that can't be bought at any price.
Get the free guide
Ted's Woodworking — The #1 Woodworking Resource
Detailed instructions, dimensioned drawings, materials & cutting lists, and 3D schematics for every skill level.
See the plansSponsored: links above are affiliate links. FixlyGuide may earn a commission on qualifying purchases — at no extra cost to you.
Frequently asked questions
Are brown spots on the bathroom ceiling always from a leak?+
Not always. While a leak is possible, if the spots are sticky or brownish-yellow and widespread above a shower, it's very often surfactant leaching from the paint itself. If the spot is localized, growing, and the drywall is soft, then you should suspect a leak.
Can I just paint over the brown spots on my ceiling?+
No, you should never paint directly over them. The spots are water-soluble residues. The water in new latex paint will reactivate them, pulling the stain right through the fresh coat. You must wash the ceiling thoroughly with a mild detergent and rinse it clean first.
What kind of paint is best for a bathroom ceiling?+
You should use a high-quality acrylic paint specifically labeled for 'kitchens and baths.' These are formulated to withstand high humidity and often contain mildewcides. A satin or semi-gloss sheen is also better than flat, as it creates a less porous, more washable surface.
How do I know if my bathroom exhaust fan is working properly?+
Turn the fan on and hold a single square of toilet paper up to the grille. If the fan can hold the paper tight against it, it's moving air effectively. If the paper flutters or falls away, the fan is likely too weak or the duct may be clogged with dust and needs cleaning.
How long do I need to wait to shower after painting my bathroom?+
This is a critical step. While the paint may feel dry to the touch in hours, it takes up to 30 days to fully cure and harden. You should wait as long as possible, but if you must use the shower, try to avoid long, steamy showers and ventilate the room extremely well for the first few weeks.
Will a dehumidifier help prevent these brown spots?+
Yes, a dehumidifier can help, but it's a secondary solution. Your first and best line of defense is a properly sized and functioning exhaust fan that vents moist air directly outside. A dehumidifier can be useful to help dry the room out after a shower but it doesn't replace proper ventilation.
Why are the spots sticky or greasy?+
The stickiness is the classic sign of surfactant leaching. The surfactants are soap-like compounds in the paint. When moisture draws them to the surface, they leave behind this tacky, sometimes oily or waxy, residue as the water evaporates.
Does the color of my paint make a difference?+
It can. While surfactant leaching can happen with any color, it's often more noticeable and more common with darker or deeper tints. This is because creating those colors requires adding more liquid colorants to the paint base, which can affect the curing process and total surfactant concentration.
Discussion
Loading comments…