- Visual Inspection for Obvious Damage — Look for the Burn Marks
- Check: Waveguide cover, oven cavity walls, rotating plate.
- If found: A burnt waveguide cover often means arcing from food debris. Replace the cover and clean the cavity well.
HVAC · High energy usage
| Project category | HVAC |
|---|---|
| Problem type | High energy usage |
| Trade required | HVAC |
| Urgency | Planned project |
| Safety risk | Low safety risk |
| DIY suitability | DIY for experienced homeowners |
| Cost category | High cost |
| Typical timeline | Assessment within weeks; replacement planned off-season |
| Contractor type | Licensed HVAC technician |
Repair option
Duct sealing, insulation, and a tune-up before touching the equipment.
Replacement option
High-efficiency replacement sized by a load calculation, not a rule of thumb.
Common causes
- Aging, low-efficiency equipment
- Leaking ducts losing conditioned air
- Insufficient attic insulation
- Oversized system short-cycling
Relevant tools:project cost estimatorrepair or replace
Published August 30, 2026Last updated August 30, 2026
Tools & materials you'll need
Affiliate linksAs an Amazon Associate FixlyGuide earns from qualifying purchases — at no extra cost to you. Prices and availability are accurate as of publication and subject to change.
Quick Answer
That sudden loud buzz from your microwave isn’t just irritating; it’s usually a cry for help from one of the high-voltage parts inside. Could be the magnetron. Could be the high-voltage diode. Sometimes it’s the capacitor acting up and failing hard. Ignore it, and you’re not just risking burnt popcorn — you’re flirting with electrical trouble or a microwave that’s dead as a doornail. Best move? Unplug it right now and leave it unplugged until you know what’s going on. I’ve seen enough melted cords and scorched plugs to know that a “little buzz” can turn into a real mess.
The Problem
Alright, let’s talk about that buzz. You toss in dinner, hit start, and instead of the usual hum, you get this ugly buzzing or growling sound. It’s not a soft purr. It sounds like something inside is fighting for its life.
A lot of homeowners just shrug and live with it. “It’s still heating.” “It’s old.” Maybe. But that noise is a warning. Something in the microwave’s high-voltage circuit is straining to make the microwaves that cook your food. That’s not just a comfort issue — it’s a safety issue. Those high-voltage parts pack a punch, and when they start going bad, they can make heat, arcing, smoke, the whole ugly show. I rolled up to a kitchen in Frisco last month where a “minor buzz” had already cooked the plug end halfway to black. No dice. You don’t want to wait that long. So let’s crack it open and see what’s actually happening behind that door.
How It Works
To really get why your microwave might buzz like a trapped hornet, you’ve gotta know a little about how the thing cooks in the first place. It’s not magic. It’s just clever engineering.
At the center of it is the magnetron. That’s the part that takes regular household electricity and turns it into microwaves. Not surf waves — electromagnetic waves, usually around 2.45 gigahertz (GHz).
But the magnetron doesn’t run on plain old wall power. It needs a serious shot of voltage. That’s where the high-voltage circuit comes in. You’ve got a high-voltage transformer stepping your standard 120-volt AC power up to something like 2,000 to 5,000 volts AC. That’s a lot of juice. Then that high-voltage AC runs through a high-voltage capacitor and a high-voltage diode. The capacitor stores electrical energy, and the diode works like a one-way valve, letting current move in only one direction. Together, they turn that high-voltage AC into an even higher, pulsating DC voltage — sometimes as high as 4,000 to 6,000 volts DC — which is exactly what the magnetron needs to make microwaves. The capacitor also smooths the power delivery and hangs onto a nasty charge even after the microwave’s unplugged, which is why poking around inside one of these things without discharging it is seriously dangerous.
So when any part of that high-voltage setup — transformer, capacitor, diode, or magnetron — starts to struggle, you can get a loud buzzing or arcing sound. That’s basically the sound of parts getting slammed under a heavy electrical load. Sometimes it’s a loose connection. Sometimes it’s an internal short. Either way, the microwave’s telling you something’s wrong.
Step-by-Step Fix
Before you do anything, and I mean anything, unplug the microwave from the wall. We’re talking thousands of volts here, even when the unit’s “off.” Safety first. No shortcuts.
-
Unplug & Ventilate — Safety First, Always
Pull the plug out of the wall. Don’t just hit the button and call it a day; actually remove the plug. If you smell burning or see smoke, open windows and get some air moving through the kitchen.- Tools: Your hands.
- Safety: Always assume high voltage is present. Never work on a plugged-in microwave.
-
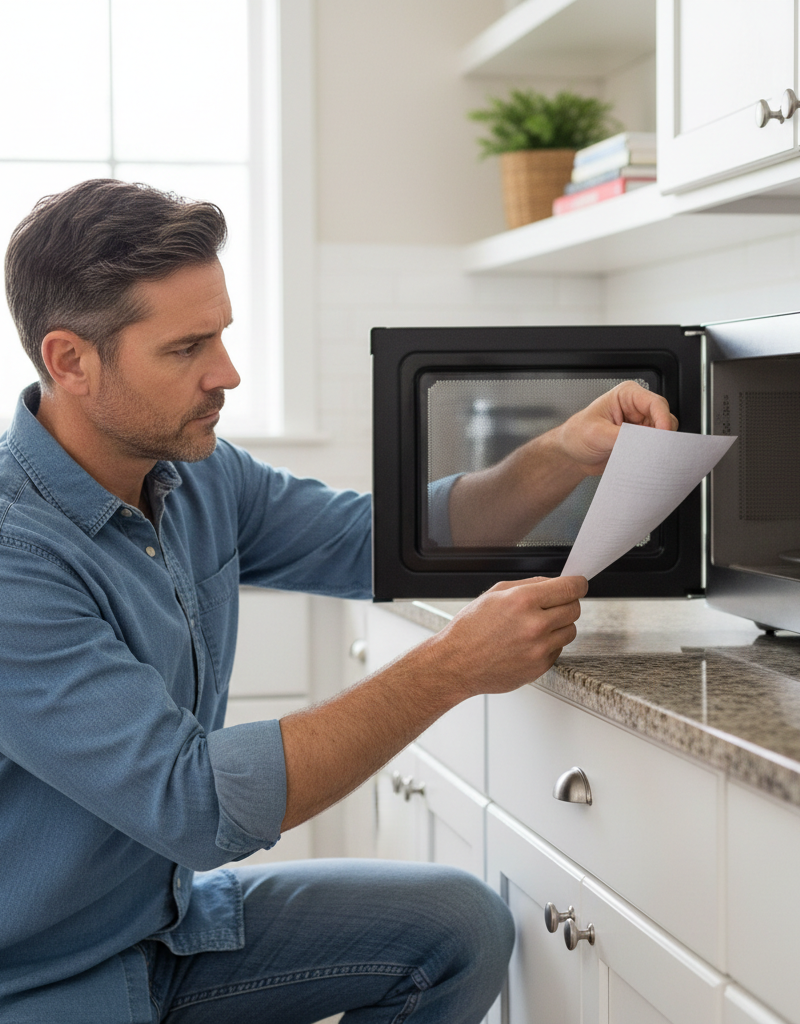
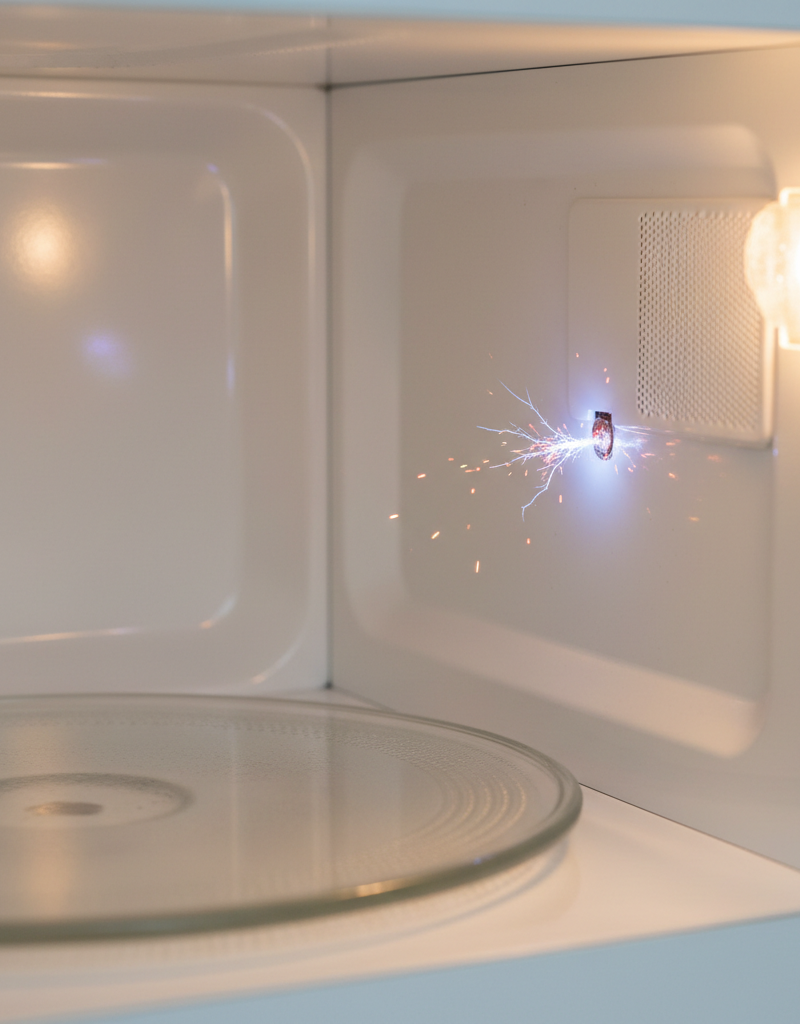
Visual Inspection for Obvious Damage — Look for the Burn Marks
Open the microwave door and give the inside a good once-over. Look for scorch marks, burnt food residue, or any metal objects that might be arcing. Pay special attention to the waveguide cover — that mica or plastic plate inside, usually on the right. If it’s burnt or damaged, that’s a big clue.- Check: Waveguide cover, oven cavity walls, rotating plate.
- If found: A burnt waveguide cover often means arcing from food debris. Replace the cover and clean the cavity well.
-
Check the Turntable & Guide Ring — Sometimes It’s Simple
Pull out the glass turntable and the plastic guide ring underneath it. Clean them up good. Sometimes food junk gets stuck under the ring, or the turntable isn’t sitting right, and that’s what’s making the grinding or buzzing sound as it tries to spin. Happens more than folks think.- Clean: Glass tray, roller guide ring, and the track it runs in.
- Reinstall: Make sure everything sits right before you test it.
-
Inspect the Door Latches — A Loose Latch Can Cause Havoc
Shut the microwave door firmly. Do the latches catch all the way? A worn or out-of-line door latch switch can keep the microwave from fully kicking on, and you can end up with partial operation and a buzzing sound as it tries to start. If the door isn’t sealing right, you can also get microwave leakage — and that’s a call-a-pro situation if I’ve ever seen one.- Test: Wiggle the door gently when it’s closed. Is there too much play? Do the latches click in clean?
- If loose: Tighten any visible screws on the door assembly, but if the latch mechanism’s broken, you’re probably replacing parts.
-
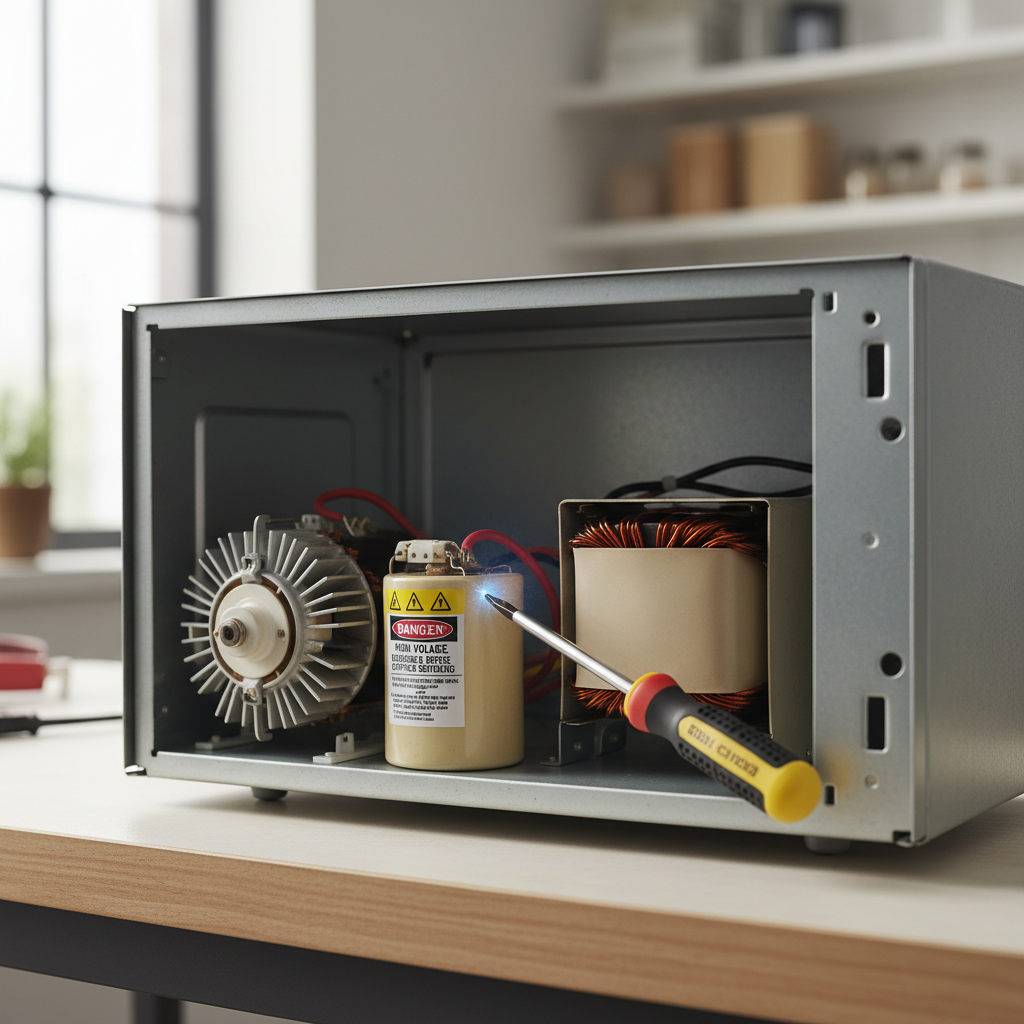
Discharge the High-Voltage Capacitor — CRITICAL SAFETY STEP
This is where it gets serious. Do NOT skip this. Even unplugged, the high-voltage capacitor can hold a deadly charge for minutes, hours, or even days. You need to discharge it. Take off the outer casing of the microwave — usually a few screws on the back and sides. Find the large cylindrical capacitor. It often looks like a beer can. Using a well-insulated screwdriver with an insulated handle, short the two terminals of the capacitor to the metal chassis. You might hear a pop or see a spark. Do it a few times. Don’t touch the terminals directly. Wear heavy-duty electrician’s gloves. If you’re not comfortable doing that, stop right here and call a pro.- Tools: Insulated screwdriver, electrician’s gloves (rated for 1,000V or higher).
- Location: Usually near the transformer and magnetron, often labeled with warnings.
- Caution: This step is extremely dangerous if not done correctly.
-
Check High-Voltage Diode and Capacitor — The Usual Suspects
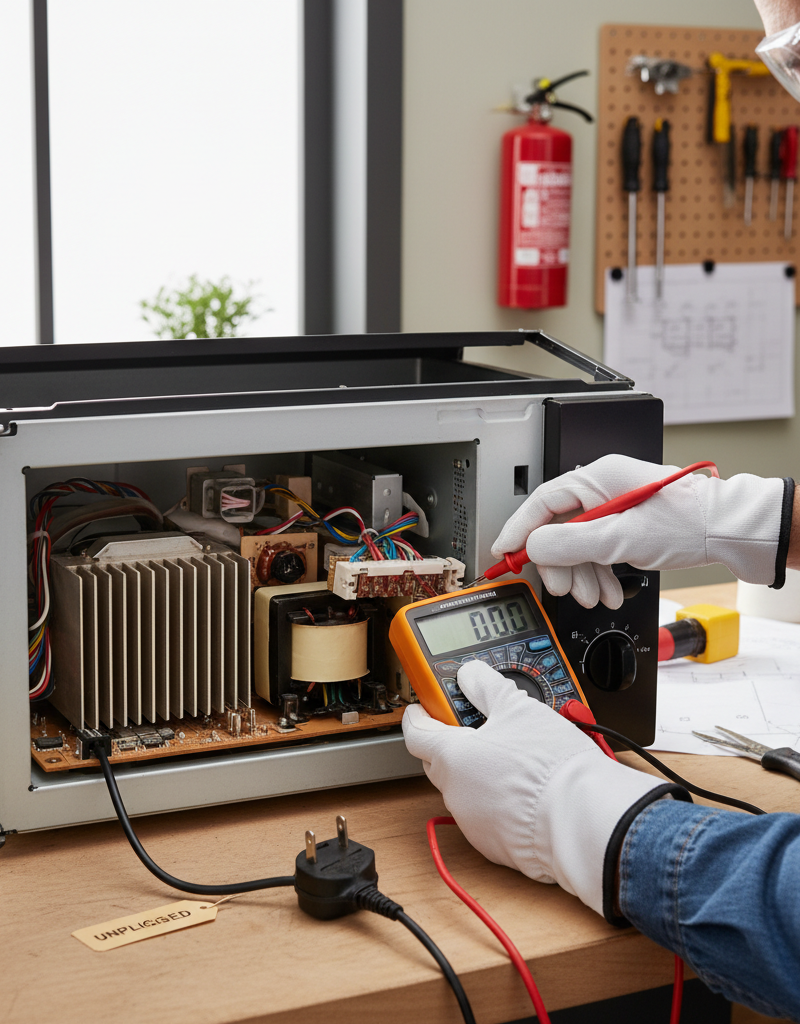
After you’ve safely discharged the capacitor, look over the high-voltage diode and capacitor. Check for arcing, burning, swelling on the capacitor, or cracks. A bad diode often looks charred or has little burn marks. You can test the diode with a multimeter for continuity in one direction and the capacitor for proper capacitance, but that takes specialized knowledge. A buzz that kicks on instantly and is really loud often points to a shorted diode or capacitor.- Diode: Often a thin, black cylindrical component connected to the capacitor and transformer.
- Capacitor: Large cylinder. Test for short by setting multimeter to resistance (Ohms) and touching probes to terminals. It should show a brief resistance then open. If it shows continuous low resistance, it’s likely shorted.
- Note: If these parts look bad or test bad, they need replacing. They’re often sold as a kit.
-
Inspect the Magnetron — The Heart of the Oven
The magnetron is the big metal tube with cooling fins, usually mounted near the waveguide. Look for damage: burnt spots, melted plastic, or a discolored antenna tip. Sometimes the magnetron’s internal filament fails, and it’ll buzz hard while trying to draw power but not actually make microwaves. You can check filament continuity with a multimeter — should be a few ohms — but a buzzing magnetron usually comes down to ruling out the diode and capacitor first. A badly damaged magnetron might also look swollen or have a strong metallic burnt smell.- Location: Often covered by a metal housing, connected to the high-voltage circuit.
- Visual Check: Look for arcing or burnt areas around the antenna cap.
-
Examine High-Voltage Transformer — The Big Power Booster
The transformer is the biggest, heaviest part in the high-voltage circuit. It usually looks like a big block of metal and wire coils. Check for overheating: melted plastic insulation, bulging, or a strong burnt electrical smell. A failing transformer can make a deep, loud hum or buzz. If the buzz is deep and steady, and everything else looks fine, the transformer may be your culprit. Replacement gets expensive and complicated, and a lot of times it makes more sense to replace the microwave.- Visual Check: Melted wax, cracked casing, or discoloration are bad signs.
- Weight: It’s surprisingly heavy for its size.
-
Look for Loose Connections or Debris — The Simple Things First
With the casing open, trace the wires in the high-voltage circuit gently. Any loose connections? Any debris — like rodent droppings, which I found in a microwave in Libertyville once, and the homeowner swore it was “just buzzing” until I showed him the nest near the transformer — that could be causing a short? Tighten what needs tightening. Sometimes that’s all it is.- Check: All wire terminals, especially around the transformer, capacitor, and magnetron.
- Clean: Use compressed air or a vacuum to remove dust and debris.
-
Consider Control Board or Fan Issues — Less Common, Still Possible
This isn’t the usual cause of a loud electrical buzz, but sometimes the cooling fan or even parts on the main control board can make odd noises. If the fan motor bearings are seizing up, you’ll hear a grinding buzz. Check the fan for obstructions or too much wobble. A buzz from the control board might mean a bad relay, though it usually sounds a little different than a high-voltage buzz.
* Fan: Spin the fan blades by hand (unplugged, of course). Should spin freely.
* Control Board: Look for burnt spots or bulging capacitors on the main circuit board.
Common Causes
- Failing High-Voltage Diode: This little one-way valve works hard. Once it starts going bad, it can short the high-voltage circuit and make a loud, sudden buzzing or growling sound. It’s often the cheapest high-voltage part to replace, thankfully.
- Shorting High-Voltage Capacitor: This part stores a massive charge. If it shorts internally, the transformer can overload and buzz hard while trying to charge the failed capacitor.
- Failing Magnetron: The magnetron is the workhorse. If its internal parts start arcing or the filament fails, it can pull too much current and make a buzzing sound while it struggles to produce microwaves.
- Loose or Arcing Connections: Sometimes it’s just a wire terminal that’s come loose after years of vibration. That can cause arcing and a buzzing noise.
- Overloaded Transformer: The transformer itself doesn’t usually fail first, but if the diode, capacitor, or magnetron shorts out, the transformer gets overloaded and can buzz very loudly in protest.
- Food Debris or Damaged Waveguide: If food splatter gets cooked onto the waveguide cover or inside the cavity, it can carbonize and cause arcing, which sounds crackly or buzzy.
Common Mistakes
- Ignoring the Buzz: Biggest mistake right there. A buzzing microwave isn’t “just old”; it’s telling you there’s a serious electrical problem brewing. Ignore it long enough and you can end up with more damage, a fire hazard, or a dead appliance.
- Assuming it’s "Just Food": Sure, food debris can cause arcing. But don’t assume that’s the only issue. A quick clean might stop a crackle, but a steady loud buzz usually means an internal electrical problem.
- Not Discharging the Capacitor: Deadly mistake. The high-voltage capacitor can hold a lethal charge for a long time. Always, always discharge it safely before touching anything inside.
- Touching High-Voltage Components Without Insulation: Even after discharge, grabbing components like the magnetron or transformer terminals with bare hands is a bad idea. Residual charge or induced voltage can still bite you. Use insulated tools.
- Using the Wrong Replacement Parts: Microwave parts, especially the high-voltage ones, need to match. Don’t try to rig something up or use a part that isn’t the right fit. That thing’s toast waiting to happen.
- Continuing to Use a Microwave That Arcs or Smokes: If you see sparks, flames, or smoke, unplug it immediately and don’t use it again until it’s professionally repaired or replaced. It’s not safe anymore.
Cost & Time Breakdown
Here’s a rough idea of what you’re looking at if you decide to tackle this yourself or bring in a pro. These are averages; prices can swing depending on your location and microwave model.
| Task | DIY Cost | Pro Cost | Time (DIY) |
|---|---|---|---|
| Basic Cleaning / Turntable Fix | $0 | N/A | 5-10 minutes |
| Replace Waveguide Cover | $10-$30 | $100-$150 | 15-20 minutes |
| Replace High-Voltage Diode | $10-$25 | $150-$250 | 30-60 minutes |
| Replace High-Voltage Capacitor | $20-$50 | $180-$300 | 30-60 minutes |
| Replace Magnetron | $70-$150 | $200-$400 | 1-2 hours |
| Replace Transformer | $50-$120 | $250-$500 | 1-2 hours |
| Entire Microwave Replacement | $100-$400+ | N/A | Instant (shopping) |
Tips & Prevention
- Keep it Clean: Wipe down the inside of your microwave now and then, especially the ceiling and the waveguide cover. Food splatter can carbonize and cause arcing, which sounds like buzzing or crackling. A quick wipe after each use can save you some grief.
- Use Microwave-Safe Cookware: Sounds obvious, right? But I’ve seen folks put metal-trimmed plates or foil in the microwave way too many times. Metal causes arcing and can damage the magnetron and other parts. If it’s not labeled "microwave safe," don’t gamble on it.
- Avoid Running Empty: Never run your microwave empty. Without food or liquid to absorb the microwaves, the energy can bounce back to the magnetron and damage it. If you’re just testing it or running it briefly, put at least a cup of water in there.
- Inspect Power Cord: Check the power cord every so often for fraying, cuts, or heat damage. A bad cord can arc at the outlet or inside the cord itself, and that’s a buzz plus a fire risk.
- Proper Door Closure: Make sure the microwave door closes firmly and latches securely. A loose door can let microwave energy leak, which is a safety issue, and it can also strain the internals.
- Listen to Your Microwave: Learn what normal sounds like. Any new, louder, or different buzzing, humming, or grinding noise means it’s time to take a closer look. Don’t wait until it smells like burnt plastic.
When to Call a Professional
Look, some jobs just aren’t DIY, especially when thousands of volts are involved. If you’re not comfortable with electrical work, discharging capacitors, or taking appliances apart, don’t mess around — call a licensed appliance repair technician. If you see smoke, sparks, or flames, or smell a strong electrical burning odor, unplug the microwave immediately and call a pro. If the buzzing comes with the microwave not heating food, or the door doesn’t latch right, it’s time for expert help. Trying to fix high-voltage parts without the right training and tools is plain dangerous and can lead to serious injury or more damage to the appliance, maybe even to the point where it can’t be saved. A pro’s got the proper gear and knows how to handle those voltage levels safely.
Related Articles
Keep troubleshooting with these hand-picked guides from FixlyGuide:
- Your Refrigerator's Loud Hum? The Fix Most People Miss — A constant, loud refrigerator hum is more than annoying—it's a warning sign. Before you call a pro, discover the #1 most overlooked cause a…
- The Silent Fire Hazard Lurking In Your Laundry Room — Don't let a clogged dryer vent become a silent fire starter. Learn why this common oversight is so dangerous, the clear warning signs to lo…
- Why Your Oven's Set Temperature Is a 50-Degree Lie — Your oven is likely off by 25-50°F, ruining your recipes; learn if it's a simple calibration issue you can fix in minutes or a faulty senso…
- Why Your Microwave Sparks and How to Prevent a Fire — A sparking microwave is alarming, but often an easy fix. Discover the common causes of microwave arcing, from forgotten forks to hidden dam…
- The Mystery of the Warm Fridge: Why Your Food Is Spoiling (and When to Call a Pro) — If your refrigerator isn't keeping food cold, it could be a simple fix or a serious problem requiring a professional. Learn what to check a…
- The Surprising Reason Your Ceiling Fan Wobbles (It’s Not Always What You Think) — A wobbling ceiling fan is more than just annoying; it can be a symptom of various issues, from loose screws to unbalanced blades, impacting…
Should you do this yourself?
Answer five quick questions before you start. Safety outranks savings every time.
Your experience with work like this
How high do you have to work?
Does the job involve any of these?
Will it need a permit?
Specialty tools
Free and instant. Educational guidance only — not a quote, inspection, or professional diagnosis.
What should this project cost?
Enter your project details for a realistic cost range before you call anyone.
Cost depends heavily on which system turns out to be the source.
- Regional adjustment
- National average
- Labor share (typical)
- ~$1,620
- Quotes to collect
- 3 written estimates
Educational estimate based on national averages — not a binding quote. Always confirm with written local estimates.
Get the print-ready PDF of this guide
A clean, ad-free, printable version you can keep on your phone or pin to the workshop wall. Free with a FixlyGuide account.
- Print-optimized layout
- Tools, materials & every step included
- Saved to your account
Frequently asked questions
Is a buzzing microwave dangerous?+
Yes, a loud or new buzzing sound in a microwave can indicate a serious electrical problem with high-voltage components, posing risks like arcing, electrical shock, or even fire. It's best to unplug it immediately and investigate.
What parts typically cause a microwave to buzz?+
The most common culprits for a buzzing microwave are failing high-voltage components: the magnetron, high-voltage diode, or high-voltage capacitor. Sometimes, it can also be a struggling high-voltage transformer or loose connections.
Can I still use my microwave if it's buzzing?+
No, it's strongly advised not to use a microwave that is buzzing loudly or making unusual noises. This indicates a potential malfunction in critical high-voltage parts that could be dangerous to operate.
How do I discharge a microwave capacitor?+
To discharge a microwave capacitor, first unplug the unit. Then, using an insulated screwdriver with an insulated handle, short out the two terminals of the capacitor to the metal chassis. You may see a spark or hear a pop. This is a very dangerous step and should only be performed by those comfortable with high-voltage electricity.
What if my microwave buzzes but still heats food?+
Even if your microwave still heats, a new or loud buzzing sound is a warning. It suggests a component is under stress or failing, which can lead to complete failure or a safety hazard down the line. It's best to address the issue promptly.
How much does it cost to fix a buzzing microwave?+
DIY repair costs can range from $10 for a diode to $150 for a magnetron. Professional repair can cost $150-$500, depending on the part (diode, capacitor, magnetron, transformer). Sometimes, replacing the microwave is more cost-effective.
Can food debris cause a buzzing sound?+
Yes, food debris or grease splattered onto the waveguide cover or inside the microwave cavity can carbonize and cause arcing, which often sounds like crackling or buzzing. Cleaning the interior can sometimes resolve this issue.
When should I replace my microwave instead of repairing it?+
Consider replacement if the repair cost approaches or exceeds 50% of a new microwave's price, especially for older units. Major component failures like the transformer or magnetron can be expensive to fix, making a new appliance a better investment.
Are older microwaves more prone to buzzing noises?+
Yes, like any appliance, microwave components can wear out over time. Capacitors can degrade, diodes can fail, and magnetrons can lose efficiency, leading to buzzing noises as they struggle to perform their functions in older units.
Discussion
Loading comments…