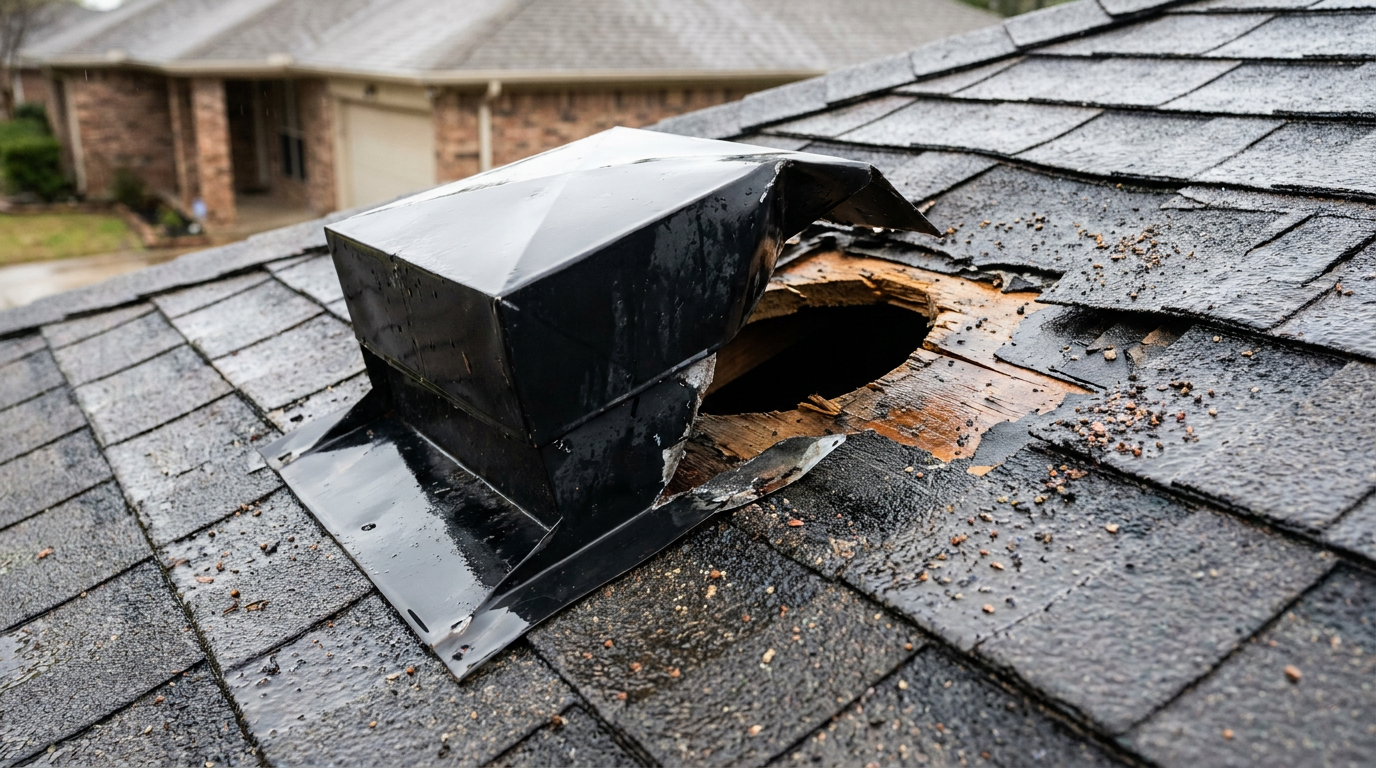
- Check attic penetrations from the inside during heavy downpours twice a year so you catch hairline seepage before the ceiling drywall stains.
- Swap brittle plastic plumbing boots for lead pipe flashings or powder-coated aluminum assemblies fitted with high-durability silicone collars rated for 25+ years.
- Upgrade spinning turbine vents to low-profile, internal-baffle box vents (like slant-back static vents) which handle wind better, up to 110 mph.
- Walk your perimeter with binoculars after windstorms topping 50 mph; make sure all metal exhaust flaps are closing flush and no pipe collars are leaning or loose.
- Make sure the original installers used at least six galvanized ring-shank nails on every large penetration flashing instead of relying on four smooth-shank staples.
Roofing · Flashing failure
| Project category | Roofing |
|---|---|
| Problem type | Flashing failure |
| Trade required | Roofing |
| Urgency | Soon — within weeks |
| Safety risk | Moderate safety risk |
| DIY suitability | Pro recommended |
| Cost category | Low cost |
| Typical timeline | Usually a half-day repair |
| Contractor type | Licensed roofing contractor |
Repair option
Replace the boot or step flashing and re-weave shingles around it.
Replacement option
Address during a full replacement when several details have failed at once.
Common causes
- Cracked pipe boots — the single most common roof leak source
- Rusted step flashing at walls and chimneys
- Sealant used as a substitute for proper metal
Relevant tools:project cost estimatordiy or hire a pro
Published November 8, 2026Last updated November 8, 2026
Tools & materials you'll need
Affiliate linksAs an Amazon Associate FixlyGuide earns from qualifying purchases — at no extra cost to you. Prices and availability are accurate as of publication and subject to change.
Quick Answer
If a bad storm ripped off your roof vents, turbine caps, or pipe jacks, water won’t wait around—it’ll run right past your shingles and dump straight down interior walls or ceiling drywall in minutes. First thing, get buckets under the leaks, move furniture out of the splash zone, and cover the opening from the attic or roof with a heavy-duty 6-mil poly tarp held down with 1x2 wood furring strips and 1-1/4-inch exterior screws. Once the weather breaks, swap out the punctured flashing boot, reset any damaged exhaust hoods, and bed new flanges in SBS-modified roofing cement.
The Problem
Straight-line winds and microbursts can hit 60 to 80 mph pretty easily during spring and summer squalls. Most shingles can take that kind of abuse, but roof penetrations—dryer vents, bath fan exhausts, attic turbines (whirlybirds), and plumbing soil stack boots—turn into little sailboats.
When wind gets under the apron flashing of a metal vent hood or catches the throat of an old plastic plumbing jack, it can yank the roofing nails right out of the 7/16-inch OSB deck. Then you’ve got a 4-inch to 12-inch open hole through the roof system. Rain coming sideways doesn’t just splash in, either. It soaks blown-in fiberglass insulation, pools on top of ceiling drywall, and tracks along wiring harnesses into light fixtures. That’s not a slow drip from a cracked shingle. That thing’s an open drain dumping gallons per minute into your house.
How It Works
Your roof is a layered water-shedding system, not a sealed submarine hull. The main defense against storm weather is the 20 to 25-degree pitch that pushes water downhill over overlapping shingles, with a backup layer of #15 felt or synthetic polymers underneath. Still, every penetration interrupts that shingled pattern.
Penetration flashings bridge that gap by using gravity and overlapping laps. A standard pipe boot or exhaust cap has a flat base apron. The lower half of that apron rides over the shingles below it, shedding runoff down the slope. The upper half tucks under the shingles above it, so water sliding down the deck hits metal or plastic instead of raw wood. Around the opening, high-grade neoprene collars or crimped sheet metal ducts steer driven water around the hole.
When storm winds create aerodynamic lift across your roof ridge, low-pressure zones form on the leeward slope. If the fasteners are old, rusted, or driven into decking voids, that negative pressure can literally suck lightweight aluminum turbines and thin plastic caps off their collars. Once that seal breaks, sheet water running down the upper shingles slips under the lower laps. After that, it ignores your underlayment and heads straight for plywood seams and interior ceiling joists.
Step-by-Step Fix
Before you even think about climbing a ladder, make sure the storm’s gone. Don’t go on a wet roof with a slope steeper than 4/12 or during sustained winds over 15 mph.
-
Contain Interior Infiltration Immediately — Clear out the room under the leak. Put heavy plastic bins—not shallow pans—right under the drips, and poke one small 1/8-inch relief hole in the center of any sagging, water-bulged ceiling drywall with a screwdriver so the water runs into the bucket instead of dumping the whole ceiling on the floor.
- Tool: 5-gallon buckets, Phillips screwdriver
- Safety: Shut off electricity at the breaker panel if water is getting into light fixtures or ceiling fans.
-
Inspect the Damage from the Attic First — Get into the attic with a high-lumen flashlight before you climb on the roof. Find the disconnected vent duct or open penetration collar. Check whether moisture pooled in the insulation batts or ran down the outside of PVC vent stacks.
- Tool: 500+ lumen work light, safety glasses, N95 dust mask
- If the roof deck is cracked or joists are splintered from falling tree limbs, stop right there and call an emergency structural crew.
-
Assemble Your Fall-Protection and Safety Gear — Wear thick rubber-soled work boots and check your extension ladder before you set it. Put the ladder base 1 foot out for every 4 feet of wall height against a stable gutter or wall standoff. Tie off the top rungs to an exterior structural anchor point if the wind keeps acting up.
- Safety: Don’t step on damp valley flashing or north-facing roof faces where moss or algae turns the surface slick.
-
Prep the Torn Penetration on the Roof — Carefully pull out the wind-mangled vent pieces or shredded rubber boot with a flat pry bar. Remove any rusted or bent 1-1/4-inch roofing nails from the roof sheathing. Sweep off loose asphalt granules, twigs, and broken shingle debris around the area so you can see clean underlayment.
- Tool: 15-inch flat pry bar (wonder bar), claw hammer
- Watch out for sharp sheet metal edges on torn galvanized vent collars.
-
Deploy an Emergency Tarp (Temporary Stopgap) — If rain’s still in the forecast, grab a 6x8-foot heavy-duty woven poly tarp and center it over the exposed penetration. Slide the upper 2 feet of the tarp under the nearest undamaged row of shingles above the hole. Nail 1x2 wood furring strips across the top, sides, and bottom using 1-1/4-inch screws so the wind can’t get under it.
- Material: 6-mil reinforced tarp, 1x2 pine furring strips, exterior wood screws
- Don’t just toss bricks or sandbags on a sloped roof tarp; a good wind gust will send them skating right off your eaves.
-
Break the Surrounding Shingle Seal Tabs — For the permanent repair, you need room to work around the penetration. Slide your flat pry bar horizontally beneath the shingle tabs beside and directly above the vent opening to pop the factory self-sealing adhesive strip without ripping the shingle mat.
- Tool: Flat roofing pry bar
- If it’s cold—under 50°F—shingles get brittle, so go slow or you’ll snap tabs.
-
Remove Interfering Fasteners — Work the pry bar under the loosened shingles to find the roofing nails holding them down around the hole. Lift gently on the nail heads, or press down on the shingle while pulling the nail with the bar’s notch. You need clear deck space so the new flashing plate can slide into position.
- Tool: Roofing bar
- Keep the nails separated so they don’t roll down the roof and land in your driveway or flowerbeds.
-
Dry-Fit the New Vent or Pipe Flashing — Slide the new metal exhaust hood or rubber plumbing boot over the pipe or duct opening. The bottom lip of the flashing has to sit flush on top of the lower shingles, while the side and top metal flanges must slide completely underneath the upper shingles. Trim any overlapping shingle corners a little with a hook blade utility knife if the flashing hangs up.
- Tool: Utility knife with hook blades, tape measure
- Make sure the duct neck or PVC pipe stands at least 8 to 12 inches above the finished roof deck so driving rain doesn’t blow back in.
-
Apply High-Performance Flashing Sealant — Lift the new flashing base plate up and run three continuous 3/8-inch beads of black SBS-modified asphalt roofing cement or high-grade polyurethane sealant along the underside edges of the metal flange. Don’t caulk the bottom lip that overlaps the downhill shingles—leave that open so trapped moisture can drain downhill.
- Material: Polyurethane roofing sealant or SBS asphalt plastic cement
- Stay away from cheap water-based or standard silicone caulk; they break down under hard UV exposure and thermal expansion within 24 months.
-
Fasten the Flashing to the Roof Deck — Set the flashing firmly into the sealant bed. Drive 1-1/4-inch or 1-1/2-inch hot-dipped galvanized roofing nails into the pre-drilled flange holes, spacing them about 4 to 6 inches apart. Put the nails 1 inch from the outer edge so the shingles cover them fully.
- Tool: 16-oz smooth-faced hammer
- Fasteners need to bite at least 3/4-inch into or fully through the wooden roof deck.
-
Re-Bed Shingles and Seal Nail Penetrations — Press the overlapping shingle tabs down tight over the sides and top of the new flashing plate. Put a quarter-sized dab of roofing cement under every lifted shingle tab to bring back the wind seal. Dab sealant directly over any exposed nail heads along the lower perimeter of the metal collar.
- Material: Roofing sealant
- Sprinkle a handful of loose roof granules over exposed wet sealant spots to protect the bitumen from UV damage.
-
Reattach the Interior Duct and Clear Insulation — Head back into the attic. Reconnect the exhaust flexible duct or metal pipe to the lower throat of the new roof vent with an all-metal worm-gear clamp and foil-faced mastic tape. Pull wet insulation at least 12 inches away from the area until the roof deck dries out fully.
- Tool: Flathead screwdriver or 5/16-inch nut driver, HVAC foil tape
- Don’t ever vent bathroom exhaust or dryer moisture straight into the attic envelope; it’ll grow black mold fast.
Common Causes
- Fastener Corrosion and Wind Pull-Through: A lot of installers use standard electro-galvanized smooth shank nails instead of ring-shank hot-dipped nails. Over a decade of temperature swings, the wood sheathing shrinks and swells, backing the nails out. Then high winds come along and yank the vent clear of the decking.
- UV Embrittlement of Thermoplastic Boots: Sun beats up standard black PVC/neoprene plumbing pipe boots. After 7 to 10 years in the sun, the rubber gets rock-hard, starts spiderweb cracking, and tears wide open in a windstorm.
- Undersized Flashing Flanges: Cheap off-the-shelf vents often come with narrow 2-inch side flanges that barely tuck under nearby shingles. If wind drives rain sideways, it forces water past that thin lip and straight through the cutout.
- Missing Sealant on Upper Laps: Vent makers plainly say to bed flanges in roofing mastic. Installers in a hurry often set flashings right on bare underlayment with no adhesive, which lets wind-driven pressure push water around the metal edge.
Common Mistakes
- Caulking the Downhill Flange Edge: Homeowners usually want to caulk all four sides of a metal vent base. Don’t caulk the bottom edge that sits on top of shingles. If water slips beneath the upper shingles, that bottom caulk bead turns into a fake dam and traps water inside the roof deck where it rots the plywood.
- Relying on Silicone or Duct Tape for Storm Repairs: Standard hardware store silicone won’t stick well to dirty, oily asphalt shingles or wet wood. It peels off in sheets the next time temps swing. Duct tape falls apart within 48 hours under UV exposure. Use true SBS-modified asphalt roofing cement or heavy-duty foil-backed butyl tape instead.
- Leaving Soaked Attic Insulation in Place: A dry roof repair won’t save the ceiling if you leave soaked cellulose or fiberglass sitting on top of the sheetrock. Wet insulation holds moisture for weeks, wrecking structural joists and feeding mold blooms. Bag it and replace it.
- Pounding Nails Straight Through Visible Shingle Faces: Nailing loose shingle tabs right through their exposed front surfaces leaves steel fasteners exposed to rain. Always secure flashings underneath the shingle tab, or cover any exposed fasteners with plenty of UV-stable roofing sealant.
- Reinstalling Dented or Twisted Turbine Vents: If wind blew your attic turbine off its base, don’t just screw the bent ball back on. Damaged turbine bearings will squeal, bind, and stop spinning, which lets blowing rain enter the open louver slots. Replace it with an engineered low-profile static vent.
Cost & Time Breakdown
| Task | DIY Cost | Pro Cost | Time |
|---|---|---|---|
| Emergency Tarping & Furring Strip Securement | $30–$55 | $250–$500 | 1–2 hours |
| Replace Damaged Neoprene Pipe Boot (Plumbing Jack) | $20–$45 | $175–$350 | 1.5–2 hours |
| Replace Roof Exhaust Hood (Dryer/Bath Fan) | $35–$70 | $225–$450 | 2–3 hours |
| Replace Blown-Off Wind Turbine (Whirlybird) | $65–$120 | $300–$550 | 2–3 hours |
| Attic Insulation Extraction and Spot Replacement | $40–$90 | $250–$600 | 2–4 hours |
Tips & Prevention
- Check attic penetrations from the inside during heavy downpours twice a year so you catch hairline seepage before the ceiling drywall stains.
- Swap brittle plastic plumbing boots for lead pipe flashings or powder-coated aluminum assemblies fitted with high-durability silicone collars rated for 25+ years.
- Upgrade spinning turbine vents to low-profile, internal-baffle box vents (like slant-back static vents) which handle wind better, up to 110 mph.
- Walk your perimeter with binoculars after windstorms topping 50 mph; make sure all metal exhaust flaps are closing flush and no pipe collars are leaning or loose.
- Make sure the original installers used at least six galvanized ring-shank nails on every large penetration flashing instead of relying on four smooth-shank staples.
When to Call a Professional
Vent and flashing replacements are well within reach for a capable homeowner, but high-risk structural and safety issues mean you need a pro. If your roof has a pitch of 7/12 or steeper (more than 7 inches of vertical rise per 12 inches of horizontal run), footing gets sketchy fast without proper fall arrest gear and roof jacks.
Call a licensed roofing contractor right away if the storm tore off structural decking along with the vent, leaving broad sections of exposed rafters, or if an attic truss is cracking, splitting, or bowing under wind load.
If water has pooled heavily over a big section of ceiling and the sheetrock is sagging near electrical switchgear, main distribution panels, or recessed lighting, stay off the roof altogether. Shut down main utility power from an exterior disconnect if it’s safe, and bring in an emergency restoration service and a certified roofer to dry the structure and secure the envelope the right way.
Frequently Asked Questions
Can I just patch a blown-off vent with roofing tar and leave it?
No. Smearing roofing cement over an open penetration without proper flashing or a real hood is going to fail the next time it rains. Thick blobs of mastic blister, crack with seasonal temperature swings, and block normal moisture flow, which creates an interior catchment basin that rots the surrounding plywood sheathing.
What is the difference between a pipe boot and an exhaust cap?
A pipe boot (or plumbing jack) slides over an open-ended PVC or cast-iron soil pipe coming through your roof, using an airtight rubber or lead collar to keep water from running down the outside of the pipe. An exhaust cap covers a venting duct (from bathroom fans, kitchen hoods, or dryers) and uses a mechanical damper flap and protective hood to let exhaust air out while blocking downdrafts, animals, and driving rain.
How do I measure my vent before buying a replacement at the hardware store?
For plumbing boots, measure the outside diameter (OD) of the pipe sticking out of the roof; standard household DWV pipes are typically 1.5 inches, 2 inches, or 3 inches nominal PVC. For exhaust vents, measure the diameter of the interior sheet-metal duct collar (usually 4-inch, 6-inch, or 8-inch round) and measure the rectangular base flashing so it matches your existing shingle layout.
Will homeowners insurance cover a blown-off roof vent?
Yes, windstorm damage to roof fixtures is usually covered under standard HO-3 homeowner policies, subject to your deductible. That said, replacing a single pipe boot or vent cap usually runs between $200 and $500, so the repair often lands well below standard wind and hail deductibles, which are frequently 1% to 2% of the home's insured value in storm-prone regions.
Can I install a lead pipe boot instead of plastic?
Yes, and in sunny areas with high UV exposure, lead pipe boots are a lot better. Lead doesn’t crack, dry out, or degrade under harsh ultraviolet radiation like standard neoprene or thermoplastic boots. A properly installed lead boot can easily last 30 to 50 years, often outlasting the asphalt shingles around it.
What should I do if the attic insulation around the vent is soaking wet?
Put on a dust mask and gloves, bag the wet insulation in heavy-duty contractor trash bags, and get it out of the attic right away. Leaving wet fiberglass or cellulose over your ceiling sheetrock traps moisture against the drywall and gives mold a perfect head start within 24 to 48 hours. Set an electric fan or dehumidifier in the space to dry the exposed framing before you install fresh insulation.
How do I safely tarp around a plumbing vent pipe sticking up?
Cut a vertical slit into the center of your heavy poly tarp starting from the bottom edge up to the middle. Slide the tarp around the PVC pipe so the opening hugs the base tight. Wrap heavy-duty, waterproof butyl flashing tape or exterior duct tape securely around the pipe and the tarp seam, and fasten the tarp edges to the roof deck with 1x2 wood furring strips screwed through the tarp.
Why did my vent blow off when my neighbor's vents were fine?
A lot of vents are fastened with smooth-shank staples or undersized electro-galvanized nails during construction just to save time. If the installer missed the rafters or used short fasteners that barely bit into the 7/16-inch OSB decking, wind uplift will pop them loose pretty fast. Lower-quality plastic vents also get brittle much quicker than heavier-gauge galvanized steel or aluminum units, which is why they crack under peak gust loads.
Related Articles
Keep troubleshooting with these hand-picked guides from FixlyGuide:
- The #1 Mistake Homeowners Make When Sealing a Deck (And How to Fix It) — Discover the crucial, often-missed step in deck sealing that prevents premature wear and water damage, ensuring your wood deck lasts for ye…
- Is Your Gutter Sagging After Every Storm? The Hidden Flaw Most Homeowners Miss — Discover the overlooked reason your gutters sag after every storm and learn the lasting fix that most homeowners miss.
- The Urgent Truth About Missing Roof Shingles (And Your 3-Step Fix) — High winds can rip shingles off your roof, exposing your home to immediate water damage – here’s how to assess, temporary patch, and plan p…
- Standing Water in Gutters? How to Fix Improper Slope in 11 Steps — Standing water in your gutters after a storm means an improper slope. Here is how to measure, realign, and re-pitch your gutters so they dr…
- Deck Screws Pulling Out? 5 Causes and the Step-by-Step Fix — Stop tripping on loose deck screws. Here is why fasteners pop out of deck boards, how to test for joist rot, and the step-by-step fix to an…
- Driveway Expansion Joint Cracking? 11 Steps to Reseal It for Good — Stop weeds, water erosion, and winter frost heave by replacing failed concrete expansion joints with commercial-grade polyurethane and clos…
Repair or replace your roof?
Plug in four numbers and see which choice holds up financially.
Free and instant. Educational guidance only — not a quote, inspection, or professional diagnosis.
Estimate your own project cost
National averages are a starting point. Enter your details for a range that fits your house.
Roof replacement cost
- Per square (installed)$604 – $866
Add $500–$2,500 if decking is rotten and needs replacement. Storm damage may be covered by insurance.
Educational estimate only — always confirm with written local bids.
What should this project cost?
Enter your project details for a realistic cost range before you call anyone.
Spot repairs commonly run $400–$1,800; full replacement typically $9,000–$18,000 for an average home.
- Regional adjustment
- National average
- Labor share (typical)
- ~$2,948
- Quotes to collect
- 3 written estimates
Educational estimate based on national averages — not a binding quote. Always confirm with written local estimates.
Fixly Project Decision Box
- DIY difficulty
- Professional Recommended
- Estimated time
- Inspection 1–2 hours · repairs 1–3 days
- Cost level
- High
Main tools / materials
- Binoculars for a ground-level look
- Flashlight for attic checks
- Moisture meter
- Roofing cement (temporary patch only)
When to stop and call a pro
- Active leak near lights, fans, or any wiring
- Sagging, bulging, or water-filled ceiling
- Steep, wet, or two-story roof — do not climb it
- Storm or hail damage you plan to claim on insurance
Need professional help?
Free roof assessment first — no phone calls until you ask for them.
Get Local Roofing HelpGet help with your roof now
Stay off the roof. These free tools help you protect the house and reach the right professional fast.
- Emergency repair checklistThe first steps that limit damage before a pro arrives.Open
- Repair or replace your roof?Answer 10 questions about age, leaks, and damage to get a clear next step.Open
- Get local estimatesSend one request and compare written estimates from vetted pros.Open
Free, no signup required. Estimates are educational guidance, not a quote or an inspection.
Get the print-ready PDF of this guide
A clean, ad-free, printable version you can keep on your phone or pin to the workshop wall. Free with a FixlyGuide account.
- Print-optimized layout
- Tools, materials & every step included
- Saved to your account
Frequently asked questions
Can I just patch a blown-off vent with roofing tar and leave it?+
No. Slapping roofing cement over an open penetration without structural flashing or a proper hood will fail during the next rainstorm. Thick globs of mastic blister, crack under seasonal temperature swings, and block normal moisture flow, creating an interior catchment basin that rots surrounding plywood sheathing.
What is the difference between a pipe boot and an exhaust cap?+
A pipe boot (or plumbing jack) slips over an open-ended PVC or cast-iron soil pipe extending through your roof, using an airtight rubber or lead collar to prevent water from running down the exterior of the pipe. An exhaust cap covers a venting duct (from bath fans, kitchen hoods, or dryers) and features a damper flap and hood to let air escape while blocking rain and animals.
How do I measure my vent before buying a replacement at the hardware store?+
For plumbing boots, measure the outside diameter of the pipe sticking out of the roof; standard household DWV pipes are typically 1.5, 2, or 3 inches nominal PVC. For exhaust vents, measure the diameter of the interior sheet-metal duct collar (usually 4-inch, 6-inch, or 8-inch round) and measure the rectangular base flashing to match your shingle layout.
Will homeowners insurance cover a blown-off roof vent?+
Yes, windstorm damage to roof fixtures is typically covered under standard HO-3 homeowner policies, subject to your deductible. However, because replacing a single pipe boot or vent cap usually costs between $200 and $500, the repair price often falls well below typical wind/hail deductibles (which are frequently 1% to 2% of insured home value).
Can I install a lead pipe boot instead of plastic?+
Yes, and in sunny regions with high UV exposure, lead pipe boots are vastly superior. Lead does not crack, dry out, or degrade under harsh ultraviolet radiation like standard neoprene or thermoplastic boots. A properly installed lead boot can easily last 30 to 50 years, outlasting the asphalt shingles around it.
What should I do if the attic insulation around the vent is soaking wet?+
Put on a dust mask and gloves, bag the wet insulation in heavy-duty contractor trash bags, and remove it immediately. Leaving wet fiberglass or cellulose over your ceiling sheetrock traps moisture against the drywall and creates an ideal breeding ground for mold within 24 to 48 hours. Run a fan to dry the exposed ceiling framing before installing fresh insulation.
How do I safely tarp around a plumbing vent pipe sticking up?+
Cut a vertical slit into the center of your heavy poly tarp starting from the bottom edge up to the middle. Slide the tarp around the PVC pipe so the opening hugs the base tightly. Wrap heavy-duty waterproof butyl flashing tape securely around the pipe and tarp seam, and secure the tarp edges with 1x2 wood furring strips screwed through the tarp.
Why did my vent blow off when my neighbor's vents were fine?+
Vents are often secured with smooth-shank staples or undersized electro-galvanized nails during construction to save installation time. If your installer missed underlying rafters or used short fasteners that barely penetrated thin OSB decking, wind uplift pops them loose. Lower quality plastic vents also turn brittle faster than heavier gauge galvanized steel units.
Discussion
Loading comments…