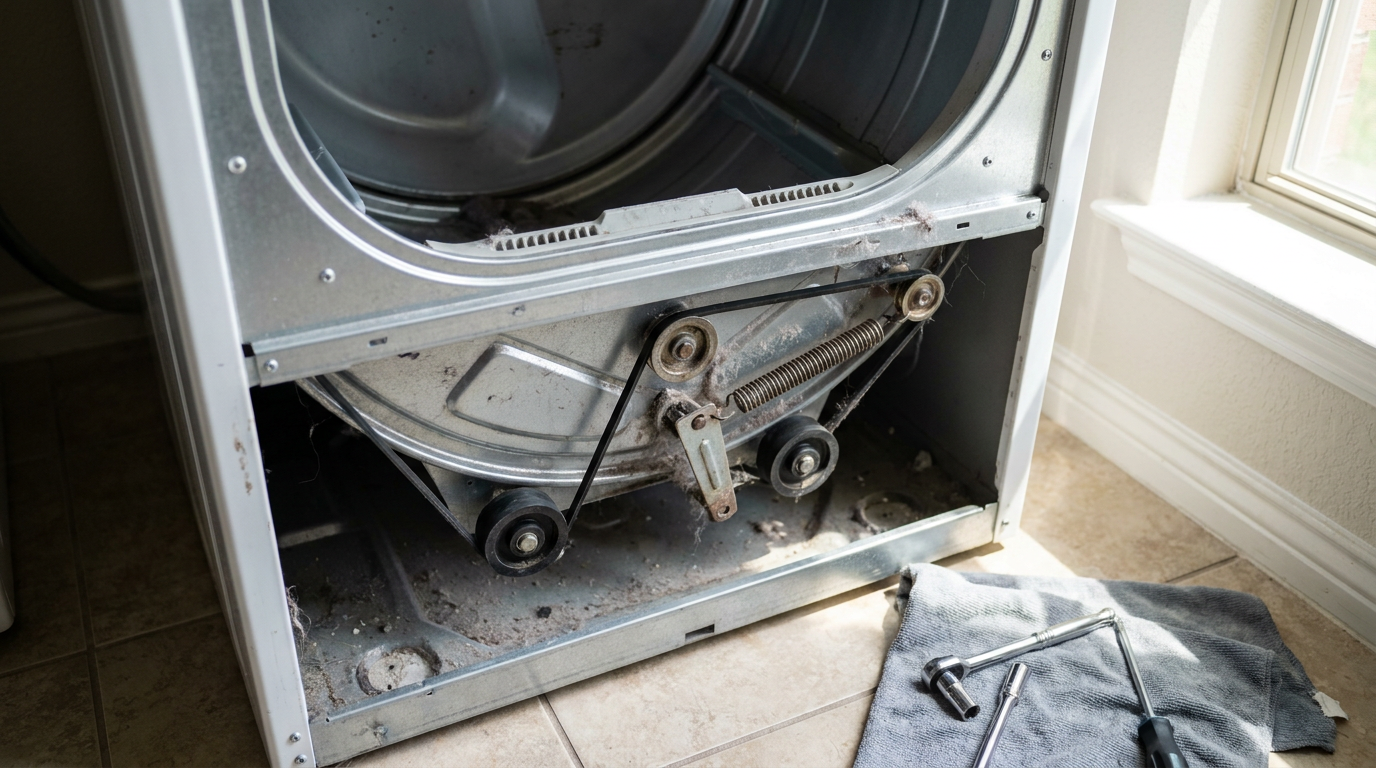
- A healthy roller spins smooth and quiet with just a little resistance. If a wheel squeals, binds, or rocks loose on the shaft, it’s done.
- Look at the rubber edge of each wheel under a bright light. Flat spots usually mean one roller seized and kept rubbing the drum.
- Pry the plastic triangular retainers off the front of the roller shafts. Slide off the outer washer, the roller wheel, and the inner washer. Cut away any hair or carpet threads wrapped around the axle base.
HVAC · High energy usage
| Project category | HVAC |
|---|---|
| Problem type | High energy usage |
| Trade required | HVAC |
| Urgency | Planned project |
| Safety risk | Low safety risk |
| DIY suitability | DIY for experienced homeowners |
| Cost category | High cost |
| Typical timeline | Assessment within weeks; replacement planned off-season |
| Contractor type | Licensed HVAC technician |
Repair option
Duct sealing, insulation, and a tune-up before touching the equipment.
Replacement option
High-efficiency replacement sized by a load calculation, not a rule of thumb.
Common causes
- Aging, low-efficiency equipment
- Leaking ducts losing conditioned air
- Insufficient attic insulation
- Oversized system short-cycling
Relevant tools:project cost estimatorrepair or replace
Published November 13, 2026Last updated November 13, 2026
Tools & materials you'll need
Affiliate links- AmazonNut driver set (1/4-inch and 5/16-inch)1 set
- AmazonStiff putty knife1 · For releasing top panel spring clips
- AmazonPhillips screwdriver1
- AmazonSmall flathead screwdriver1 · For prying roller retaining clips
- AmazonShop vacuum with crevice tool1
- AmazonWork gloves1 pair · To protect hands from sharp sheet metal edges
As an Amazon Associate FixlyGuide earns from qualifying purchases — at no extra cost to you. Prices and availability are accurate as of publication and subject to change.
Quick Answer
If your dryer squeaks, squeals, or screeches, nine times out of ten you’re looking at plain old mechanical friction from a worn part that’s supposed to support the drum. Usually it’s a dry idler pulley bearing, tired drum support rollers, worn front glide bearings, or a drive belt that’s getting ragged. Unplug the dryer, crack the cabinet open, and check the idler pulley and rollers for wobble, flat spots, or roughness. Clean out the lint and swap the cheap wear parts, and you’ll knock out over 90% of screeching problems in under two hours.
The Problem
A squeaking dryer gets old fast. What starts as a little bird-chirp in the first five minutes turns into a nasty screech or grinding noise that seems to travel through every wall in the house.
Dryers are simple machines, really. An electric motor spins a heavy steel drum loaded with 15 to 30 pounds of wet clothes at about 45 to 50 RPM. To keep that drum centered and quiet, the machine depends on a few support points that take a beating every cycle. After years of heat, lint, and plain wear—ambient temps up around 135°F to 165°F will cook the grease right out of them—plastic sleeves thin out, rubber rollers flatten, and bronze bearings run dry.
Ignore the squeak and it’ll bite you. Hard. If an idler pulley or drum roller locks up, the friction can melt the belt, chew up the drum axle, or smoke the motor. I’ve pulled a water heater in Frisco last month that had exactly this kind of “I’ll deal with it later” mindset around the laundry room, and the belt was basically confetti. What could’ve been a $25 DIY fix turns into a broken belt, an overheated motor, or a gouged drum that’ll cost you a pile more to replace.
How It Works
To track the noise down, you’ve gotta picture what’s moving under that sheet metal.
+-----------------------------------------------------------+
|                        DRYER CABINET                      |
|                                                           |
|     [Front Felt / Glides]               [Rear Bulkhead]   |
|            |                                   |          |
|            v                                   v          |
|      +-----------+                       +-----------+    |
|      | Drum Lip  |=======================| Drum Axle |    |
|      +-----------+     STEEL DRUM        +-----------+    |
|            ^           (45-50 RPM)             ^          |
|            |                                   |          |
|            |          === DRIVE BELT ===       |          |
|            |                  |                |          |
|            +-----------+      |         +------+-----+    |
|                        |      v         | Drum Rollers    |
|                        |   [Idler]      | (2 or 4 wheels) |
|                        |   [Pulley]     +------------+    |
|                        |      |                           |
|                        v      v                           |
|                    [Drive Motor Shaft]                    |
+-----------------------------------------------------------+
Your dryer drum hangs between two bulkheads. On Whirlpool, Kenmore, Maytag, and Samsung units, the back of the drum rides on two (sometimes four) rubber-tired wheels called drum support rollers. Those wheels spin on fixed steel shafts. On GE units, the drum often pivots on a single rear ball-and-socket bronze bearing mounted to the cabinet wall.
Up front, the drum lip rides on teflon, nylon, or plastic glide pads backed by felt seals. A wide rubber belt wraps around the drum, then drops down to the bottom of the cabinet and loops around a spring-loaded tension wheel—the idler pulley—before running back to the motor shaft.
When you hit start, the motor spins at roughly 1,725 RPM. That shaft turns the belt, the belt drags the drum down to around 48 RPM, and the whole load keeps tumbling. If a support wheel seizes, or the bearing in the idler pulley goes metal-on-metal, that’s your squeak. No mystery there.
Step-by-Step Fix
Before you buy anything, open the machine and find the exact bad part. In most cases, grabbing a complete dryer tune-up kit ($20 to $40 online, which usually includes a new belt, idler pulley, and rollers) makes more sense than chasing one part at a time. They’ve all got the same mileage on them, anyway.
1. Disconnect Power and Gas — Cut all utility connections completely.
Pull the dryer away from the wall. Unplug the heavy 240V power cord (or 120V cord if gas). If you’ve got a gas dryer, turn the manual shutoff valve on the yellow gas flex line perpendicular to the pipe run.
- Safety: Never work on a dryer that’s still plugged in. Electric dryers carry 240 volts across two 120V legs—enough to hurt you bad.
- If the outlet cord feels hot or brittle, make a note to replace the receptacle or cord whip.
2. Remove the Lint Trap and Top Panel — Release the spring clips holding the cabinet lid.
Pull out the lint screen. Look down into the lint chute housing: remove the two 1/4-inch hex screws or Phillips screws holding that housing to the top panel. Then slide a stiff putty knife into the horizontal seam between the top deck and the front panel, about 3 to 4 inches in from each front corner, to pop the internal metal spring latches.
- Tool: Stiff putty knife and 1/4-inch nut driver.
- Lift the top panel like a car hood. Prop it up with a 2x4 scrap or swing it all the way back against the wall.
3. Disconnect the Door Switch and Remove the Front Panel — Free the front bulkhead.
Follow the wires to the door safety switch, usually on the underside of the top or inside the front frame. Unclip the plastic harness plug with your thumb tab. Remove the two 5/16-inch or 1/4-inch hex screws holding the upper corners of the front panel to the side cabinets.
- Tilt the front panel forward a bit, lift it off its bottom tabs, and set it on a blanket so you don’t scratch the enamel.
- Pay attention to how the front felt seal and plastic glides sit against the drum lip.
4. Release Belt Tension on the Idler Pulley — Slip the belt off the motor shaft.
Reach under the drum into the bottom of the cabinet. You’ll feel the motor on one side and a spring-loaded arm with a small wheel on the other. Push the idler pulley arm toward the motor to take the tension off the belt.
- Slip the loose belt off the grooved motor pulley spindle.
- Let the idler arm down gently. Don’t get sloppy here—the spring snaps back hard if your hand slips.
5. Pull the Drum Out of the Cabinet — Clear access to the rear mechanical components.
Use the loose belt as a lifting handle. Grab the belt near the top of the drum with one hand and support the rim with the other. Guide the drum forward through the cabinet opening, tipping it a touch to clear the front frame edges.
- Set the drum aside upright.
- Check the painted outside surface where the belt rides. A polished black stripe is normal; deep scoring or heavy rubber smear means the belt’s been slipping.
6. Inspect and Test the Idler Pulley — Spin the tension wheel by hand.
Find the idler pulley assembly down by the motor at the bottom of the cabinet. Spin the plastic wheel hard with your fingers.
- It should spin quietly and freely for several seconds. If it rattles, wobbles side-to-side, screeches, or stops dead right away, that internal sleeve bearing is toast.
- To remove it: pull the retaining triangle ring or C-clip off the shaft with a small flathead screwdriver, slide the old wheel and fiber washers off, and wipe the steel shaft clean of black belt dust.
7. Inspect the Rear Drum Support Rollers — Check for flat spots, hair bind, and shaft play.
Find the two support rollers mounted to the rear bulkhead. Spin each one by hand.
- A healthy roller spins smooth and quiet with just a little resistance. If a wheel squeals, binds, or rocks loose on the shaft, it’s done.
- Look at the rubber edge of each wheel under a bright light. Flat spots usually mean one roller seized and kept rubbing the drum.
- Pry the plastic triangular retainers off the front of the roller shafts. Slide off the outer washer, the roller wheel, and the inner washer. Cut away any hair or carpet threads wrapped around the axle base.
8. Inspect the Front Glides and Rear Bearing Bracket — Check remaining friction points.
If your machine is a GE style without rear rollers, inspect the rear center drum axle ball and the nylon cup bracket on the rear bulkhead. Look for plastic shavings or metal-on-metal gouging.
- For front-glide models (Whirlpool/Kenmore/LG): Check the white nylon or green Teflon glide shoes riveted to the upper front bulkhead. If the plastic’s worn down to the bare metal rivets, the drum is scraping steel on steel.
- Replace worn glides by drilling out rivets or popping out snap-in tabs, then seat the new pads square.
9. Clean Shafts and Install New Components — Reassemble the wear points correctly.
Clean every steel roller shaft and the idler bracket shaft with 91% isopropyl alcohol and a clean rag or fine 0000 steel wool until you’ve got bare, polished steel.
- Slip on the inner washer, slide on the new drum roller (or idler wheel), install the outer washer, and push the new retaining clip firmly into the shaft groove until it clicks.
- CRITICAL: Do NOT spray WD-40, automotive grease, or standard machine oil onto these shafts. Wet lube grabs lint like a magnet, and that gunk turns into an abrasive paste that wipes out new rollers in weeks. If lubrication is needed, use only high-temperature dry graphite powder or genuine OEM turbine lubricant if the manufacturer specifically calls for it. Most modern replacement rollers use self-lubricating oil-impregnated sintered bronze bushings that have to go in dry.
10. Vacuum the Cabinet Interior — Eliminate lint fire hazards before closing up.
With the drum out, you’ve got full access to the dryer’s guts. Vacuum all the lint out of the motor windings, the base pan, the blower wheel housing, and the burner funnel or electric heating element housing.
- Tool: Shop vac with a narrow crevice tool.
- A thick blanket of lint around the motor traps heat, trips thermal cutoffs, and wears the motor bearings out early.
11. Reinstall the Drum and Route the Drive Belt — Seat the belt and drum correctly.
Lift the drum back into the cabinet using the belt as a sling. Set the back rim of the drum onto the rubber support rollers. Reach under the drum with both hands to route the belt around the motor pulley and idler arm.
- The belt grooves have to face down against the drum metal and motor spindle.
- Pull the idler arm to make a loop, thread the belt around the motor shaft, and release the idler arm so the spring pulls the pulley tight against the flat back side of the belt, making an "S" or "Z" shape tension loop.
- Rotate the drum by hand counterclockwise for 4-5 full rotations so the belt centers itself on the drum body and doesn’t walk off the edge.
12. Reassemble Cabinet and Run a Test Cycle — Final closure and verification.
Set the front bulkhead back on its bottom frame pins, hook the drum lip over the front glides or felt seal, and reinstall the top retaining screws. Reconnect the door switch wire harness. Lower the top panel and slam it down firmly over the spring clips. Put the lint chute screws back in.
- Plug the power cord back in and open the gas line valve if applicable.
- Run the dryer empty on an Air Fluff (no-heat) cycle for 2 minutes while you listen close. The screech should be gone, replaced by a smooth, low mechanical hum.
Common Causes
A dryer squeak doesn’t just show up out of nowhere. One of these five parts is almost always behind it:
- Dry or Seized Idler Pulley Bearing: The small plastic tension wheel spins at roughly 3,000 RPM—way faster than the drum. When its sleeve bearing runs dry, it gives off a sharp, constant screech that sounds a lot like a loose fan belt on an old truck.
- Worn Drum Support Roller Wheels: The rear rollers carry over half the weight of the drum and wet clothes. After a while, lint wraps the shaft or the rubber tire goes out of round. That gives you a squeak-squeak-squeak that matches the drum’s 45-50 beats per minute.
- Worn Front Glide Pads or Felt Seals: These slick Teflon strips sit on the upper inner lip of the front panel and let the drum slide smooth. When they wear through, bare steel from the drum scrapes the steel bulkhead, and you’ll see thin gray dust in the door frame.
- Deteriorated Rear Center Bearing Bracket (GE Models): Pretty common on GE and Hotpoint dryers, the drum rides on a single ball spindle set in a nylon bearing sleeve bolted to the rear wall. Once the factory high-temp grease dries out, the squeal gets heavier as the drum heats up.
- Frayed or Split Drive Belt: A belt that’s cracking, peeling rubber ribs, or splitting apart will slap and squeak every time the damaged spot runs through the idler pulley tensioner.
Common Mistakes
- Spraying WD-40 or standard grease onto roller shafts. This is the big one. Standard WD-40 is a solvent, not a long-term lubricant; it strips away what’s left of the factory oil and disappears in 48 hours. Worse, petroleum grease pulls in lint. That lint turns into gritty sludge and chews up the steel shaft, which ruins the bulkhead. Keep the shafts dry and clean.
- Replacing only one roller. If one rear wheel failed, the other one has been through the same heat and the same millions of turns. Swapping only the squeaking wheel means you’ll be back in there in two months doing the twin. I don’t like that kind of call-back, and you won’t either. Always replace rollers, idler pulleys, and the belt as a matched set.
- Forgetting to reconnect the door switch harness. It’s easy to button everything up, hit start, and find the machine dead as a doornail. Nine times out of ten, the small plastic door switch connector didn’t get clicked back together before the front panel went on.
- Forcing the drum belt on backward. Dryer belts have a flat backing side and a ribbed traction side. The grooved side MUST face the drum surface and the motor pulley. Put the flat side on the motor spindle and you’ll get slippage, burning smells, and loud squealing under load.
- Ignoring flat spots on new rollers during reinstallation. When you slide the drum back in, it’s easy to knock a new roller sideways or bump a washer loose. Always turn the drum by hand 5 times before you reinstall the front panel so you know it’s tracking smooth.
Cost & Time Breakdown
| Task | DIY Cost | Pro Cost | Time |
|---|---|---|---|
| Idler Pulley Replacement | $12–$25 | $140–$220 | 45–60 min |
| Rear Drum Rollers (Set of 2–4) | $18–$35 | $160–$250 | 60–90 min |
| Front Drum Glides & Felt Seal | $15–$30 | $130–$210 | 45–60 min |
| Rear Center Bearing Kit (GE) | $20–$40 | $150–$230 | 60–90 min |
| Full Maintenance Kit (Belt, Rollers, Idler) | $25–$50 | $180–$300 | 60–90 min |
| Drive Motor Replacement (Rare) | $90–$160 | $280–$420 | 90–120 min |
Tips & Prevention
- Never overload the drum beyond capacity. Stuffing in two king-size blankets at once puts too much downward pressure on the support rollers and stretches the belt, which cuts the life of both in half. If the clothes can’t tumble freely, split the load.
- Vacuum inside the cabinet every 24 months. Pull the lint trap chute apart or remove the lower inspection panel every two years to clear loose lint. Too much lint inside the machine heats things up and contaminates the bearings.
- Replace the entire wear assembly together. If you’ve got a dryer over 5 years old open on your bench, spend the extra $20 on a complete maintenance kit. Replacing the belt, both rear rollers, and the idler pulley at the same time resets the wear clock across all the moving parts.
- Check the dryer's level. Use a 24-inch bubble level across the top panel front-to-back and side-to-side. An unlevel dryer makes the drum drift and puts uneven grinding pressure on one set of glides or rollers.
- Listen for pitch changes early. A faint chirp at startup that fades after two minutes is usually the idler pulley bearing starting to go. Fix it now and you won’t be dealing with a snapped belt when you’ve got wet towels waiting.
When to Call a Professional
Most dryer squeaks are straightforward mechanical fixes that a homeowner with basic hand tools can handle on a Saturday morning. Still, there are times when calling an appliance tech is the smarter move.
If the high-pitched screech is coming straight from the drive motor itself—specifically the internal motor bronze bushings rather than the idler pulley—the job means pulling the motor, transferring the blower wheel without cracking its brittle plastic threads, and messing with electrical harness terminals. If your dryer is part of a stacked laundry center jammed in a tight closet where the heavy unit can’t be safely unstacked or pulled without damaging drywall or rigid gas lines, hire someone with the right lifting gear.
And if you smell natural gas, see scorch marks on the wiring harnesses inside the cabinet, or the squeak comes with breaker trips, shut off the breaker, close the gas line, and call a licensed pro right away.
Related Articles
Keep troubleshooting with these hand-picked guides from FixlyGuide:
- The #1 Mistake Homeowners Make When Their Dryer Stops Drying (And How to Fix It Free) — If your dryer is taking too long to dry clothes, the most common culprit is a clogged vent, which can be easily fixed with simple tools.
- The 30-Minute Trick When Your Dishwasher Won't Drain (Plumbers Keep Secret) — Discover the real reasons your dishwasher isn't draining and how to fix it in under an hour, without calling a plumber.
- Dishwasher Won't Fill With Water? 5 Causes and the Step-by-Step Fix — Dishwasher running dry? Learn how to diagnose a stuck float switch, unclog a water inlet valve, and test solenoid continuity with step-by-s…
- Dishwasher Tablet Not Dissolving? 6 Causes and the Step-by-Step Fix — Dishwasher tablet not dissolving? Here are the 6 real causes—from blocked dispenser doors to cold water—and the step-by-step fix to get cle…
- The $5 Part That Stops Your Fridge From Leaking (And Why It Fails) — A leaking refrigerator can lead to serious floor damage and appliance issues. Often, the culprit is a clogged defrost drain, a simple fix m…
- Is Your Gutter Sagging After Every Storm? The Hidden Flaw Most Homeowners Miss — Discover the overlooked reason your gutters sag after every storm and learn the lasting fix that most homeowners miss.
Should you do this yourself?
Answer five quick questions before you start. Safety outranks savings every time.
Your experience with work like this
How high do you have to work?
Does the job involve any of these?
Will it need a permit?
Specialty tools
Free and instant. Educational guidance only — not a quote, inspection, or professional diagnosis.
What should this project cost?
Enter your project details for a realistic cost range before you call anyone.
Cost depends heavily on which system turns out to be the source.
- Regional adjustment
- National average
- Labor share (typical)
- ~$1,620
- Quotes to collect
- 3 written estimates
Educational estimate based on national averages — not a binding quote. Always confirm with written local estimates.
Frequently asked questions
Can I spray WD-40 on a squeaking dryer roller or pulley?+
Spray lubricant is the worst thing you can use inside a dryer. WD-40 or standard grease attracts tumbling lint and dust instantly, turning into a gritty, abrasive paste that ruins shafts and destroys bearings in weeks. Furthermore, petroleum solvents are flammable inside a high-heat appliance. Modern replacement rollers and idler pulleys use self-lubricating sintered bronze bushings designed to operate completely dry.
Is it safe to keep running a dryer that squeaks?+
Running a squeaking dryer will quickly make the problem worse and much more expensive. A squeaking roller or idler pulley is suffering from severe friction; it will eventually seize up entirely. When the component stops turning, the friction will shred or snap the rubber drive belt, potentially gouge the metal drum, or overload and burn out the drive motor.
How can I tell if the squeak is the roller or the idler pulley?+
Listen to the rhythm of the noise. A squeak that repeats at roughly 45 to 50 beats per minute matches the rotation of the drum, pointing to a flat spot on a drum roller or a worn front glide. A continuous, high-pitched screech that sounds like a screaming car fan belt indicates a dry idler pulley, which spins at several thousand RPM.
Do all dryer brands have the same support rollers inside?+
Yes, Whirlpool, Kenmore, Maytag, Amana, and Samsung dryers generally share a common architecture featuring two or four rubber support rollers at the rear and a belt-tensioning idler pulley at the bottom. General Electric (GE) and Hotpoint dryers, however, often use a top-supported front glide bearing system and a single ball-and-socket bronze bearing at the center of the rear drum.
Is it worth fixing a squeaking dryer or should I just replace it?+
Dryer repair kits cost $20 to $50, while a new dryer costs between $500 and $1,200. If your machine is under 10 to 12 years old and heats properly, spending an hour or two replacing the wear components is overwhelmingly worth it. Dryers are simple mechanical machines, and a new set of rollers and a belt often adds another 5 to 8 years of quiet life.
Why does my dryer squeak when cold but stop once it warms up?+
A squeak that appears only during the first 2 to 5 minutes of a cycle is the classic early warning sign of a dry sleeve bearing in the idler pulley or drum roller. As friction generates heat, the metals expand slightly and redistribute what tiny amount of lubricant remains, temporarily quieting the squeak. It will worsen over time until it screeches continuously.
What is the difference between a squeaking noise and a thumping noise?+
A thumping sound indicates a flat spot on one of the rubber drum support rollers, usually caused by heavy wet clothes sitting in the drum undisturbed for days, or a roller that seized and dragged against the drum. A squeak, by contrast, is high-pitched metal-on-metal or plastic friction from a lack of lubrication or worn-out glides.
How long does it take a homeowner to replace dryer rollers and belts?+
For a first-timer, expect the job to take about 60 to 90 minutes from start to finish. Taking photos with your smartphone as you take panels and wire harnesses off makes putting everything back together fast and foolproof. Experienced DIYers can usually swap an idler pulley and rollers in roughly 30 to 45 minutes.
Discussion
Loading comments…