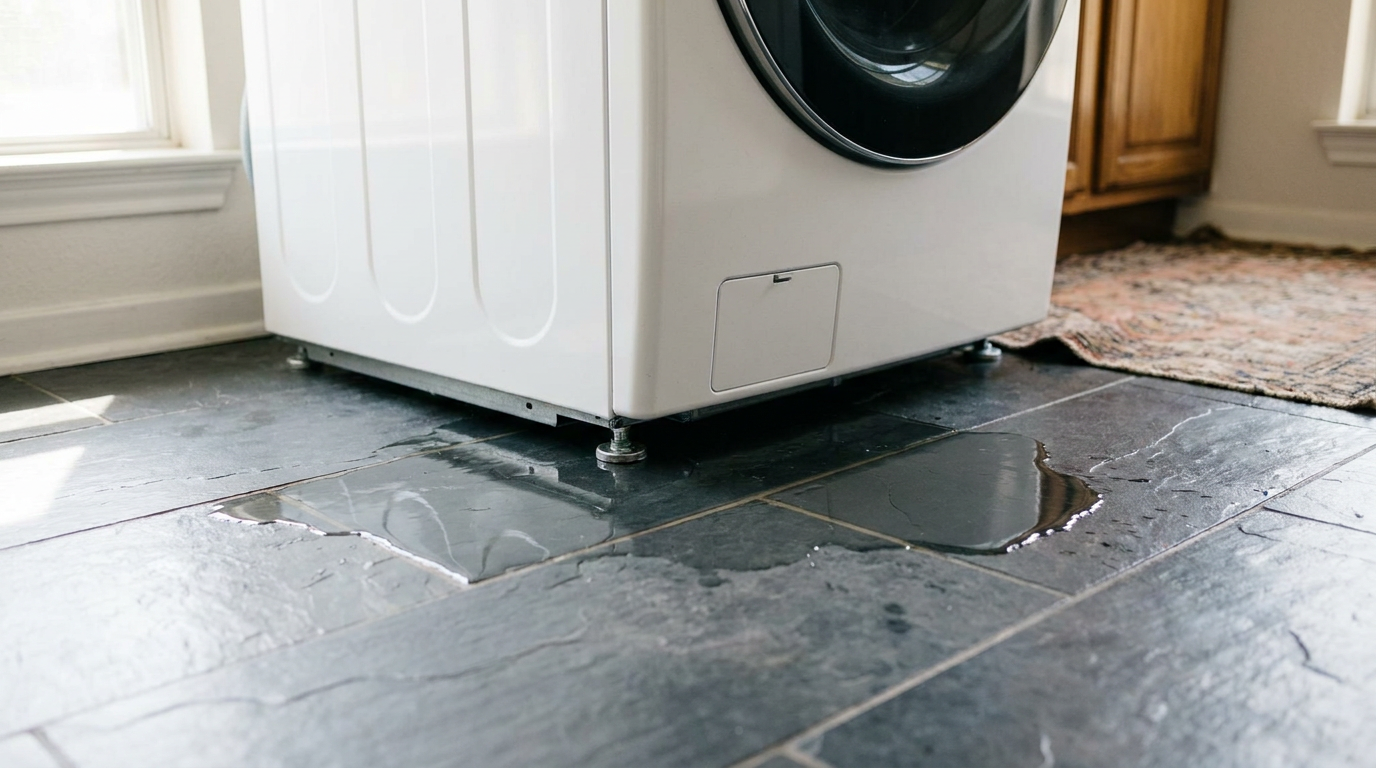
- Check the electric drain pump casing and front cleanout cap. Look closely at the drain pump's clear plastic impeller chamber and the center shaft where the motor attaches.
- If water drips from the small weep hole between the pump motor and the plastic impeller housing, the pump's internal shaft seal has failed, and you must replace the entire pump assembly.
- Check the twist-out debris filter o-ring on front-load units; hair and sediment often foul the threads, letting water weep past the rubber gasket.
Plumbing · Leak
| Project category | Plumbing |
|---|---|
| Problem type | Leak |
| Trade required | Plumbing |
| Urgency | Emergency — act now |
| Safety risk | High safety risk |
| DIY suitability | DIY for experienced homeowners |
| Cost category | Low cost |
| Typical timeline | Shut water off now; repair usually same or next day |
| Contractor type | Licensed plumber |
Repair option
Isolate at the shutoff, replace the failed component, and dry the cavity fully.
Replacement option
Repipe the run or the branch when corrosion is widespread.
Common causes
- Failed supply line or shutoff valve
- Worn washers, cartridges, or P-trap connections
- Pinhole corrosion in older copper
Relevant tools:emergency checklistdiy or hire a pro
Published November 12, 2026Last updated November 12, 2026
Tools & materials you'll need
Affiliate links- AmazonNut driver set (1/4-inch and 5/16-inch)For cabinet and panel screws
- AmazonSlip-joint pliersFor factory wire spring hose clamps
- AmazonFlathead screwdriver or rigid putty knifeTo pop console or cabinet retaining clips
- AmazonHigh-lumen LED flashlightTo inspect dark areas inside cabinet
- AmazonWet/dry shop vacuumTo extract residual water from tub
As an Amazon Associate FixlyGuide earns from qualifying purchases — at no extra cost to you. Prices and availability are accurate as of publication and subject to change.
Quick Answer
If your washing machine is leaking water from underneath, unplug the thing right away and shut off the hot and cold water valves behind it. No sense letting it keep running. Leaks pooling under the cabinet usually come from a split drain pump hose, a cracked water pump casing, worn tub seal bearings, or a loose internal fill hose. You can fix split hoses, loose clamps, and bad drain pumps with basic hand tools for under $65, but if the water’s slinging out from a worn rear tub bearing assembly or a corroded outer tub, calling a licensed appliance tech or replacing the washer is the smart move.
The Problem
A puddle sneaking out from beneath your washing machine is one of those jobs that makes homeowners go, “Where in the world is that coming from?” Unlike a supply hose failure behind the unit that sprays your drywall, an underneath leak often stays hidden until water seeps through the baseboards or soaks the subfloor below.
And water’s sneaky. It drips from one bad part, hits the steel baseplate, runs along a wire harness or frame lip, and shows up three feet away from the real trouble. I can’t tell you how many times I’ve seen folks misread that. They spot water pooling by the front-left leveling leg, assume the front door seal’s shot, buy a $120 door gasket, and then the puddle comes right back on the next rinse cycle. No dice.
Leaks don’t fix themselves. I pulled a washer in Frisco last month that had been weeping so long the subfloor had gone soft under one corner. A tiny 2-ounce leak per cycle doesn’t sound like much until it turns into a flood that ruins flooring, grows mold between the joists, and fries drive motors or control boards sitting just inches above the wet floorpan.
How It Works
To track the leak down, you’ve got to know how water moves through the machine and where gravity drags it when a seal lets go.
[Hot/Cold Inlets] ---> [Water Inlet Valve] ---> [Detergent Dispenser]
                                                        |
                                                        v
                                                 [Outer Wash Tub]
                                                        |
                                                        v
                                                 [Tub-to-Pump Hose]
                                                        |
                                                        v
[External Drain Standpipe] <--- [Drain Hose] <--- [Electric Drain Pump]
When a cycle starts, house pressure pushes municipal water through your external braided hoses at 40 to 60 PSI into the water inlet valve. The valve splits that water through internal rubber lines into the detergent dispenser housing and down into the outer tub. The outer tub is a watertight plastic or porcelain shell holding 15 to 25 gallons of water, hung inside the cabinet on heavy-duty springs and shock absorbers.
At the bottom of the outer tub sits a wide accordion-style rubber boot—the tub-to-pump hose. That feeds straight into the electric drain pump. Modern drain pumps use an impeller driven by a magnetic motor to shove wastewater up through an internal corrugated discharge hose and out through your household standpipe. Meanwhile, the center drive shaft passes through the back (or bottom) of the outer tub through a greased rubber tub seal, riding on pressed metal bearings.
Every one of those joints depends on rubber gaskets, friction-fit hoses, and spring-wire or worm-gear clamps. And because the tub shakes and oscillates like crazy during the 1,200 RPM spin cycle, those hoses flex all the time. Over five to ten years, motor vibration, thermal expansion, detergent buildup, and stray debris wear through rubber walls and crack plastic pump housings. Once that happens, gravity just dumps water straight down onto the floor. Simple as that.
Step-by-Step Fix
Before you tear into the cabinet, pull the washer out a little from the wall. Take a dry paper towel and wipe the hot and cold brass supply spigots and wall connections. Dry? Good. That tells you the leak’s internal. Now follow these steps and you’ll find it.
-
Cut power and shut off the water supply—no exceptions. Pull the machine's plug from the 120V wall outlet (never work on a wet appliance while it's connected to shore power), then turn both the hot and cold supply valves behind the washer fully clockwise until tight.
- Tool: Work gloves and safety glasses.
- Safety note: If standing water surrounds the power cord or wall outlet, switch off the dedicated 20-amp circuit breaker at your main service panel before stepping into the puddle.
-
Siphon or bail any standing water from the tub. If the washer stopped mid-cycle with water inside, disconnect the external drain hose from the wall standpipe and drop it into a 5-gallon utility bucket resting on the floor to gravity-drain the remaining water.
- If water refuses to gravity-drain, use a wet/dry shop vacuum on the drum interior so you don’t get a nasty spill when you start pulling hoses.
-
Remove the access panel to expose the undercarriage. On front-load washers, you will typically remove the lower front service toe-kick (secured by three 1/4-inch hex screws) or the rear stamped-steel panel (six to eight 5/16-inch hex screws). On top-load washers, you'll release the top console spring clips with a putty knife and slide the entire outer steel cabinet off its base.
- Tool: 1/4-inch and 5/16-inch nut drivers, rigid metal putty knife.
- Keep a magnetic tray handy so you don't lose the cabinet mounting screws.
-
Inspect the baseplate for telltale leak trails. Grab a high-lumen flashlight and examine the bottom metal pan, hoses, and pump housing for white calcium crust, rust trails, or blue detergent stains.
- Water evaporates fast on warm metal, but evaporated detergent and hard water leave clear "chalk tracks" pointing right back to the bad part.
-
Examine the tub-to-pump hose for coin punctures. Inspect the large, accordion-pleated rubber hose running between the tub drain port and the pump intake; feel along the ridges for pinholes, soft spots, or punctures.
- Homeowners find bra underwires, drywall screws, or hairpins in this hose all the time, slowly sawing through the rubber under spin vibration.
-
Check the electric drain pump casing and front cleanout cap. Look closely at the drain pump's clear plastic impeller chamber and the center shaft where the motor attaches.
- If water drips from the small weep hole between the pump motor and the plastic impeller housing, the pump's internal shaft seal has failed, and you must replace the entire pump assembly.
- Check the twist-out debris filter o-ring on front-load units; hair and sediment often foul the threads, letting water weep past the rubber gasket.
-
Inspect the tub seal and drive bearing area. Look directly underneath the center of a top-load tub or at the rear center pulley of a front-load tub.
- If you see a dark ring of rust, brown water droplets, or slung grease radiating outward across the back panel like spokes on a wagon wheel, your main tub bearing seal has failed (jump to "When to Call a Professional").
-
Swap out a split hose or broken drain pump. Loosen the hose clamp using slip-joint pliers (for spring wire clamps) or an 8mm nut driver (for worm-gear clamps), wiggle the hose off the plastic barb, and drain residual water into a shallow baking dish.
- Clean the plastic mating barb with a scouring pad to remove dried mineral scale before sliding the new OEM hose or pump into position.
- Always seat the clamp precisely in the molded groove 1/4 inch back from the hose end; over-tightening worm-gear clamps can crush plastic pump housings.
-
Inspect internal fill hoses and dispenser bellows. Trace the rubber hoses connecting the water inlet valve at the top rear of the washer to the detergent dispenser box and down into the tub.
- High municipal water pressure (above 70 PSI) can blow these small slip-fit hoses off their barbs, or detergent caking can cause the dispenser box to overflow internally and run down the cabinet walls.
-
Run a diagnostic leak test before reinstalling the panels. Reconnect the water supply hoses, turn both valves on, plug the machine into power (keeping clear of any exposed internal wiring), and initiate a short "Rinse & Spin" cycle while watching the interior with your flashlight.
- Stay 2 feet away from moving belts and spinning pulleys. Look for fresh weeping, pulsing sprays, or dripping at your new connections.
- Once confirmed dry, pull the plug again, reattach all access panels securely with their original ground screws, and level the unit.
Common Causes
- Cracked Drain Pump Housing or Bad Pump Shaft Seal: Drain pumps take the beating. Small gravel, coins, and plastic clips sneak past the tub filter, jam the impeller, and crack the pump's thermoplastic housing or rupture its shaft seal.
- Punctured Tub-to-Pump Hose: The thick accordion boot beneath the tub flexes hard on every spin cycle. Stray nails, bra wires, or screws pierce the rubber ridges, opening small slits that only leak during rapid tub motion.
- Worn Main Tub Bearing and Shaft Seal: The seal separating 20 gallons of soapy water from the high-speed steel drive bearings eventually dries out, tears, and leaks. That shows up as brown, rusty water slinging directly from the drum's rotating drive shaft.
- Loose or Corroded Hose Clamps: Factory spring clamps lose tension over thousands of wash cycles, while cheap aftermarket worm-drive clamps corrode from humidity. Water seeps around the loose fitting during the drain phase.
- Cracked Outer Tub Assembly: Front-load spider arm brackets (the aluminum three-pronged bracket holding the inner basket) corrode and crack. When they snap at 1,200 RPM, the stainless steel basket shifts and gouges a gash directly through the plastic outer tub wall.
- Detergent Dispenser Siphon Clog: Oversudsing from using non-HE (High Efficiency) detergent backs up the soap drawer. Water backs up at the intake and cascades down the inside of the front cabinet wall, mimicking an under-tub leak.
          +----------------------------------------------+
          |      UNDERNEATH WASHER LEAK DIAGNOSIS        |
          +----------------------------------------------+
                                 |
                 Does water leak during entire cycle?
                                 |
                  +--------------+--------------+
                  |                             |
                 YES                            NO
                  |                             |
      Check Fill Hoses &          Only during DRAIN or SPIN?
      Inlet Valve Connections                   |
                                  +-------------+-------------+
                                  |                           |
                                DRAIN                        SPIN
                                  |                           |
                          Check Drain Pump,          Check Tub Seal &
                          Pump Housing, &            Center Bearing
                          Tub-to-Pump Hose           (Look for rust streaks)
Common Mistakes
- Assuming water on the floor means a bad door boot. Folks reflexively swap out the front rubber door gasket on front-load units because it's the only seal they can see. In reality, less than 15% of underneath puddles start at the door gasket; check the pump and bottom hoses first.
- Tipping a front-load washer on its face or side. Never lay a front-load washing machine flat on the floor to reach the bottom without reinstalling the original factory shipping bolts. Without support, the 80-pound concrete counterweights will shear the suspension springs and destroy the tub.
- Using regular silicone or plumbing tape on split rubber hoses. Wrapping silicone tape, duct tape, or plumber's putty around a split tub-to-pump hose never holds. Modern drain pumps generate significant dynamic head pressure; a patched hose will blow out mid-cycle when you aren't home. Always replace the hose.
- Overtightening worm-gear clamps onto plastic pump barbs. DIYers love using socket drivers on band clamps until they're as tight as possible. Plastic pump inlets crack under excessive torque—tighten until snug, plus a 1/2 turn (roughly 15 to 20 inch-pounds), never more.
- Ignoring brown or rusty spray patterns. If you see rusty trails radiating from your drive shaft, replacing the water pump won't solve your leak. That rust proves your inner tub seal has failed, and water is running directly through the main bearings.
Cost & Time Breakdown
| Task | DIY Cost | Pro Cost | Time |
|---|---|---|---|
| Replace Tub-to-Pump Accordion Hose | $20–$45 | $175–$250 | 45–60 min |
| Replace Electric Drain Pump Assembly | $35–$85 | $225–$350 | 45–75 min |
| Re-secure/Replace Loose Hose Clamps | $5–$12 | $125–$175 | 30 min |
| Clear/Reseal Detergent Dispenser Housing | $0–$15 | $150–$200 | 40 min |
| Main Tub Seal and Rear Bearing Replacement | $60–$140 (parts) | $450–$700 | 3–5 hours |
| Replace Cracked Outer Tub Half | $180–$320 (parts) | $550–$850 | 3–4 hours |
Tips & Prevention
- Switch strictly to 2 tablespoons of liquid HE detergent. Modern high-efficiency washers use as little as 12 to 15 gallons of water per load. Excess soap creates mountains of suds that force water out of the air vents, overflowing the dispenser and dripping into the lower cabinet.
- Clean the drain pump debris filter every 90 days. Unscrew the small cleanout cap at the bottom front of your front-loader and clear out hair, coins, and lint. Trapped metal debris will eventually chew up the rubber pump seals and plastic impeller.
- Empty pockets religiously before tossing clothes in the basket. Coins, nails, drywall screws, and golf tees are the number one cause of punctured tub-to-pump hoses and gouged plastic pump impellers.
- Check washer leveling every six months. Place a 2-foot carpenter's level across the top lid. If the machine rocks, adjust the threaded rubber feet and lock their nuts with an adjustable wrench. Severe vibration fatigues rubber hose joints and cracks plastic fittings.
- Inspect internal hoses whenever you pull the machine out. If you ever pull your washer out to clean behind it, take five minutes to pull the rear cover and feel the rubber hoses. If any hose feels sticky, brittle, rock-hard, or spongy, replace it before it ruptures.
When to Call a Professional
Some underneath leaks are simple bolt-on repairs, but others are telling you the machine's structure is done. If you remove your washer's rear panel and find a dark, greasy rust streak sprayed across the outer tub and back casing, your main tub seal has failed. Fixing this means tearing the machine down to the bare frame, pulling the transmission or rotor, splitting the outer tub halves, and pressing out industrial steel bearings with a specialized puller. That’s a 4-hour job with a high chance of DIY trouble.
Same goes if your washer sounds like a freight train during the spin cycle along with the leak, or if you find a hairline crack in the structural composite outer tub. Stop right there. A cracked tub shell or corroded spider arm means major component replacement, and the bill often lands at 50% to 70% of the cost of a brand-new machine. A licensed appliance technician can tell you straight whether rebuilding the drum assembly makes sense or if it’s time to retire the unit.
Related Articles
Keep troubleshooting with these hand-picked guides from FixlyGuide:
- Freezer Frost Buildup? 6 Causes and How to Fix the Ice Yourself — Stop thick ice from choking your freezer. Step-by-step diagnosis and repairs for blocked drains, failed defrost heaters, bad bimetal switch…
- The Washer Whispers: Why Your Machine Won't Fill (and the $0 Fix) — Frustrated by a washing machine that just won't fill with water? It's a common headache, but often a simple, free fix could be hiding in pl…
- The Mystery Smell: Why Your Washer Stinks (and the 15-Minute Fix) — Is your washing machine leaving your clothes smelling worse than when they went in? Don't toss that machine just yet—often, a stinky washer…
- Washing Machine Shaking Violently? 6 Causes and How to Stop It — Stop your washing machine from shaking violently, banging during spin cycles, and walking across the floor with these proven mechanical fix…
- That Mildew Smell in Your Washer? Here's the Real Fix. — Tired of 'clean' laundry smelling musty? The problem isn't your detergent; it's trapped bacteria and mold inside your washing machine. We'l…
- Garbage Disposal Making a Grinding Noise? 5 Causes of That Racket (and the Fix) — A metal-on-metal grinding sound from your garbage disposal usually means a foreign object is stuck. Here's how to safely find it and what t…
Should you do this yourself?
Answer five quick questions before you start. Safety outranks savings every time.
Your experience with work like this
How high do you have to work?
Does the job involve any of these?
Will it need a permit?
Specialty tools
Free and instant. Educational guidance only — not a quote, inspection, or professional diagnosis.
Questions to ask before you sign
Ask every contractor the same questions and the cheapest bid stops looking cheapest. Check them off as you go — your progress is saved on this device.
Free, no signup. Bring this to every walkthrough so you compare bids on the same terms.
What should this project cost?
Enter your project details for a realistic cost range before you call anyone.
Common repairs run $150–$650; repipes and water-heater replacements reach $1,500–$4,500.
- Regional adjustment
- National average
- Labor share (typical)
- ~$754
- Quotes to collect
- 3 written estimates
Educational estimate based on national averages — not a binding quote. Always confirm with written local estimates.
Fixly Project Decision Box
- DIY difficulty
- Moderate
- Estimated time
- 30 minutes – half a day
- Cost level
- Moderate
Main tools / materials
- Adjustable wrench
- Plunger or drain auger
- Bucket and towels
- Thread tape
When to stop and call a pro
- Water you cannot shut off at the fixture or main
- Sewage backing up into more than one fixture
- Water near electrical panels or outlets
- Gas water heater work beyond relighting a pilot
Need professional help?
Get a Licensed PlumberHandle this before it gets worse
First steps that limit damage, then a way to reach a qualified pro.
- Emergency repair checklistThe first steps that limit damage before a pro arrives.Open
- Get local estimatesSend one request and compare written estimates from vetted pros.Open
- Estimate this projectGet a cost range for your scope and ZIP before you call anyone.Open
Free, no signup required. Estimates are educational guidance, not a quote or an inspection.
Get the print-ready PDF of this guide
A clean, ad-free, printable version you can keep on your phone or pin to the workshop wall. Free with a FixlyGuide account.
- Print-optimized layout
- Tools, materials & every step included
- Saved to your account
Frequently asked questions
Can I keep using my washing machine if it only leaks a tiny bit underneath?+
Yes. Water running down inside the cabinet can short out the electric drive motor, shift actuator, or wiring harness located directly below the drum. Furthermore, unresolved leaks will rot your subfloor and trigger mold growth within 48 hours.
Why does my washer only leak from underneath during the spin or drain cycle?+
A leak that only shows up during draining or high-speed spinning points directly to the discharge system—the electric drain pump, the tub-to-pump hose, or the internal drain hose. Water is only pushed through these parts under pressure when the pump runs.
What causes water to pool specifically under the front-left or front-right corner?+
Check your pump debris filter cleanout first. If coins or hair get trapped in the filter gasket, or if the pump's internal shaft seal cracks, water will drip out from the pump body and pool directly beneath the front corners of the machine.
Can I use waterproof tape or silicone to patch a cracked tub-to-pump hose?+
No. Flex-seal, silicone caulk, and waterproof tape will quickly fail under the constant vibration, dynamic water pressure, and hot soapy water inside a washer. You must replace the damaged hose with an OEM-spec rubber hose and proper tension clamps.
What does it mean if there is brown, oily water slung on the back wall of my washer?+
You have a blown main tub seal and failed tub bearings. Soapy water has washed through the bearing race, liquified the protective grease, and corroded the steel balls. The black-brown spray is oxidized bearing grease slung outward by the spinning pulley.
Do front-load washing machines leak underneath more often than top-load machines?+
Front-load washers leak more frequently simply because they have more failure points: a multi-piece bellows system, front cleanout filters, door gaskets, and higher spin speeds (up to 1,400 RPM) that put intense vibrational stress on internal rubber fittings.
Can using too much laundry detergent actually cause a washer to leak underneath?+
Yes, using non-HE (High Efficiency) detergent or using too much soap causes massive oversudsing. Suds enter the rear air vent tube and detergent dispenser overflow channels, spilling liquid down the cabinet sides and onto your floor.
Is it worth fixing a leaking washing machine, or should I buy a new one?+
If the leak is caused by a hose, pump, valve, or clamp, fixing it is almost always worth it for $20 to $85 in parts. However, if the leak is caused by a cracked outer tub or failed rear tub bearings on a machine older than 8 years, replacement is generally wiser.
Discussion
Loading comments…