- Using Abrasive Cleaners on Appliances: Scrubbing a stainless steel refrigerator or dishwasher front with a scouring pad will permanently scratch the finish. Use only microfiber cloths and approved stainless steel cleaners.
- Forgetting to Unplug Appliances: Before pulling out a major appliance to clean behind it or service its components, ALWAYS unplug it from the wall to prevent electrical shock or damage to the machine.
- Getting Electrical Components Wet: When cleaning refrigerator coils, light fixtures, or vents, be extremely careful not to spray water or liquid cleaner directly onto wiring, sockets, or motors.
- Ignoring Manufacturer’s Instructions: Your appliance manuals contain specific instructions for cleaning filters, panels, and surfaces. Ignoring them can void your warranty or lead to damage.
Published June 27, 2026Last updated August 17, 2026
Tools & materials you'll need
Affiliate links- AmazonMicrofiber cloths5-10 · Essential for wiping surfaces without leaving lint.
- AmazonWhite vinegarA natural and effective cleaner and disinfectant.
- AmazonBaking sodaA mild abrasive, great for making cleaning pastes.
- AmazonHeavy-duty degreaser or strong dish soapFor tackling the greasy range hood filter.
- AmazonAll-purpose cleanerFor general wipedowns of shelves and baseboards.
- AmazonRubber gloves1 pair · Protect your hands from dirt and cleaners.
- AmazonDust maskRecommended when cleaning dusty areas to avoid inhaling allergens.
As an Amazon Associate FixlyGuide earns from qualifying purchases — at no extra cost to you. Prices and availability are accurate as of publication and subject to change.
Quick Answer
A quarterly deep clean targets the 12+ hidden zones where dust, grease, and mildew accumulate, areas missed by routine weekly tidying. This includes pulling out appliances to clean behind them, degreasing range hood filters, clearing dishwasher and washing machine traps, and scrubbing grout lines. Performing this systematic clean every three months dramatically improves indoor air quality, appliance efficiency, and overall home hygiene.
The Problem
You clean your house every week. You wipe the counters, vacuum the floors, and scrub the toilets. From the surface, everything looks pristine. The problem is the slow, silent buildup of grime in the places you can't see and don't think to check. Out of sight, a combination of dust, grease, moisture, and shed skin cells is creating a feast for bacteria and mold, stressing your appliances, and degrading your indoor air quality. These "hotspots" of filth are the reason your kitchen might have a faint, unidentifiable odor, why your allergies flare up indoors, or why your refrigerator seems to be running constantly. A weekly surface clean is essential maintenance, but it merely tidies the presentation layer of your home; it doesn't address the deep-seated dirt that compromises your home’s health and mechanical systems. Over the course of just three months, dust bunnies behind the dryer can become a legitimate fire hazard, mold can take root in a washing machine gasket, and caked-on grease in a range hood filter can become a stubborn, stinky mess.
How It Works
A quarterly deep cleaning routine operates on the principle of preventative maintenance rather than reactive cleaning. It’s a systematic approach to hygiene that goes beyond surface appearances. The goal is to interrupt the cycle of accumulation before it becomes a major problem. For example, dust and pet hair pulled into your refrigerator's condenser coils force the compressor to work harder, consuming more electricity (increasing your utility bill by as much as $10-$20 per month) and shortening the appliance's lifespan. By cleaning these coils every three months, you maintain peak efficiency. Similarly, airborne grease from cooking doesn't just land on your stovetop; it travels and settles on top of cabinets and gets sucked into your range hood filter. This grease traps dust and becomes a sticky, bacteria-laden film. By degreasing these areas quarterly, you prevent a much tougher cleaning job down the road and reduce kitchen odors. This deep clean is about resetting your home’s baseline cleanliness. It improves air quality by removing vast quantities of settled dust and allergens, ensures your appliances run efficiently and safely, and stops small moisture issues from turning into significant mold colonies. It's a strategic investment of a few hours each season to ensure your home remains a truly clean and healthy environment.
Step-by-Step Fix
Safety First: Before starting, ensure you have good ventilation. Wear gloves, especially when handling cleaning solutions, and a dust mask for tasks that stir up allergens. Always test new cleaners on a small, inconspicuous area first. Never, ever mix cleaning products, especially those containing bleach and ammonia, which can create toxic chloramine gas.
-
Conquer Behind-Appliance Voids — Carefully pull your refrigerator, stove, and washing machine away from the wall (you may need a helper). You’ll likely find a shocking accumulation of dust, lost items, and food debris. Use your vacuum’s crevice tool to remove all the loose dirt. Then, with a long-handled brush or cloth, wipe down the walls, baseboards, and the sides of the appliances themselves before mopping the floor. This single step removes a massive allergen reservoir.
-
Service Refrigerator Coils & Drip Pan — Unplug the refrigerator. The condenser coils are usually at the back or behind a front grille. Use a specialized condenser coil brush ($8-$15) and your vacuum to gently remove all dust and pet hair. Clogged coils can reduce efficiency by up to 30%. Locate the drip pan (usually at the bottom) and carefully slide it out. Wash it with hot, soapy water to eliminate mold and odors, then dry completely before replacing.
-
Degunk the Dishwasher Filter — Even with a pre-rinse, food particles get trapped. Locate the filter, typically at the bottom of the dishwasher tub—it usually twists to unlock. Remove it and any surrounding mesh screens. Scrub them in the sink with a stiff brush and hot, soapy water to remove a slimy film of old food. While it's out, wipe down the inside of the filter housing. A clean filter means cleaner dishes and no more musty smells.
-
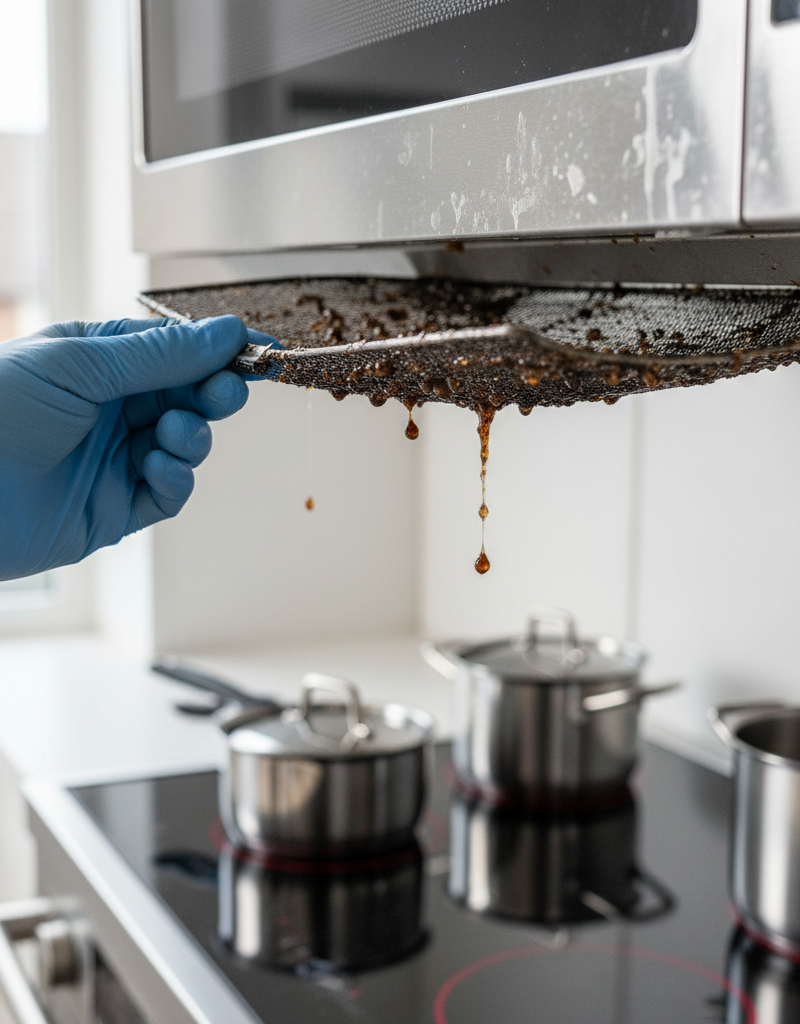
Degrease the Range Hood Filter — This is your frontline defense against aerosolized cooking grease. Most metal mesh filters can be removed with a simple latch. Check if it's dishwasher-safe (many are). For stubborn grease, soak the filter for 30 minutes in a sink filled with hot water and a heavy-duty degreasing dish soap or a specialized degreaser solution. Use a soft brush to scrub away any remaining residue, then rinse thoroughly and let it air dry completely before reinstalling.
-
De-Mold the Washing Machine — Front-load washers are notorious for mold in the rubber door gasket. Pull the gasket back and wipe down the entire interior fold with a 1:1 solution of white vinegar and water or a specialized washing machine cleaner. Remove the detergent drawer and scrub it in the sink. Finally, run a cleaning cycle on the hottest setting with a cup of vinegar or a machine cleaning tablet to flush the inner drum and hoses.
-
Purge HVAC Vents & Registers — Dust and allergens constantly circulate through your HVAC system, collecting on the grilles of your vents and registers. Unscrew or pop off each grille. You can either wash them in the sink with warm, soapy water or take them outside and spray them with a hose. Use your vacuum’s brush and crevice tool to clean as far into the ductwork as you can reach before reattaching the clean, dry grilles.
-
Dust High-Up Fixtures — Ceiling fans and light fixtures are out-of-sight dust magnets. For fans, use a "pillowcase trick": slide an old pillowcase over a blade and pull it back, trapping all the dust inside. For intricate light fixtures or chandeliers, turn off the power at the circuit breaker, then use a damp microfiber cloth to carefully wipe down each surface. A dry paintbrush is also excellent for flicking dust out of tight crevices.
-
Empty and Clean All Cabinets — Go through your kitchen cabinets and pantry one section at a time. Remove everything, checking expiration dates on food items. Vacuum up all crumbs and debris from the shelves and corners. Wipe down the interior surfaces with an all-purpose cleaner, paying special attention to any sticky spills or rings. Let them dry before reorganizing and returning the contents.
-
Scour Window & Door Tracks — These tracks collect an amazing amount of dirt, dust, and dead insects. Use your vacuum's crevice tool to get the loose stuff out first. Then, spray the track with an all-purpose cleaner and let it sit for a minute. Use a stiff brush or a toothbrush to scrub the grime out of the corners. Finally, use paper towels or a cloth wrapped around a screwdriver to wipe the track clean.
-
Detail Baseboards & Door Frames — These surfaces get covered in dust and scuff marks. Start by using your vacuum’s brush attachment to remove all the loose dust from the baseboards and the top ledges of door and window frames. Then, use a magic eraser or a cloth dampened with soapy water to remove scuffs and fingerprints. This small detail makes an entire room feel cleaner.
-
Refresh Upholstery & Drapes — Fabrics trap dust, pet dander, and odors. Check the care tags first. Most curtains can either be machine washed or vacuumed thoroughly with an upholstery attachment. For couches and chairs, remove all cushions and use your vacuum’s crevice tool to get deep into the seams where crumbs and dirt hide. Then, vacuum all fabric surfaces with the upholstery brush.
-
Revive Kitchen & Bathroom Grout — Grout is porous and easily stains. For deep cleaning, create a paste of baking soda and water. Apply it to the grout lines and let it sit for 15 minutes. Then, spray the area with a 1:1 white vinegar and water solution—it will foam up. Scrub the lines with a dedicated grout brush (about $5) or a stiff toothbrush, then rinse the entire area with clean water.
Common Causes
Why do these hidden spots get so dirty? It's a combination of physics, chemistry, and daily life.
- Airborne Grease: Every time you cook, microscopic particles of oil become aerosolized. They don't just fall straight down; they travel on air currents, sticking to your range hood filter, the tops of your cabinets, and even nearby walls.
- The Stack Effect: Hot air rises. This process carries dust, pet dander, and pollen upwards, where it lands on the tops of ceiling fan blades, door frames, and high light fixtures.
- Condensation & Humidity: Bathrooms and laundry rooms are high-humidity zones. This moisture, combined with warmth and organic matter (like skin cells), creates the perfect breeding ground for mold and mildew in places like washing machine gaskets, shower grout, and behind toilets.
- Appliance Respiration: Appliances with motors and fans, like refrigerators and dryers, actively pull air from the room to cool themselves or vent exhaust. In doing so, they inhale dust, lint, and hair, which clogs their internal components like coils and vents, creating both a fire hazard and an efficiency drain.
- Gravity & Neglect: Crumbs in a pantry, dust behind the stove, and dirt in a window track are all examples of gravity at work. Because these areas are out of sight or difficult to reach, a small amount of debris is left to accumulate during weekly cleans, growing into a major mess over several months.
Common Mistakes
- Using Abrasive Cleaners on Appliances: Scrubbing a stainless steel refrigerator or dishwasher front with a scouring pad will permanently scratch the finish. Use only microfiber cloths and approved stainless steel cleaners.
- Forgetting to Unplug Appliances: Before pulling out a major appliance to clean behind it or service its components, ALWAYS unplug it from the wall to prevent electrical shock or damage to the machine.
- Mixing Cleaning Chemicals: Never mix bleach with ammonia, rubbing alcohol, or even vinegar. These combinations can create toxic gases. Stick to one cleaner at a time or use natural alternatives like vinegar and baking soda (used separately).
- Skipping the Patch Test: Applying a new or harsh cleaning solution directly to a large, visible area without testing it can lead to discoloration or damage. Always test on a hidden spot first, like the back of a couch cushion or an unseen section of grout.
- Getting Electrical Components Wet: When cleaning refrigerator coils, light fixtures, or vents, be extremely careful not to spray water or liquid cleaner directly onto wiring, sockets, or motors.
- Ignoring Manufacturer’s Instructions: Your appliance manuals contain specific instructions for cleaning filters, panels, and surfaces. Ignoring them can void your warranty or lead to damage.
Cost & Time Breakdown
| Task | DIY Cost (Supplies) | Professional Cost | Time |
|---|---|---|---|
| Full-Home Quarterly Deep Clean | $20 - $75 | $300 - $600 | 4-8 hours |
| Appliance Deep Clean (3 major) | $15 - $30 | $150 - $250 | 1-2 hours |
| Professional Grout & Tile Cleaning | $20 (grout paste/brush) | $200 - $400 | 2-3 hours |
| Upholstery & Drapery Cleaning | $10 (vacuuming) | $150 - $300 | 1-2 hours |
| Window Track & Sill Cleaning | $5 (cleaner/brush) | Included in most deep cleans | 1 hour |
Tips & Prevention
- Use High-Quality Doormats: Place one outside and one inside every exterior door to trap dirt at the source, dramatically reducing the amount tracked into the house.
- Run Exhaust Fans Religiously: In the bathroom, run the fan during your shower and for 15-20 minutes afterward to vent humid air and prevent mold growth.
- Use the "Touch-Up" Rule: If you spill something in a cabinet or the fridge, clean it up immediately instead of letting it dry into a stubborn mess for the quarterly clean.
- Invest in a Splatter Guard: Using a simple mesh screen over your pans when frying can reduce the amount of grease that escapes and lands on your backsplash and range hood.
- Keep a Squeegee in the Shower: Wiping down the glass and tile after each use takes 30 seconds and drastically reduces soap scum and mineral deposit buildup, making your quarterly grout scrub much easier.
- Schedule It Now: Don't just finish this clean and forget about it. Open your calendar right now and set a recurring appointment for three months from today. Consistency is the key.
When to Call a Professional
While this quarterly deep clean is a manageable DIY project for most, there are situations where calling in a professional cleaning service is the smarter, safer, and more effective choice. If you discover a significant amount of what appears to be black mold (often in walls, behind appliances, or in damp basements), do not disturb it. Contact a mold remediation specialist who has the proper training and equipment to handle it safely. Furthermore, if you have very high, hard-to-reach ceiling fans, fixtures, or windows, a professional service with the right ladders and insurance can do the job without risk of injury. For heavily stained and discolored grout that doesn't respond to cleaning, a tile and grout specialist can use commercial-grade steam cleaners and may recommend resealing to protect it long-term. Finally, if you simply lack the time, physical ability, or energy for a 4-8 hour intensive cleaning session, hiring a pro is a great investment in your home and your own well-being. They can often accomplish the entire checklist in half the time you could, thanks to experience and specialized tools.
Your seasonal maintenance checklist
The small jobs that prevent the expensive repairs. Tick them off — progress saves on this device.
Free, no signup. Skip anything that requires roof access or working near live electrical.
What should this project cost?
Enter your project details for a realistic cost range before you call anyone.
Cost depends heavily on which system turns out to be the source.
- Regional adjustment
- National average
- Labor share (typical)
- ~$1,620
- Quotes to collect
- 3 written estimates
Educational estimate based on national averages — not a binding quote. Always confirm with written local estimates.
Stay ahead of the next repair
Turn this guide into a schedule you will actually follow.
- Is this a safe DIY job?Check permits, tools, and risk before you start the steps below.Open
- Estimate this projectGet a cost range for your scope and ZIP before you call anyone.Open
Free, no signup required. Estimates are educational guidance, not a quote or an inspection.
Get the print-ready PDF of this guide
A clean, ad-free, printable version you can keep on your phone or pin to the workshop wall. Free with a FixlyGuide account.
- Print-optimized layout
- Tools, materials & every step included
- Saved to your account
Frequently asked questions
How often should I really do this full deep clean?+
A full deep clean hitting all 12 of these spots is recommended once per quarter, or every three months. For households with multiple pets, allergy sufferers, or lots of cooking, you might do certain tasks (like degreasing the range hood filter) more frequently.
Can I use store-bought cleaners instead of vinegar and baking soda?+
Absolutely. There are excellent commercial cleaners formulated for every task on this list, from grout cleaners to stainless steel polishes and machine cleaning tablets. Just be sure to read the label and use the product as directed for your specific surface or appliance.
What is the single most important spot on this checklist?+
From a safety and cost-saving perspective, cleaning the refrigerator condenser coils is arguably the most critical. Clogged coils are a major cause of appliance inefficiency and early failure. From a pure filth perspective, cleaning behind the refrigerator and stove often yields the most shockingly satisfying results.
Is it worth hiring a pro for this?+
It can be. If you lack the 4-8 hours of time, the physical mobility to move appliances, or the right tools, a professional cleaning service can be a fantastic investment. They can often do a more thorough job in less time. For a full-home deep clean, expect to pay between $300 and $600.

Discussion
Loading comments…