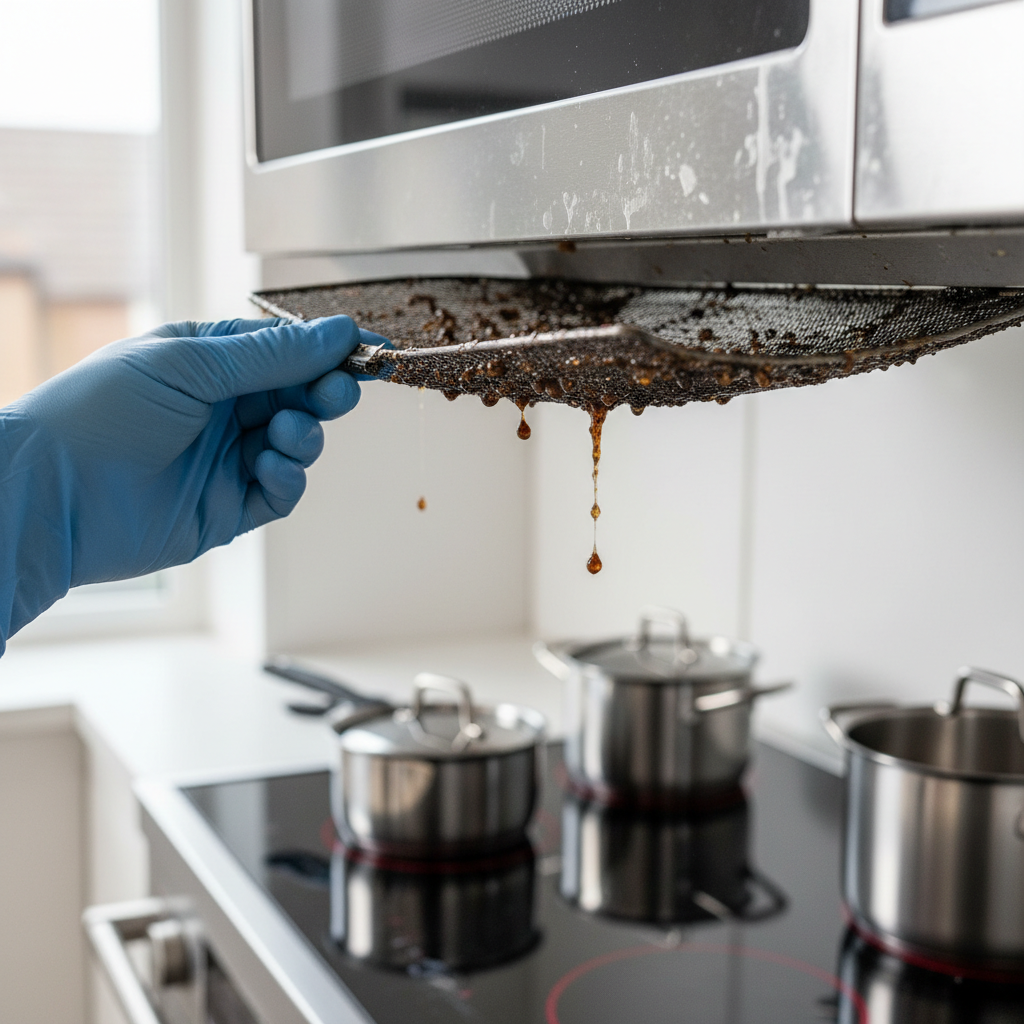
- Type of Cooking: Frying, sautéing, and anything that throws a lot of oil splatter — bacon, pan-seared steaks, deep-frying — will coat those filters in grease. Boiling water or steaming veggies? Not so much.
- Lack of Awareness: This is the big one. Most homeowners just don’t know these filters exist or that they need cleaning. Out of sight, out of mind, until the vent fan starts sounding like a dying pigeon or the kitchen fills with smoke.
- Neglect: Even if you know about them, it’s an easy chore to put off. A few weeks turns into a few months, and suddenly you’ve got a filter that could probably stand on its own.
Published September 1, 2026Last updated September 1, 2026
Tools & materials you'll need
Affiliate linksAs an Amazon Associate FixlyGuide earns from qualifying purchases — at no extra cost to you. Prices and availability are accurate as of publication and subject to change.
Quick Answer
Alright, let’s get straight to it: that greasy, grimy mess hiding underneath your microwave? It’s probably the grease filter, and yep, it’s nasty. Its job is to catch airborne grease and crud from your stovetop before it gunk up your microwave’s insides and recirculation fan. When it gets packed solid with grease, it can’t do its job, which means more smoke hanging around in your kitchen and, honestly, a fire risk too. You’ve gotta pull it out, degrease it, rinse it, and let it dry. Don’t skip that part — it makes a real difference.
The Problem
I’ve been doing this work for over a quarter-century, and I swear, if there’s one kitchen item homeowners miss over and over, it’s the microwave grease filter. You know, that thin metal mesh screen tucked away on the underside of your over-the-range microwave? Most folks don’t even know it’s there, let alone what it does. But trust me, that thing’s a workhorse. Every time you cook anything on your stovetop — frying bacon, simmering a stew, or just boiling pasta — tiny grease particles, steam, and cooking odors float up. Your microwave’s fan kicks on, pulls that air in, and those filters are the first line of defense.
Over time, those filters get completely saturated. They go from a clean, kinda shiny mesh to a dark, sticky, almost solid block of greasy grime. What happens then? First, your microwave’s ventilation drops through the floor. Instead of sucking up smoke and steam, it’s just recirculating it, and your kitchen starts smelling like last night’s dinner. Second, and a lot more serious, that grease is flammable. A filter caked with grease is a straight-up fire hazard. I’ve seen homes where a stovetop flare-up lit off a super-greasy filter, and believe me, it’s not pretty. I pulled a microwave filter in Frisco last month that looked like someone had dipped it in motor oil and breaded it. Same story. Same mess. Don’t let that be you. You gotta give these filters some attention, and it’s not nearly as hard as folks think.
How It Works
Okay, let’s talk shop for a minute about how your microwave’s ventilation system actually works, especially the over-the-range kind. When you fire up your stovetop, cooking fumes — steam, grease, odors — start rising. Your microwave has a fan, usually called a vent fan or exhaust fan, that pulls this air in. But before that air goes anywhere, it passes through a series of filters. The most common one, and the one we’re talking about here, is the grease filter. These are usually made of multiple layers of aluminum mesh or charcoal, built to catch those grease particles. Think of it like a fine net catching tiny fish. The mesh has countless microscopic openings that let air pass through but trap the bigger, sticky grease molecules.
Some microwaves just recirculate the filtered air back into the kitchen through vents on top, which is common if you don’t have external ducting. Others vent the air directly outside through a duct system. Either way, that grease filter matters. If it’s clogged, the fan has to work harder, moves less air, and gets louder while it’s doing it. The air that does get through isn’t properly filtered, which means grease can build up inside the microwave’s motor and ductwork, and that shortens its life. Plus, a clean filter helps the microwave stay at its normal operating temperature; restricted airflow can make it overheat. So, keeping these filters clean isn’t just about smells; it’s about the appliance lasting and, more importantly, staying safe.
Step-by-Step Fix
Ready to tackle that greasy beast? It’s not glamorous, but it’s a quick job that pays off. Here’s how I do it:
-
Safety First — Unplug It — Always, always, always start by unplugging your microwave from the wall outlet. Don’t be a hero; electricity and water don’t mix. Even if you think you’re just doing a quick scrub, take the extra five seconds to pull the plug. You’ll be glad you did.
-
Locate and Remove the Filters — The grease filters are usually on the underside of your over-the-range microwave. They typically have a small handle, tab, or a release latch you push or slide. Sometimes you need to push them up slightly and then pull them down or slide them out. Don’t force it; if it feels stuck, check your microwave’s manual. You might have one or two filters, depending on the model. They’re probably caked with grease, so try not to manhandle them or you’ll just get grimy.
- Pro Tip: If your microwave has a charcoal filter (often located behind the vent grille inside the microwave), those are usually not cleanable and need to be replaced periodically, usually every 6-12 months. This article focuses on the metal mesh grease filters found on the bottom.
-
Prepare Your Soaking Solution — This is where the magic happens. You need something that cuts through grease. I usually go with a large utility sink or a plastic tub. Fill it with really hot water — as hot as your tap will get, ideally around 120-140°F. Then add a generous squirt of heavy-duty dish soap, like Dawn, or a dedicated degreaser. For really tough crud, I sometimes add a half-cup of baking soda to the mix. Stir it up until you get a good lather.
-
Soak the Filters — Carefully place the greasy filters into your hot, soapy solution. Make sure they’re fully submerged. Let them sit. For moderately dirty filters, 15-30 minutes might do it. For filters that look like they haven’t been cleaned since the Reagan administration, let ’em soak for at least an hour, or even overnight if they’re truly awful. The heat and the degreaser will start breaking down that stubborn grease.
-
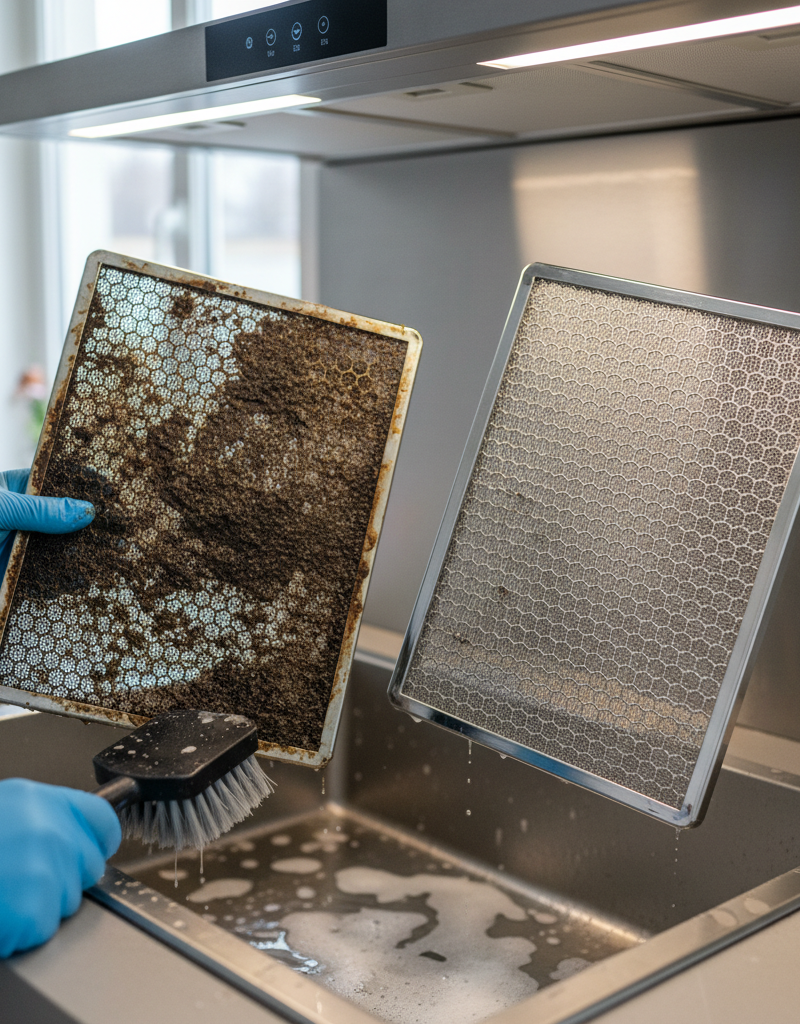
Scrub ‘Em Down — After soaking, pull one filter out. You’ll likely see a lot of grease has already loosened and floated off. Now grab a stiff-bristled scrub brush — an old toothbrush works for tight spots, too. Scrub both sides of the filter hard. Pay special attention to the mesh itself. You want to see the aluminum shine through. Don’t be shy about putting some elbow grease into it. If the water gets too dirty, drain it and refill with fresh hot soapy water.
- Watch Out: Some filters have a thin, delicate mesh. Don’t use anything metal or super abrasive like steel wool, or you could damage the filter and reduce its effectiveness. A plastic-bristled brush is usually best.
-
Rinse Thoroughly — Once you’ve scrubbed all the visible grease off, rinse the filters under hot running water. You want to wash away all the soap residue and any remaining bits of grime. Hold it up to the light; if you can see through it clearly without any dark, blocked spots, you’re golden. If not, back to the scrub tub it goes.
-
Dry Completely — This step matters if you don’t want mold or mildew hanging around. You can air-dry them on a clean towel or drying rack. If you’re in a hurry, you can gently pat them dry with a clean cloth. Just make sure they’re bone dry before putting them back. Moisture can cause issues, especially with metal filters.
-
Reinstall the Filters — Once dry, slide or snap the filters back into their slots on the underside of your microwave. Make sure they click securely into place. They should fit snugly. If they’re flopping around, they’re not installed right.
-
Plug It Back In & Test — Now you can plug your microwave back into the wall. Run the vent fan on high for a minute or two. You should hear a clear, strong airflow. Your kitchen will thank you, and you’ve just knocked down a real fire hazard.
Common Causes
So why do these filters get so gross? It usually comes down to a few things:
- Frequency of Cooking: If you cook a lot, especially frying or high-heat cooking, your filters are going to load up with grease faster. A family that cooks dinner nightly will clog filters way quicker than someone who only uses their stovetop once a week.
- Type of Cooking: Frying, sautéing, and anything that throws a lot of oil splatter — bacon, pan-seared steaks, deep-frying — will coat those filters in grease. Boiling water or steaming veggies? Not so much.
- Lack of Awareness: This is the big one. Most homeowners just don’t know these filters exist or that they need cleaning. Out of sight, out of mind, until the vent fan starts sounding like a dying pigeon or the kitchen fills with smoke.
- Neglect: Even if you know about them, it’s an easy chore to put off. A few weeks turns into a few months, and suddenly you’ve got a filter that could probably stand on its own.
Common Mistakes
I’ve seen plenty of folks make these blunders. Don’t be one of ’em:
- Using Abrasive Cleaners or Tools: Steel wool, harsh chemical oven cleaners, or even a screwdriver to scrape off gunk can damage the delicate mesh of the filter, making it less effective. Stick to soft brushes and degreasers.
- Ignoring the Microwave Manual: Every microwave is a little different. Some have specific instructions for filter removal or cleaning. Skimming the manual for your model number (often inside the door frame) can save you a headache.
- Not Unplugging the Microwave: This is a huge safety no-no. You’re dealing with electricity, potentially water, and moving parts if the fan accidentally kicks on. Always unplug it. No exceptions.
- Forgetting to Dry Completely: Reinstalling a wet filter can lead to mildew, odors, or even rust on metal components. Let them air dry completely, or towel dry thoroughly.
- Trying to Clean Charcoal Filters: Some microwaves have charcoal filters, especially those that recirculate air. These aren’t cleanable; they’re built to absorb odors and need to be replaced, not washed. Trying to clean them will just ruin them.
- Delaying Cleaning Too Long: Once the grease hardens and bakes onto the filter, it’s ten times harder to remove. Regular cleaning (every 1-3 months, depending on cooking habits) makes the job a whole lot easier and faster.
Cost & Time Breakdown
Here’s what you can expect when cleaning these filters:
| Task | DIY Cost | Pro Cost | Time |
|---|---|---|---|
| Gather supplies | $5-$15 | N/A | 5 minutes |
| Remove filters | $0 | N/A | 1-2 minutes |
| Soaking | $0 | N/A | 15 min - overnight |
| Scrubbing & rinsing | $0 | N/A | 5-10 minutes |
| Drying & reinstalling | $0 | N/A | 5 minutes |
| Total (Active Time) | $5-$15 | N/A | 25-30 min |
| Total (Including Soak) | $5-$15 | $75-$150+ | 1-12+ hours |
Note: A professional cleaning service might include this as part of a larger kitchen deep clean, but it’s rarely a standalone service. The pro cost listed is an estimate if someone were to come out specifically for this, which is highly unlikely.
Tips & Prevention
Look, prevention beats cure, especially with grease. Here are a few things I tell my homeowners:
- Regular Cleaning Schedule: Put a reminder on your calendar to clean these filters every 1-3 months. If you’re a heavy cooker — lots of frying, searing — aim for monthly. It’s easier to clean them when they’re only moderately greasy.
- Use Your Vent Fan: It sounds obvious, but so many people forget to turn on their microwave’s vent fan when cooking. Make it a habit. It’s there for a reason — to pull those greasy fumes away.
- Consider a Splatter Guard: For frying or high-splatter cooking, use a mesh splatter guard over your pans. It won’t eliminate all grease, but it’ll cut down what hits the filter.
- Wipe Down the Underside Regularly: While you’re at it, give the underside of your microwave a quick wipe with a degreasing spray and a paper towel after cooking. It catches a lot of grease before it even gets to the filter.
- Check for Charcoal Filters: If your microwave recirculates air, check your manual to see if it has a charcoal filter. These can’t be cleaned and need to be replaced periodically — usually every six months to a year. A dirty charcoal filter won’t pose a fire risk like a grease filter, but it definitely makes your kitchen smell stale.
When to Call a Professional
Honestly, cleaning microwave grease filters is 100% a DIY job. There’s almost no scenario where you’d need to call a pro for just this. However, if you run into trouble removing the filters and worry you might damage your microwave, or if your microwave’s vent fan isn’t working right even after cleaning the filters — it’s making strange noises, or not moving air at all — then it’s time to call an appliance repair technician. They can diagnose mechanical issues with the fan motor or electrical components. Don’t mess with internal electrical components unless you’re a licensed pro; you could seriously hurt yourself or ruin the appliance.
If you’ve tried to clean them and they’re still completely blocked or damaged, you might need to buy replacement filters. Most appliance parts stores or online retailers carry them. Just make sure you have your microwave’s model number handy.
FAQ
Q: How often should I clean my microwave grease filters? A: I tell folks to aim for every 1-3 months, depending on how much you cook, especially if you do a lot of frying. If your kitchen fills with cooking smells or your vent fan sounds weak, it
Related Articles
Keep troubleshooting with these hand-picked guides from FixlyGuide:
- The Secret to Banishing Old Pet Odors (Even When You Can't Find the Stain) — Don't let hidden pet accidents ruin your home's fresh scent; this guide reveals how to find and eliminate old pet odors and their invisible…
- The 3 Lies Your Carpet Cleaner Tells You (And Why Your Carpet Stinks) — Ever notice those 'cleaned' carpet stains pop right back up, or a lingering funk that just won't quit? It's not bad luck; it's bad science.
- That Annoying Haze on Your Stainless Steel Sink? Here's How I Get It Out — I've seen it a hundred times: a cloudy, hazy film clinging to a stainless steel sink that just won't come clean. It's usually from hard wat…
- The Grimy Secret Under Your Oven: Why Your Kitchen Never Feels Truly Clean — Your oven and range hood are silent culprits in your kitchen's battle against persistent grease and grime. This guide tackles how to deep c…
- The Grimy Secret Behind Your Dull Bathroom Faucet — And How to Make It Shine — Discover the real culprit behind your bathroom faucet's dull, grimy appearance and how to quickly restore its shine with a few common house…
- The Secret Hairball Fix Plumbers Don't Want You to Know — Tired of standing in ankle-deep water? Most shower clogs are a gnarly mix of hair and soap scum, and you can clear them yourself without ha…
Should you do this yourself?
Answer five quick questions before you start. Safety outranks savings every time.
Your experience with work like this
How high do you have to work?
Does the job involve any of these?
Will it need a permit?
Specialty tools
Free and instant. Educational guidance only — not a quote, inspection, or professional diagnosis.
What should this project cost?
Enter your project details for a realistic cost range before you call anyone.
Cosmetic refreshes start near $5,000; full remodels commonly $25,000–$45,000.
- Regional adjustment
- National average
- Labor share (typical)
- ~$8,550
- Quotes to collect
- 3 written estimates
Educational estimate based on national averages — not a binding quote. Always confirm with written local estimates.
Before you start
Check the difficulty, permits, and safety risk — then decide whether to call a pro.
- Estimate this projectGet a cost range for your scope and ZIP before you call anyone.Open
- Get local estimatesSend one request and compare written estimates from vetted pros.Open
Free, no signup required. Estimates are educational guidance, not a quote or an inspection.
Get the print-ready PDF of this guide
A clean, ad-free, printable version you can keep on your phone or pin to the workshop wall. Free with a FixlyGuide account.
- Print-optimized layout
- Tools, materials & every step included
- Saved to your account
Frequently asked questions
How often should I clean my microwave grease filters?+
I tell folks to aim for every 1-3 months, depending on how much you cook, especially if you do a lot of frying. If your kitchen fills with cooking smells or your vent fan sounds weak, it's definitely time to clean 'em.
Can I put microwave grease filters in the dishwasher?+
Some manufacturers say you can, but I usually don't recommend it. The high heat can sometimes warp the delicate mesh, and they don't always get completely clean. Hand-washing with hot, soapy water is usually more effective and safer for the filter.
What if my filters are too greasy to clean?+
If they're absolutely caked and nothing is coming off after a good soak and scrub, they might be beyond cleaning. At that point, it's best to just replace them. Check your microwave's model number and order new ones online or from an appliance parts store.
Do all microwaves have grease filters?+
Most over-the-range microwaves, especially those that vent or recirculate air from the stovetop, will have grease filters. Countertop models usually don't have them since they don't serve a ventilation purpose for cooking surfaces.
Can a dirty microwave filter cause a fire?+
Absolutely, yes. That accumulated grease is highly flammable. If you have a flare-up on your stovetop, those grease-soaked filters can easily catch fire, which can quickly spread. It's a serious fire hazard that you want to avoid.
What's the difference between a grease filter and a charcoal filter?+
Grease filters are usually metal mesh, designed to trap airborne grease particles, and they're often found on the bottom of the microwave. Charcoal filters are typically carbon-based, meant to absorb odors, and are generally located behind the vent grille inside the microwave. Grease filters are washable; charcoal filters need to be replaced.
My microwave still smells after cleaning the filters. What else could it be?+
If the filters are clean but you still have odors, check for a charcoal filter if your model has one – it might need replacing. Also, give the interior of the microwave a good scrub, especially the ceiling and behind the waveguide cover. Sometimes odors just get baked onto those surfaces.
Can I just use degreaser spray instead of soaking?+
For lightly soiled filters, a good degreaser spray and a scrub might work. But for serious grease buildup, soaking them in hot, soapy water (or water with degreaser) is far more effective. It gives the product time to really break down the grease without you having to scrub endlessly.
Discussion
Loading comments…