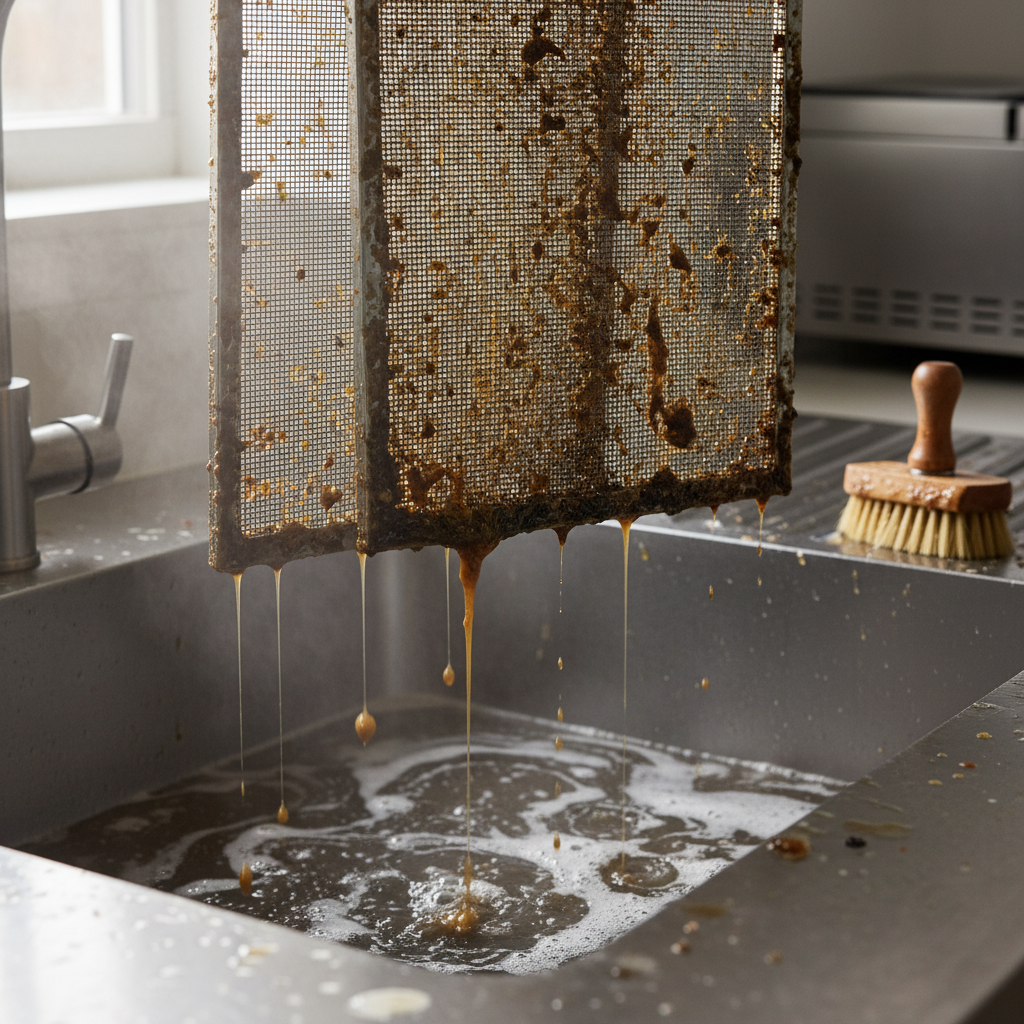
- Safety First: Turn off the power to your range hood at the breaker. Seriously, don’t skip this. You don’t want the fan kicking on or an electrical problem while you’re handling wet metal.
- Lay down old newspapers or towels on your countertop or floor. This gets messy fast, and grease has a way of ending up where it doesn’t belong.
- Fill your biggest pot or a utility sink with water and get it boiling. You want it really hot, close to boiling, but not a rolling boil if you’re using a sink.
Published September 25, 2026Last updated September 25, 2026
Tools & materials you'll need
Affiliate linksAs an Amazon Associate FixlyGuide earns from qualifying purchases — at no extra cost to you. Prices and availability are accurate as of publication and subject to change.
Quick Answer
Look, I’ve cleaned more greasy range hoods than I care to count in my 25+ years on the job. That sticky grime on your range hood filter isn’t just ugly; it’s a fire hazard, and it’s choking off your hood’s ability to pull cooking fumes out of the kitchen. The quick fix? Hit it with serious degreaser and hot water. Don’t count on the dishwasher—it just doesn’t cut it for the real stuff. I’ll show you how I’d tackle it on a jobsite, and how to get those filters spotless so your kitchen air actually clears out.
The Problem
Alright, so you cook, right? Good. Every time you fire up the stove—especially if you’re frying, searing, or stir-frying—you’re blasting microscopic grease particles and vaporized oils into the air. Your range hood is supposed to suck that mess up and out. But before it goes anywhere, it runs through those metal mesh filters. They’re built to trap grease. Trouble is, they get too good at it.
Over time, those tiny particles stack up, mix with dust, and turn into a thick, sticky layer that’s about as fun as varnish on your hands. Your dishwasher? It’s not made to break down that kind of baked-on crud. Sure, it might move some of it around, but it won’t really dissolve it. That’s why the filters still look nasty after a “wash.” And yeah, a clogged filter means your hood isn’t moving air, your kitchen smells like last night’s dinner, and you’ve got a real fire risk hanging right over the cooktop.
How It Works
Your range hood is basically a strong fan inside a canopy, and its whole job is to create a localized updraft. That updraft grabs smoke, steam, and airborne grease while you’re cooking. Then the air gets pulled through a set of filters, usually multi-layer mesh made of aluminum or stainless steel. Those mesh layers act like baffles, making the grease-laden air change direction fast. The heavier grease particles slam into the metal and stick, while the cleaner air keeps moving and gets sent out—either outdoors in a ducted system or back into the kitchen through charcoal filters in a ductless setup.
All of that depends on the filters staying open. When they’re clean, air moves like it should, and grease capture stays solid. Once grease starts building up, those tiny openings shrink and eventually plug up. Airflow drops hard. The fan has to work harder to pull less air, and you’ll hear the motor straining even though it’s not really doing the job. Worse yet, that grease is flammable. A flare-up can light off a greasy filter fast, and then you’ve got flames pushing into the ductwork—maybe into the attic, maybe into the walls. That’s why I keep telling folks around places like Plano or Frisco, “Don’t mess around with greasy filters!” I pulled one out of a hood in McKinney once and it was so caked up it probably weighed an extra two pounds. No kidding. The homeowner swore the hood was broken, but it was just suffocating under old cooking oil. Getting it truly clean isn’t about looks. It’s safety, plain and simple.
Step-by-Step Fix
1. Prep Your Workspace — Get everything ready before you start. * Safety First: Turn off the power to your range hood at the breaker. Seriously, don’t skip this. You don’t want the fan kicking on or an electrical problem while you’re handling wet metal. * Lay down old newspapers or towels on your countertop or floor. This gets messy fast, and grease has a way of ending up where it doesn’t belong. * Fill your biggest pot or a utility sink with water and get it boiling. You want it really hot, close to boiling, but not a rolling boil if you’re using a sink.
2. Remove the Filters — Most filters are pretty easy to pop out. * Look for small clips or pull tabs on the filter frame. Gently push or pull those to release the filter. Usually they slide out or pivot down. * Handle them carefully; they’re probably dripping grease already. Keep them level if you can while you move them to the cleaning spot. * If they’re stuck, don’t muscle it. There may be a screw or a different latch. Check the range hood manual if you’re not sure.
3. Degrease and Soak — This is where things start happening. * Choose Your Degreaser: I’ve had good luck with heavy-duty degreasers like the ones made for engines or industrial kitchens. Dish soap is fine for light grease, but for the real junk, you need something stronger. A good concentrated dish soap with degreasing power can work too, or a specialized kitchen degreaser. If you want a more natural route, baking soda and white vinegar can help, but it takes longer. * The Soak: Set one filter carefully into the hot water in your pot or sink. Add a generous amount of your degreaser. If you’re using a heavy-duty product, follow the bottle for dilution. If you’re using dish soap, dump in a good half-cup or more. You should see the hot water start breaking down some of that surface grease right away. * Let it soak for at least 15-30 minutes. On stubborn ones, I’ve let ’em sit for an hour. You’ll actually see grease lifting off and floating on top of the water. That’s the good stuff right there.
4. Scrub the Grime Away — Get in there and work it. * Wearing rubber gloves, pull the filter out of the hot, greasy water. Be careful, it’ll still be hot. * Grab a stiff-bristled brush—a dish brush works fine, or an old toothbrush for the corners. Scrub all sides of the filter and pay extra attention to the mesh layers. You’ll be surprised how much gunk comes loose. * Rinse the filter under very hot running water to flush out loosened grease and any degreaser residue. * Take a close look. If you still see a lot of grease, repeat the soak and scrub. With years of buildup, a second or third round is sometimes just how it goes.
5. Final Rinse & Dry — Clean means dry. * Once the filter looks truly clean, rinse it one last time under hot water so there’s no degreaser left behind. You don’t want chemical smells or tastes when you’re cooking later. * Shake off the water and lay the filters on a clean towel to air dry completely. Don’t put them back in wet; that’s just asking for rust or mildew. * This usually takes about 30-60 minutes, depending on humidity. Make sure they’re bone dry before you reinstall them.
6. Clean the Hood Interior — Don’t forget the housing. * While the filters are drying, grab a rag and some all-purpose kitchen cleaner or a diluted degreaser solution. Wipe down the inside surfaces of the range hood where the filters sit. You’ll probably find grease in there too. * Don’t spray directly into any electrical components. Spray the rag first, then wipe. * Clean the outside of the hood too—polish it up. Makes a big difference.
7. Reinstall Filters — Put it all back together. * Once the filters are completely dry, slide them back into their slots. They should go in easy if they’re clean and lined up right. * Secure the clips or tabs. * Turn the power back on at the breaker. * Test the fan. It should sound smoother and move air better now.
Common Causes
- High-Heat Cooking: Frying, searing, and stir-frying throw off a lot more airborne grease than boiling or steaming. Those tiny oil droplets are usually the main culprit.
- Infrequent Cleaning: Letting grease build up for months or years just creates a harder, more baked-on mess that’s tougher to break loose.
- Ineffective Cleaning Methods: Running filters through a standard dishwasher cycle is rarely enough for heavy, sticky grease. It often just softens it and spreads it around.
- Insufficient Ventilation: If your hood isn’t strong enough for how you cook, or if you don’t turn it on every time, more grease hangs in the air and settles on surfaces—including the filters.
- Lack of Degreaser: Trying to clean tough grease with just hot water and a sponge is like trying to put out a bonfire with a squirt gun. You need something that actually breaks down the oil.
Common Mistakes
- Ignoring the problem: Thinking a dirty filter is just “cosmetic.” It’s a fire hazard and it drags down hood performance. I’ve seen duct fires start from nothing more than ignored, saturated filters.
- Dishwasher dependence: Expecting your dishwasher to magically dissolve years of baked-on grease. It’s not a deep-cleaning degreaser. You need scrubbing and a real solvent for that.
- Skipping the power-off step: Working on the hood with the power on is a major safety no-no. Electrocution risk or accidental fan activation can hurt you fast.
- Using abrasive scrubbers: Steel wool or overly aggressive brushes can scratch or damage the delicate mesh, which makes the filters less effective and harder to clean next time.
- Not rinsing thoroughly: Leaving degreaser residue on the filters can cause chemical odors when the hood runs, or leave behind a film that grabs more grease even faster.
- Forgetting the interior: If you clean the filters but leave the inside of the hood greasy, you’re right back where you started.
Cost & Time Breakdown
Here’s a realistic look at what you’re signing up for:
| Task | DIY Cost | Pro Cost | Time |
|---|---|---|---|
| Degreaser & Supplies | $10–$25 | Included | 10–15 min (shopping) |
| Filter Removal | $0 | Included | 5 min |
| Deep Soaking & Scrubbing | $0 | Included | 30–90 min |
| Hood Interior Cleaning | $0 | Included | 15–30 min |
| Total | $10–$25 | $75–$150+ (Min) | ~1–2 hours |
Tips & Prevention
- Regular Cleaning: Aim to deep clean your filters every 1-3 months, depending on how often you cook. If you fry daily, do it monthly. If you cook light meals, quarterly might be fine. Don’t wait until they’re visibly caked.
- Use Your Fan: Always turn on your range hood before you start cooking and leave it running for at least 5-10 minutes after you finish. That helps clear out the leftovers in the air.
- Heat & Degreaser: Remember the combo. Hot water loosens grease, and a good degreaser breaks it down chemically. You need both if you want the thing actually clean.
- Pre-Soak: For really tough jobs, a quick pre-soak in just hot water before adding the degreaser can get things moving.
- Hood Strength: Make sure your range hood has enough CFM (Cubic Feet per Minute) for your stovetop. A general rule of thumb is 100 CFM per 10,000 BTUs of stove output, or 100 CFM per linear foot of range width for electric.
- Duct Cleaning: Every few years, consider having the actual exhaust ductwork professionally cleaned, especially if you’ve had a history of severely greasy filters. It’s not a common homeowner chore, but it can matter.
When to Call a Professional
While cleaning range hood filters is a perfectly doable DIY task, there are times when you should just call in a pro. If you’ve got a commercial-grade range hood, or one tied into a complex ventilation system, it’s probably best to have a specialized HVAC technician handle the maintenance. Also, if you notice strange noises from the fan, electrical issues like flickering lights, or the hood still isn’t pulling air well even after a thorough filter cleaning, then you’re probably dealing with a mechanical issue, not just grease buildup. Don’t try to rewire anything yourself; leave electrical work to a licensed electrician. For serious duct blockages or if you suspect internal damage, a professional duct cleaning service or HVAC tech will have the right tools and know-how to check it safely and fix it. Your safety and the proper functioning of your kitchen ventilation system are worth the call.
Related Articles
Keep troubleshooting with these hand-picked guides from FixlyGuide:
- The Grimy Secret Under Your Oven: Why Your Kitchen Never Feels Truly Clean — Your oven and range hood are silent culprits in your kitchen's battle against persistent grease and grime. This guide tackles how to deep c…
- The Invisible Film Making Your Bathroom Mirror Streaky – And How to See Clearly — Discover why your bathroom mirror always looks streaky, even after cleaning, and learn the pro trick to get a perfectly clear, fog-free ref…
- The Secret to Cleaning Your Greasy Oven Door (No Harsh Chemicals Needed) — Don't spend hours scrubbing a grimy oven door with harsh chemicals; I'll show you a contractor's trick to get that glass sparkling clean in…
- Why Your Kitchen Sink Drain Stinks (Even After You've Cleaned It) — Don't just mask that foul odor from your kitchen sink; get rid of the gunk causing it with this pro-level cleaning method.
- The Mystery Smell: Why Your Fridge Stinks (Even After Cleaning It) — That persistent, foul odor in your refrigerator isn't just gross; it's often a sign of hidden issues. Learn the real culprits behind linger…
- Why Your Paint Just Won't Cover (and How to Stop the Struggle) — Struggling with paint that just won't cover the old color, even after multiple coats? I'll show you why it happens and how to fix it for go…
What should this project cost?
Enter your project details for a realistic cost range before you call anyone.
Cosmetic refreshes start near $5,000; full remodels commonly $25,000–$45,000.
- Regional adjustment
- National average
- Labor share (typical)
- ~$8,550
- Quotes to collect
- 3 written estimates
Educational estimate based on national averages — not a binding quote. Always confirm with written local estimates.
Frequently asked questions
How often should I clean my range hood filters?+
You should aim to deep clean your range hood filters every 1-3 months, depending on how frequently and intensely you cook. High-heat cooking or frying warrants more frequent cleaning, perhaps even monthly, to prevent excessive grease buildup.
Can I put my range hood filters in the dishwasher?+
While some manufacturers say it's okay, most dishwashers won't truly deep clean heavily greased filters. They might smear the grease around or just remove surface oil. For a truly clean filter, a manual soak with a strong degreaser and hot water is usually needed.
What kind of degreaser works best for range hood filters?+
Heavy-duty kitchen degreasers, concentrated dish soaps known for grease-cutting power, or even specialized engine degreasers (with proper ventilation and precautions) work well. For a less harsh option, a solution of baking soda and hot water can also be effective.
Why is my range hood still not pulling air after cleaning the filters?+
If your hood isn't pulling air effectively after a thorough filter cleaning, the problem might be mechanical. This could indicate a motor issue, a blockage further in the ductwork, or a problem with the fan assembly itself. At that point, it's best to call an HVAC professional.
Is a greasy range hood filter a fire hazard?+
Absolutely. Accumulated grease on range hood filters is highly flammable. A kitchen flare-up from the stovetop can easily ignite these filters, spreading fire into the exhaust ductwork and potentially throughout your home. Regular cleaning is crucial for fire prevention.
How do I remove stubborn, baked-on grease?+
For stubborn, baked-on grease, you'll need a prolonged soak. Use very hot (almost boiling) water with a strong degreaser, and let the filters soak for 30-60 minutes, or even longer. Follow up with vigorous scrubbing with a stiff brush and repeated rinses.
Should I wear gloves when cleaning the filters?+
Yes, always wear sturdy rubber gloves when handling greasy filters and strong degreasers. This protects your hands from harsh chemicals and the sticky, unpleasant grease. It'll make cleanup much easier too.
What if my filters are rusty after cleaning?+
If your filters are rusting, they might be made of steel or an alloy that's not stainless, or the protective coating has worn off. Ensure they are completely dry after washing. If rust is significant, it might be time to consider replacing them, as rust can compromise their integrity and appearance.

Discussion
Loading comments…