
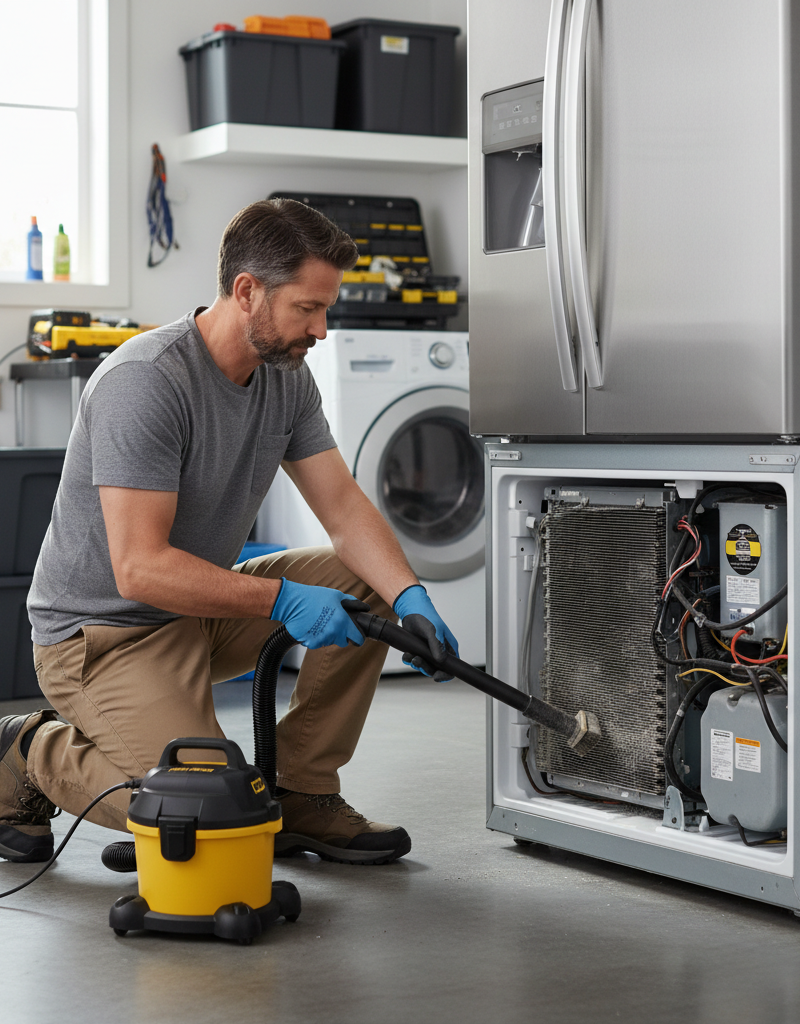
- Clear the Back/Bottom Area — Dust Bunnies Beware
- Unplug First! I’m serious. Don’t skip it.
- Access: Pull the fridge away from the wall. Find the condenser coils, usually a black grid on the back or underneath, behind a grille. Some models have a kick plate down low in front that comes off to expose them.
HVAC · High energy usage
| Project category | HVAC |
|---|---|
| Problem type | High energy usage |
| Trade required | HVAC |
| Urgency | Planned project |
| Safety risk | Low safety risk |
| DIY suitability | DIY for experienced homeowners |
| Cost category | High cost |
| Typical timeline | Assessment within weeks; replacement planned off-season |
| Contractor type | Licensed HVAC technician |
Repair option
Duct sealing, insulation, and a tune-up before touching the equipment.
Replacement option
High-efficiency replacement sized by a load calculation, not a rule of thumb.
Common causes
- Aging, low-efficiency equipment
- Leaking ducts losing conditioned air
- Insufficient attic insulation
- Oversized system short-cycling
Relevant tools:project cost estimatorrepair or replace
Published September 28, 2026Last updated September 28, 2026
Tools & materials you'll need
Affiliate links- AmazonVacuum cleaner with narrow attachment
- AmazonCoil cleaning brushoptional, but very helpful
- AmazonAdjustable wrench or socket setfor leveling feet or access panels
- AmazonPhillips head screwdriverfor access panels
- AmazonFlathead screwdriverfor prying or advancing defrost timer
- AmazonSpirit levelfor checking if fridge is level
- AmazonFlashlight or headlampfor inspecting dark areas
As an Amazon Associate FixlyGuide earns from qualifying purchases — at no extra cost to you. Prices and availability are accurate as of publication and subject to change.
Quick Answer
That loud hum, buzz, or rattle coming from your fridge isn't just annoying; it's usually the appliance waving a red flag. Most times, it's something pretty simple — a dirty coil, a fan blade tapping something, or a compressor working harder than it ought to. Don’t lose your head yet. Grab a few basic tools, and I’ll show you how to find the noise and shut it up.
The Problem
I’ve heard every version of this one. Homeowners tell me their fridge sounds like a "jet engine," a "dying animal," or a "freight train" rolling through the kitchen. Not exactly subtle, right? A noisy refrigerator isn’t just rough on your ears; it can point to a problem that, if you ignore it, turns into a bigger, pricier repair later on. A fridge ought to run quietly, kicking on and off as needed to hold temp. When it starts howling, grinding, or buzzing way louder than normal, something’s off. We’re talking about sounds that are clearly louder or different from the usual soft hum. That’s not just a comfort issue — it’s a warning sign.
How It Works
To figure out why your fridge is screaming, you’ve gotta know how it’s supposed to whisper. A refrigerator runs on a vapor compression system to keep things cold. Here’s the short version:
- Refrigerant Circulation: A special liquid refrigerant moves through coils, pulling heat out of the fridge. As it absorbs heat, it turns into a low-pressure gas.
- Compressor Action: That gas heads to the compressor, which is basically the heart of the whole system. The compressor squeezes it down and heats it up. That’s one of the main places you’ll hear mechanical noise.
- Condenser Coils: The hot, high-pressure gas then goes to the condenser coils, usually on the back or bottom of the fridge. A fan — the condenser fan — blows air across those coils and dumps the heat into the room. As it cools, the gas turns back into a high-pressure liquid.
- Evaporator Coils & Fan: That liquid refrigerant then passes through an expansion valve into the evaporator coils, which sit inside the freezer compartment. There, it expands fast, turns back into a cold, low-pressure gas, and pulls heat out of the freezer and fridge sections. Another fan — the evaporator fan — pushes that cold air around inside.
So when you hear a racket, it’s usually one of those moving parts: the compressor, the condenser fan, or the evaporator fan. The defrost timer, a little motor that cycles the defrost heater, can get noisy too. Everything else, like the sealed tubing, ought to stay quiet. Figuring out which part is talking helps narrow it down fast. If the sound gets louder when you open the freezer door, that usually points to the evaporator fan. If it’s coming from the back or bottom, think condenser fan or compressor. See? That’s already half the battle.
Step-by-Step Fix
Alright, let’s calm that thing down. Unplug the fridge before you start poking around. Every time. No shortcuts.
-
Check Placement & Leveling — The Simple Shake-Down
- Listen: Sometimes the fridge just isn’t sitting right. Give it a gentle rock. Does the noise change? Get worse? If it’s rocking, the leveling feet may be off. If it’s bumping a wall or cabinet, pull it out a little.
- Adjust: Get down low and find the leveling feet, usually on the front corners. You can usually turn them by hand or with a wrench to raise or lower a corner. You want all four feet (or two feet and two rollers) sitting solidly on the floor. A cheap spirit level helps if you want it dead-on.
-
Clear the Back/Bottom Area — Dust Bunnies Beware
- Unplug First! I’m serious. Don’t skip it.
- Access: Pull the fridge away from the wall. Find the condenser coils, usually a black grid on the back or underneath, behind a grille. Some models have a kick plate down low in front that comes off to expose them.
- Clean: Use a coil brush or a vacuum with a narrow nozzle to get dust, pet hair, and debris off the condenser coils and fan blades. I pulled a water heater in Frisco last month that had exactly this kind of fuzzball mess around the base — same story here, just with a fridge. When the coils are packed up, the compressor has to strain, and that’s where the noise starts getting louder and uglier.
-
Inspect the Condenser Fan — The Rear Racket
- Still unplugged? Good. Keep it that way.
- Access: You’re still working back or bottom side. Remove the access panel, usually held by a few quarter-inch hex screws or Phillips screws. That’ll expose the condenser fan motor and blade.
- Check: Spin the blade by hand. Does it wobble? Hit anything? Sometimes a loose wire, a scrap of cardboard, or even a pest gets in there. Make sure the blade’s clean and not cracked. If it’s loose and sloppy, the motor bearings may be shot, or the blade itself could be busted. If it grinds when you spin it by hand, that motor’s probably on its last legs and needs to go.
- Replace (if needed): If the motor’s toast, order a new one. It’s usually held in with a few screws and wires that are easy enough to track. Snap a photo before you disconnect anything — saves you from guessing later.
-
Listen to the Evaporator Fan — The Freezer Fanfare
- Unplug it.
- Access: Open the freezer door. The evaporator fan sits behind an access panel, usually on the back wall inside the freezer. Empty the freezer, pull the shelves if needed, then remove the panel. It may be iced over if the defrost system’s acting up.
- Check: Once you can see the blade, look for ice buildup or anything blocking it. A stray bit of packaging or a chunk of frost can throw it off. Clear the obstruction. Spin the blade by hand. Does it move freely? Any wobble? If it squeals, grinds, or drags, the motor’s likely failing.
- Defrost (if iced): If there’s a lot of ice, defrost the freezer by hand. Unplug the fridge for 24-48 hours and leave the freezer door open with towels down for the meltwater. A bowl of hot water inside can speed things up. That’ll melt the ice that’s choking the fan.
- Replace (if needed): If the motor still sounds bad after you clear the ice and debris, swap the evaporator fan motor. Usually it’s a pretty straight swap.
-
Examine the Compressor — The Heartbeat Heavy
- Access: The compressor is that big black tank down by the back bottom of the fridge, usually near the condenser coils. A couple copper lines run into it.
- Listen (carefully): With the fridge plugged in and running, try to tell whether the loud hum or rumble is coming straight from the compressor. If it’s shaking hard or making a deep grinding sound, it may be failing. Do not touch the compressor while it's running; it can get very hot. If you’ve ruled out the fans and it’s still loud, this is usually a "call a pro" job. Compressor replacement is a whole different animal, and it involves refrigerant work.
- Vibration Reduction: Sometimes the compressor mounting bolts or springs loosen up. If they’re easy to reach and clearly loose, you might be able to snug them after unplugging and letting things cool down. Or, if the noise is being amplified because the fridge is vibrating against the floor or frame, rubber feet or vibration pads under the fridge can help. Not on the compressor itself — under the fridge. I had a service call in Newton, Massachusetts, where the customer swore the fridge was about to blast off through the floor. Turned out the old GE’s plastic feet were cracked, and the whole cabinet was rattling against the linoleum. New leveling feet, and that thing went quiet.
-
Check the Defrost Timer — The Ticking Time Bomb (of sound)
- Location: This little part usually clicks or buzzes while it cycles. You might find it behind the kick plate at the bottom front, inside the top control panel, or on the back of the fridge. If you can’t spot it, check the appliance diagram. It looks like a small box with a dial or gear.
- Listen: If you hear a steady clicking or buzzing that doesn’t match the fans or compressor, the defrost timer could be the culprit. A faint click now and then is normal. A loud, constant buzz isn’t.
- Test: If you think the timer’s the problem, you can often advance it by hand (after unplugging!) with a screwdriver to force a defrost cycle or move it back into cooling. If the noise stops once you move it past a certain point, that’s a pretty good clue. If the racket comes back after it cycles again, you’ve probably found it.
- Replace: Swapping a defrost timer is usually pretty simple: unplug, pull the access panel, disconnect the wires (take a photo!), and put the new one in. Cheap part, easy job.
Common Causes
- Dirty Condenser Coils: The usual suspect. Dust, pet hair, and junk act like a blanket and make the compressor run hotter and louder.
- Obstructed or Failing Fan Blades: Whether it’s the condenser fan cooling the coils or the evaporator fan moving cold air around, a blade hitting something or a motor with bad bearings will make plenty of noise.
- Loose or Worn Compressor Mountings: If the compressor isn’t held tight, its normal vibration can get amplified and shake the whole fridge.
- Defective Defrost Timer: This small motorized part can start buzzing hard when it goes bad.
- Unlevel Refrigerator: A fridge that rocks around can vibrate against the floor or cabinets and sound way worse than it is.
Common Mistakes
- Ignoring the Noise: A lot of folks figure, "eh, it’s just an old fridge." That’s how you end up with a bigger repair. Sometimes a full failure.
- Not Unplugging the Fridge: You’re working around electrical parts and spinning fans. Always unplug it first. Don’t make a bad day worse.
- Forgetting to Clean Coils Regularly: Most homeowners do it once, maybe twice, over the life of the fridge. I tell people to hit it once a year, same as swapping furnace filters. Saves money. Saves headaches.
- Mishandling Fan Blades: If you bend a blade while cleaning, you’ll throw it out of balance and make the vibration even worse. Easy does it.
- Overlooking the Leveling: Sounds too simple, I know — but an unlevel fridge can create a pile of extra vibration and noise.
- Assuming the Worst Immediately: Don’t jump straight to "it’s the compressor!" without checking the simple stuff first. Compressors do fail, sure. But most of the time, it’s the fans or the coils causing the grief.
Cost & Time Breakdown
| Task | DIY Cost | Pro Cost | Time |
|---|---|---|---|
| Leveling & Positioning | $0 | $50–$100 (part of service call) | 5–10 minutes |
| Clean Condenser Coils | $0–$15 (brush) | $100–$200 | 15–30 minutes |
| Replace Condenser Fan Motor | $50–$150 | $200–$400 | 30–60 minutes |
| Replace Evaporator Fan Motor | $60–$180 | $250–$450 | 45–90 minutes |
| Replace Defrost Timer | $20–$50 | $150–$300 | 20–40 minutes |
| Compressor Replacement | Not DIY | $400–$800+ | 2–4 hours (pro) |
Tips & Prevention
- Annual Coil Cleaning: Make it a once-a-year habit. Pull the fridge out, unplug it, and clean those condenser coils. Best bang for the buck.
- Maintain Clearance: Give the fridge a few inches of breathing room behind it and on the sides. Don’t shove it flush to the wall.
- Don't Overload: It won’t directly cause noise, but stuffing the fridge or freezer makes the parts work harder, and that shortens their life.
- Check Leveling Periodically: Give the fridge a little nudge every year or so. If it rocks, adjust the feet.
- Listen to Your Appliance: New noise is never random. Catch it early, and the fix is usually easier and cheaper.
- Keep the Doors Shut: Less open-door time means less work for the compressor and fans.
When to Call a Professional
Look, I’m all for DIY, but some jobs are best left alone. If you’ve cleaned the coils, checked the fans for obstructions, and the noise is still there — especially if it’s a loud grinding, hammering, or deep rumble coming right from the compressor — that’s your sign. Compressor work means refrigerants and special tools, and that’s not a backyard project. Same deal if you’ve worked through the steps and still can’t find the source, or if you’re just not comfortable taking panels off the fridge. A good appliance tech can usually sort it out quick. If the loud noise comes with poor cooling, call sooner rather than later. Food starts spoiling fast. And don’t mess with the sealed refrigerant system unless you’re a certified HVAC/R tech. That stuff isn’t forgiving, and you can make a small problem a lot worse.
Related Articles
Keep troubleshooting with these hand-picked guides from FixlyGuide:
- The Annoying Hum: The Real Reason Your Fridge Vibrates (And How to Silence It) — Is your refrigerator buzzing or vibrating loudly? Don't ignore that annoying hum. This guide uncovers the common culprits behind fridge vib…
- That Midnight Buzz: 5 Reasons Your Refrigerator Is So Loud — A refrigerator making a loud buzzing sound at night is often a sign of a struggling component, from a dirty condenser fan to an aging compr…
- The Mystery of the Warm Fridge: Why Your Food Is Spoiling (and When to Call a Pro) — If your refrigerator isn't keeping food cold, it could be a simple fix or a serious problem requiring a professional. Learn what to check a…
- Your Refrigerator's Loud Hum? The Fix Most People Miss — A constant, loud refrigerator hum is more than annoying—it's a warning sign. Before you call a pro, discover the #1 most overlooked cause a…
- The Real Reason Your Dishwasher Leaks (It’s Not Always the Hose) — A leaking dishwasher can be a homeowner's headache, but often the culprit isn't a failed hose, but rather a simple fix around the door or t…
- The Real Reason Your Smoke Alarm Chirps Every 30 Seconds (It's Not Always the Battery) — Don't just swap batteries; a smoke detector chirping every 30 seconds can signal various issues, from dust to improper installation, demand…
Should you do this yourself?
Answer five quick questions before you start. Safety outranks savings every time.
Your experience with work like this
How high do you have to work?
Does the job involve any of these?
Will it need a permit?
Specialty tools
Free and instant. Educational guidance only — not a quote, inspection, or professional diagnosis.
What should this project cost?
Enter your project details for a realistic cost range before you call anyone.
Cost depends heavily on which system turns out to be the source.
- Regional adjustment
- National average
- Labor share (typical)
- ~$1,620
- Quotes to collect
- 3 written estimates
Educational estimate based on national averages — not a binding quote. Always confirm with written local estimates.
Before you start
Check the difficulty, permits, and safety risk — then decide whether to call a pro.
- Estimate this projectGet a cost range for your scope and ZIP before you call anyone.Open
- Get local estimatesSend one request and compare written estimates from vetted pros.Open
Free, no signup required. Estimates are educational guidance, not a quote or an inspection.
Get the print-ready PDF of this guide
A clean, ad-free, printable version you can keep on your phone or pin to the workshop wall. Free with a FixlyGuide account.
- Print-optimized layout
- Tools, materials & every step included
- Saved to your account
Frequently asked questions
Why is my refrigerator making a loud humming noise?+
A loud humming often points to the compressor working hard, usually due to dirty condenser coils blocking airflow, or a condenser fan motor that's struggling. Cleaning the coils is the first, easiest step to try.
Can a dirty refrigerator coil make it noisy?+
Absolutely, it's one of the most common reasons! When condenser coils are covered in dust and debris, the compressor has to work much harder and longer to cool the fridge, leading to increased noise and inefficiency.
My fridge rattles when it runs. What could it be?+
Rattling can be caused by a few things: the refrigerator not being level, objects vibrating against the fridge, or a fan blade (either condenser or evaporator) hitting an obstruction or having a loose mounting. Check for anything in the fan's path first.
How often should I clean my refrigerator condenser coils?+
I recommend cleaning your condenser coils at least once a year. If you have pets that shed a lot, or live in a dusty environment, you might even want to do it every six months to keep your fridge running efficiently and quietly.
Is it dangerous if my refrigerator is making a loud noise?+
While often not immediately dangerous, a loud noise is a warning sign. Ignoring it can lead to increased energy consumption, premature wear on components, and eventually, a costly breakdown. Address it promptly to prevent further damage.
What does a failing compressor sound like?+
A failing compressor typically makes a very loud, deep hum, rumble, or even a continuous grinding sound. It might also vibrate excessively. If you suspect the compressor, it's time to call a professional.
Why does my freezer fan make a loud noise when I open the door?+
If the noise gets louder when you open the freezer door, it's almost certainly the evaporator fan. It could be due to ice buildup on the blades, an obstruction, or a failing fan motor. Try defrosting the freezer first to see if that resolves it.
Can I replace a noisy refrigerator fan myself?+
Yes, replacing both the condenser and evaporator fan motors is a common DIY repair. You'll need to unplug the fridge, access the fan, and usually unbolt the old motor and disconnect its wiring, then reverse the process for the new one. Always take photos before disconnecting wires.
My fridge makes a loud clicking noise. What's that?+
A loud, consistent clicking might be the defrost timer trying to cycle but getting stuck or failing. It's a small, motorized component that can become noisy when it's on its way out and is usually a straightforward, inexpensive replacement.
How much does it cost to fix a noisy refrigerator?+
The DIY cost can be as low as $0 for cleaning or leveling, up to $180 for a fan motor or defrost timer. If you need a pro, a service call alone can be $100-$200, with total costs for parts and labor ranging from $150-$450, depending on what needs to be replaced. Compressor replacement is much higher, often $400-$800+.


Discussion
Loading comments…