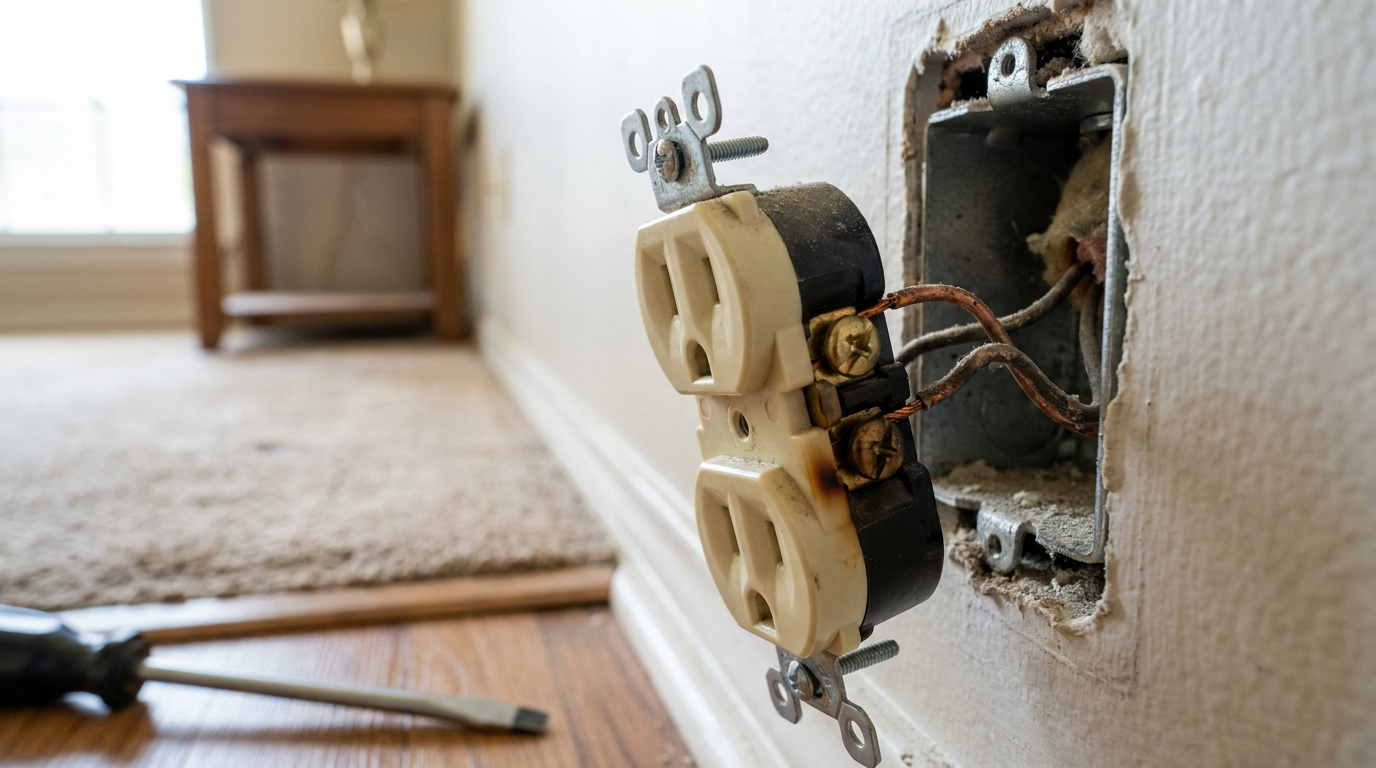
- Loose screw terminals: After years of plugging in appliances, unplugging them, and going through heat cycles, terminal screws back out a little. Current jumps the gap, and that makes arcing noise plus vibration.
- Worn internal wiper springs: Inside the outlet, spring-loaded brass clips hold the blades of your appliance plugs. After thousands of insertions, those wipers get tired and lose grip, so plugs sag and arc internally under load.
- Overloaded branch circuits: Pulling 18 amps continuously through an older 15-amp branch circuit makes the metal parts superheat and flex a bit. The device hums as the circuit gets close to thermal limit right before the breaker trips.
- Corroded or loose neutral connections: If the return neutral path has a loose wire nut deeper in the wall box, the uneven return current can create audible harmonics across everything downstream on that circuit.
- Aluminum wiring oxidation: Homes built between 1965 and 1973 often used solid aluminum branch circuits. Aluminum oxidizes fast, which creates high resistance at connection points and brings on crackling plus real localized heat.
Electrical · Panel or service upgrade
| Project category | Electrical |
|---|---|
| Problem type | Panel or service upgrade |
| Trade required | Electrical |
| Urgency | Planned project |
| Safety risk | High safety risk |
| DIY suitability | Licensed pro only |
| Cost category | High cost |
| Typical timeline | Permit plus utility scheduling, commonly 2–6 weeks |
| Contractor type | Licensed electrician |
Repair option
Add a subpanel when the main service is adequate.
Replacement option
Full service upgrade with utility coordination and permits.
Common causes
- Obsolete or recalled panel brands
- Service capacity too small for added loads
- No room for required AFCI/GFCI breakers
Relevant tools:project cost estimatorcompare quotes
Published October 29, 2026Last updated October 29, 2026
Tools & materials you'll need
Affiliate links- AmazonNon-contact voltage tester1 · to verify zero voltage safely
- AmazonWire stripper/cutter tool1 · with gauge selector (12-14 AWG)
- Amazon#2 Phillips or square-drive screwdriver1 · for terminal and mounting screws
- AmazonFlathead screwdriver1 · for faceplate removal
- Amazon3-prong receptacle circuit analyzer1 · to verify correct wiring polarity
As an Amazon Associate FixlyGuide earns from qualifying purchases — at no extra cost to you. Prices and availability are accurate as of publication and subject to change.
Quick Answer
A buzzing or humming electrical outlet usually comes from loose terminal screws, worn-out internal spring contacts shaking at 60 Hz line frequency, or an overloaded circuit. Shut off power at the main breaker panel right away, confirm zero voltage with a reliable non-contact tester, and take a look at the receptacle. Tightening terminals or swapping a worn receptacle is pretty straightforward DIY, but buzzing with scorching, melting, or aluminum wiring means you need to call a licensed electrician now. No dice otherwise.
The Problem
Not much gets a homeowner’s attention faster than a quiet, stubborn hum coming from inside the wall. You plug in a floor lamp or a vacuum, and then you hear it—a buzz, maybe a low drone, maybe that nasty little frying sound.
That sound isn’t just annoying. It’s a sign of electrical friction. Under standard North American household current, alternating electricity swings back and forth at 60 cycles per second (60 Hz). When your electrical box is tight and healthy, that motion stays silent. But once a connection loosens, arcing starts, or an internal contact loses its spring tension, that 60 Hz cycle turns into an audible vibration or a tiny spark leap.
And yeah, you don’t want to ignore it. Arcing makes heat fast—well over 1,000°F in a split second—and that’ll wreck thermoplastic outlet bodies, melt PVC insulation, and can light off nearby wood framing or drywall paper. Catching it early can save you from an ugly emergency callout, or worse, a house fire.
How It Works
To figure out the buzz, you’ve got to know how alternating current (AC) moves through the receptacle box. Standard 120-volt household power comes in through a three-wire setup: a black "hot" conductor that brings power to the outlet, a white "neutral" conductor that carries it back, and a bare copper or green "ground" wire that’s there just to dump fault current safely to earth.
Incoming Hot (Black) ----> Brass Terminal Screw
                                 |
                          Receptacle Slots (Plugs draw current)
                                 |
Incoming Neutral (White) <- Silver Terminal Screw
Inside a regular duplex outlet, you’ve got two sets of brass or copper-alloy wiper contacts grabbing the prongs on whatever you plug in. When you draw power—say, 12 amps for a space heater on a 15-amp circuit—the current creates an electromagnetic field. If the terminal screws on your hot or neutral wires are tightened right, usually 12 to 14 inch-pounds per manufacturer specs, the connection stays near-zero resistance. Power flows clean.
But if a screw backs out from seasonal heating and cooling, or if somebody used the push-in "stab-in" ports on the back of the device, resistance climbs. Then electricity starts jumping microscopic air gaps. That tiny, constant leap through the air is micro-arcing. And because North American power reverses polarity 120 times every second (60 complete cycles), the loose metal parts vibrate 60 times per second, which gives you that classic 60 Hz hum or the crispy, bacon-frying sound of sustained arcing.
Step-by-Step Fix
Follow these steps in exact order to safely troubleshoot, open, and replace a buzzing electrical receptacle.
-
Kill the circuit at the main breaker panel — Go to your electrical panel and flip the breaker that feeds the buzzing outlet all the way to OFF. If the panel directory isn’t labeled worth a darn, plug in a radio or lamp ahead of time so you can hear or see the exact moment power drops.
- Safety check: Don’t trust a wall switch or a guess based on room layout; snap the breaker handle firmly until you feel it lock.
-
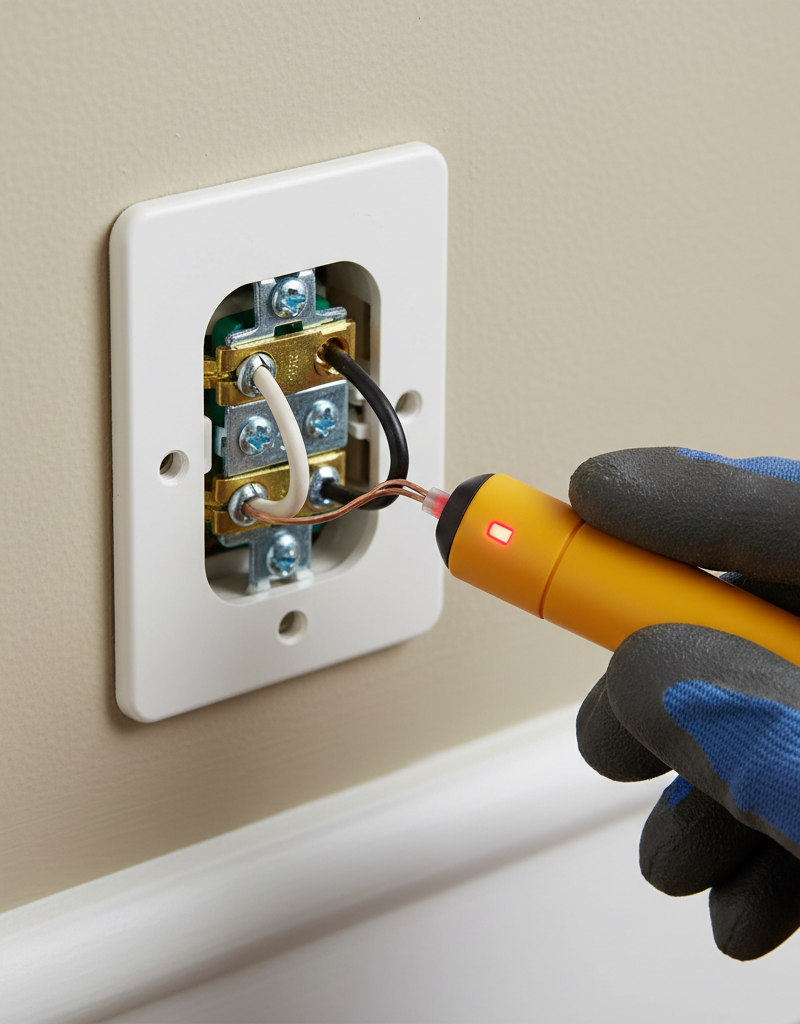
Verify zero voltage with a non-contact tester — Put a reliable non-contact voltage detector at both vertical slots (hot and neutral) and the ground pin hole on the buzzing outlet. The tester shouldn’t chirp or light up red.
- Tool note: Test the detector on a known live outlet first so you know the battery’s good before you trust it here.
-
Remove the faceplate and inspect for exterior heat damage — Back out the single center screw (or the top and bottom screws on decorative plates) with a flathead screwdriver and pull the wall plate off. Look at the back side for brown scorch marks, warped nylon, or that faint fishy smell of cooked plastic.
- If you see melted plastic or charring along the drywall cut, stop right there and read the professional callout below.
-
Extract the receptacle from the junction box — Take out the two 6-32 mounting screws holding the metal yoke to the top and bottom of the wall box. Grab the top and bottom tabs and ease the receptacle straight out into the room so the wires are easy to see.
- If the wire insulation feels brittle or flakes off in chunks, don’t keep poking at it.
-
Perform a physical secondary voltage test across all terminals — Set a digital multimeter or two-lead voltage tester across the brass hot screws and the silver neutral screws, then between the brass screws and the bare copper ground wire. The meter has to read 0.0 VAC.
- Don’t skip this: multi-wire branch circuits can share a neutral wire that still carries dangerous stray current even if your hot breaker is off.
-
Check for rear stab-in (push-in) wire connections — Look at the back of the outlet body and see whether the copper wires are shoved into little round holes instead of being wrapped on the side screw terminals. Push-in spring contacts are famous for losing grip over time, which leads to internal arcing and loud buzzing.
- If your wires are back-stabbed, you’ve probably found the main issue; the outlet needs to be replaced using side-screw terminals.
-
Inspect conductor material and gauge — Make sure your supply wires are standard solid copper. Copper looks like a shiny new penny or a dull reddish-brown metal. If the wires are dull silver-gray, you’re likely looking at vintage 1960s–1970s aluminum wiring.
- Critical safety rule: Aluminum wiring expands at twice the rate of copper and can’t be tied into standard $2 hardware store receptacles without specialized CO/ALR ratings or copalum splicing.
-
Disconnect the old outlet and prepare clean wire ends — Back out the brass and silver terminal screws counterclockwise with a #2 square-drive (Robertson) or standard Phillips screwdriver and unhook the wires. If the wires were back-stabbed, use a small flat precision screwdriver in the release slot next to the wire hole to pop them free—or just snip them close to the device with linesman pliers.
- Strip back 5/8 inch of clean insulation on each wire with your strippers if the exposed copper looks pitted, nicked, or heat-darkened.
-
Loop and install a commercial-grade specification receptacle — Bend the clean copper conductors into clockwise hooks using the looping hole on your wire strippers. Hook the black wire clockwise around the brass screw, the white wire clockwise around the silver screw, and the bare wire around the green ground screw.
- Torque the terminal screws down firmly to approximately 14 inch-pounds. Wrapping clockwise matters because the screw tightening draws the copper loop tighter instead of pushing it off the post.
-
Fold wires carefully into the junction box — Push the conductors back into the electrical box in an accordion-style "Z-fold" instead of cramming them against the rear wall. Keep the bare copper grounding conductor pushed toward the back of the box, away from the side brass terminals.
- Pro tip: Wrap the perimeter of the outlet body with two wraps of heavy-duty UL-listed vinyl electrical tape to insulate the exposed terminal screws from striking the metal sides of the box.
-
Mount the outlet and reinstall the faceplate — Thread the 6-32 mounting screws into the box ears, keeping the outlet plumb and flush with the finished wall. Don’t overtighten them, or you can snap the mounting ears off PVC rough-in boxes. Put the faceplate back on.
-
Restore power and test with a 3-prong circuit analyzer — Walk back to the main breaker box, flip the breaker handle firmly back to ON, and return to the room. Plug in an inexpensive 3-prong receptacle tester to verify correct wiring polarity (two amber lights on standard units) and listen for any leftover noise under a moderate load.
Common Causes
A buzzing outlet usually doesn’t show up for no reason. Figuring out what’s actually failing tells you whether you’re looking at a simple outlet swap or a deeper circuit problem.
- Loose screw terminals: After years of plugging in appliances, unplugging them, and going through heat cycles, terminal screws back out a little. Current jumps the gap, and that makes arcing noise plus vibration.
- Worn internal wiper springs: Inside the outlet, spring-loaded brass clips hold the blades of your appliance plugs. After thousands of insertions, those wipers get tired and lose grip, so plugs sag and arc internally under load.
- Overloaded branch circuits: Pulling 18 amps continuously through an older 15-amp branch circuit makes the metal parts superheat and flex a bit. The device hums as the circuit gets close to thermal limit right before the breaker trips.
- Back-stabbed push-in connections: Cheap builder setups often use the push-in quick-connect holes on the back of builder-grade receptacles. Those depend on tiny metal leaf springs that lose tension, oxidize, and start buzzing within 5 to 10 years.
- Corroded or loose neutral connections: If the return neutral path has a loose wire nut deeper in the wall box, the uneven return current can create audible harmonics across everything downstream on that circuit.
- Aluminum wiring oxidation: Homes built between 1965 and 1973 often used solid aluminum branch circuits. Aluminum oxidizes fast, which creates high resistance at connection points and brings on crackling plus real localized heat.
Common Mistakes
Even seasoned DIYers cut corners on electrical work that can lead to repeat problems or fire hazards. Don’t make these mistakes:
- Reusing back-stab ports on the new receptacle: It’s tempting to shove the wires into the rear holes and save two minutes. Don’t. Use the side-screw terminals or screw-clamp plates every time; they give you 500% more surface-contact area and won’t vibrate loose under load.
- Wrapping wires counterclockwise under the terminal screws: If you loop copper counterclockwise, tightening the screw pushes the wire outward and leaves only a sliver pinched under the head. Always make the loop clockwise so the screw draws the wire in.
- Jamming wires blindly into the box: Shoving a receptacle back into a packed junction box with brute force can put the bare ground wire right against a live brass terminal screw. Fold the wires back carefully, like accordion bellows.
- Ignoring aluminum wiring indicators: Swapping a standard copper-only receptacle onto old silver-colored aluminum wires without special dual-rated CO/ALR devices or AlumiConn mechanical connectors is a serious fire code violation.
- Using cheap $0.75 builder-grade outlets: Basic residential outlets have thin internal stampings that wear out fast. Spend the extra $3 and buy a commercial-grade or "spec-grade" receptacle with solid brass strap construction and clamp-down screw terminals.
Cost & Time Breakdown
| Task | DIY Cost | Pro Cost | Time |
|---|---|---|---|
| Single Outlet Replacement (Commercial Grade) | $4–$8 | $150–$225 | 20–30 min |
| 3-Prong Circuit Analyzer & Voltage Tester Kit | $20–$35 | N/A (Standard Pro Tool) | 5 min |
| Junction Box Rewiring (Fixing Melted Conductors) | $10–$15 | $200–$350 | 45–60 min |
| Dedicated Circuit Run (If Overloaded) | $60–$100 | $450–$900 | 2–4 hours |
| Aluminum Wiring Pigtail Repair (Per Room) | $30–$50 | $350–$650 | 1–2 hours |
Tips & Prevention
Keeping your electrical system in shape doesn’t take much, and it helps stop problems before they hide behind your baseboards and sheetrock.
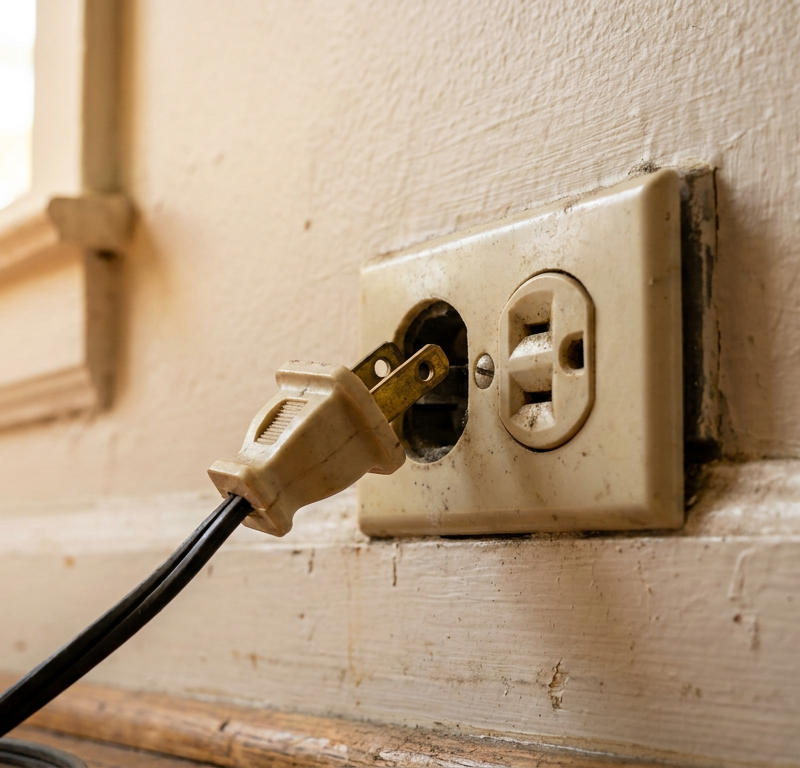
- Do the three-second drop test: If a phone charger or lamp plug slides out of an outlet slot under its own weight or with a feather-light tug, the internal contacts are shot. Replace the receptacle right away before loose contact turns into arcing.
- Follow the 80% continuous load rule: Don’t run high-draw appliances totaling more than 1,440 watts (80% of a 15-amp, 120-volt circuit) on one branch line continuously. Space heaters, hair dryers, and window AC units shouldn’t share a circuit.
- Use commercial specification-grade receptacles: When you replace standard outlets, skip the bargain contractor bins and look for packages marked "Commercial Specification Grade." They’ve got thicker mounting straps, heavy-duty brass contacts, and screw-pressure plates that clamp the wire tight.
- Schedule an infrared or thermal leak scan: Every five to seven years, or when you buy an older home, check your outlets and breaker panel with a portable thermal imaging camera while the house is under normal load. Hot spots over 110°F usually mean failing terminations before they start making noise.
When to Call a Professional
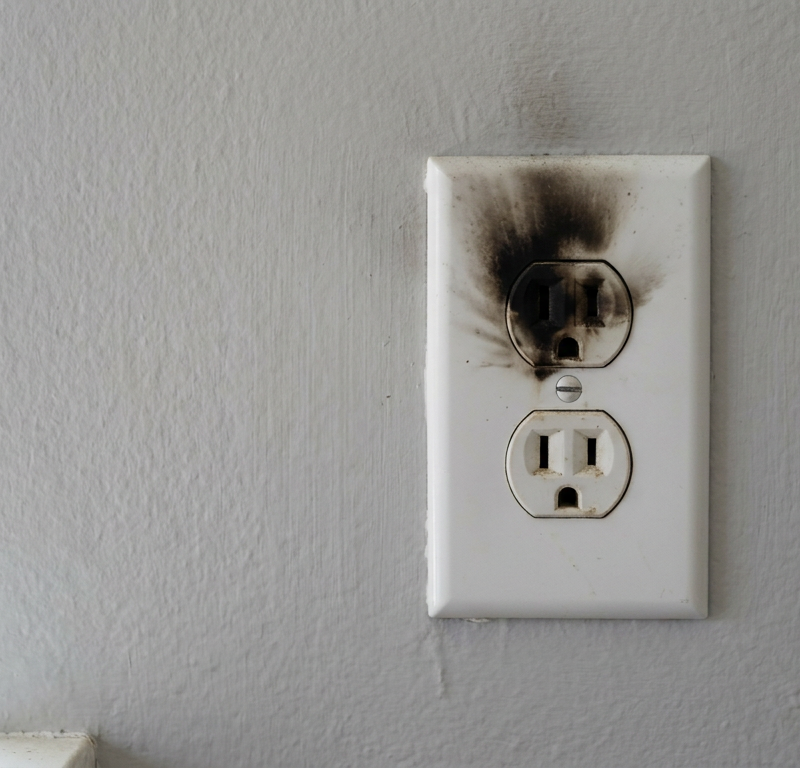
A buzzing outlet stops being a simple swap the minute you spot physical heat damage or a complicated wiring setup. If you pull off the wall plate and find charred black insulation, melted thermoplastic on the outlet body, or scorched drywall paper, stop right there.
Call a licensed electrician if your home has 1960s-era solid aluminum wiring, if the junction box has more than four tangled cables with no clear labeling, or if resetting the breaker makes it trip right back with a loud pop. I pulled a water heater in Frisco last month that had exactly this kind of stubborn hum on the same circuit—turned out the neutral was cooked halfway back in the box. If you swap the receptacle for a brand-new commercial unit and the buzzing still hangs on, the trouble’s deeper in the wall cavity or in the neutral bus bar inside the main panel—both are nasty shock and arc-flash hazards for unlicensed homeowners.
Frequently Asked Questions
Can a buzzing outlet catch fire?
Yes. A buzzing outlet is often caused by electrical arcing—current jumping across loose connections or damaged contacts. Those micro-arcs make hot spots that can exceed 1,000°F, and that’ll light off insulation, drywall paper, or wood framing in the wall cavity.
Why does my outlet only buzz when something is plugged in?
The internal wiper contacts are probably worn, or the terminal screws are loose. When nothing’s plugged in, no current moves through the receptacle contacts. Once you plug in a device and power it up, current rushes through the weak mechanical connection, and that starts the micro-arcing and 60 Hz vibration.
Is a humming outlet the same thing as a buzzing outlet?
Not quite. A faint, low, smooth hum around 60 Hz is common on outlets feeding electronic transformers or solid-state dimmers, and it’s usually harmless electromagnetic hum. A rough, uneven buzz or sizzling sound means physical arcing across an air gap, and that calls for the power to come off immediately.
What causes a GFCI outlet to buzz?
GFCI receptacles have sensitive electronic sensing transformers, solenoids, and circuit boards inside the plastic shell. If a GFCI buzzes, it usually points to failed internal electronics, worn sensing coils, or line noise from heavy inductive loads like motors or LED power drivers. If it hums all the time with nothing plugged in, replace the GFCI.
Can I just spray electrical contact cleaner into a buzzing outlet?
No. Don’t spray liquid cleaners, solvents, or WD-40 into an electrical wall receptacle. Liquid solvents break down the plastic parts, attract dirt and dust, and can flash or short when the circuit’s live.
Why does my brand-new outlet buzz?
If a new outlet buzzes, the usual suspects are terminal screws that weren’t torqued right, wires that slipped out from under the screw heads while you were pushing the box back in, or conductors shoved into rear back-stab ports instead of using the side screws. Shut off the breaker and check every mechanical terminal is snug.
How do I know if my outlet wires are aluminum?
Look at the bare wire exposed at the terminal screws. Copper has a reddish, bright metallic shine. Aluminum is dull silver-gray, softer to the touch, and you’ll often find it in homes built between 1965 and 1973. If your home has aluminum branch wiring, standard replacement outlets can’t be used safely without special connectors.
Will a breaker always trip if an outlet is buzzing?
No. Standard thermal-magnetic circuit breakers trip on sustained overcurrent or a direct dead short. Low-level arcing often draws normal amperage well below the 15-amp or 20-amp trip point, so an outlet can buzz and spark for months without tripping the breaker. Only modern Arc-Fault Circuit Interrupter (AFCI) breakers reliably catch that condition.
Related Articles
Keep troubleshooting with these hand-picked guides from FixlyGuide:
- Outlet Sparks When Plugging In? 5 Causes and the Step-by-Step Fix — Learn why outlets spark, how to tell harmless micro-arcs from serious fire hazards, and the step-by-step method to safely test and replace…
- Loose Electrical Outlet? Why Plugs Fall Out and the Step-by-Step Fix — Plugs falling out of your wall outlet? Loose internal contacts cause arcing, resistance, and fire hazards. Here is how to replace a worn re…
- Why One Room Has No Power (But the Breaker Isn't Tripped) — Discover why a whole room might suddenly lose power even when your circuit breaker stays stubbornly on, and learn how to safely troubleshoo…
- Why Your Outlet Died (Even If the Breaker's ON): The Hidden Causes Everyone Misses — Discover the surprising reasons why an electrical outlet might stop working even when the circuit breaker appears to be on, and learn how t…
- The 7 Head-Scratching Reasons Your Outlet Died (Even With The Breaker On) — Discover the surprising reasons why an electrical outlet might stop working even when its circuit breaker is fully engaged, and how to safe…
- The Hidden Reason Your GFCI Trips (It's Not Always a Faulty Outlet) — A continuously tripping GFCI outlet is a critical safety warning, often indicating moisture, a faulty appliance, or a wiring problem that r…
Should you do this yourself?
Answer five quick questions before you start. Safety outranks savings every time.
Your experience with work like this
How high do you have to work?
Does the job involve any of these?
Will it need a permit?
Specialty tools
Free and instant. Educational guidance only — not a quote, inspection, or professional diagnosis.
What should this project cost?
Enter your project details for a realistic cost range before you call anyone.
Outlet and switch work usually $150–$400; panel upgrades commonly $1,800–$4,200.
- Regional adjustment
- National average
- Labor share (typical)
- ~$709
- Quotes to collect
- 3 written estimates
Educational estimate based on national averages — not a binding quote. Always confirm with written local estimates.
Fixly Project Decision Box
- DIY difficulty
- Professional Recommended
- Estimated time
- Diagnosis 1–2 hours
- Cost level
- Moderate
Main tools / materials
- Non-contact voltage tester
- Outlet tester
- Flashlight
When to stop and call a pro
- Burning smell, scorch marks, or a warm outlet or switch plate
- A breaker that trips again right after being reset
- Any work inside the service panel
- Aluminum wiring or cloth-insulated wiring
Need professional help?
Talk to a Licensed ElectricianGet the print-ready PDF of this guide
A clean, ad-free, printable version you can keep on your phone or pin to the workshop wall. Free with a FixlyGuide account.
- Print-optimized layout
- Tools, materials & every step included
- Saved to your account
Frequently asked questions
Can a buzzing outlet catch fire?+
Yes. A buzzing outlet is frequently caused by electrical arcing—current jumping across loose connections or damaged contacts. These micro-arcs generate intense points of heat exceeding 1,000°F, which easily ignites nearby insulation, drywall paper, or wood framing inside your wall cavity.
Why does my outlet only buzz when something is plugged in?+
The internal wiper contacts are likely worn or the terminal screws are loose. When no appliance is plugged in, zero current passes through the receptacle contacts. Once you plug in a device and turn it on, electrical current rushes through the poor mechanical connection, sparking micro-arcing and 60 Hz vibrational hums.
Is a humming outlet the same thing as a buzzing outlet?+
Not quite. A faint, low-pitched, smooth hum (around 60 Hz) is common on outlets powering electronic transformers or solid-state dimmers and is usually benign electromagnetic hum. A harsh, uneven buzz or sizzling sound indicates physical arcing across an air gap, which demands immediate power shutoff.
What causes a GFCI outlet to buzz?+
GFCI receptacles house sensitive electronic sensing transformers, solenoids, and circuit boards inside their plastic chassis. If a GFCI buzzes, it typically indicates internal electronic component failure, degraded sensing coils, or electrical line noise from heavy inductive loads like motors or LED power drivers. If it hums continuously with nothing plugged in, replace the GFCI.
Can I just spray electrical contact cleaner into a buzzing outlet?+
No. Never spray liquid cleaners, solvents, or WD-40 into an electrical wall receptacle. Liquid solvents break down the plastic internals, attract dirt and dust, and present an immediate flash-fire or short-circuit hazard when energized.
Why does my brand-new outlet buzz?+
If a newly installed outlet buzzes, the most common reason is improperly torqued terminal screws, wires that slipped out from under the screw heads during box insertion, or conductors pushed into rear back-stab ports instead of using the side screws. Shut off the breaker and verify every mechanical terminal is securely torqued.
How do I know if my outlet wires are aluminum?+
Inspect the bare wire exposed at the terminal screws. Copper has a distinct reddish, bright metallic sheen. Aluminum is dull silver-gray, softer to the touch, and often found in homes built between 1965 and 1973. If your home has aluminum branch wiring, standard replacement outlets cannot be used safely without specialized connectors.
Will a breaker always trip if an outlet is buzzing?+
No. Standard thermal-magnetic circuit breakers trip on sustained overcurrent (too many amps) or direct dead shorts (hot touching neutral or ground). Low-level arcing often draws normal amperage well below the 15-amp or 20-amp trip threshold, allowing an outlet to buzz and spark for months without tripping the breaker. Only modern Arc-Fault Circuit Interrupter (AFCI) breakers reliably detect this condition.
Discussion
Loading comments…