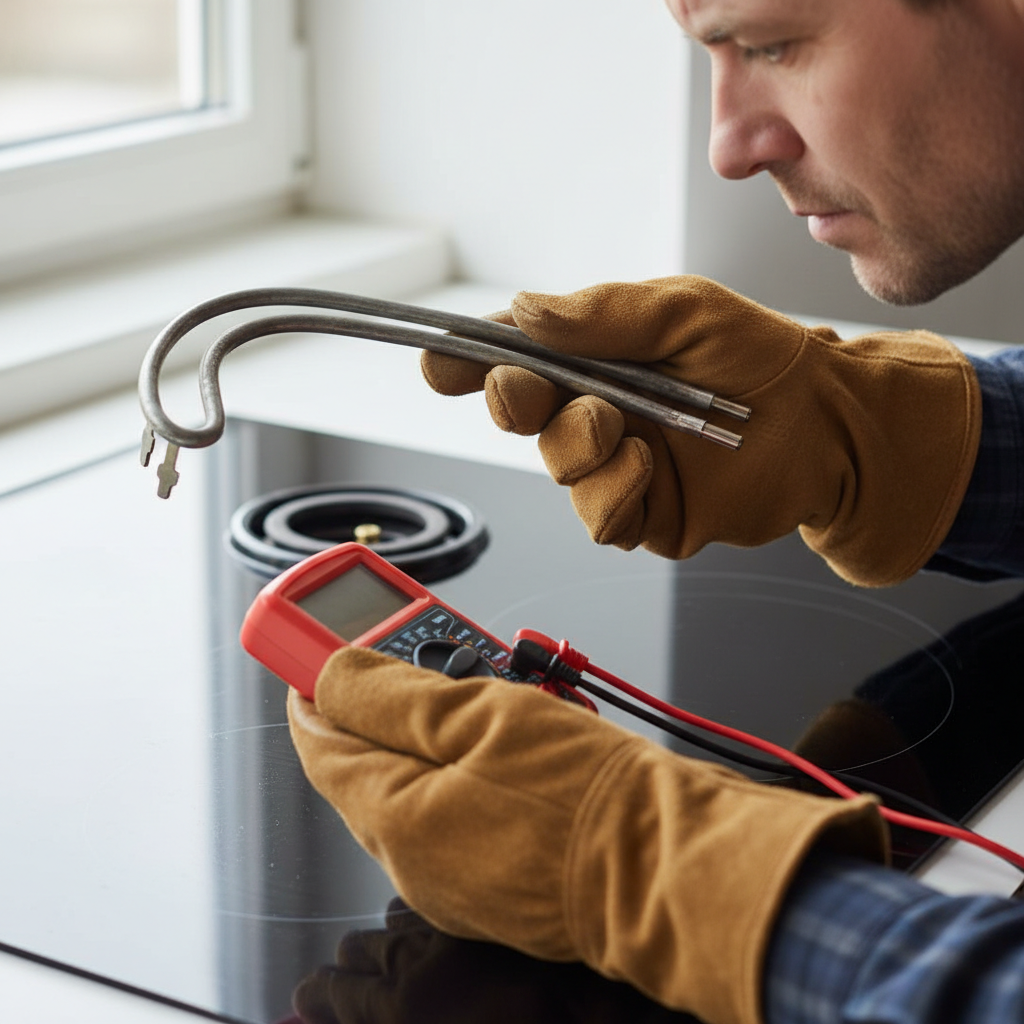
- Worn Out Burner Element: The resistive wire inside the element can break down over time. Heat-cool-heat-cool, day after day — it wears on the thing. Once it starts going, you’ll get weak or uneven heat.
- Faulty Infinite Switch: This is the part that controls how much power reaches the element. If it’s acting up, it may not send enough current even on “high.” Basically, it’s a bad traffic cop.
- Loose or Corroded Terminal Connections: Where the burner plugs in, or where wires land on the switch, corrosion and looseness create resistance. That chokes off heat. Same idea as a kink in a garden hose — less gets through.
- Incorrect Voltage Supply: Not as common if just one burner’s acting up, but if the stove isn’t getting the full 240 volts from the house, all the burners can suffer. That leans more toward an electrician, but it’s on the list.
HVAC · High energy usage
| Project category | HVAC |
|---|---|
| Problem type | High energy usage |
| Trade required | HVAC |
| Urgency | Planned project |
| Safety risk | Low safety risk |
| DIY suitability | DIY for experienced homeowners |
| Cost category | High cost |
| Typical timeline | Assessment within weeks; replacement planned off-season |
| Contractor type | Licensed HVAC technician |
Repair option
Duct sealing, insulation, and a tune-up before touching the equipment.
Replacement option
High-efficiency replacement sized by a load calculation, not a rule of thumb.
Common causes
- Aging, low-efficiency equipment
- Leaking ducts losing conditioned air
- Insufficient attic insulation
- Oversized system short-cycling
Relevant tools:project cost estimatorrepair or replace
Published September 11, 2026Last updated September 11, 2026
Tools & materials you'll need
Affiliate linksAs an Amazon Associate FixlyGuide earns from qualifying purchases — at no extra cost to you. Prices and availability are accurate as of publication and subject to change.
Quick Answer
If your electric stove burners aren’t getting hot enough, I’d start with three usual suspects: a bad electrical connection at the terminal block, a failing infinite switch that’s supposed to meter the heat, or a burner element that’s just worn out and giving up. Most of the time, you can sort it out with a few basic tools and a little patience.
The Problem
You know the scene. You’re trying to boil water for pasta, and it feels like it’s taking all night. Or you’re hoping for a hard sear on a steak, and the pan just won’t get screaming hot. The burners glow, sure, but they’re acting weak, laggy, and plain frustrating. Dinner starts getting weird real fast. I’ve had homeowners tell me, “The burner’s on, but it’s not on,” and yep — that’s exactly the problem. It’s common, and a lot of times it’s a pretty simple thing to track down once you know where to look.
How It Works
Alright, here’s the basic rundown on how these electric burners heat up. Nothing fancy, just good old resistance and a little wiring.
When you turn the knob, you’re telling an infinite switch how much power to send to the heating element. It’s not a simple on/off deal. Think of it more like a dimmer. The “infinite” part means it can dial heat up or down across a whole range, not just two settings.
Inside the burner element — that coiled metal piece — there’s a resistive wire, usually Nichrome, which is a nickel-chromium alloy. Electricity runs through that wire, hits resistance, and turns that resistance into heat. More current, more heat. That’s why the coil glows red. It’s not magic. It’s just a tiny metal heater getting cooking-hot.
The path matters, too. Power comes from your electrical panel, through the breaker, into the stove, through the infinite switch, then to the terminal block where the burner plugs in, and finally through the element itself. Any weak spot along that route — loose wire, corroded connector, tired part — can choke off the current. Less current means less heat. Simple as that.
The infinite switch is cycling power on and off very fast, especially on lower settings, to hold an average temperature. On high, it ought to be sending almost continuous power. If it’s failing, it might not pass enough juice even with the knob cranked up. That’s the whole game right there. Get the flow right, and the burner does its job. Miss it, and you’re standing there wondering why your skillet’s acting like it’s half asleep.
Step-by-Step Fix
Start with safety. No shortcuts here. Electricity doesn’t care how handy you are. Before you touch anything, unplug the stove or turn off the corresponding circuit breaker at your main panel. I’m serious. Once it’s dead, then you can start poking around.
-
Check the Burner's Connection — The First Look
- The first thing I do is lift the burner element straight out. Most electric coil burners pop right out of their receptacle. Take a close look at the prongs on the element and the terminals inside the receptacle. Dirty? Corroded? Burnt-looking? That’s where a lot of weak heating starts. A little corrosion or a sloppy fit can make lousy contact, and that’s enough to make the burner act tired. If it’s just crusty, I’ll usually clean it up with a wire brush or fine-grit sandpaper. If the prongs or terminals are badly pitted or cooked, that thing’s toast — you’re probably replacing the element, and maybe the receptacle too if it’s been abused long enough.
-
Inspect for Loose Wires — The Power Path
- With the stove still unplugged, pull it out from the wall carefully. You’ll probably need to take off a rear access panel to get at the wiring. Look for anything loose, frayed, burnt, or melted, especially where wires connect to the burner receptacle or the infinite switch. A loose connection adds resistance, and resistance steals heat. Tighten any loose screws on terminal blocks. If the insulation looks scorched or melted, don’t mess around — those wires need replacing. I pulled a stove in Frisco last month with insulation melted right off a connection at the switch, and the homeowner had been smelling “hot electronics” for a week. That smell was the warning.
-
Test the Burner Element — Resistance is Futile (If Too High)
- You’ll need a multimeter here. Set it to resistance, usually Ohms, marked with the Greek letter Omega. With the burner element removed from the stove, put one probe on each prong. A healthy 8-inch, 2100-watt electric burner should usually land somewhere between 18 and 25 Ohms. A 6-inch, 1250-watt burner might read in the 22-30 Ohm range. Those numbers can shift a little by brand and wattage, so don’t treat them like holy writ. But if you get an “OL” reading, meaning open loop, or something way off like 100 Ohms, the element’s bad and needs replacing. The wattage is usually stamped on the metal part under the coil.
-
Check the Infinite Switch — The Brains of the Operation
- This one takes a little more digging. You’ll need to get into the control panel, which usually means pulling the knobs and then removing a few screws or clips. The infinite switch will have several wires hooked to it. Take a picture before you disconnect a single thing. Trust me on that. Look for burn marks or melted spots on the switch or its terminals. To test it, you’ll usually need the wiring diagram for your exact stove model, and that’s often behind the control panel or online. It’s generally a continuity check. With the switch in the “off” position, certain terminals shouldn’t show continuity, and when it’s on “high,” they should — depending on the diagram. If it doesn’t pass, you’re replacing the switch. A lot of DIY folks get stuck right here, but this part does fail plenty.
-
Clean and Reassemble — Putting it All Back Together
- Once you’ve found and replaced anything bad — the element, a wire, the switch, whatever’s shot — put it back together carefully. Make sure every connection is tight. Check that no wires got pinched. Reinstall the access panels and slide the stove back into place. Then, and only then, plug it back in or flip the breaker. Test the burner on a few settings. It ought to heat fast and even, and on high it should get properly hot. If it still feels weak, you may have missed a problem, or you may be dealing with a bigger issue in the stove’s main harness or your home’s electrical supply. That’s when I’d tell you to call a pro.
Common Causes
- Worn Out Burner Element: The resistive wire inside the element can break down over time. Heat-cool-heat-cool, day after day — it wears on the thing. Once it starts going, you’ll get weak or uneven heat.
- Faulty Infinite Switch: This is the part that controls how much power reaches the element. If it’s acting up, it may not send enough current even on “high.” Basically, it’s a bad traffic cop.
- Loose or Corroded Terminal Connections: Where the burner plugs in, or where wires land on the switch, corrosion and looseness create resistance. That chokes off heat. Same idea as a kink in a garden hose — less gets through.
- Incorrect Voltage Supply: Not as common if just one burner’s acting up, but if the stove isn’t getting the full 240 volts from the house, all the burners can suffer. That leans more toward an electrician, but it’s on the list.
Common Mistakes
- Not unplugging the stove first. I’m putting this first for a reason. It’s the dangerous one. Cut the power. Period.
- Replacing only one burner when another is also weak. If a couple burners are acting up, especially ones about the same age, don’t ignore the rest. Sometimes they’re all wearing out together.
- Overlooking simple loose connections. Folks love to jump straight to “the part’s bad,” but a dirty or loose terminal is often the real trouble. Don’t skip the visual check.
- Forgetting to take pictures of wiring. A quick phone photo can save you a whole pile of grief when you’re putting the switch or terminal block back together. You will not remember every wire.
- Using the wrong replacement part. Stove parts can look almost identical and still be wrong. Different wattage, different voltage, wrong fit — no dice. Check the model number and part number twice.
- Not checking the element's wattage. Burner elements come in different wattages, plain and simple. If you swap an 8-inch burner that’s 2100 watts for one that’s only 1500 watts, it’ll run weaker even if it’s working perfectly. Match it.
Cost & Time Breakdown
| Task | DIY Cost | Pro Cost | Time |
|---|---|---|---|
| Inspect & Clean Connections | $0-$5 | $75-$150 | 15-30 minutes |
| Replace Burner Element | $20-$50 | $120-$200 | 30-45 minutes |
| Replace Infinite Switch | $40-$100 | $150-$250 | 45-90 minutes |
| Replace Burner Receptacle | $15-$30 | $100-$180 | 45-60 minutes |
| Diagnose Multiple Issues | $0-$10 (multimeter) | $150-$300 | 1-2 hours |
| Electrical System Check (Pro) | N/A | $150-$350 | 1-3 hours |
Tips & Prevention
- Regular Cleaning: Keep the stove clean, especially the burner receptacles. Food spills and grease can chew up terminals over time. A quick wipe after cooking helps more than people think.
- Gentle Handling: When you’re removing or cleaning elements, don’t manhandle the prongs. Bend them or stress them, and you’ll end up with loose contact and weak heat.
- Check for Arcing: If it’s safe and you can see underneath, watch for sparks where the prongs meet the receptacle. Arcing means trouble. Usually a bad connection or a failing receptacle.
- Match Wattage for Replacements: Always match the wattage of the original burner element. Don’t eyeball it. Wrong wattage means wrong heat.
- Listen for the "Click": The infinite switch cycles on and off. If one burner’s switch starts clicking way less than it used to, or not at all on high, that’s a clue it may be going south.
- Avoid Submerging Elements: Don’t dunk burner elements in water to clean them. That can wreck the internal wiring and set you up for a short.
When to Call a Professional
Look, I’m all for DIY, but sometimes you’ve gotta call in somebody who does this for a living. If you’ve gone through the steps, replaced the part you thought was bad, and the burner’s still weak, it’s time. Same goes if your multimeter readings don’t make sense, if you find burnt wires that go past an easy fix, or if you think the house wiring is feeding the stove low voltage. Messing with the main panel or major wiring without the right training can go sideways in a hurry — fires, shocks, the whole ugly mess. A licensed appliance tech or electrician’s got the tools and know-how to track down internal wiring issues or supply problems safely. Don’t gamble with electricity if you’re not sure.
Related Articles
Keep troubleshooting with these hand-picked guides from FixlyGuide:
- That Midnight Buzz: 5 Reasons Your Refrigerator Is So Loud — A refrigerator making a loud buzzing sound at night is often a sign of a struggling component, from a dirty condenser fan to an aging compr…
- The 30-Minute Fix: Why Your Gas Burner Lights But Won't Stay Lit — Your gas stove burner lights up for a second then quickly extinguishes? It's a common, frustrating issue often due to a dirty or faulty the…
- That 15-Minute Brew? Your Coffee Maker's Secret Clog — A slow-dripping coffee maker is almost always a sign of internal mineral buildup, not a faulty machine, and a simple vinegar descaling can…
- My Toaster Only Toasts One Side: The Hidden Thermostat Flaw — If your toaster only toasts one side, the cause is often an imbalanced internal thermostat or misaligned heating element, a specific flaw y…
- Why Your Dishwasher Leaves Dishes Soaking Wet (And It's Not Your Rinse Aid) — Discover the real reasons your dishwasher isn't drying dishes and how to fix them, from blocked vents to faulty heating elements. Don't let…
- The Mystery Smell: Why Your Fridge Stinks (Even After Cleaning It) — That persistent, foul odor in your refrigerator isn't just gross; it's often a sign of hidden issues. Learn the real culprits behind linger…
Should you do this yourself?
Answer five quick questions before you start. Safety outranks savings every time.
Your experience with work like this
How high do you have to work?
Does the job involve any of these?
Will it need a permit?
Specialty tools
Free and instant. Educational guidance only — not a quote, inspection, or professional diagnosis.
What should this project cost?
Enter your project details for a realistic cost range before you call anyone.
Cost depends heavily on which system turns out to be the source.
- Regional adjustment
- National average
- Labor share (typical)
- ~$1,620
- Quotes to collect
- 3 written estimates
Educational estimate based on national averages — not a binding quote. Always confirm with written local estimates.
Fixly Project Decision Box
- DIY difficulty
- Advanced
- Estimated time
- Homeowner checks 20–30 minutes
- Cost level
- Moderate
Main tools / materials
- Clean air filter
- Garden hose for condenser coils
- Shop vac for the condensate line
When to stop and call a pro
- Burning smell, smoke, or a tripping breaker
- Refrigerant lines iced over or hissing
- Any work inside the sealed refrigerant circuit (EPA-licensed only)
- Gas smell near a furnace — leave and call the utility
Need professional help?
Find an HVAC Pro Near YouBefore you start
Check the difficulty, permits, and safety risk — then decide whether to call a pro.
- Estimate this projectGet a cost range for your scope and ZIP before you call anyone.Open
- Get local estimatesSend one request and compare written estimates from vetted pros.Open
Free, no signup required. Estimates are educational guidance, not a quote or an inspection.
Get the print-ready PDF of this guide
A clean, ad-free, printable version you can keep on your phone or pin to the workshop wall. Free with a FixlyGuide account.
- Print-optimized layout
- Tools, materials & every step included
- Saved to your account
Frequently asked questions
Why is my electric stove burner heating slowly?+
Slow heating often indicates that the burner isn't getting full power. This can be due to a failing infinite switch, a loose connection at the terminal block, or a burner element that's beginning to fail internally. Check for corrosion or damage at the connections first.
Can a weak electric burner cause a fire?+
While less common than a fully shorted element, a weak burner with loose or corroded connections can generate excessive heat at those points, potentially leading to arcing and a fire hazard. Always address weak burners promptly and safely.
How do I know if my infinite switch is bad?+
A bad infinite switch might cause inconsistent heating, no heat at all, or the burner only working on certain settings. Visually inspect it for burning or melting, and if comfortable, use a multimeter to check for continuity according to your stove's wiring diagram.
How much does it cost to replace an electric stove burner element?+
A new electric burner element typically costs between $20 and $50 for the part. If you hire a professional, expect the total cost, including labor, to be in the range of $120 to $200.
What tools do I need to fix a weak electric burner?+
For basic troubleshooting, you'll need a screwdriver, needle-nose pliers, a wire brush, and potentially a multimeter. For replacement, you'll need the specific replacement parts like a new element or infinite switch.
Is it safe to use an electric burner that's not getting hot enough?+
It's generally not recommended to continue using a burner that's not functioning correctly. While it might still heat, the underlying issue (like a loose connection) could pose a fire risk or further damage your stove. It's best to diagnose and fix it.
Can I replace just one prong on my burner element?+
No, you cannot replace individual prongs on a burner element. If the prongs are damaged, corroded beyond cleaning, or loose, the entire burner element needs to be replaced as a single unit.
How long do electric stove burner elements usually last?+
Electric stove burner elements typically last between 5 to 15 years, depending on usage and quality. Frequent use, especially at high temperatures, can shorten their lifespan.
What's the difference between a weak burner and a completely dead one?+
A weak burner still generates some heat but doesn't reach full temperature. A dead burner generates no heat at all. Both indicate an issue with power delivery or the element itself, but a dead burner often points to a complete break in the circuit.

Discussion
Loading comments…