- Expose and remove the fasteners on the damaged piece — Push the unzipped upper panel upward to expose the nailing hem of your melted panel. You'll see a row of galvanized roofing nails driven through the horizontal slots every 16 inches.
- Tool required: Flat pry bar or wonder bar.
- Slide the thin edge of the pry bar under the nail heads. Work them out gently without denting or punching holes through the weather-resistant barrier (Tyvek or tar paper) behind the vinyl.
Roofing · Aging roof
| Project category | Roofing |
|---|---|
| Problem type | Aging roof |
| Trade required | Roofing |
| Urgency | Planned project |
| Safety risk | Low safety risk |
| DIY suitability | Pro recommended |
| Cost category | High cost |
| Typical timeline | Plan 4–12 weeks ahead for scheduling and material lead time |
| Contractor type | Licensed roofing contractor |
Repair option
Maintenance repairs to buy a season or two while you budget.
Replacement option
Planned replacement, which is almost always cheaper than a leak-driven emergency.
Common causes
- Normal weathering past the shingle service life
- Poor attic ventilation cooking the shingles from below
- Repeated repairs on the same slopes
Relevant tools:repair or replace roofproject cost estimatorhome improvement material prices
Published October 24, 2026Last updated October 24, 2026
Tools & materials you'll need
Affiliate linksAs an Amazon Associate FixlyGuide earns from qualifying purchases — at no extra cost to you. Prices and availability are accurate as of publication and subject to change.
Quick Answer
To fix melted or warped vinyl siding caused by concentrated solar reflection from Low-E windows or a nearby grill, cut out the distorted profile using an abrasive wheel, slide new replacement vinyl into the existing lock seams using a siding zipper tool, and hang the replacement piece loosely with 1-1/2-inch roofing nails driven into the center of the nailing slots. Stop it from happening again right away by installing exterior solar screens (minimum 80% UV block) or perforated anti-reflective film on the offending window panes.
The Problem
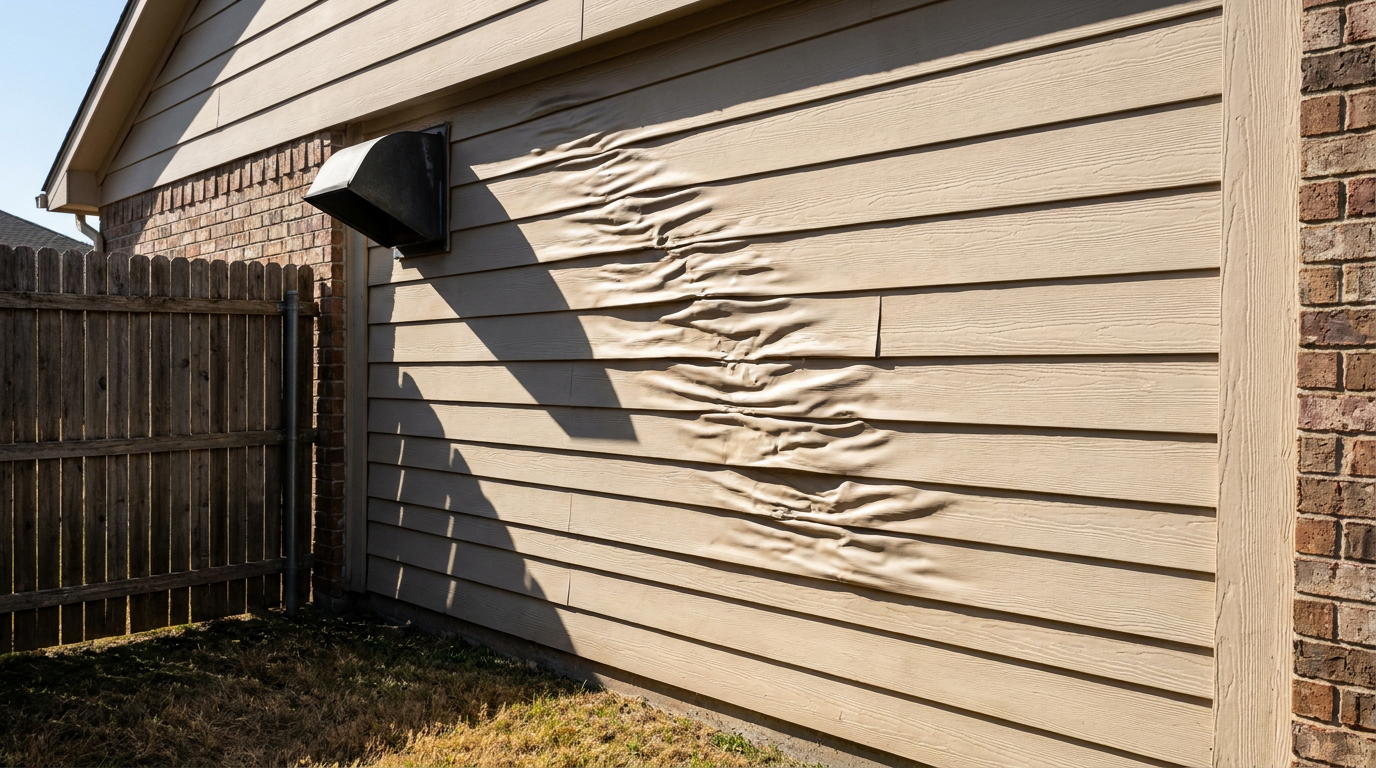
Walk down the side of your home on a sunny afternoon and you might spot a weird, local mess: vinyl siding planks that look like somebody hit them with a heat gun. They're shriveled, sagging, blistered, or pinched inward in a diagonal slash across the wall.
This isn't age, and it isn't bad manufacturing. It's heat distortion. Standard vinyl siding (polyvinyl chloride or PVC) is built to handle normal summer outdoor temperatures up to roughly 140°F to 150°F without losing its shape. But modern double-pane and triple-pane Low-E (low-emissivity) windows have tiny pressure differences between the glass panes. That little vacuum pulls the center of the glass inward and turns it into a concave mirror.
When the sun hits that concave pane at the right angle, it focuses solar energy into a tight, nasty beam—a magnifying glass effect. That reflected beam can drive temperatures of 170°F to over 220°F straight onto your siding. In North Texas or across the sunny South, where walls are already baking at 105°F ambient heat, that focused beam will liquefy and distort PVC planks within minutes. I pulled a water heater in Frisco last month and found a side wall with this exact pattern — perfect little melt marks, dead straight line, no mystery once you saw the window. Until you replace the charred planks and break up that reflective beam, any new vinyl you install is just asking to get cooked again.
How It Works
Vinyl siding doesn't make a rigid, airtight barrier against your house; it's a suspended weather screen that needs room to move. PVC expands and contracts like crazy with weather swings. A typical 12-foot vinyl panel can grow or shrink by up to 1/2 inch between a 20°F winter night and a 105°F summer afternoon.
To allow for that movement, the siding has horizontal slots along the top nailing hem. Fasteners—usually 1-1/2-inch galvanized roofing nails—have to go into the exact center of those oval slots, and you leave a 1/32-inch gap (about the thickness of a dime) between the nail head and the vinyl surface. The bottom edge of every panel has a curved hook (the lock) that snaps into the top channel of the panel below it.
       [ Wall Stud / Sheathing ]
                  |
     [Nail: 1/32" gap under head]
                  |
         [Oval Nailing Slot]  <-- Top Hem
                  |
             \    |
              \   |  <-- Vinyl Panel Face
               \  |
                \ |
                  |
           [Bottom Lock]
                  |
        [Interlocking Channel] <-- Snaps into course below
When exterior temperatures push past vinyl's heat deflection temperature (HDT)—usually between 160°F and 165°F—the polymer chains loosen up. If the panel's nailed too tight, it buckles into ripples. If a concentrated solar focal point blasts it with more than 200°F, the molecular bond gives up entirely: the PVC shrinks, pulls free of its locking channel, puckers, and cools into a permanent, brittle wrinkle. Fixing it means unlocking the panel course without wrecking the good panels above or below, hanging a fresh panel the right way, and getting rid of the thermal magnifier.
Step-by-Step Fix
Follow these steps to safely remove warped siding panels, lock in identical replacements, and keep the nearby reflective windows from melting the wall a second time.
-
Identify the heat source and mark the reflection path — Walk the damaged side between 11:00 AM and 3:00 PM so you can see exactly where the sunlight bounces. If your neighbor's second-story Low-E window or your own patio door throws a sharp glare onto that wall, that's your culprit. If the damage is 3 feet above a patio slab right where your gas grill sits, your cooking exhaust did it.
- Safety Note: Don't stare straight into the reflected window beam; that concentrated UV light can strain your eyes.
- If the source is a neighbor's window: You've got to solve the reflection before you replace the panels, or you'll cook through the new material fast.
-
Source a color-matched replacement panel — Snip a 2-inch square piece from the worst warped section or save a piece from a hidden spot (like behind an air conditioning condenser or inside a shed gable) to take to an exterior building supply yard. Standard home improvement box stores usually stock only basic white, clay, and almond in limited profiles (typically Double 4-inch or Double 4.5-inch Dutch Lap).
- Pro Tip: Modern siding fades after two to three years of sun exposure. If a brand-new panel looks noticeably darker than the wall, swap in an older panel from behind the garage where folks won't see it and use the new one in the hidden spot.
-
Unlock the course directly above the damaged panel — Slip a siding removal tool (most people call it a "zip tool") under the bottom edge of the good panel sitting right above the melted piece. Slide the hook of the zip tool until it catches the hidden bottom lip of the upper panel. Pull downward a touch and run the tool horizontally along the whole length to pop the panel loose from the damaged piece's top lock.
- Tool required: Siding zip tool (malco-style side-lock unlocker).
- If the siding is cold: Don't do this below 50°F; cold vinyl gets brittle and will crack right along the lock seam under tension.
-
Expose and remove the fasteners on the damaged piece — Push the unzipped upper panel upward to expose the nailing hem of your melted panel. You'll see a row of galvanized roofing nails driven through the horizontal slots every 16 inches.
- Tool required: Flat pry bar or wonder bar.
- Slide the thin edge of the pry bar under the nail heads. Work them out gently without denting or punching holes through the weather-resistant barrier (Tyvek or tar paper) behind the vinyl.
-
Disengage the damaged panel from the bottom track — Use your zip tool on the damaged panel itself, hooking into its bottom locking hem where it grips the lower course. Pull down to unclip it, then slide the damaged piece out from the wall.
- Check the housewrap behind the panel. If the heat charred or melted the housewrap or foam board insulation, tape any tears with approved exterior sheathing tape (such as Tyvek tape) before you keep going.
-
Measure and cut the replacement panel to length — Measure the gap between vertical corner posts or J-channels where the piece has to go. Measure the old piece if it didn't shrink lengthwise, or take the wall measurement and subtract 1/4 inch at each end (1/2 inch total) so you've got thermal expansion space inside the J-channels.
- Cutting technique: Use an abrasive cutoff wheel in an angle grinder or a backwards-facing fine-tooth vinyl blade on a circular saw. For quick cuts, heavy-duty tin snips work fine, but don't crush the profile while you're snipping.
-
Hang the replacement panel into the lower lock — Slide the new panel into place. Push upward until its bottom lock firmly engages the lip of the panel below it. You'll feel it snap in along the full length.
- Make sure the panel can slide left and right freely by 1/4 inch with your hands. If it binds, the lock isn't seated evenly or the cut is too long against the corner post.
-
Nail the new panel properly — Drive 1-1/2-inch galvanized roofing nails into the center of the pre-punched horizontal slots, spaced roughly 12 to 16 inches apart.
- Critical rule: Leave a 1/32-inch gap between the nail head and the vinyl hem. Don't drive the nail flush against the siding. The panel has to hang from the nails, not get clamped to the sheathing.
-
Lock the upper panel back down — Pull the loose bottom edge of the upper panel down over your new panel's top lock. Insert your zip tool into the lock seam, pull down slightly to stretch the vinyl lip, and slide the tool along the seam while pushing the panel in with your other palm until the interlock snaps shut from end to end.
-
Install anti-reflective mitigation on the offending window — Kill the solar glare before it cooks the new panel. If the reflection came from your own window, install an exterior-mounted solar screen with an 80% to 90% heat block rating, or apply a matte, micro-perforated exterior window film (often called bus-wrap film or turf-shield film).
- If the window belongs to a neighbor: Go over there polite and offer to pay for an exterior full-coverage bug screen or anti-reflective film on that one offending window pane. Exterior screens scatter the light beams, turning a laser-like reflection into diffuse, harmless ambient light.
       CONCENTRATED REFLECTION (DANGER)
  Sunlight ---> [Concave Window Pane] ===(Tight Beam 210°F)===> [Melted Vinyl]

       DIFFUSED REFLECTION (SAFE)
  Sunlight ---> [Solar Screen / Film] --- (Scattered Ray 110°F) ---> [Protected Vinyl]
Common Causes
- Concave Low-E window glass deflection: Insulated glass units go through pressure changes during winter-to-summer transitions. When interior seal pressure drops relative to barometric pressure, the twin panes curve inward like a magnifying mirror, throwing a focal beam that burns siding 10 to 30 feet away.
- Proximity to outdoor cooking appliances: Running a propane or natural gas grill within 3 to 5 feet of vinyl siding easily creates convective air temperatures exceeding 250°F. Siding above and behind the grill lid will droop and sag within twenty minutes.
- High-reflectance ground surfaces: Polished light-colored concrete patios, unshaded white landscape gravel, or nearby glass railings that bounce direct southern sun straight into lower siding runs can push wall surface temperatures above 160°F.
- Tight face-nailing combined with moderate heat: If a panel was nailed too tight without room to expand, even normal 115°F surface heat makes the panel push hard against its fasteners and warp into wavy humps that look a lot like heat melt.
- Fire pit or portable smoker exhaust: Smoke and heat funnels coming out of small wood pellet smokers or fire bowls blow hot gases across the exterior envelope, distorting panels even if flames never touch the wall.
Common Mistakes
- Face-nailing through the middle of the vinyl plank: Homeowners often try to pin down a warped or buckling panel by running a drywall screw or trim nail straight through the exposed front face. That locks the panel solid. On the next 40-degree temperature swing, the vinyl will split down the middle or rip itself off the wall.
- Driving nails flush against the nailing hem: Hammering nails down tight against the siding hem stops the natural sliding expansion. When the sun hits the wall, the panel can't move along its slots, so it bows outward like a ripple potato chip. Always leave that 1/32-inch space.
- Replacing vinyl without fixing the window glare first: Swapping out melted panels before solving the neighbor's concave window beam is just throwing cash away. The very next sunny afternoon at 1:30 PM, that laser beam will land right back on the exact same spot and melt your new $30 panel.
- Attempting to flatten warped vinyl with a heat gun: Once PVC goes past its heat deflection limit and shrinks, its molecular structure is permanently changed. Heating it with a heat gun or blowtorch only scorches the vinyl, ruins its UV stabilizers, and turns the plastic chalky and brittle. Cut it out and replace it.
- Cutting replacement panels too tight against corner trim: Jamming a replacement piece tight between two J-channels leaves zero room for expansion. On an 85°F day, that piece will push against the channel walls and warp right away, even without any extra window reflection.
Cost & Time Breakdown
| Task | DIY Cost | Pro Cost | Time |
|---|---|---|---|
| Single panel replacement (materials only) | $15–$35 | $175–$350 | 45–60 min |
| 3 to 5 panel replacement run | $60–$120 | $450–$750 | 2–3 hours |
| Exterior solar window screen installation | $35–$65 | $120–$250 | 30–45 min |
| Perforated anti-glare window film application | $25–$50 | $150–$220 | 30 min |
| Housewrap / insulation barrier patch | $15–$30 | Included in siding repair | 15–20 min |
Tips & Prevention
- Keep outdoor cooking gear 8 to 10 feet out: Always set your backyard barbecue grill, flat-top griddle, or smoker at least 8 feet away from any vinyl-clad wall or soffit so you don't cook the siding with radiant heat.
- Inspect walls seasonally in early spring: As the sun's angle shifts between March and May, focal points from nearby glass windows change locations on your home. Catching a hot glare spot early lets you install a screen before the siding softens.
- Opt for exterior screens on east- and south-facing windows: Full-frame fiberglass exterior screens cut glare completely while dropping cooling costs. They keep the glass from acting like an unobstructed parabolic mirror.
- Check panel movement by hand: Grab any newly repaired vinyl panel and try to slide it horizontally 1/4 inch with your fingers. If it won't budge, the nails are too tight; loosen them before the summer heat shows up.
- Save scrap pieces from initial installation: Whenever work gets done on your home, keep two or three full-length vinyl panels in your attic or garage. Siding colors get discontinued every 3 to 5 years, so exact color matching gets tough later.
When to Call a Professional
If heat distortion runs up two stories across dozens of panels, tackling this from an extension ladder turns into a serious fall hazard. Call a licensed siding professional if the melted vinyl comes with scorched, blackened, or smoldering oriented strand board (OSB) underneath, which points to severe thermal conduction or an active fire hazard.
You should also bring in an exterior contractor if your home uses discontinued specialty profiles (such as beaded, vertical board-and-batten, or insulated foam-backed vinyl) where matching material means specialized wholesale distributor accounts. And if the heat reflection comes from an uncooperative neighbor's commercial-grade windows or high-elevation panes that need staging or boom lifts to reach, hiring a professional siding company with an insurance adjuster liaison helps document thermal damage for third-party property liability claims.
Related Articles
Keep troubleshooting with these hand-picked guides from FixlyGuide:
- The Mystery of the Loose Siding Panel: Why It Flaps and How to Fix It Right — Loose siding panels aren't just an eyesore; they can lead to serious water damage if not addressed quickly. Learn why your siding is flappi…
- Deck Wobbles When Walking? 10 Causes of Sway and the Step-by-Step Fix — Stop dangerous deck sway before structural failure occurs. Diagnose loose ledger connections, rotten posts, and install code-approved brace…
- The Ugly Truth About Chalky Siding (And Your Simple 3-Hour Fix) — Don't let faded, chalky siding ruin your home's curb appeal. This guide explains why it happens and gives you a straightforward, effective…
- The Weird White Powder on Your Siding: And How to Stop It Coming Back — That strange white powder on your siding isn't just ugly; it's a sign of moisture issues that could lead to bigger problems. Here's how to…
- The #1 Gutter Mistake That Causes Overflow (It's Not Clogs!) — Discover the often-overlooked culprit behind overflowing gutters during heavy rain and learn the surprising, easy fix most homeowners miss.
- The Invisible War Under Your Sidewalk: 3 Ways to Stop Tree Roots (Without Killing the Tree) — Tree roots lifting your sidewalk can be a trip hazard and an eyesore. Learn how to address the issue effectively and prevent further damage.
Should you do this yourself?
Answer five quick questions before you start. Safety outranks savings every time.
Your experience with work like this
How high do you have to work?
Does the job involve any of these?
Will it need a permit?
Specialty tools
Free and instant. Educational guidance only — not a quote, inspection, or professional diagnosis.
What should this project cost?
Enter your project details for a realistic cost range before you call anyone.
Spot repairs commonly run $400–$1,800; full replacement typically $9,000–$18,000 for an average home.
- Regional adjustment
- National average
- Labor share (typical)
- ~$2,948
- Quotes to collect
- 3 written estimates
Educational estimate based on national averages — not a binding quote. Always confirm with written local estimates.
Decide what your roof needs
Two minutes of questions turns "something is wrong up there" into a clear next step.
- Repair or replace your roof?Answer 10 questions about age, leaks, and damage to get a clear next step.Open
- Compare contractor quotesScore up to four bids on price, warranty, licensing, and timeline.Open
- Get local estimatesSend one request and compare written estimates from vetted pros.Open
Free, no signup required. Estimates are educational guidance, not a quote or an inspection.
Get the print-ready PDF of this guide
A clean, ad-free, printable version you can keep on your phone or pin to the workshop wall. Free with a FixlyGuide account.
- Print-optimized layout
- Tools, materials & every step included
- Saved to your account
Frequently asked questions
At what temperature does vinyl siding start to melt?},{answer:+
Standard residential vinyl siding begins to soften and distort around 160°F to 165°F (its heat deflection temperature). Direct exposure to concentrated solar beams from Low-E windows can easily push surface temperatures past 200°F to 220°F, causing immediate warping and melting.
Discussion
Loading comments…